


独立按键
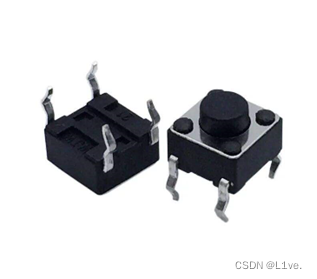
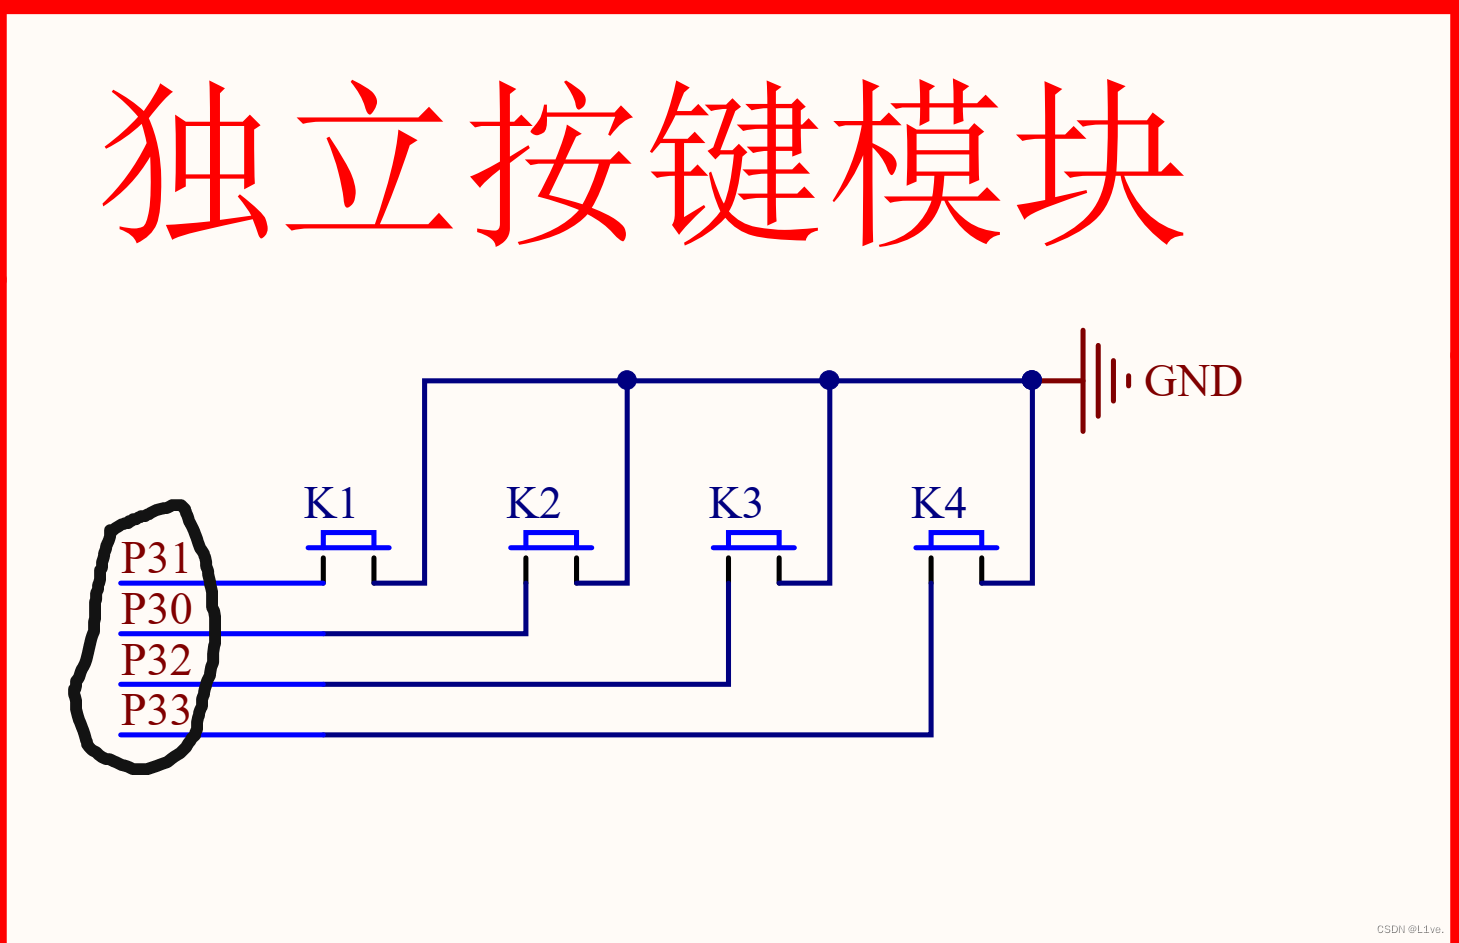
原理
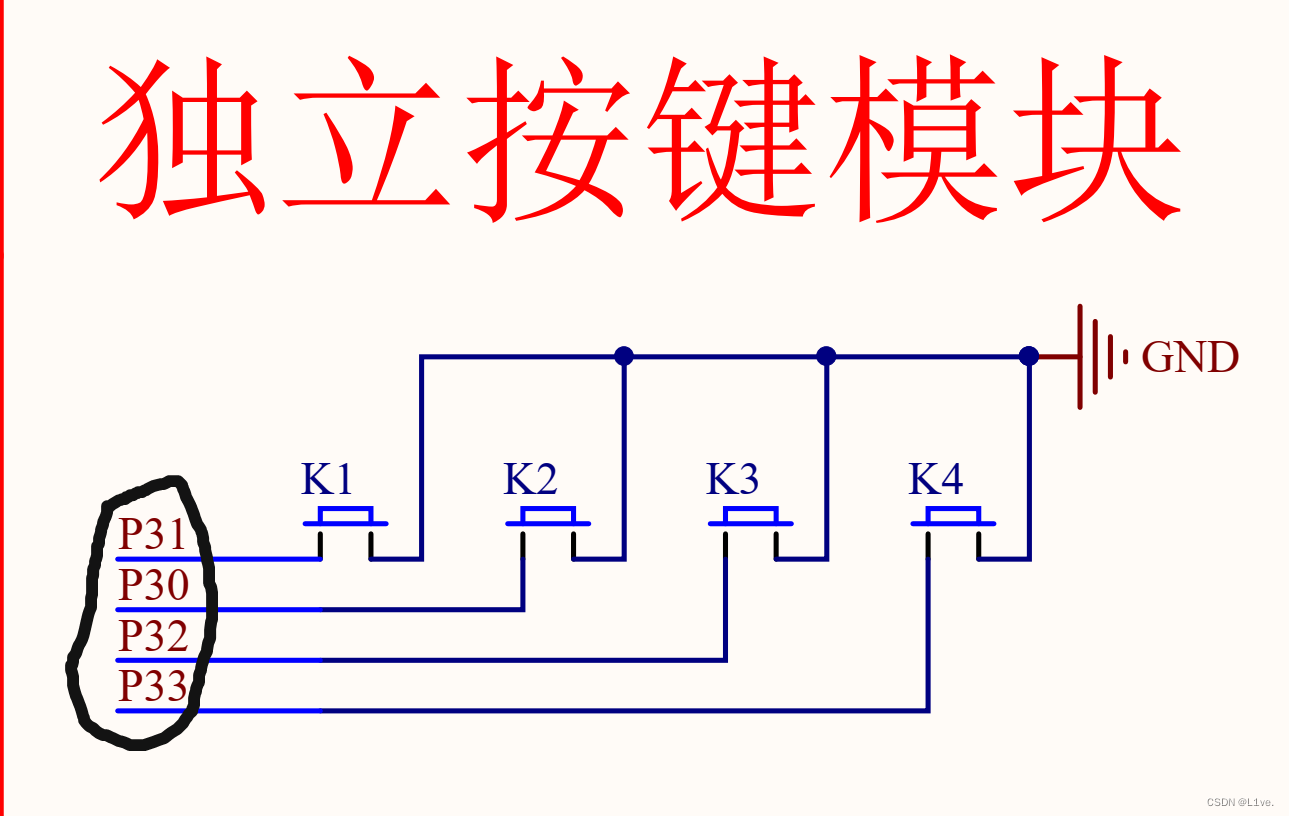
独立按键接到L口上——说明在没有案下按键时,接口也处于高电平状态
则与LED模块原理一致
代码实操
一个LED灯亮时的代码:
#include <REGX52.H>

void main()
{
	P2 = 0xFE;
	while(1)
	{

	}

}
但是P2对应的是八个寄存器:头文件中

但是只想操作一个LED灯时:可以通过操作位寄存器来单独操作一个LED灯:
如图所示:
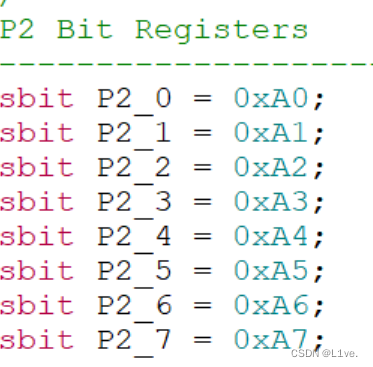
之前是操作一个八位寄存器,是给八位的数据,但是操作单独一个的时候,就可以只给0或者1(非零数效果和1一致)
电亮第一个LED灯:
#include <REGX52.H>
void main()
{
	P2_0 = 0;
	while(1)
	{

	}
}
LED关联独立按键
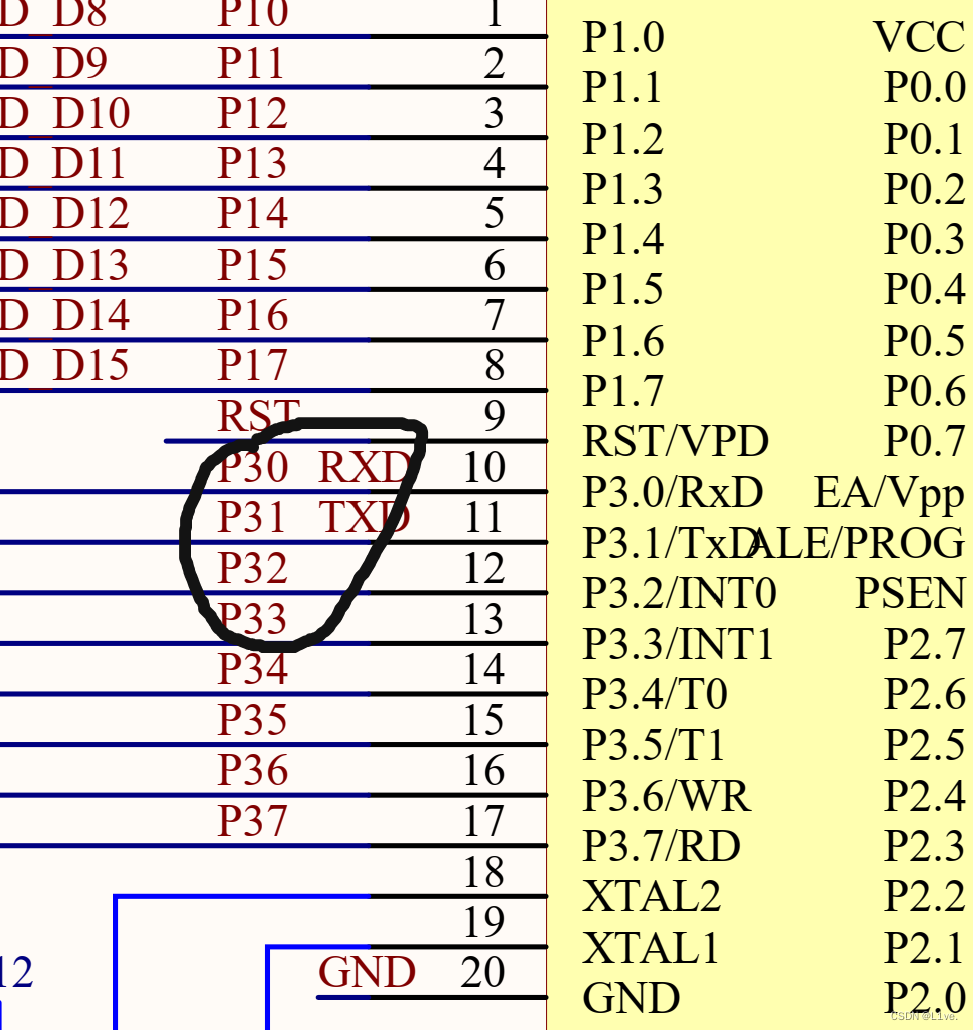
注意: 独立按键对应的P3(四位寄存器),单独操作一个独立按键即P3_0 ==
实现按着亮,松开灭
#include <REGX52.H>

void main()
{
	while(1)
	{
		if(P3_0 == 0)
		{
			P2_0 = 0;
		}
		else
		{
			P2_0 = 1;
		}
	}
}
值得注意的是:独立按键上对应的L口排序不是顺序的,P31和P30交换了位置,则P3_0和P3_1交换了位置
由此我们还能实现按住前两个按键才亮,其中&&还可以改成或(||)
#include <REGX52.H>

void main()
{
	while(1)
	{
		if(P3_0 == 0 && P3_1 == 0)
		{
			P2_0 = 0;
		}
		else
		{
			P2_0 = 1;
		}
	}
}
知识插入:
位运算
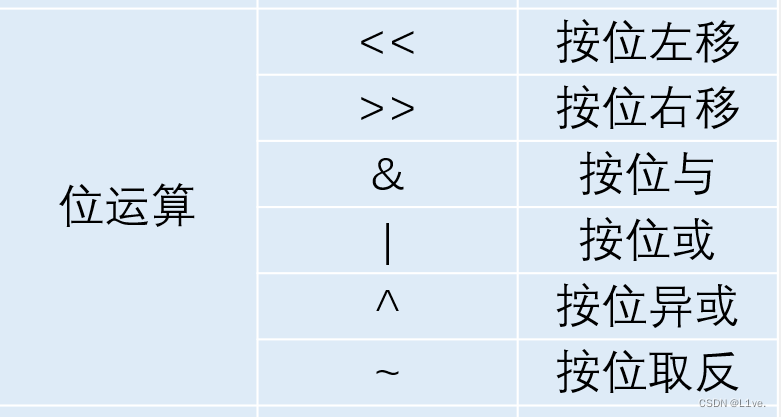
按位左移:0011 1100 << 1 -> 0111 1000 即每位向左移一位,空缺位补零
按位右移:0011 1100 << 2 -> 0000 1111 即每位向右移两位,空缺位补零
按位与: 1010 1100 & 0100 1000 -> 0000 1000 即位对位,计算1&0=0,1&1=1
按位或:1|0=1,1|1=1,0|0=0
按位异或:1^1=0,1^0=1,0^0=1
按位取反:~0001 1000 -》 1110 0111
按键的抖动与消抖
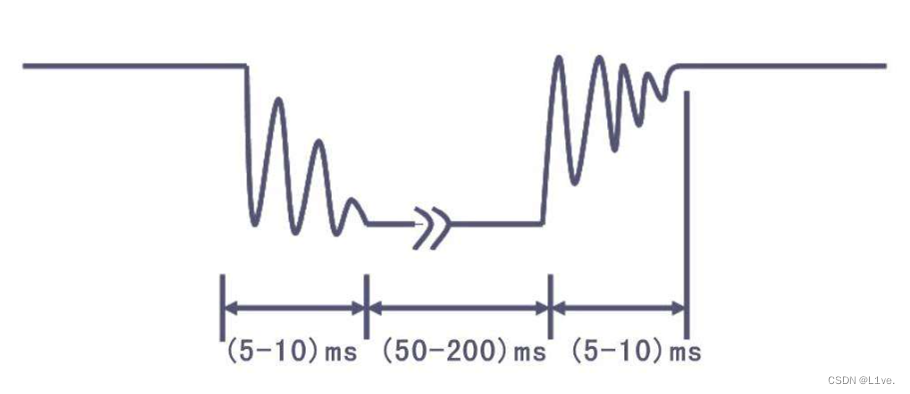
首先,先生成延时代码,如下图所示
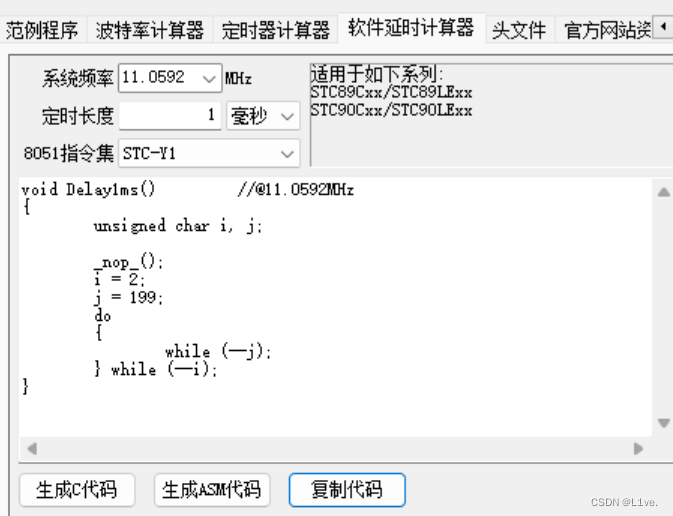
注意:要添加头文件:#include <INTRINS.H>,不然识别不了_nop_();会导致报错
再稍微对生成的代码进行修改,使其变成可以输入参数来控制延时长短的函数。
记得要验证函数是否正确!!!
用一下代码验证:
#include <REGX52.H>
#include <INTRINS.H>

void Delay(unsigned int xms)
{
	unsigned char i, j;
	while(xms)
	{
		_nop_();
		i = 2;
		j = 199;
		do
		{
			while (--j);
		} while (--i);
		xms--;
	}

}

void main()
{
	while(1)
	{
		P2_0 = 0;
		Delay(500);
		P2_0 = 1;
		Delay(500);
	}
}
实现按键控制LED的状态
#include <REGX52.H>
#include <INTRINS.H>

void Delay(unsigned int xms)
{
	unsigned char i, j;
	while(xms)
	{
		_nop_();
		i = 2;
		j = 199;
		do
		{
			while (--j);
		} while (--i);
		xms--;
	}
}

void main()
{
	while(1)
	{
		if(P3_1 == 0)
		{
			Delay(20);
			while(P3_1 == 0);
			Delay(20);

			P2_0 =~ P2_0;
		}
	}
}
控制LED实现二进制
先写出基础的框架(按键的消抖和独立按键控制LED的状态)
#include <REGX52.H>
#include <INTRINS.H>

void Delay(unsigned int xms)
{
	unsigned char i, j;
	while(xms)
	{
		_nop_();
		i = 2;
		j = 199;
		do
		{
			while (--j);
		} while (--i);
		xms--;
	}
}


void main(void)
{
	while (1)
	{
		if (P3_1 == 0)
		{
			Delay(20);
			while (P3_1 == 0);
			Delay(20);

		}
	}

}
因为是实现LED灯的二进制显示,所以直接对P2进行操作
想法如下:
#include <REGX52.H>
#include <INTRINS.H>

void Delay(unsigned int xms)
{
	unsigned char i, j;
	while(xms)
	{
		_nop_();
		i = 2;
		j = 199;
		do
		{
			while (--j);
		} while (--i);
		xms--;
	}
}


void main(void)
{
	while (1)
	{
		if (P3_1 == 0)
		{
			Delay(20);
			while (P3_1 == 0);
			Delay(20);

			P2++;
		}
	}

}
但是得出的结果却是相反的,LED的灭灯呈现出二进制显示;这是因为P2口默认高电平,即P2==1111 1111,加1之后,会出现溢出,变成P2 == 0000 0000;
P2--可以实现目标现象
#include <REGX52.H>
#include <INTRINS.H>

void Delay(unsigned int xms)
{
	unsigned char i, j;
	while(xms)
	{
		_nop_();
		i = 2;
		j = 199;
		do
		{
			while (--j);
		} while (--i);
		xms--;
	}
}


void main(void)
{
	while (1)
	{
		if (P3_1 == 0)
		{
			Delay(20);
			while (P3_1 == 0);
			Delay(20);

			P2--;
		}
	}

}
我们还可以采用赋予变量实现;因为P2++得出的结果是0000 0000;取反后还是1111 1111,不能实现功能,但是我们可以通过赋予变量实现该功能。
操作如下:
#include <REGX52.H>
#include <INTRINS.H>

void Delay(unsigned int xms)
{
	unsigned char i, j;
	while(xms)
	{
		_nop_();
		i = 2;
		j = 199;
		do
		{
			while (--j);
		} while (--i);
		xms--;
	}
}


void main(void)
{
	unsigned char LEDnum = 0;
	while (1)
	{
		if (P3_1 == 0)
		{
			Delay(20);
			while (P3_1 == 0);
			Delay(20);
			LEDnum++;
			P2 =~ LEDnum;
		}
	}

}
实现控制LED移位
先写出基础的框架(按键的消抖和独立按键控制LED的状态)
#include <REGX52.H>
#include <INTRINS.H>

void Delay(unsigned int xms)
{
	unsigned char i, j;
	while(xms)
	{
		_nop_();
		i = 2;
		j = 199;
		do
		{
			while (--j);
		} while (--i);
		xms--;
	}
}


void main(void)
{
	while (1)
	{
		if (P3_1 == 0)
		{
			Delay(20);
			while (P3_1 == 0);
			Delay(20);

		}
	}

}
这里我们使用一个变量来辅助实现该功能:
1、先对P2初始化为0x01,即第一个LED亮;
2、先定义一个unsigned char LEDnum,并使其在每次循环加1;
3、再对LEDnum进行判断,超过或等于8时重新赋值为0;
4、使P2对LEDnum按位左移,再取反
#include <REGX52.H>
#include <INTRINS.H>

void Delay(unsigned int xms)
{
	unsigned char i, j;
	while(xms)
	{
		_nop_();
		i = 2;
		j = 199;
		do
		{
			while (--j);
		} while (--i);
		xms--;
	}
}
unsigned char LEDnum = 0;
void main(void)
{
	P2 = ~0x01;
	while (1)
	{
		if (P3_1 == 0)
		{
			Delay(20);
			while (P3_1 == 0);
			Delay(20);
			LEDnum++;
			if (LEDnum >= 8)
			{
				LEDnum = 0;
			}
			P2 =~(0x01<<LEDnum);
		}
	}
}
我们还可以在此基础上再做改良,添加一个按钮,按下向右位移。
思路一致:
#include <REGX52.H>
#include <INTRINS.H>

void Delay(unsigned int xms)
{
	unsigned char i, j;
	while(xms)
	{
		_nop_();
		i = 2;
		j = 199;
		do
		{
			while (--j);
		} while (--i);
		xms--;
	}
}
unsigned char LEDnum = 0;
void main(void)
{
	P2 = ~0x01;
	while (1)
	{
		if (P3_1 == 0)
		{
			Delay(20);
			while (P3_1 == 0);
			Delay(20);
			LEDnum++;
			if (LEDnum >= 8)
			{
				LEDnum = 0;
			}
			P2 =~(0x01<<LEDnum);
		}
		if (P3_0 == 0)
		{
			Delay(20);
			while (P3_0 == 0);
			Delay(20);
			if (LEDnum == 0)
			{
				LEDnum = 7;
			}else{
				LEDnum--;
			}
			P2 =~(0x01<<LEDnum);
		}
	}
}
注意点:1、unsigned char LEDnum一定要作为全局变量在函数外定义,不然会报错(未搞懂);
2、注意向右位移的代码编写,在判断LEDnum时需要多加注意,因为LEDnum--到0时再减会变成最大值,因为它是无符号的。


 1万+
1万+


 被折叠的 条评论
为什么被折叠?
被折叠的 条评论
为什么被折叠?
 到【灌水乐园】发言


