


全栈开发一条龙——前端篇
第一篇:框架确定、ide设置与项目创建
第二篇:介绍项目文件意义、组件结构与导入以及setup的引入。
第三篇:setup语法,设置响应式数据。
辅助文档:HTML标签大全(实时更新)
本文继续介绍数据绑定、计算属性和比较重要的watch监视
文章目录
一、单向绑定和双向绑定
单向绑定
<template>
    <div class = "style_test">
    姓:  <input type = "text" :value="xin">  <br>
    名:  <input type = "text" :value="ming">  <br>
    全名:<input type = "text">
   </div>
</template>

<script>
  export default{
    name : 'Test',//组件名
    }
</script>

<script setup>
    import {ref} from 'vue'
    import {reactive} from 'vue'
    let xin = ref('张')
    let ming = ref('三')
</script>
<style>
  .style_test{
       background-color: rgb(72, 138, 166);
       box-shadow: 0 0 10px;
       border-radius:10px;
       padding: 20px;
  }
</style>
通过:value=“变量”,我们可以实现单向绑定,即数据可以由我设置好的变量流向页面。
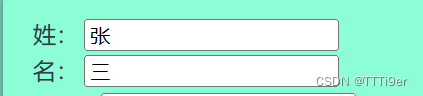
但是当我们修改文本框之后,我们xin和ming是不会发生改变的 。
双向绑定
把:model改成v-model即可
<template>
    <div class = "style_test">
    姓:  <input type = "text" v-model="xin">  <br>
    名:  <input type = "text" v-model="ming">  <br>
    全名:<span>{{xin}}{{ming}}</span>
   </div>
</template>
双向绑定后就可以实时渲染修改的数据了。你在文本框里改数据,变量的值会立刻发生变化。

目前需求简单,你写 全名:<span>{{xin}}{{ming}}</span>倒也没什么,但是这个对象很难维护,比如,我需要中文转为拼音,那就解决不了了,所以我们要引入计算属性。
二、计算属性
我们先引入import {computed} from vue
为了解决刚刚上述的问题,如果我们可以写一个函数,进行一系列操作,最后返回我们想要的,那就方便了。
基本示例
<template>
<div class = "style_test">
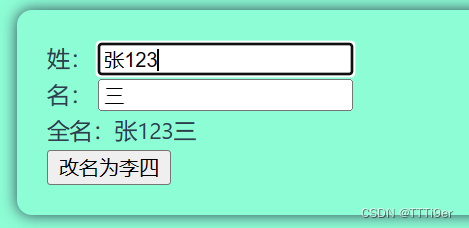
姓: <input type = "text" v-model="xin"> <br>
名: <input type = "text" v-model="ming"> <br>
全名:<span>{{fullname}}</span> <br>
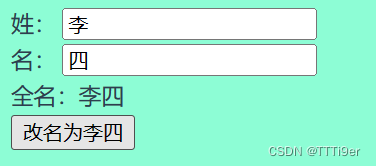
<button @click="changename">改名为李四</button>
</div>
</template>
<script>
export default{
name : 'Test',//组件名
}
</script>
<script setup>
import {computed, ref} from 'vue'
import {reactive} from 'vue'
let xin = ref('张')
let ming = ref('三')
let fullname = computed({
get(){ //读取时调取
return xin.value+ming.value
},
set(source_data){ //设置时调取
const [str1,str2] = source_data.split('-')
xin.value = str1
ming.value = str2
}
})
function changename(){
fullname.value = '李-四'
}
</script>
<style>
.style_test{
background-color: rgb(72, 138, 166);
box-shadow: 0 0 10px;
border-radius:10px;
padding: 20px;
}
</style>
接下来进行代码的讲解

首先,我们要先用computed函数,来构造个名字为fullname的计算属性。
然后我们要设置一个get函数和一个set函数。get函数会在每次要用到fullname的时候自动执行,返回值即其获得的值。
同理,在后续代码中修改fullname.value的时候,会自动调用set函数。
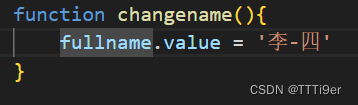
比如这个修改,set函数的source_data 就会接收到’李-四’的值,然后根据-切分这个字符串,然后分别赋值给xin和ming。这样,再次调用fullname的时候,调用get函数的时候,就是更新后的值了,效果如图。
计算属性算出来的也是一个ref的响应式数据
三、Watch监视数据
import {watch} from 'vue'
1.作用范围
watch只能监视以下数据:
1.ref和reactive定义的数据
2.函数的返回值
3.一个包含以上内容的数组
2.watch的写法(基本类型)
语法是这样的watch(监视谁?, 监视到了要干嘛?)
一个代码示例如下:
<template>
    <div class = "style_test">

     <h2>和为:{{sum}}</h2>
     <button @click="add_sum">sum+1</button>
     <h2>{{counter}}次</h2>
   </div>
</template>
<script setup>
    import {ref,watch} from 'vue'
    let sum = ref(0)
    let counter = ref(0)
   function add_sum(){
    sum.value += 1
   }

   watch(sum,() =>{
      counter.value+=1
   })

</script>
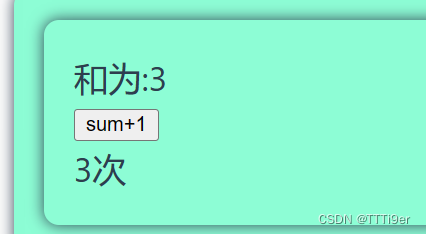
如图,每次sun发生变化,就会自动执行watch函数中的回调函数。
注,在watch的时候,不需要加.value
3.如何停止监视
watch函数是由返回值的,返回一个停止监视的函数。我们用一个函数去接收他,然后在需要停止的时候调用即可。
   const stpw = watch(sum,() =>{
      counter.value+=1
      if(counter.value>=10){stpw()}
   })

如此写代码,在counter大于10之后就不监视了。
4.watch监视对象类型
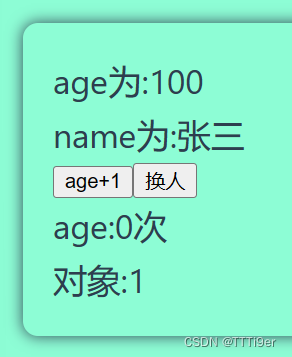
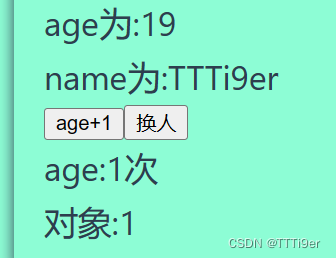
1)监视对象
如果在监视里写类名,那么只有对象指向的地址发生改变的时候才会监视到。
<template>
    <div class = "style_test">
     <h2>age为:{{person.age}}</h2>
     <h2>name为:{{person.name}}</h2>
     <button @click="add_name">age+1</button>
     <button @click="change_person">换人</button>
     <h2>age:{{counter}}次</h2>
     <h2>对象:{{counter2 }}</h2>
   </div>
</template>

<script>
    export default {
        name : 'Test'//组件名
    }
</script>

<script setup>
    import {ref,watch} from 'vue'

    let person=ref({
      name : 'TTTi9er',
      age : 18
    })
    let counter = ref(0)
    let counter2 = ref(0)
   function add_name(){
    person.value.age += 1
   }

   const stpw = watch(person.age,() =>{
      counter.value+=1
      if(counter.value>=10){stpw()}

   })
   const stpw2 = watch(person,() =>{
      counter2.value+=1
      if(counter.value>=10){stpw2()}

   })
   function change_person(){
    person.value ={name : '张三',
                   age  : 100}
   }
</script>

<style>
  .style_test{
       background-color: rgb(72, 138, 166);
       box-shadow: 0 0 10px;
       border-radius:10px;
       padding: 20px;
  }
</style>
2)监视对象的属性
想要监视对象的属性,我们需要使用watch的第三个参数来开启深度监视。
   const stpw = watch(person,() =>{
      counter.value+=1
      if(counter.value>=10){stpw()}
    },{deep : true})
这样不论是对象,还是对象的属性发生变化,都可以监视到。
据说还有可以监视特定对象的方法,参考链接,笔者亲测无效,如果有佬知道麻烦告知。
3)监视reactive对象
rective,默认是深度监视的,而且无法关闭。
<template>
    <div class = "style_test">
     <h2>age为:{{person.age}}</h2>
     <h2>name为:{{person.name}}</h2>
     <button @click="add_name">age+1</button>
     <button @click="change_person">换人</button>
     <h2>age:{{counter}}次</h2>
     <h2>对象:{{counter2 }}</h2>
   </div>
</template>

<script>
    export default {
        name : 'Test'//组件名
    }
</script>

<script setup>
    import {reactive,watch,ref} from 'vue'

    let counter= ref(0)
    let counter2= ref(0)
    let person=reactive({
      name : 'TTTi9er',
      age : 18
    })

   function add_name(){
    person.age += 1
   }

   const stpw = watch(person,() =>{
      counter.value+=1
      if(counter.value>=10){stpw()}
    },{deep : true})

   const stpw2 = watch(person,() =>{
      counter2.value+=1
      if(counter2.value>=10){stpw2()}

   })

   function change_person(){
    Object.assign(person,{name:'李四',
                          age:100
    })
   }

</script>

<style>
  .style_test{
       background-color: rgb(72, 138, 166);
       box-shadow: 0 0 10px;
       border-radius:10px;
       padding: 20px;
  }
</style>
监视的操作没区别,基本只有.value的差别。


 505
505


 被折叠的 条评论
为什么被折叠?
被折叠的 条评论
为什么被折叠?
 到【灌水乐园】发言


