


系列文章目录
提示:本文章将系统记录8个项目
项目一 Linux操作系统的安装与使用
项目二 管理用户与用户组
项目三 管理文件
项目四 使用vim编辑器
项目五 管理软件包
项目六 管理进程
项目七 管理磁盘
项目八 管理网络
文章目录
- 系列文章目录
- 前言
- 项目一 Linux操作系统的安装与使用
- 项目二 管理用户和用户组
- 2.1用户和用户组概述
- 2.21用户账号文件/etc/passwd
- 2.22用户影子文件/etc/shadow
- 2.23用户默认配置文件/etc/login.defs
- 2.24用户组账号文件/etc/group
- 2.31添加用户useradd命令
- 2.32设置用户密码passwd命令
- 2.33修改用户命令usermod命令
- 2.34删除用户命令userdel命令
- 2.35用户临时禁用与恢复命令(passwd或者usermod)
- 2.4用户切换命令(su或者sudo)
- 2.51查看用户所属的组命令groups
- 2.52创建用户组命令groupadd
- 2.53修改用户组命令groupmod
- 2.54删除用户组命令groupdel
- 2.55管理用户组中的用户命令gpasswd
- 项目导入
- 任务2-1添加用户
- 任务2-2添加用户组
- 任务2-3为用户组设置权限
- 项目三 管理文件
- 项目四 使用vim编辑器
- 项目五 管理软件包
- 项目六 管理进程
- 项目七 管理磁盘
- 项目八 管理网络
前言
本文简单介绍Linux操作系统入门基础知识,可以简单使用命令管理操作Linux系统。
提示:以下是本篇文章正文内容,下面案例可供参考
项目一 Linux操作系统的安装与使用
1. 1 Linux操作系统的起源与发展
Linux操作系统起源于UNIX操作系统,是一个免费开源的操作系统。

1. 2 Linux操作系统的发行版本
1.商业版本:占据份额最多的是RHEL和SUSE Linux Enterprise Server
2.社区版本:

1. 3 Linux操作系统的特点
Linux特点
完全免费
完全兼容POSIX 1.0标准
支持多用户、多任务
良好的界面
强大的网络功能
安全稳定
支持多平台
1. 4 Linux操作系统的应用领域

1. 5 Linux操作系统的图形用户界面
Linux操作系统常用图形用户界面有KDE和GNOME两种,两种都是基于X Window视窗系统实现


1. 61 Shell简介
Linux操作系统的字符界面就是Shell终端,是一种具备特殊功能的程序,处于用户与内核之间,提供用户与内核交互的接口。

还是一个命令解释器

1. 62 Shell命令操作
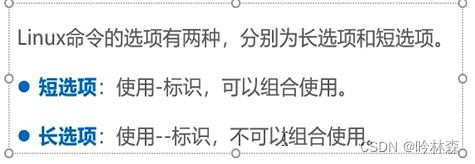
格式:
command [options] [arguments]
command 表示名令名称,options表示选项,定义命令的执行特性,arguments表示参数,指定命令作用的对象。
实例:删除目录dir
rm -r dir

注意主用户为美元符号$ 普通用户为井号#
任务1 安装Linux操作系统
1.安装Vmware虚拟机软件
为不影响物理机正常使用,安装Vmware虚拟机,在虚拟机中安装Linux操作系统。
2.安装Linux操作系统
官网下载直接安装即可。详细安装步骤可网上查找
任务2 管理Linux操作系统
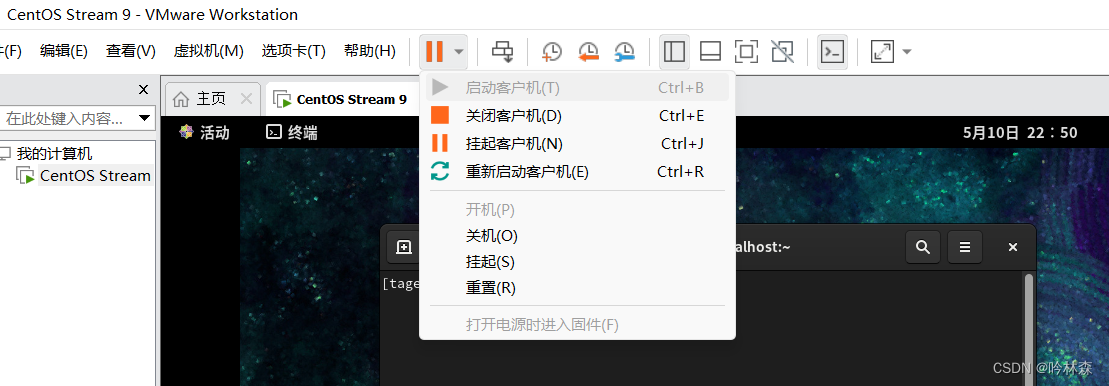
1.系统关机、挂起与重启
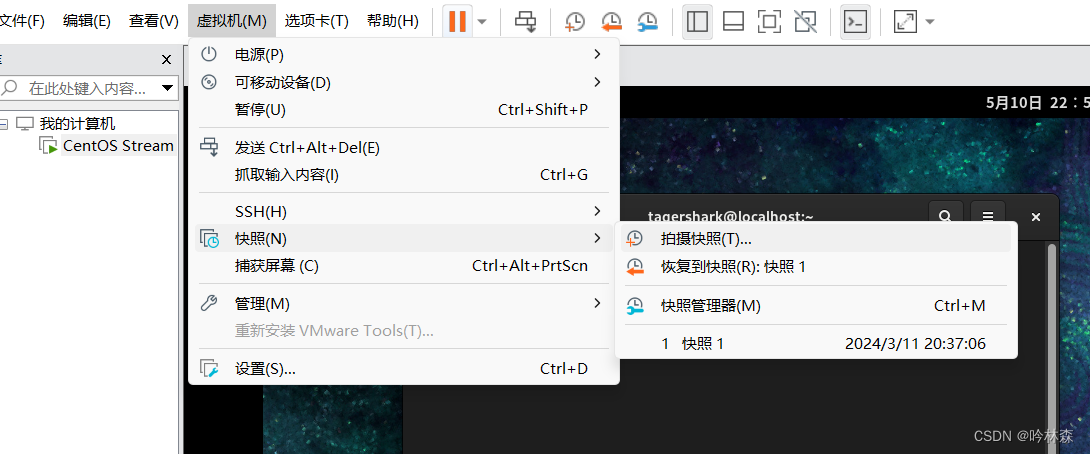
2.拍摄快照
快照可以对某一点的系统进行备份存档,如果后续操作中出现意外情况,通过快照可以快速恢复到之前状态。
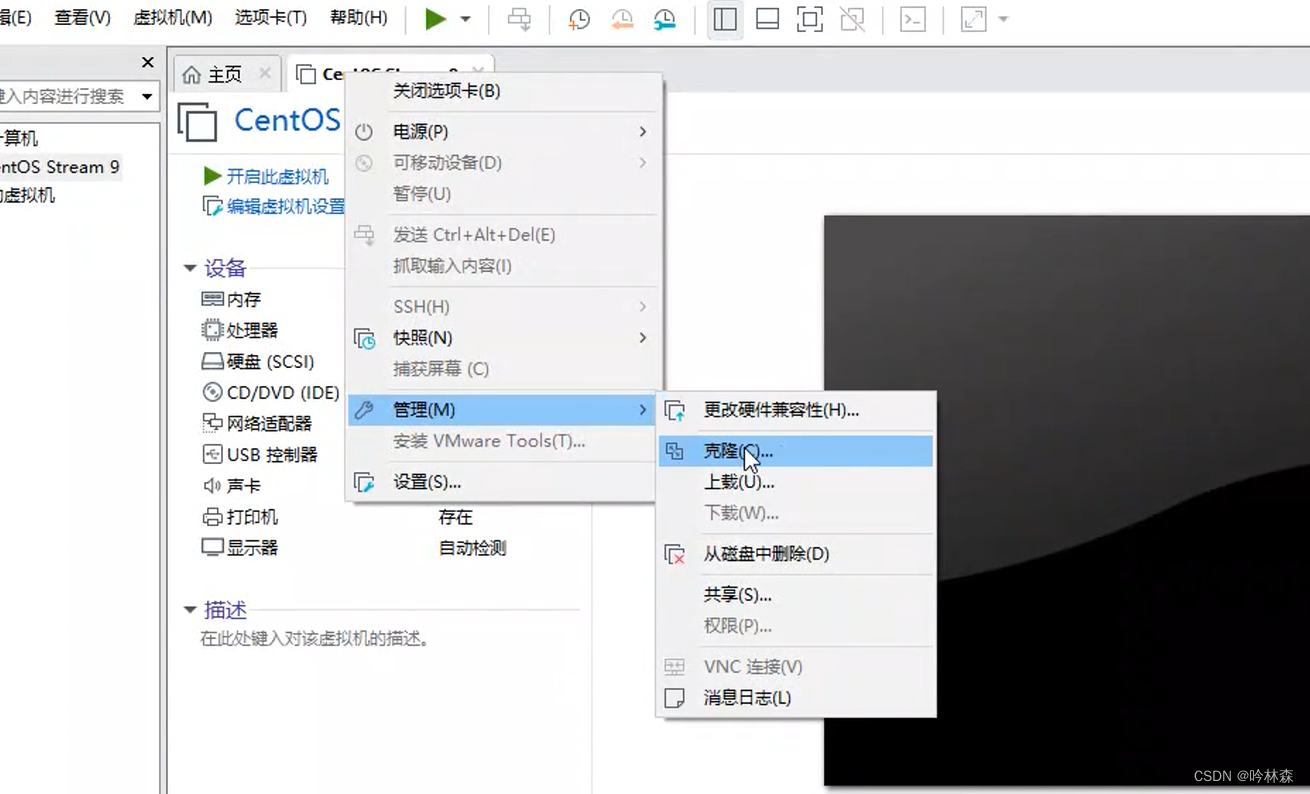
3.克隆
任务3 远程登录Linux操作系统
1.官网下载Xshell 或者FinalShell
2.连接
以FinalShell为例:

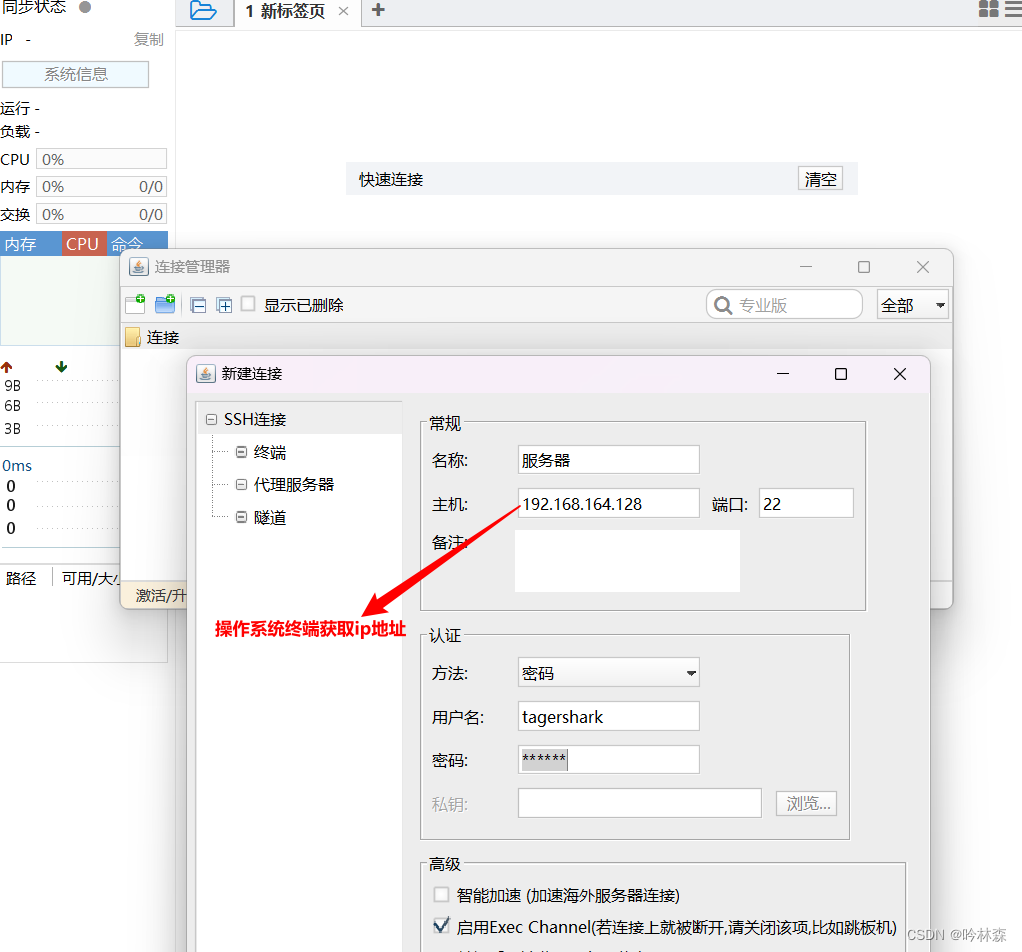
获取ip地址:输入命令ifconfig

项目二 管理用户和用户组
2.1用户和用户组概述
1.用户:就是使用系统的人,Linux操作系统中每一个用户都有一个用户名(账号),系统为每一个用户分配唯一用户标识,称为UID。
2.分类
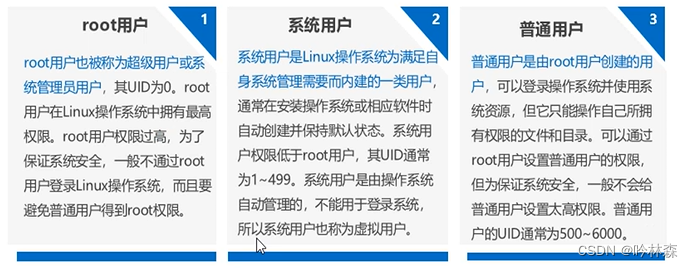
3.用户组:具有相同特性的用户集合,用户组的所有用户会同时拥有权限 也会被分配到唯一个标识,称为GID,一个用户可以同时是多个用户组的成员,当一个用户属于多个用户组时,用户组分为基本组与附加组,基本组只有一个,附加组可以多个
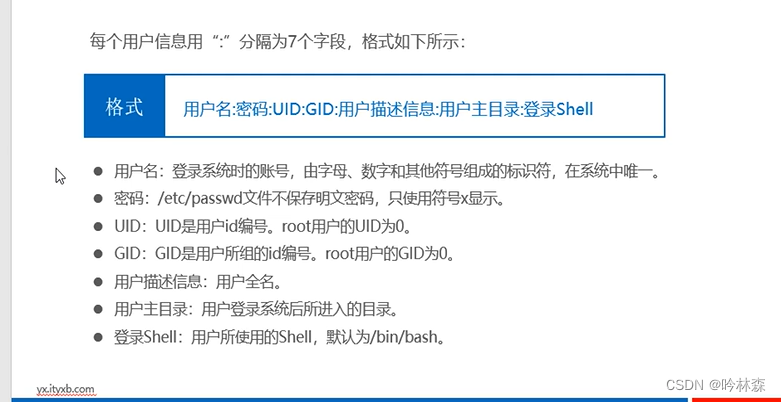
2.21用户账号文件/etc/passwd
(1)Linux操作系统中,用户账号的相关信息(密码除外)都保存在/etc/passwd文件中
(2)所有用户都可以查看/etc/passwd文件中的内容
例如: 如下
chrony:x:982:980:chrony system user:/var/lib/chrony:/sbin/nologin
dnsmasq:x:981:979:Dnsmasq DHCP and DNS server:/var/lib/dnsmasq:/usr/sbin/nologin
tcpdump:x:72:72::/:/sbin/nologin
tagershark:x:1000:1000:TagerShark:/home/tagershark:/bin/bash
2.22用户影子文件/etc/shadow
(1)/etc/shadow文件由/etc/passwd文件产生,称为用户影子文件
(2)/etc/shadow用于存储加密后的用户密码,只有root用户可以读取

例如: 如下
[tagershark@localhost ~]$ cat /etc/shadow
cat: /etc/shadow: 权限不够
[tagershark@localhost ~]$ su
密码:
[root@localhost tagershark]# cat /etc/shadow
root:$6$KCZZiVQW8PDQjl9n$4.QQ4AGZETctfeccMywR.3YOH09km5EPYt9hTE/vHBWgdFFuUulKSFMIu5O9htDoMHM/Fy/Nqi9.::0:99999:7:::
2.23用户默认配置文件/etc/login.defs
了解用户默认配置文件的作用
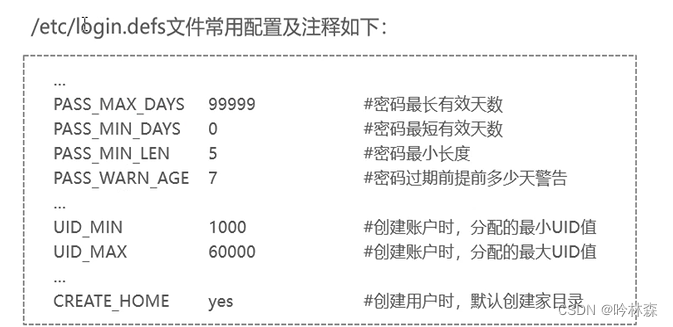
例如: 如下
[root@localhost tagershark]# cat /etc/login.defs
#
# Please note that the parameters in this configuration file control the
# behavior of the tools from the shadow-utils component. None of these
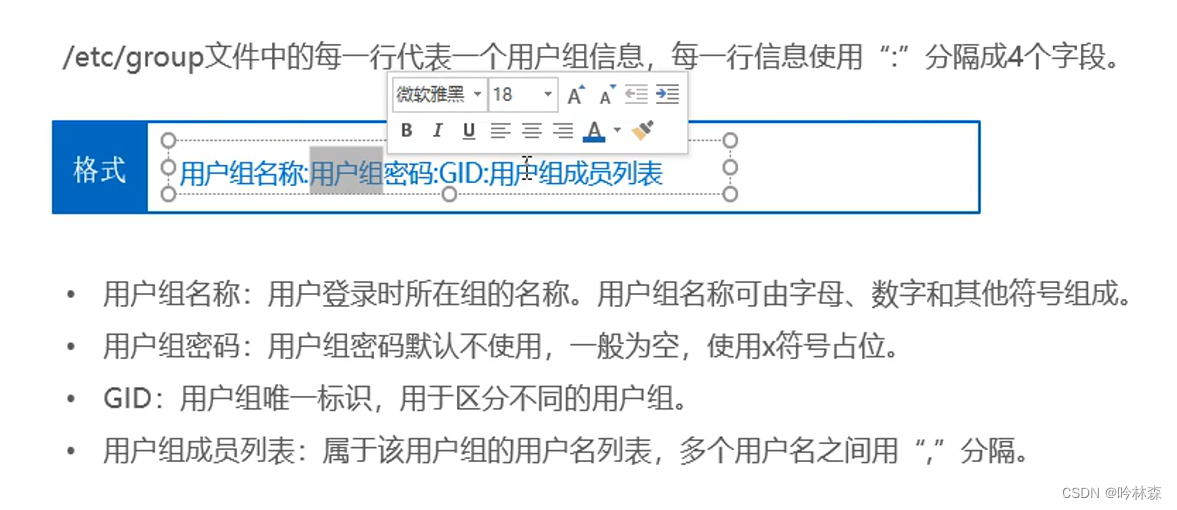
2.24用户组账号文件/etc/group
(1)保存用户组信息 ,所有用户可查看
(2)也有一个影子文件/etc/gshadow,只有root用户有权限查看
例如: 如下
[root@localhost tagershark]# cat /etc/group
root:x:0:
bin:x:1:
daemon:x:2:
sys:x:3:
adm:x:4:
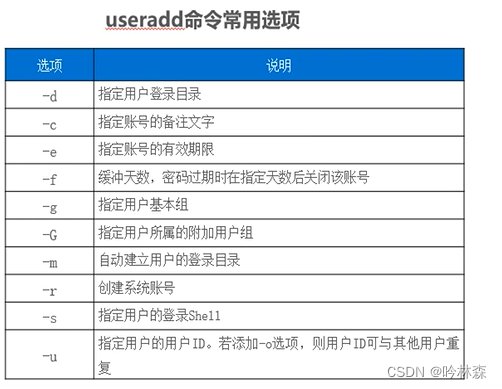
2.31添加用户useradd命令
(1)添加用户就是在系统中创建新账号,设置用户名、用户组、主目录、登录shell

(2)案例:
1.添加用户liming
[root@localhost tagershark]# useradd liming
2.添加用户itcast,并指定用户的主目录为/user/itcast
[root@localhost tagershark]# useradd -d /usr/itcast -m itcast
3.添加用户wangxiao,并为用户指定登录Shell 为/bin/sh,指定基本组为itheima
[root@localhost tagershark]# groupadd itheima
[root@localhost tagershark]# useradd -s /bin/sh -g itheima wangxiao
4.添加用户Addy,并设置用户ID为1024
[root@localhost tagershark]# useradd Addy -u 1024
2.32设置用户密码passwd命令
(1)Linux系统中使用passwd命令为用户设置密码

(2)案例
[tagershark@localhost ~]$ su - itcast
密码:
su: 鉴定故障
[tagershark@localhost ~]$ su
密码:
[root@localhost tagershark]# passwd itcast
更改用户 itcast 的密码 。
新的密码:
重新输入新的密码:
passwd:所有的身份验证令牌已经成功更新。
[root@localhost tagershark]# exit
exit
[tagershark@localhost ~]$ su - itcast
密码:
[itcast@localhost ~]$
2.33修改用户命令usermod命令
(1)修改用户信息(及修改用户账号属性如用户ID、主目录、用户组、登录shell)

 (2)案例
(2)案例
1.修改用户Addy的UID为2000
[root@localhost itcast]# usermod -u 2000 Addy
[root@localhost itcast]# cat /etc/passwd
-- 查看/etc/passwd文件如下  Addy:x:2000:1024::/home/Addy:/bin/bash
2.34删除用户命令userdel命令
userdel命令可以删除指定用户及用户相关的文件和信息


(2)案例
[root@localhost itcast]# userdel liming
[root@localhost itcast]# userdel liming
userdel:用户“liming”不存在
[root@localhost itcast]# cat /etc/passwd
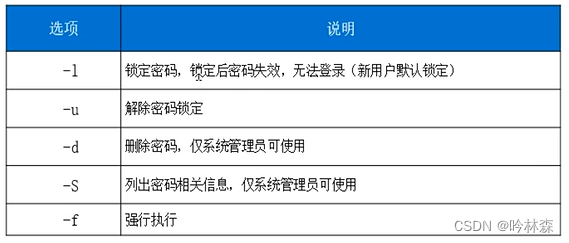
2.35用户临时禁用与恢复命令(passwd或者usermod)
(1)passwd
1.passwd命令禁用itcast用户
[root@localhost itcast]# passwd -l itcast
锁定用户 itcast 的密码 。
passwd: 操作成功
2.passwd命令解除itcast用户
[root@localhost itcast]# passwd -u itcast
解锁用户 itcast 的密码。
passwd: 操作成功
(2)usermod
1.usermod命令禁用itcast用户
[root@localhost itcast]# usermod -L itcast
2.usermod命令解除itcast用户
[root@localhost itcast]# usermod -U itcast
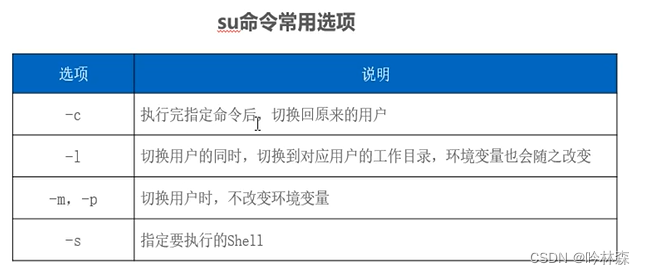
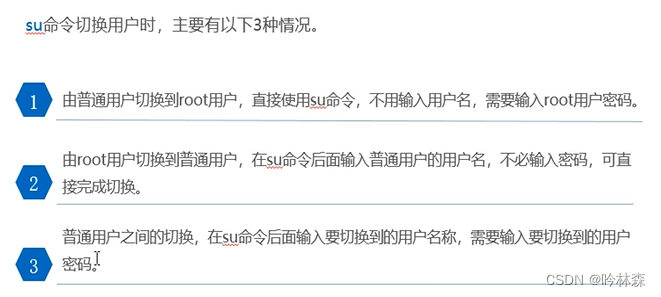
2.4用户切换命令(su或者sudo)
1.su
su命令可以在任意用户之间切换

(2)案例
[itcast@localhost ~]$ su
密码:
[root@localhost itcast]# exit
exit
--加—使得不仅切换到root用户同时环境也切换到root用户环境
[itcast@localhost ~]$ su -
密码:
[root@localhost ~]#
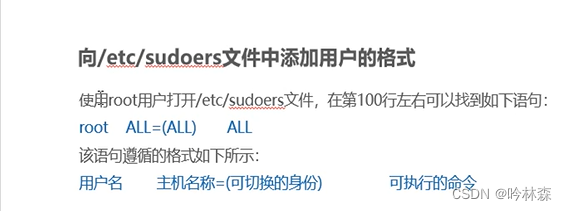
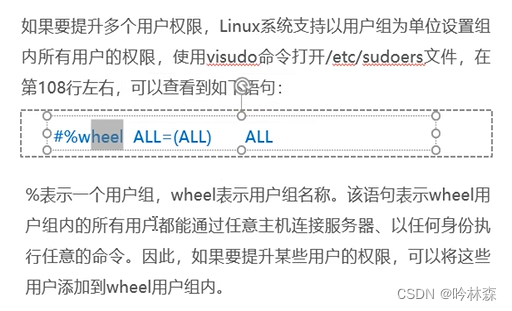
2.sudo命令
sudo命令是一个受限su命令,只有被root用户添加到/etc/sudoers文件中的用户才能使用sudo命令
注意:不能使用vi/vim编辑器直接对/etc/sudoers文件进行编辑,使用visudo命令编辑
(2)案例
1、
visudo /etc/sudoers
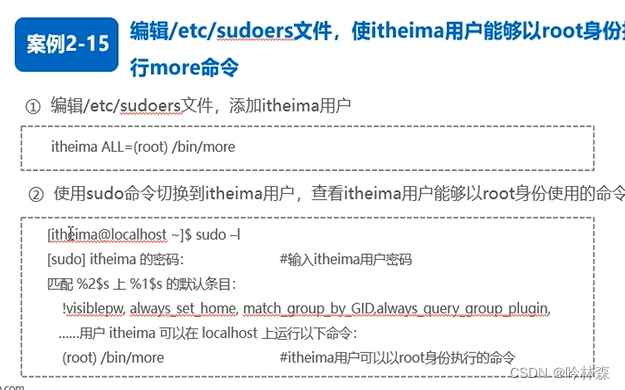

2、

[Addy@server2230520 ~]$ sudo more /etc/shadow
2.51查看用户所属的组命令groups
groups命令用于查看一个用户所属的组

[root@server2230520 itheima]# groups itheima
itheima : itheima
[root@server2230520 itheima]# groups itcast
itcast : itcast
[root@server2230520 itheima]# groups root
root : root
2.52创建用户组命令groupadd

(2)案例
创建一个用户组group3 指定GID为2010
[root@server2230520 itheima]# groupadd -g 2010 group3
[root@server2230520 itheima]# cat /etc/group
-- 查看 /etc/group 结果: group3:x:2010:
2.53修改用户组命令groupmod
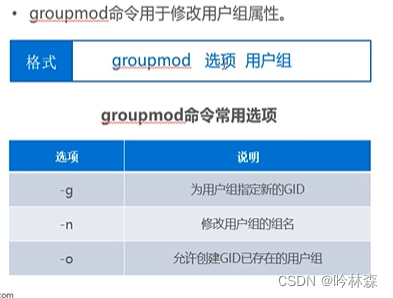
案例
修改用户组group3的GID为4000,并更改用户组名为group6
[root@server2230520 itheima]# groupmod -g 4000 -n group6 group3
[root@server2230520 itheima]# cat /etc/group
2.54删除用户组命令groupdel
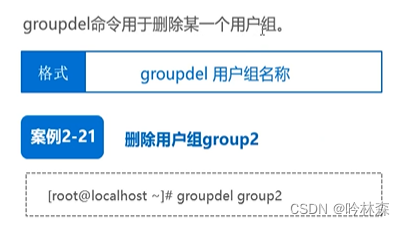
案例:删除用户组group6
[root@server2230520 itheima]# groupdel group6
[root@server2230520 itheima]# cat /etc/group
2.55管理用户组中的用户命令gpasswd
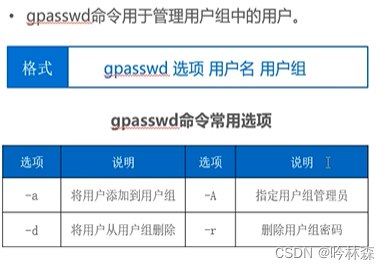
案例
将itheima用户添加至Addy用户组和itcast用户组
[root@server2230520 itheima]# gpasswd -a itheima Addy
正在将用户“itheima”加入到“Addy”组中
[root@server2230520 itheima]# gpasswd -a itheima itcast
正在将用户“itheima”加入到“itcast”组中
[root@server2230520 itheima]#
将itheima用户从Addy用户组和itcast用户组中移除
[root@server2230520 ~]# gpasswd -d itheima itcast
正在将用户“itheima”从“itcast”组中删除
[root@server2230520 ~]# gpasswd -d itheima itheima
正在将用户“itheima”从“itheima”组中删除
gpasswd:用户“itheima”不是“itheima”的成员
[root@server2230520 ~]# group itheima
bash: group: 未找到命令...
文件搜索失败: /media/BaseOS was not found
[root@server2230520 ~]# groups itheima
itheima : itheima Addy
[root@server2230520 ~]# gpasswd -d itheima Addy
正在将用户“itheima”从“Addy”组中删除
项目导入

任务2-1添加用户
[itheima@server2230520 root]$ su -
密码:
[root@server2230520 ~]# useradd dail -e 2022-12-07
[root@server2230520 ~]# useradd lily -e 2022-12-07
[root@server2230520 ~]# useradd anan -e 2022-12-07
[root@server2230520 ~]# passwd dail
更改用户 dail 的密码 。
新的 密码:
重新输入新的 密码:
passwd:所有的身份验证令牌已经成功更新。
[root@server2230520 ~]# passwd lily
更改用户 lily 的密码 。
新的 密码:
重新输入新的 密码:
passwd:所有的身份验证令牌已经成功更新。
[root@server2230520 ~]# passwd anan
更改用户 anan 的密码 。
新的 密码:
重新输入新的 密码:
passwd:所有的身份验证令牌已经成功更新。
任务2-2添加用户组
1.添加用户组temp
[root@server2230520 ~]# groupadd temp
2.将dali、lily和anan这3个用户添加到temp用户组
[root@server2230520 ~]# gpasswd -a dail temp
正在将用户“dail”加入到“temp”组中
[root@server2230520 ~]# gpasswd -a lily temp
正在将用户“lily”加入到“temp”组中
[root@server2230520 ~]# gpasswd -a anan temp
正在将用户“anan”加入到“temp”组中
[root@server2230520 ~]#
任务2-3为用户组设置权限
1.修改/etc/sudoers文件权限
[root@server2230520 /]# ll /etc/sudoers
-r--r-----. 1 root root 4387 5月  13 09:26 /etc/sudoers
[root@server2230520 /]# chmod 774 /etc/sudoers
[root@server2230520 /]# ll /etc/sudoers
-rwxrwxr--. 1 root root 4387 5月  13 09:26 /etc/sudoers
2.编辑/etc/sudoers文件,添加如下配置

3.保存退出
项目三 管理文件
3.1认识Linux文件系统
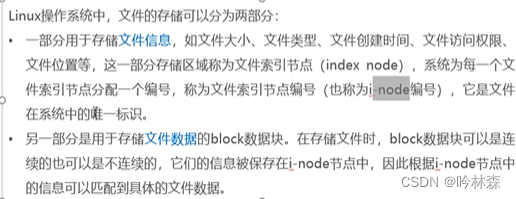
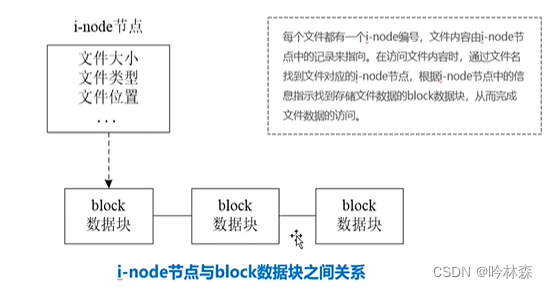
(1)文件系统是一个程序,它规定数据在磁盘上的组织存储方式,也规定了系统访问数据的方式。文件的存储与访问都要依赖文件系统。
(2)常用文件系统有ext3、ext4和xfs
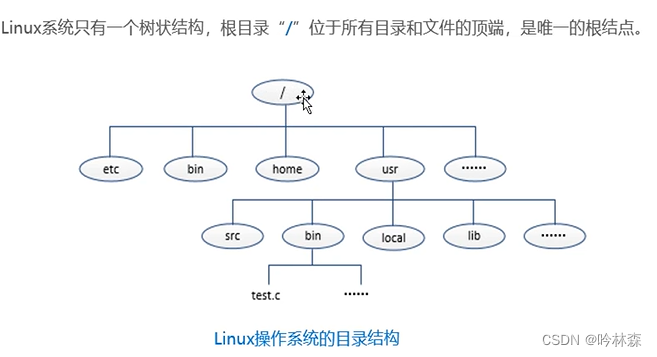
3.2Linux目录结构
(1)目录结构是磁盘等存储设备上文件的组织形式
3.3Linux操作系统文件类型
(1)普通文件
Linux操作系统的文件大部分都是普通文件,包括文本文件、数据文件、可执行的二进制程序文件等
(2)目录文件
目录文件是一种特殊文件,Linux操作系统利用它构成文件系统的树形结构
(3)设备文件
设备文件存储在/dev目录下。设备文件分为字符设备文件(如键盘、鼠标)与块设备文件(如磁盘)。字符设备文件以字节流的方式进行访问(每访问一个字符)块设备文件一块为单位访问数据。
(4)链接文件
链接文件是给系统中已有的文件提供另外一种访问方式。它为系统重多个用户以不同权限访问共享文件提供了一种机制。
(4)管道文件
管道文件是建立在内存中可以同时被两个进程访问的文件。管道文件的数据传输是单向的,只能是从一个进程从一端写入、另一个进程从另一端读写。
(6)套接字文件
套接字文件也是用于实现进程间的通信。

3.41目录操作命令
1.pwd命令
显示用户当前工作目录的绝对路径
[tagershark@localhost ~]$ pwd
/home/tagershark
2.cd命令
用户切换用户的工具目录
[tagershark@localhost ~]$ cd /etc
[tagershark@localhost etc]$ pwd
/etc
注意:cd后面没有目录时切换到当前用户的主目录”
回到上一级目录:
[tagershark@localhost etc]$ cd ..
[tagershark@localhost /]$ pwd
/
3.ls目录
查看目录下的文件

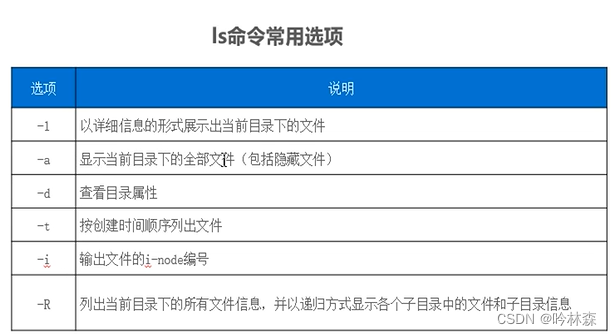
(1)查看当前目录下的文件
ls
(2)查看当前目录下所有文件(包括隐藏)
ls -a
4.mkdir命令
创建目录

[tagershark@localhost ~]$ mkdir ggbond
[tagershark@localhost ~]$ ls
公共  模板  视频  图片  文档  下载  音乐  桌面  ggbond
如果目录不存在使用-p直接创建
[tagershark@localhost ~]$ mkdir -pv a/b/c
mkdir: 已创建目录 'a'
mkdir: 已创建目录 'a/b'
mkdir: 已创建目录 'a/b/c'
[tagershark@localhost ~]$ ls
公共  模板  视频  图片  文档  下载  音乐  桌面  a  ggbond
5.rmdir
删除目录 p选项是指递归删除该目录的所有子文件
[tagershark@localhost ~]$ rmdir ggbond
rm: 无法删除 'ggbond/': 是一个目录
[tagershark@localhost ~]$ rmdir -p  a/b/c
[tagershark@localhost ~]$ ls
公共  模板  视频  图片  文档  下载  音乐  桌面
3.42文件内容显示命令
1.cat命令用于将文件内容打印到输出设备

显示文件内容有编号
[tagershark@localhost ~]$ cat -n /etc/passwd
     1  root:x:0:0:root:/root:/bin/bash
     2  bin:x:1:1:bin:/bin:/sbin/nologin
2.more命令
用于分页显示文件内容

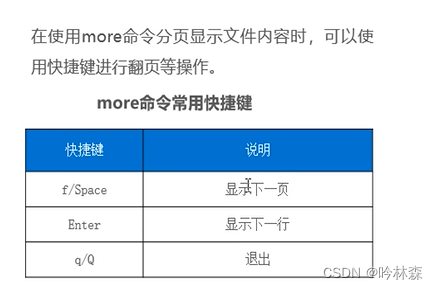
分页显示/etc/passwd文件内容
more /etc/passwd
3.less命令
支持向上向下翻页
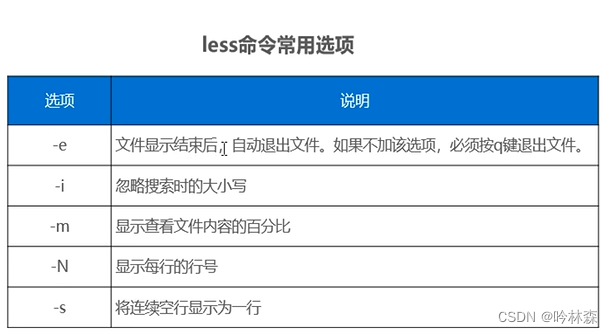

less /etc/passwd
4.head命令
用于查看文件的前n行命令

查看/etc/passwd前6行内容

5.tail命令
用于显示文件的后n行内容
[root@localhost tagershark]# tail -4 /etc/passwd
Addy:x:2000:1024::/home/Addy:/bin/bash
dail:x:2001:2001::/home/dail:/bin/bash
lily:x:2002:2002::/home/lily:/bin/bash
anan:x:2003:2003::/home/anan:/bin/bash
[root@localhost tagershark]#
3.43文件查找命令
1.find
通过关键字,从指定目录开始,递归搜索各个子目录,查找符合条件的文件


查找指定目录下的passwd文件
[root@localhost tagershark]# find /etc -name passwd
/etc/passwd
/etc/pam.d/passwd
[root@localhost tagershark]#
2.which命令
主要用于搜索可执行文件的位置
[root@localhost tagershark]# which ls
alias ls='ls --color=auto'
        /usr/bin/ls
[root@localhost tagershark]# which cat
/usr/bin/cat
[root@localhost tagershark]# which more
/usr/bin/more
3.whereis
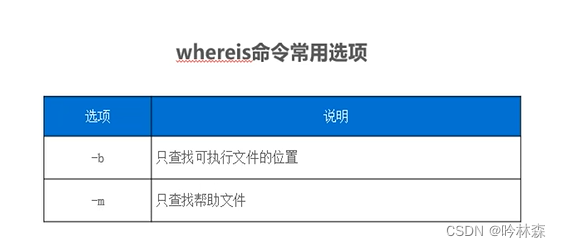
[root@localhost tagershark]# whereis -b ls
ls: /usr/bin/ls
[root@localhost tagershark]# whereis -m ls
ls: /usr/share/man/man1/ls.1.gz /usr/share/man/man1p/ls.1p.gz
[root@localhost tagershark]#
3.44文件内容统计
wc用于统计文件的字节数、字数和行数

[root@localhost tagershark]# wc -c /etc/group
955 /etc/group
[root@localhost tagershark]# wc -l /etc/group
68 /etc/group
[root@localhost tagershark]# wc -w /etc/group
68 /etc/group
3.45文件复制、移动、删除
1.cp文件复制命令


例如:在root用户当前目录下新建a.txt文件
[root@localhost tagershark]# echo "hello world" >> a.txt
[root@localhost tagershark]# ls
公共  模板  视频  图片  文档  下载  音乐  桌面  a.txt
[root@localhost tagershark]# cd a.txt
bash: cd: a.txt: 不是目录
[root@localhost tagershark]# cat a.txt
hello world
[root@localhost tagershark]#
要求1:使用cp命令将a.txt文件中的内容复制到b.txt文件中
(1)复制文件内容
[root@localhost tagershark]# cp a.txt b.txt
[root@localhost tagershark]# ls
公共  视频  文档  音乐  a.txt
模板  图片  下载  桌面  b.txt
要求2:创建dir目录,将a.txt文件和b.txt文件复制到dir目录下
(2)将文件复制到指定目录
[itcast@localhost ~]$ mkdir dir
[itcast@localhost ~]$ cp a.txt b.txt dir
[itcast@localhost ~]$ cd dir
[itcast@localhost dir]$ ls
a.txt  b.txt
[itcast@localhost dir]$
注意:尽量在普通用户操作,不要在root用户随意添加删除文件,防止误操作
要求3:在itcast用户当前目录下创建itcast目录,将dir目录复制到icast目录
(3)复制目录
[itcast@localhost ~]$ mkdir icast
[itcast@localhost ~]$ ls
a.txt  b.txt  dir  icast
[itcast@localhost ~]$ cp -R dir icast
[itcast@localhost ~]$ ls
a.txt  b.txt  dir  icast
[itcast@localhost ~]$ cd icast
[itcast@localhost icast]$ ls
dir
[itcast@localhost icast]$
2,文件移动命令mv
两个功能
一个重命名文件
一个是移动文件/目录到指定目录

案例:把a.txt b.txt dir 移动到mvdir下
[itcast@localhost ~]$ ls
a.txt  b.txt  dir  icast
[itcast@localhost ~]$ mkdir mvdir
[itcast@localhost ~]$ ls
a.txt  b.txt  dir  icast  mvdir
[itcast@localhost ~]$ mv a.txt  b.txt  dir mvdir
[itcast@localhost ~]$ ls
icast  mvdir
如果mv命令后面是相同路径下的两个文件 这mv命令作用是重命名文件
实例:在mvdir目录下,将a.txt文件重命名为c.txt
[itcast@localhost mvdir]$ ls
a.txt  b.txt  dir
[itcast@localhost mvdir]$ mv a.txt c.txt
[itcast@localhost mvdir]$ ls
b.txt  c.txt  dir
3.文件删除命令rm
rm命令用于删除文件/目录
简写rm rm可以删除一个空目录 无法删除有子目录的目录 -r表示递归删除目录下的子目录 -f表示不做任何提示
案例:删除itcast用户家目录下的itcast目录和mvdir目录
[itcast@localhost ~]$ ls
icast  itcast  mvdir
[itcast@localhost ~]$ rm -rf itcast
[itcast@localhost ~]$ rm -rf mvdir
[itcast@localhost ~]$ ls
icast
[itcast@localhost ~]$
3.46文件更新
touch命令
注意:使用touch命令时如果文件不存在会创建一个新的文件
修改文件icast的时间戳为系统当前时间
[itcast@localhost ~]$ ls -l
总用量 0
drwxr-xr-x. 2 itcast itcast 6  5月 15 17:15 icast
[itcast@localhost ~]$ touch icast
[itcast@localhost ~]$ ls -l
总用量 0
drwxr-xr-x. 2 itcast itcast 6  5月 15 18:48 icast
[itcast@localhost ~]$
3.51gzip命令与gunzip命令
(1)gzip命令

(2)gunzip命令
gunzip命令解压.gz格式的压缩包
(3)案例
在itcast用户当前目录下创建a.txt文件、b.txt文件,使用gzip命令和gunzip命令分别对两个文件进行压缩与解压缩
[itcast@localhost ~]$ echo "hello a.txt" >>a.txt
[itcast@localhost ~]$ echo "hello b.txt">>b.txt
[itcast@localhost ~]$ ls
a.txt  b.txt  icast
[itcast@localhost ~]$ gzip a.txt b.txt
[itcast@localhost ~]$ ls
a.txt.gz  b.txt.gz  icast
[itcast@localhost ~]$ gunzip -v a.txt.gz b.txt.gz
a.txt.gz:       -16.7% -- replaced with a.txt
b.txt.gz:       -16.7% -- replaced with b.txt
[itcast@localhost ~]$ ls
a.txt  b.txt  icast
[itcast@localhost ~]$
注意zcat命令可以用来查看.gz压缩包单独压缩的内容,如果多个文件压缩到一个压缩包中就不能使用此命令查看文件内容
a.txt.gz  b.txt  icast
[itcast@localhost ~]$ zcat a.txt.gz
hello a.txt
[itcast@localhost ~]$
在这里插入代码片
3.52bgzip2命令与bunzip2命令
(1)bgzip2命令

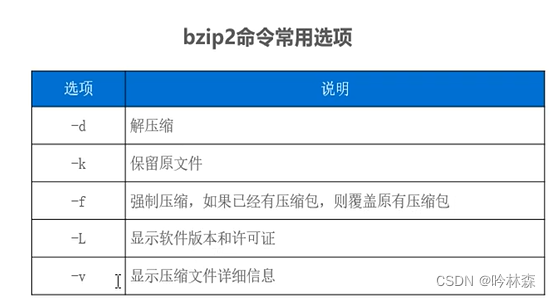
(2)bunzip2命令
bunzip2命令解压缩.bz2格式的压缩包与bzip2 -d功能相同
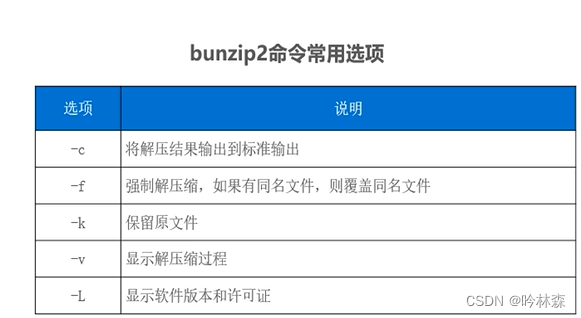
(3)案例
使用bzip2命令压缩a.txt文件和b.txt文件,并使用bunzip2命令解压缩
[itcast@localhost ~]$ ls
a.txt  b.txt  icast
[itcast@localhost ~]$ bzip2 a.txt b.txt
[itcast@localhost ~]$ ls
a.txt.bz2  b.txt.bz2  icast
[itcast@localhost ~]$ bunzip2 -c a.txt.bz2 b.txt.bz2
hello a.txt
hello b.txt
[itcast@localhost ~]$ ls
a.txt.bz2  b.txt.bz2  icast
[itcast@localhost ~]$ bunzip2  a.txt.bz2 b.txt.bz2
[itcast@localhost ~]$ ls
a.txt  b.txt  icast
bzcat可用来查看.bz2压缩包的文件内容
3.53zip命令与unzip命令
(1)zip命令
可以保留源文件且可以将多个文件压缩到一个压缩包

(2)unzip命令
unzip命令用于解压.zip格式的压缩包
(3)案例
使用zip命令压缩a.txt文件和b.txt文件,并使用unzip命令解压缩到dir目录
[itcast@localhost ~]$ zip ab a.txt b.txt
  adding: a.txt (stored 0%)
  adding: b.txt (stored 0%)
[itcast@localhost ~]$ ls
ab.zip  a.txt  b.txt  icast
[itcast@localhost ~]$ mkdir dir
[itcast@localhost ~]$ unzip ab.zip -d dir
Archive:  ab.zip
 extracting: dir/a.txt
 extracting: dir/b.txt
[itcast@localhost ~]$ cd dir/
[itcast@localhost dir]$ ls
a.txt  b.txt
3.54文件打包tar命令
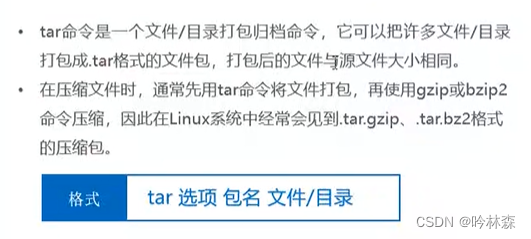
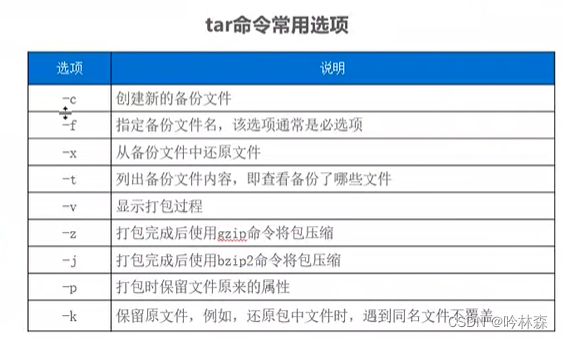
1.创建tar包
案例:将/usr/bin目录下的文件打成tar包usrbin.tar
[itcast@localhost ~]$ tar -cvf usrbin.tar /usr/bin
[itcast@localhost ~]$ ls
ab.zip  a.txt  b.txt  dir  icast  usrbin.tar
2.查看并还原tar包
[itcast@localhost ~]$ tar -tf usrbin.tar //查看包
[itcast@localhost ~]$ tar -xf usrbin.tar usr //还原包到usr目录中
[itcast@localhost ~]$ ls
ab.zip  a.txt  b.txt  dir  icast  usr  usrbin.tar
[itcast@localhost ~]$ cd usr/
[itcast@localhost usr]$ ls
bin
3.打包之后压缩文件
将/usr/bin目录下的文件打包并使用bzip2命令压缩
[itcast@localhost ~]$ tar -jcvf usrbin.tar.bzip2 /usr/bin
[itcast@localhost ~]$ ls
ab.zip  b.txt  icast  usrbin.tar        usrbin.tar.gzip
a.txt   dir    usr    usrbin.tar.bzip2
[itcast@localhost ~]$ ls -lht usrbin.tar
-rw-r--r--. 1 itcast itcast 120M  5月 15 19:32 usrbin.tar
[itcast@localhost ~]$ ls -lht usrbin.tar.bzip2
-rw-r--r--. 1 itcast itcast 42M  5月 15 19:55 usrbin.tar.bzip2
3.61文件权限概述
用户对文件/目录的访问权限可分为3种,分别是读、写、执行,Linux系统中可用字符表示法和数字表示法
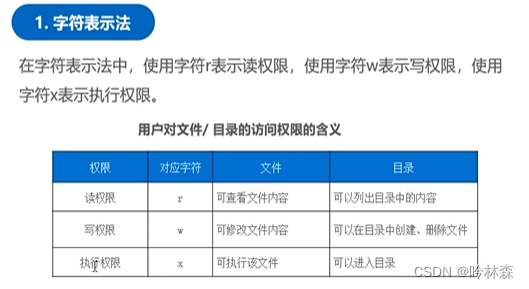
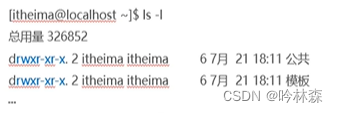
案例:查看itheima用户当前目录下文件详细信息


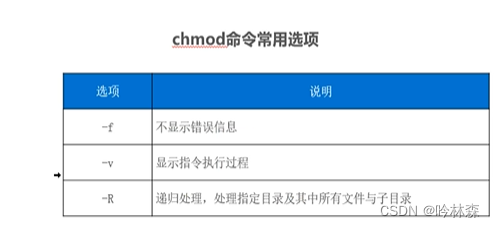
3.62chmod命令
(1)chmod命令用于更该文件/目录的权限
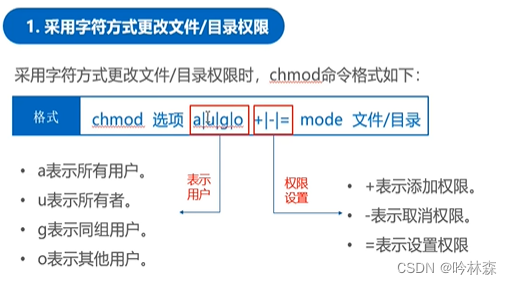
案例
在itheima用户的当前目录下,创建file文件,并设置file文件,并设置所有者有执行权限,其他用户有读写权限
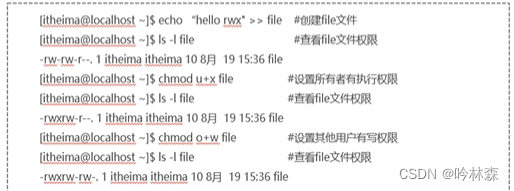

案例
设置file文件权限,所有者具有读、写、执行权限,同组用户和其他用户只有读权限

3.63chown命令
(1)chown命令用于更改文件/目录的所有者,默认情况下文件/目录的所有者为创建该文件/目录的所有者的用户

案例
更改file文件所有者为Addy用户

3.71文件链接概述
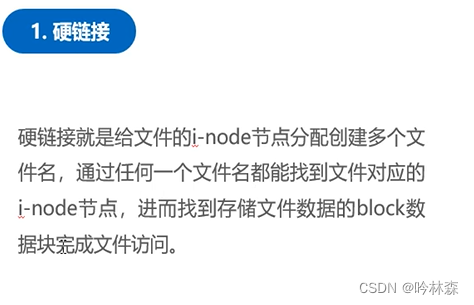

3.72文件链接管理命令-ln命令
(1)Linux系通过ln命令创建链接文件

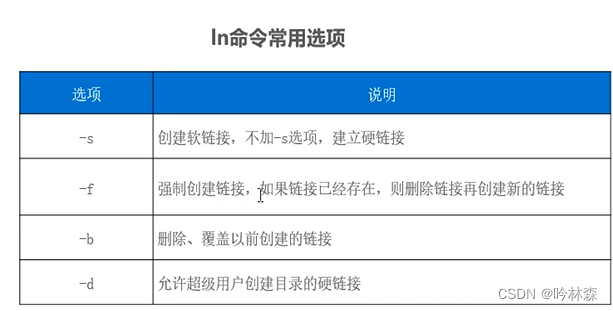
(2)案例
1.在itcast用户当前目录下,创建hello文件,并创建硬链接,通过硬链接修改文件内容,并查看文件信息
[itcast@localhost ~]$ echo "hello world" >>hello
[itcast@localhost ~]$ ls
ab.zip  b.txt  hello  usr         usrbin.tar.bzip2
a.txt   dir    icast  usrbin.tar  usrbin.tar.gzip
[itcast@localhost ~]$ ln hello hello-hard
[itcast@localhost ~]$ echo "nihao china" >>hello-hard
[itcast@localhost ~]$ cat hello-hard
hello world
nihao china
[itcast@localhost ~]$ cat hello
hello world
nihao china
2.在itcast用户当前目录下创建file.txt文件,并创建file.txt文件的软链接,通过软链接修改文件内容。
[itcast@localhost ~]$ echo "We are good friend">>file.txt
[itcast@localhost ~]$ ln -s file.txt sfile
[itcast@localhost ~]$ ls -il
18601817 -rw-r--r--. 1 itcast itcast        19  5月 16 22:35 file.txt
18611104 lrwxrwxrwx. 1 itcast itcast         8  5月 16 22:35 sfile -> file.txt
[itcast@localhost ~]$ echo "hello China">>sfile
[itcast@localhost ~]$ cat sfile
We are good friend
hello China
[itcast@localhost ~]$ cat file.txt
We are good friend
hello China
注意;不管是通过硬链接还是软链接修改文件后,源文件都会发生变化
项目四 使用vim编辑器
4.1 vim编辑器的启动、保存与退出
1.启动
如果文件名存在,则是打开文件,不存在则系统会新建一个文件
vim file
2,保存和退出

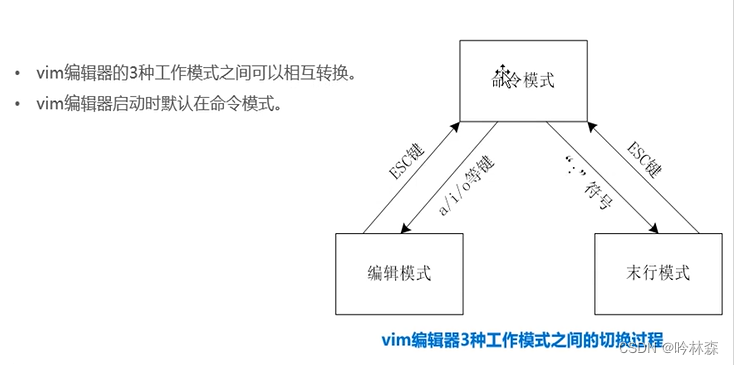
4.21命令模式


4.22编辑模式

4.23末行模式

4.24 vim模式之间的转换
项目导入


在/etc/hosts文件中使用vim编辑器添加一行 主机名 localhost 即可
项目五 管理软件包
5.1rpm概述
(1)rpm一款软件包管理工具
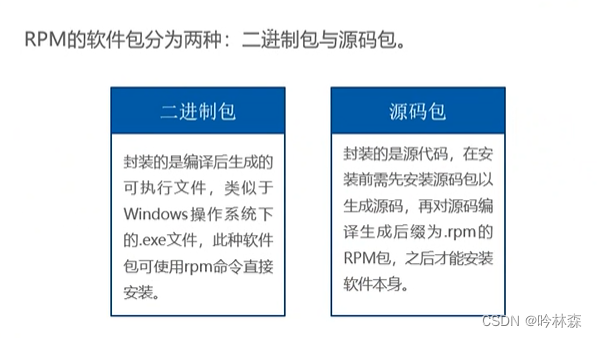

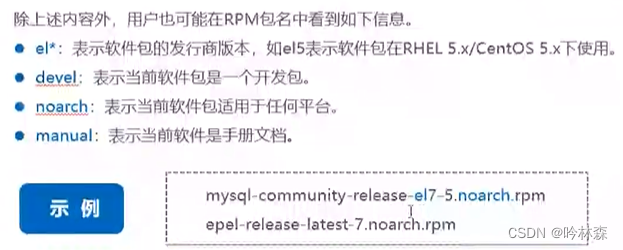
5.21安装软件
(1)rpm命令可以安装rpm软件包


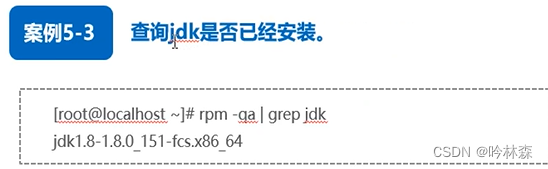
5.22查询软件


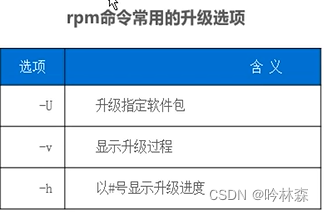
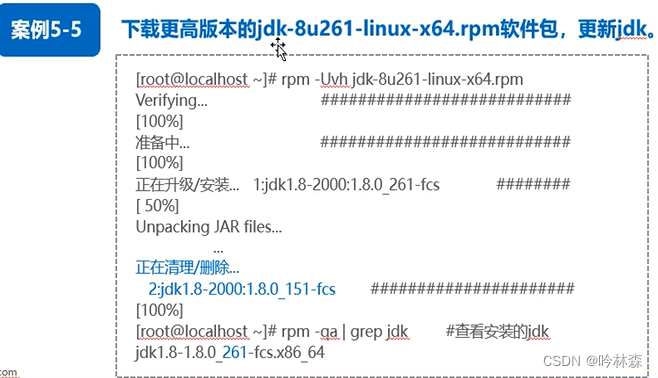
5.23升级软件
5.24卸载软件

注意:一些软件包不独立使用,可能与其他软件包存在依赖关系,因此一般不使用rpm管理存在依赖关系的软件包
5.3YUM与DNF概述
(1)YUM概述
YUM最大优势就是可以自动解决软件包之间的依赖关系,YUM维护了一个软件仓库成为YUM源,类似手机中应用商店,管理着Linux发行版本中的应用程序,并维护这些应用程序之间的依赖关系,CentOSLinux5/6/7系统默认你YUM管理rpm软件包
(2)DNF概述
由于YUM存在性能低下,内存占用高等问题开发出DNF解决一些wenti

5.4def安装软件

5.4def查询软件
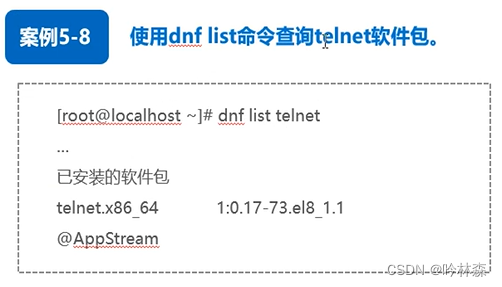
[root@localhost ~]# dnf info telnet查询详细信息
5.4def检测升级软件

更新升级安装的telnet命令
[root@localhost ~]# dnf upgrade telnet
5.4def卸载软件
卸载telnet命令rmove
[root@localhost ~]# dnf -y remove telnet
清除过期无用的缓存数据命令clean,需指定软件包名称,清除所有使用all选项
[root@localhost ~]#dnf clean talnet
[root@localhost ~]#dnf clean all
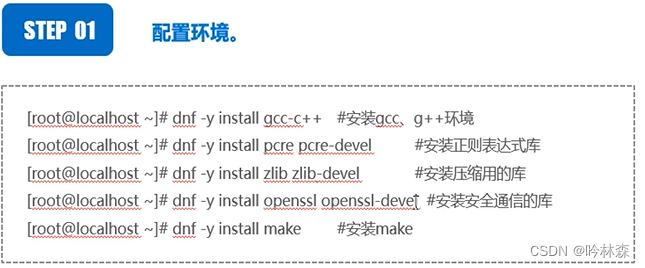
5.51源码编译过程
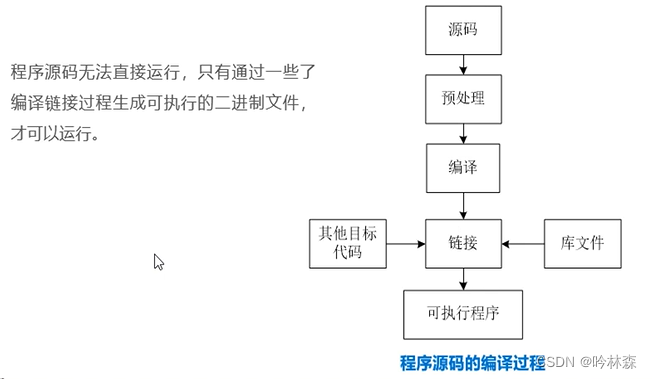

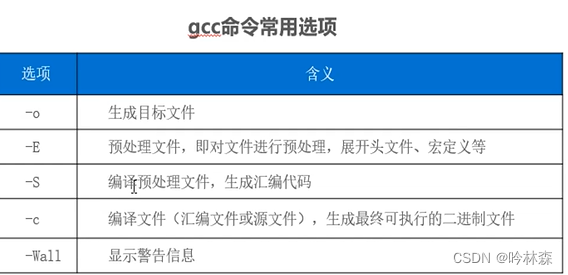
c语言源码文件编译过程(第一种方式)
(1)预处理 [root@localhost ~]# gcc -E hello.c -o hello.i
(2)编译[root@localhost ~]# gcc -S hello.i -o hello.s
(3)汇编 [root@localhost ~]# gcc -c hello.s -o hello.o
(4)链接[root@localhost ~]# gcc hello.o -o hello
生成可执行的hello文件 执行
[root@localhost ~]# ls
anaconda-ks.cfg  hello.c  hello.o
hello            hello.i  hello.s
[root@localhost ~]# ./hello
hello world
利用gcc直接编译注意:对于单一简单的文件采用这种方式,有依赖关系的复杂源文件要使用(第一种方式)一步一步编译
[root@localhost ~]# ls
anaconda-ks.cfg  hello.c
[root@localhost ~]# gcc hello.c -o hello
[root@localhost ~]# ls
anaconda-ks.cfg  hello  hello.c
[root@localhost ~]#
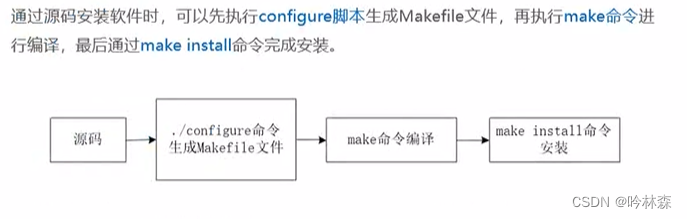
5.52make工具
使用gcc命令逐个编译工作量大且容易出错,make编译工具完成复杂程序的编译
1.makefile文件
用于存储编译命令,里面的命令是运行configure脚本文件自动生成的。
2.make命令
make命令用于执行makefile文件,即执行makefile文件中的编译命令
3.make install 命令
make install 命令的作用是安装生成的二进制文件。make install 命令也是读取makefile文件中的指令安装软件。
项目导入

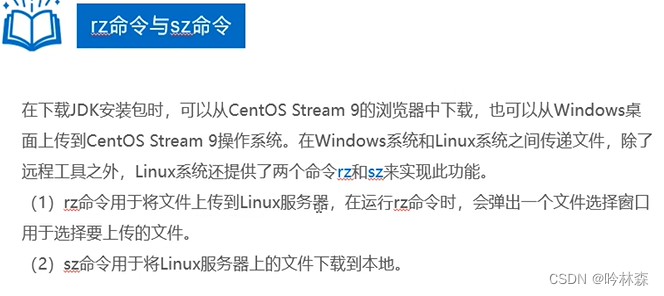
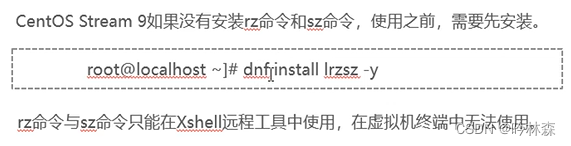
安装MySQL8
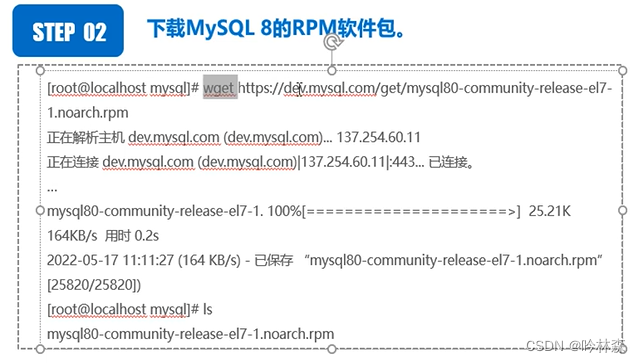
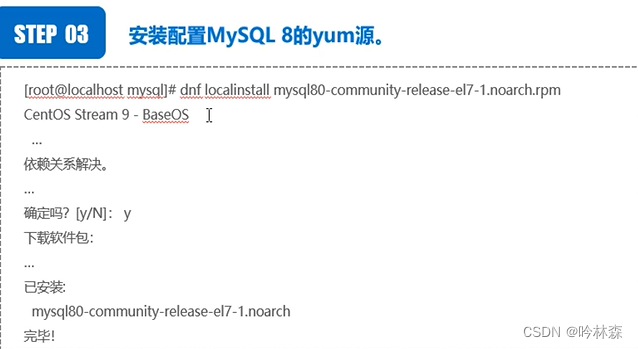
安装好yum源后安装server程序文件(193),启动mysql(195)登录mysql(197)
 192  dnf search mysql
  193  dnf install mysql-server.x86_64
  194  systemctl status mysqld
  195  systemctl start mysqld
  196  systemctl status mysqld
  197  mysql -uroot -p
安装nginx1.18
采用源码方式安装
window去nginx官网下载nginx1.18版本
1.tar -xf nginx-1.18.0.tar.gz
2.  ./configure
3. make
4. make install
5. cd /usr/local/nginx
6. cd sbin
7. ./nginx
项目六 管理进程
6.11进程概念
(1)进程就是一个程序运行所需要的特殊环境、二进制程序的执行过程。结束后进程消失,所有的资源会被系统回收
6.12进程状态


6.13进程标识符
(1)每个进程都有唯一标识即PID,进程终止,PID会被回收,可能会被分配给其他进程使用。Linux系统中除了初始化进程,其他进程都有一个父进程(PPID)
(2)用户标识符UID (EUID对应给与权限的root用户)
(3)组织标识符GID (EGID)
6.21进程查看命令
1.ps命令用于查看当前系统中正在运行信息
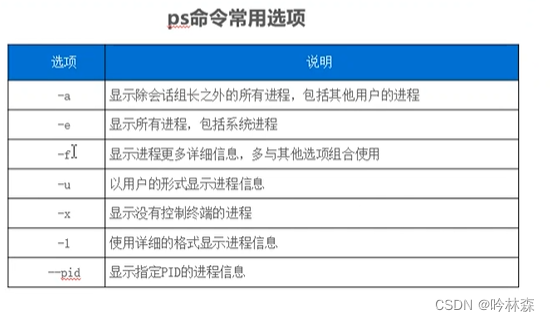
[root@localhost mysql8]# ps -aux
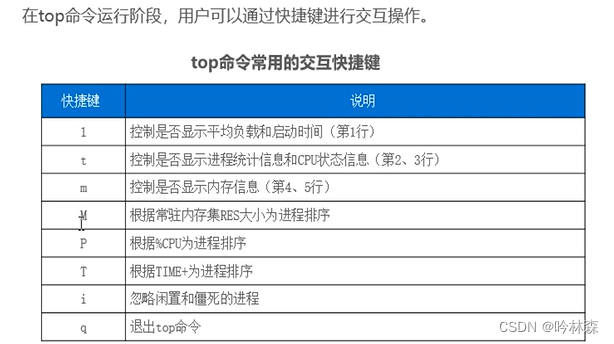
2.top命令
ps命令静态显示信息,二top命令动态的显示进程状态信息

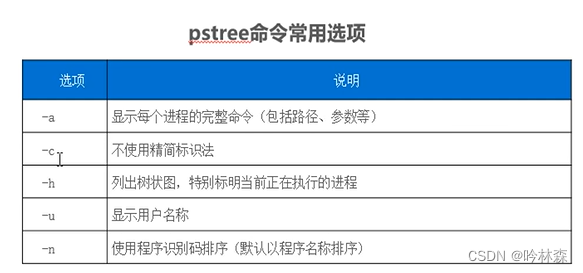
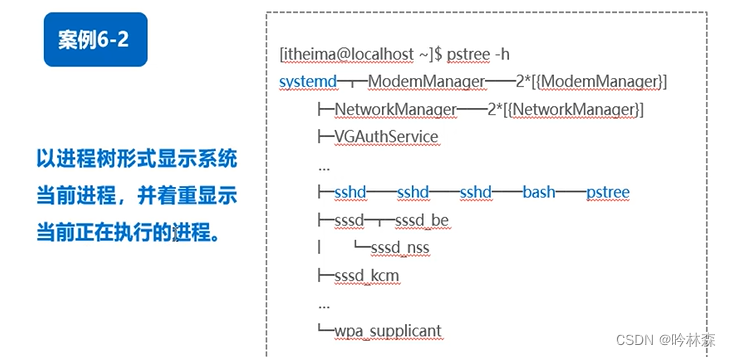
3.pstree命令
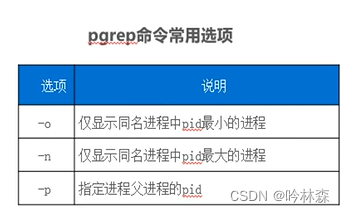
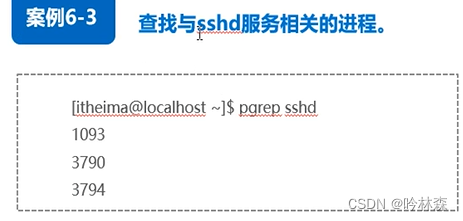
 4.pgrep命令
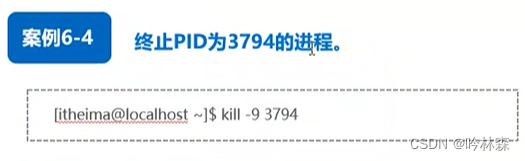
6.21进程终止命令
1.kill命令
发送某个信号给指定进程,以改变进程的状态,参数一般是PID
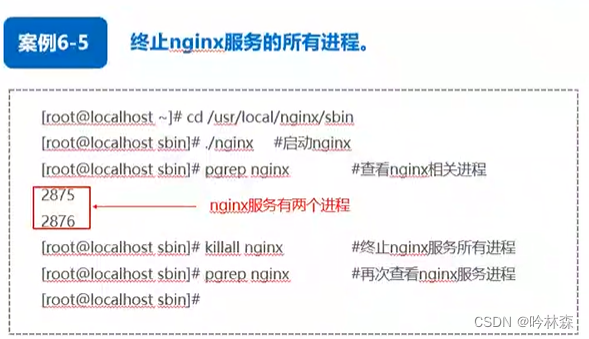
2.killall命令
killall命令用于终止某个服务对应所有的全部进程,参数一般为服务名称
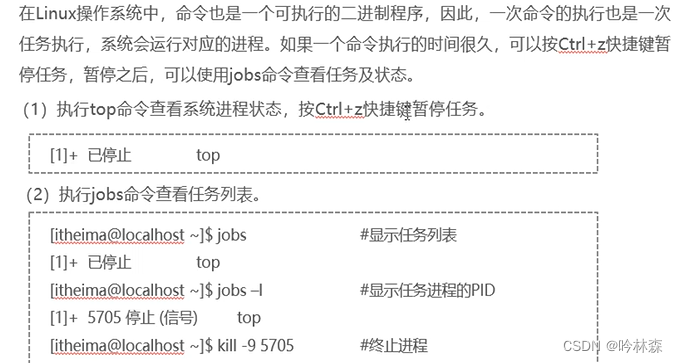
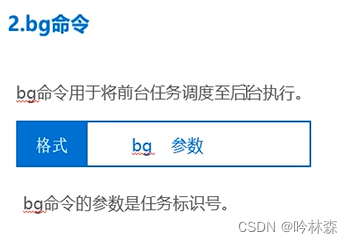
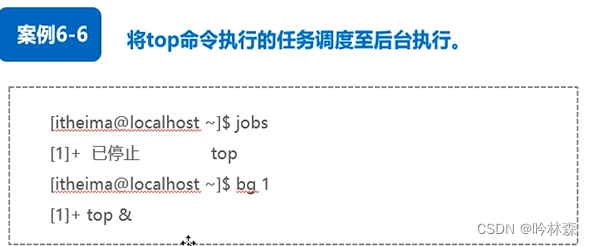
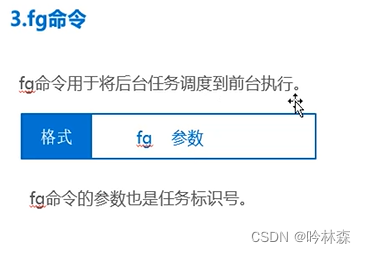
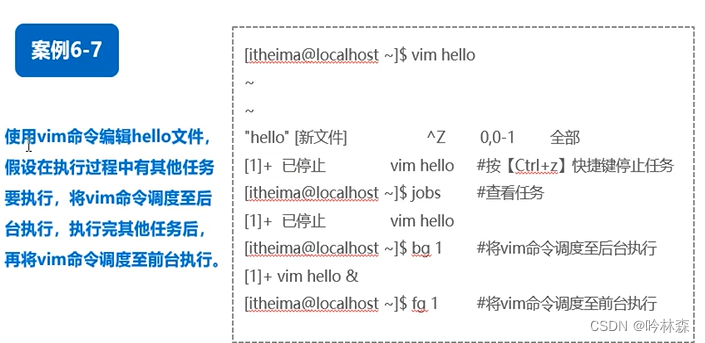
6.3任务的前台与后台调度
Linux系统中分为前台进程和后台进程
6.4服务管理


(2)启动
systemctl start httpd
(3)终止
systemctl stop httpd
(4)查看
systemctl status httpd
(5)设置开机自启动
systemctl enable httpd
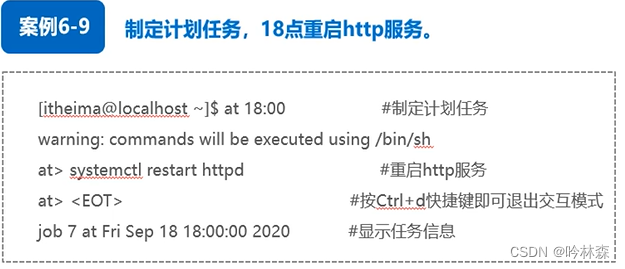
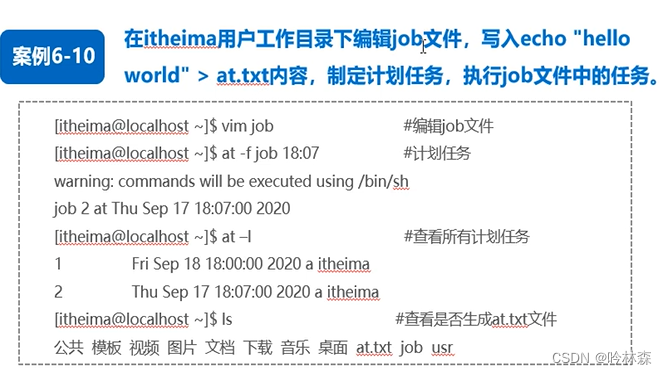
6.51at命令
at命令用于执行一次性计划任务,一般用于满足临时性的工作需求
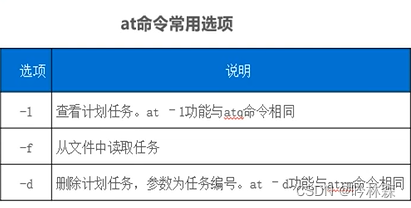

batch命令:相对于at命令,batch命令会在系统负载较低、资源比较空闲的时候执行,因此batch命令不指定时间
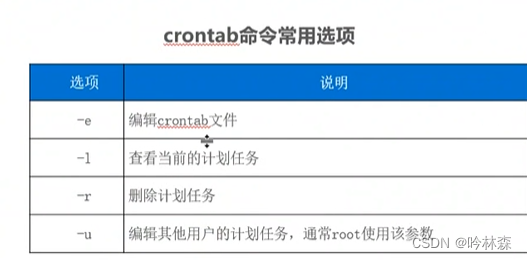
6.52crontab命令
at命令只能执行一次性命令,crontab命令可周期性重复执行某一任务
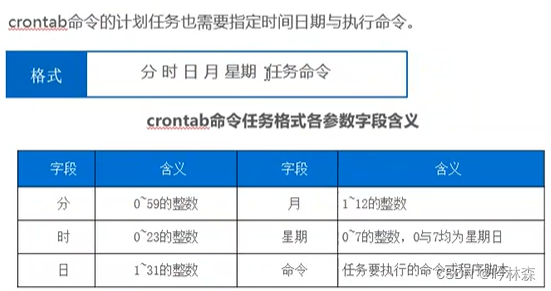
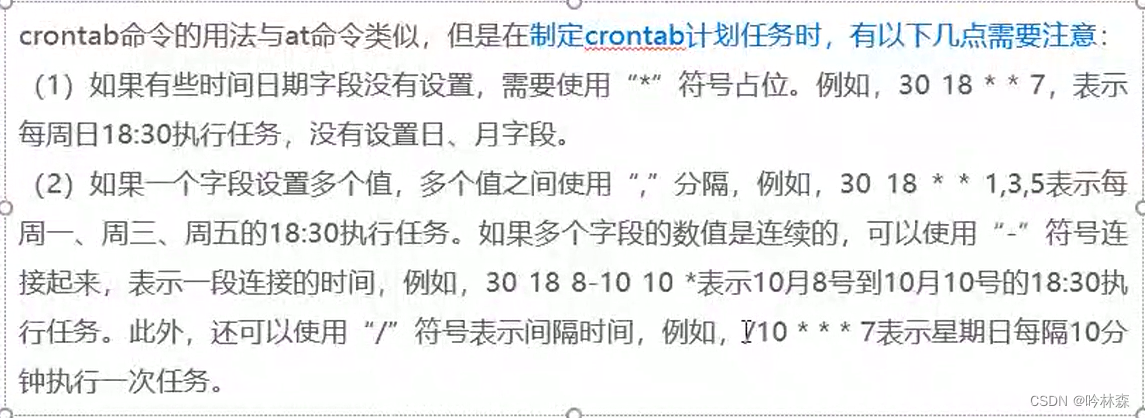
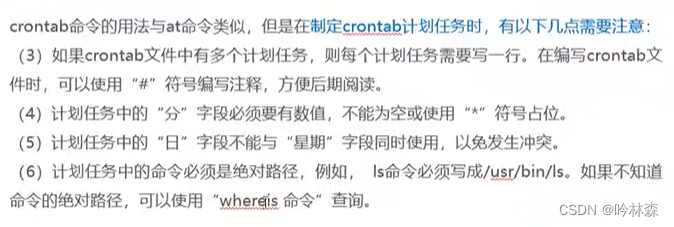
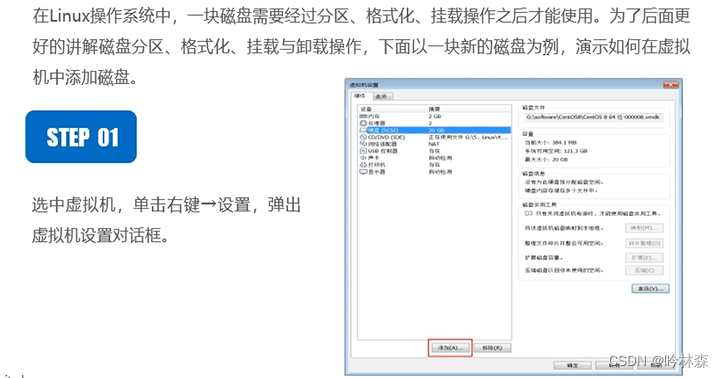
项目七 管理磁盘
7.11磁盘设备命名规则

7.12查看磁盘使用情况
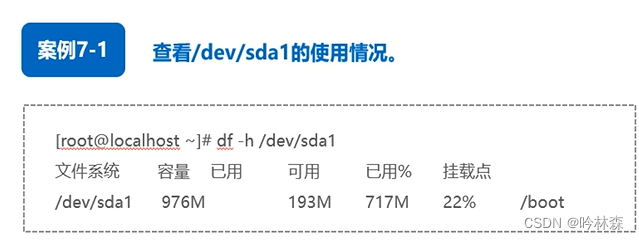
1.df命令
查看磁盘的使用情况,包括磁盘容量、已用空间大小、可用空间大小、磁盘使用率等信息。

2.du命令
用于查看文件或目录的磁盘占用情况


7.2添加磁盘
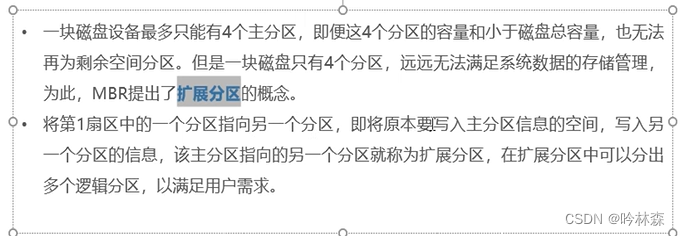
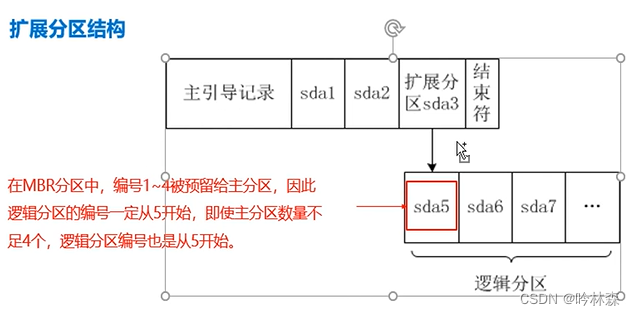
7.31MBR分区规则


7.32MBR分区管理
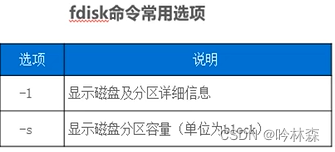
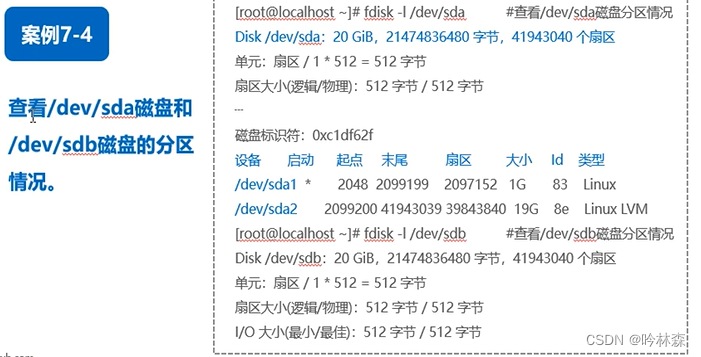
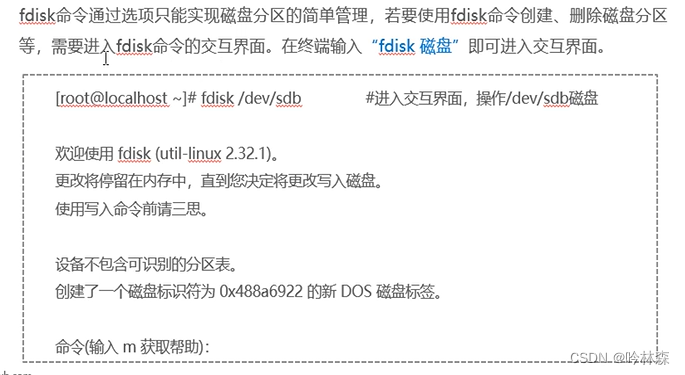
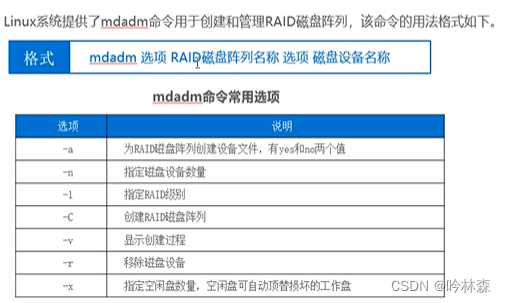
使用fdisk命令对磁盘分区进行管理,功能包括创建分区、删除分区、查看分区等。
7.33GPT分区规则

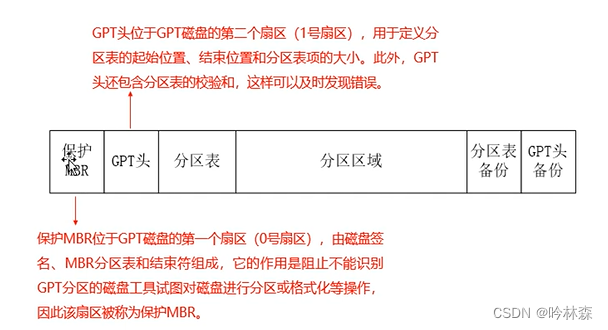

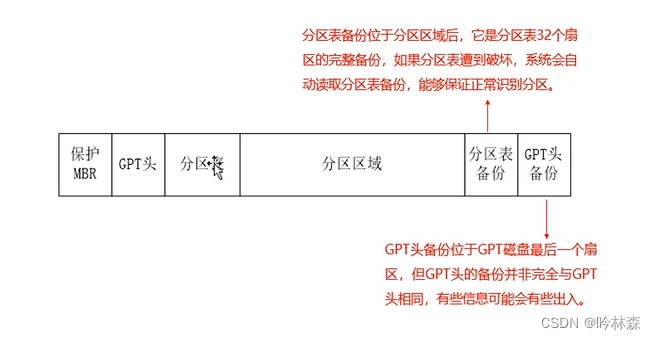
7.34GPT分区管理
使用parted命令,既可以管理MBR分区,也可以管理GPT分区(通常),

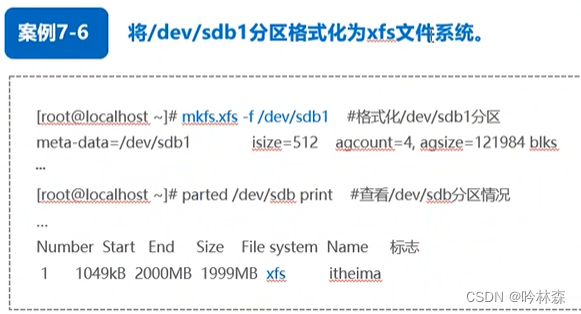
7.4格式化分区
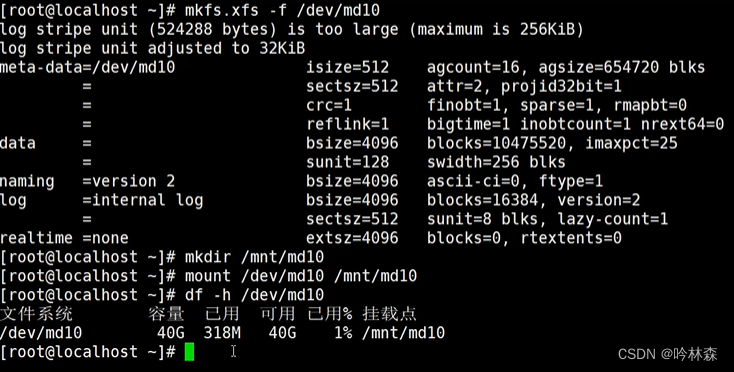
磁盘分区完成后,需要在分区上创建文件系统以规定数据的存储方式,在分区上创建文件系统就是格式化分区

进行格式化,设置文件系统ext4
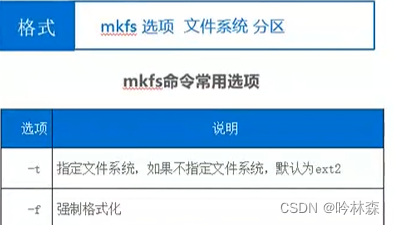
[root@localhost ~]# mkfs -t ext4  /dev/sdb1
[root@localhost ~]# parted /dev/sdb1  print
另一种方式:

7.51挂载
挂载就是将磁盘分区(或其他硬件设备)与一个目录进行关联,这样就可以在磁盘分区中存储数据,mount命令可用于实现磁盘分区色挂载

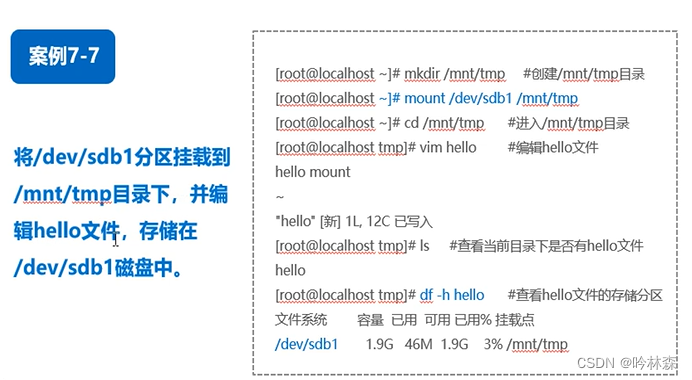
注意:mount命令挂载之后,系统重启,挂载会失效,想要挂载永久生效就必须把挂载信息按照一定的格式写入到/etc/fstab文件中


7.52查看挂载信息
(1)findmnt命令
用于快速查看设备的挂载信息

[root@localhost temp]# findmnt
[root@localhost temp]# findmnt  /dev/sdb1
TARGET    SOURCE    FSTYPE OPTIONS
/mnt/temp /dev/sdb1 xfs    rw,relatime,seclabel,attr2,inod
[root@localhost temp]#
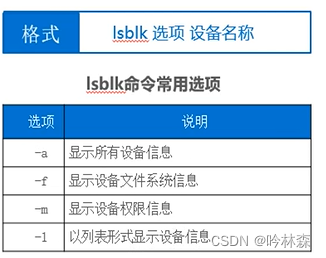
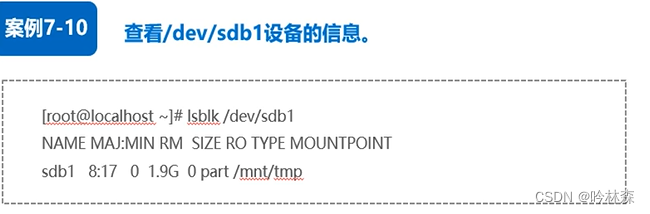
(1)lsblk命令
用于列出除了RAM盘之外所有可用的快设备信息,包括硬盘、闪存盘、CD-ROM等
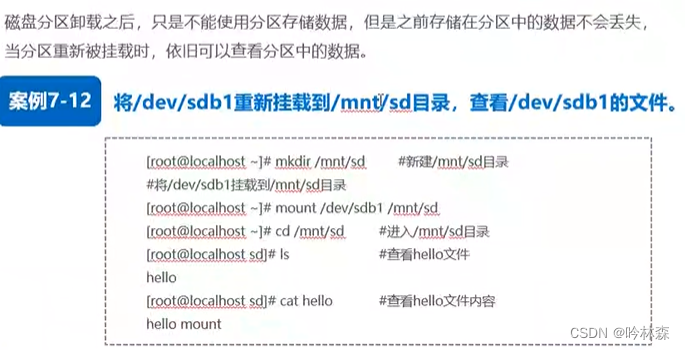
7.53卸载磁盘分区
就是取消磁盘分区与目录的关联关系umount,umount命令可以是磁盘分区,也可以是挂载目录

7.6LVM概述
逻辑卷管理机制是Linux系统管理磁盘分区的一种机制


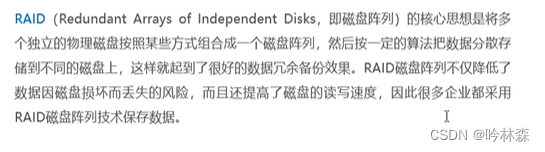
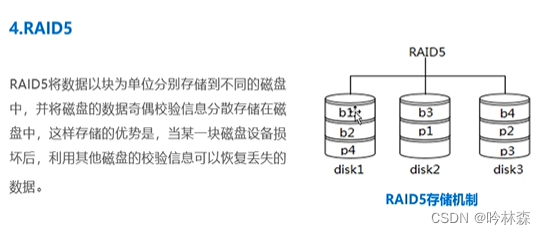
7.7RAID概述

7.71创建LVM逻辑卷

下一步:#vgcreate itcast /dev/sdb /dev/sdc
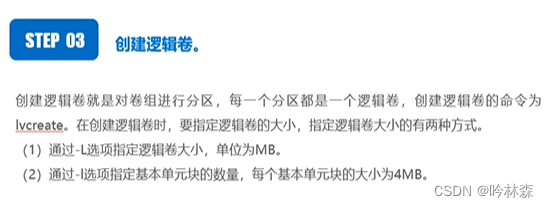
下一步:# lvcreate -n itcast1 -L 500M itcast
接着查看:# lvdisplay
紧跟:#cd itcast
下一步:#mkfs.xfs -f /dev/itcast/itcast1
接着:#mkdir /mnt/lvitcast
下一步:#mount /dev/itcast/itcast1 /mnt/lvitcast
接着:#findmnt /dev/itcast/itcast1
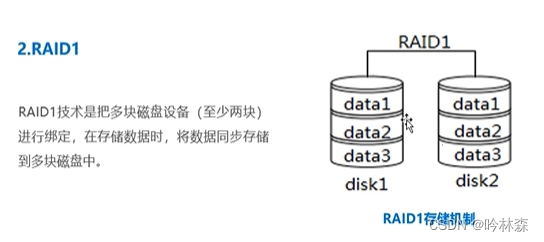
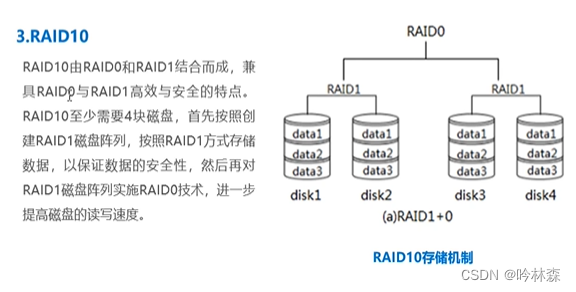
7.72部署RAID10

项目八 管理网络
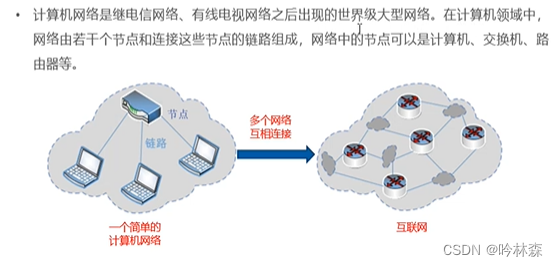
8.11计算机网路概述

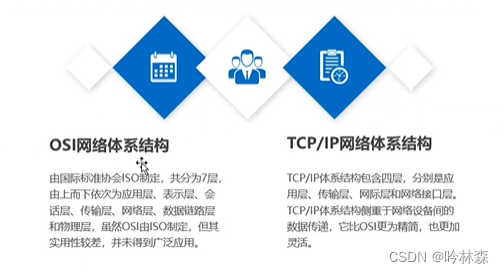
8.12网络协议与体系结构
网络通信必须遵守一定的协议规则,网络协议主要有语法、语义、同步3个要素
常见网络体系结构
8.13网络数据传输流程

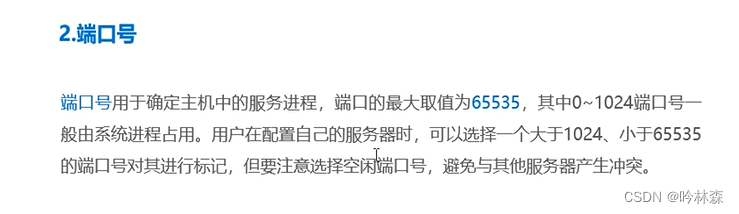
8.14IP地址与端口号
1.ip地址
是一种网络协议,也是网络中一台主机的唯一标识。


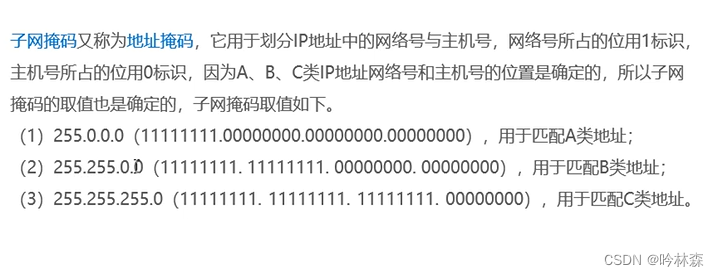
8.15子网掩码
8.21主机配置
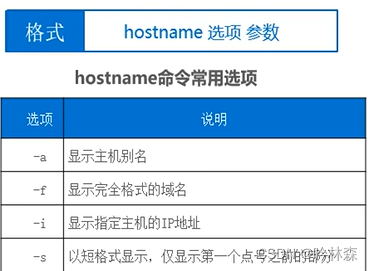
(1)hostname命令
用于查询、修改主机名
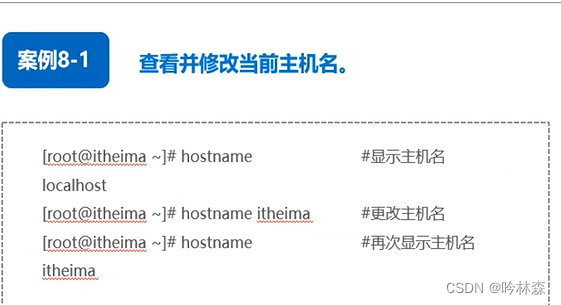
注意:hostname命令只是临时修改主机名,系统重启,新的主机名失效,若要使得新设置的主机名永久生效,可以在主机名配置文件/etc/hostname中修改
#vim /etc/hostname 写入内容:itheima(新主机名).localdomain
(2)hostnamectl命令
hostnamectl命令是CentOS7新增的命令,功能比hostname强大,定义3种主机名
临时主机名、静态主机名、高级主机名


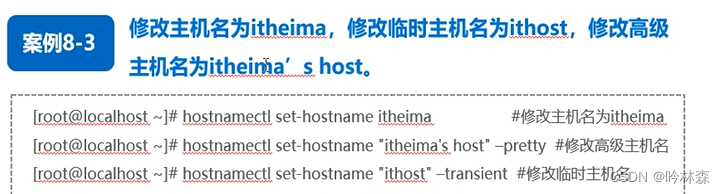
注意:使用hostnamectl命令修改主机名永久生效,设置主机名时主机名要用(" ")括起来,设置静态则不使用临时主机名
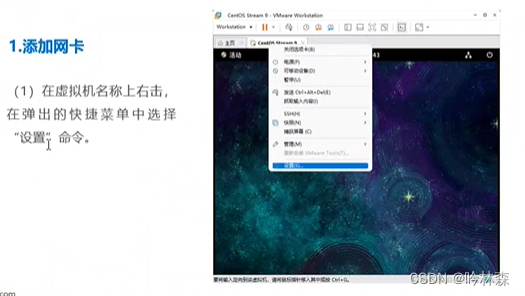
8.22网卡配置

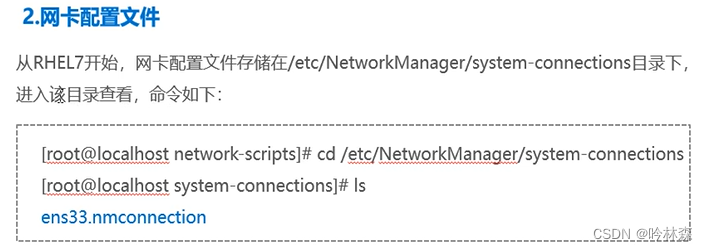

[root@localhost ~]# cd /etc/NetworkManager/system-connections/
[root@localhost system-connections]# ls
ens160.nmconnection
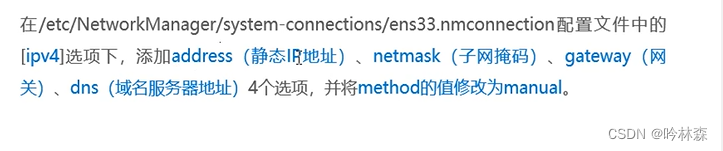
[root@localhost system-connections]# vim ens160.nmconnection
--编辑内容
method=mannual
address=192.168.132.200
netmask=255.255.255.0
gateway=192.168.132.2
dns=8.8.8.8
--保存退出
虚拟机(真实客户机不是远程控制工具)使用#nmcli c reload重启 ,重启ens160(其他型号)网卡 #nmcli c up ens160,使用# ip a查看是否配置成功!
8.31ping
用于测试主机之间网络的连通性


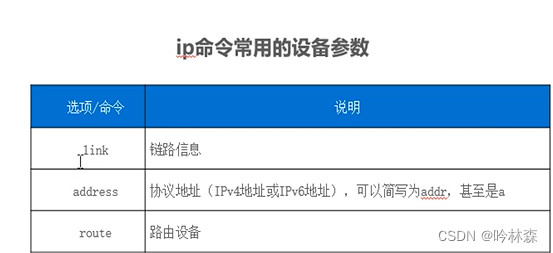
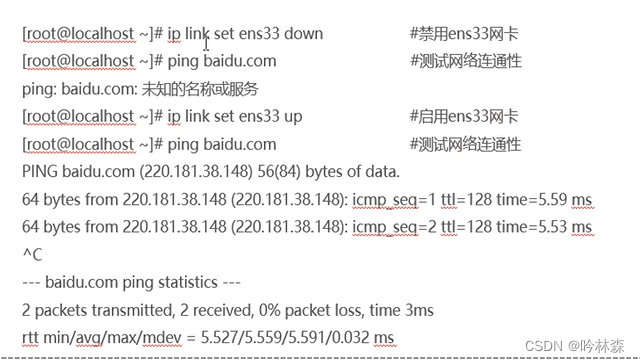
8.32ip命令
用于显示/配置网卡、路由、接口和隧道等网络设备的参数信息

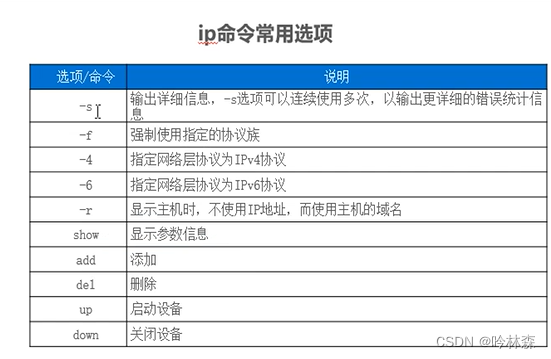
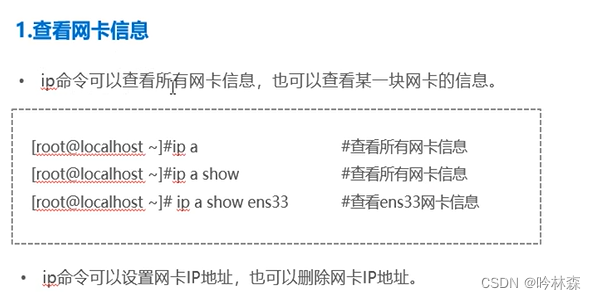
2.设置网卡IP地址
也可以用来删除网卡地址

3.禁用和启用网卡
ip命令的子命令down与up可以禁用、启用网卡
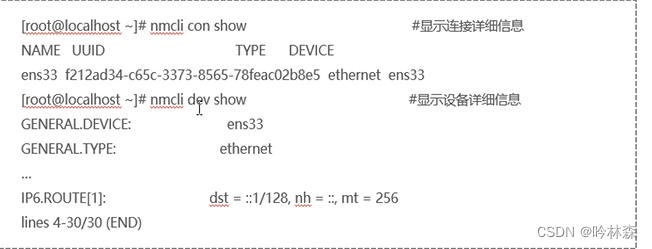
8.33nmcli命令
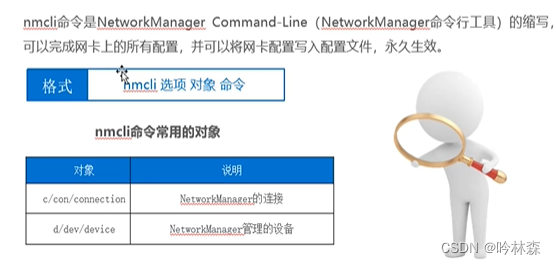
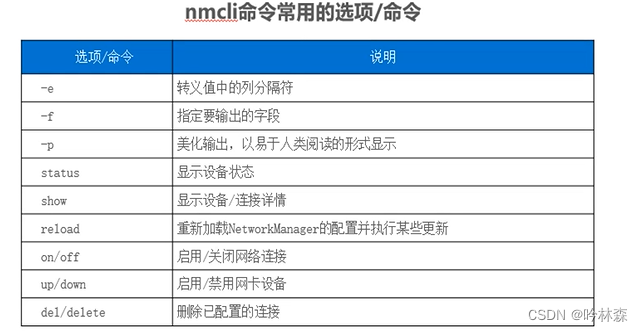
(1)显示连接和设备的详细信息
(2)查看设备的状态
[root@localhost ~]# nmcli dev status
DEVICE  TYPE      STATE         CONNECTION
ens160  ethernet  已连接        ens160
lo      loopback  连接(外部)  lo
[root@localhost ~]#
(3)重启网络
[root@localhost ~]# nmcli c reload
[root@localhost ~]#
(4)启用/关闭网络连接

(5)启用/禁用网卡

(6)删除连接

8.34 nslookup命令
nslookup命令用于查询域名
(1)查询www.baidu.com对应的IP地址
[root@localhost system-connections]# nslookup www.baidu.com
Server:         192.168.169.2
Address:        192.168.169.2#53

Non-authoritative answer:
www.baidu.com   canonical name = www.a.shifen.com.
Name:   www.a.shifen.com
Address: 183.240.98.161
Name:   www.a.shifen.com
Address: 120.232.145.185
Name:   www.a.shifen.com
Address: 2409:8c54:870:34e:0:ff:b024:1916
Name:   www.a.shifen.com
Address: 2409:8c54:870:67:0:ff:b0c2:ad75
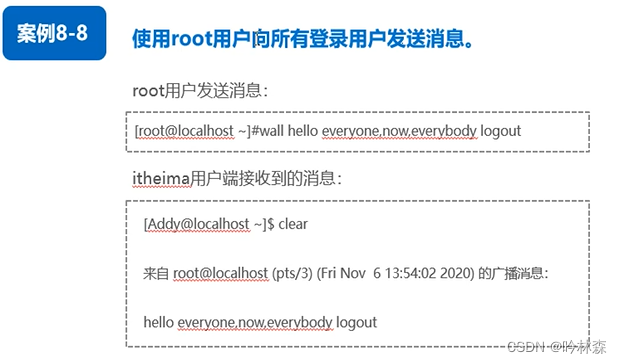
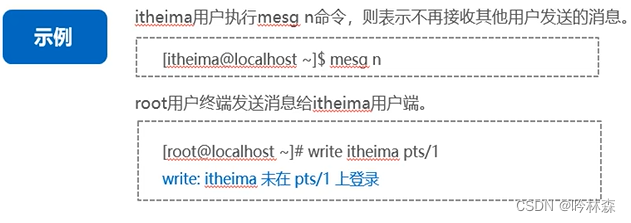
8.41write命令
write命令用于给其他登录用户发送实时消息


8.42 wall命令
wall命令是write all 的缩写,它用于向所有用户发送广播消息,当某个用户使用wall命令发送消息后,所有登录用户都能收到消息
8.43 mesg命令
mesg命令用于设置当前用户终端是否接受其他用户发送的消息 两个参数值 y(接收)和n(决绝接收)
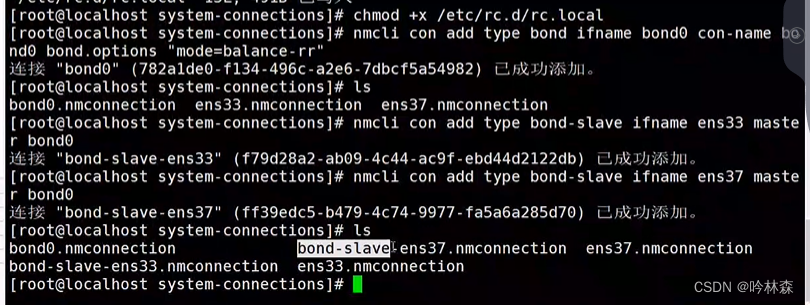
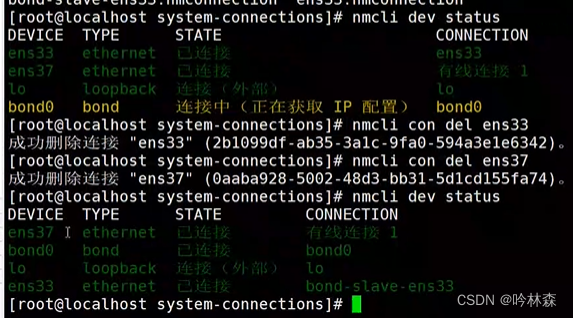
项目导入
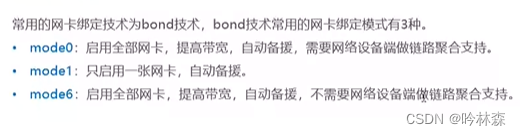
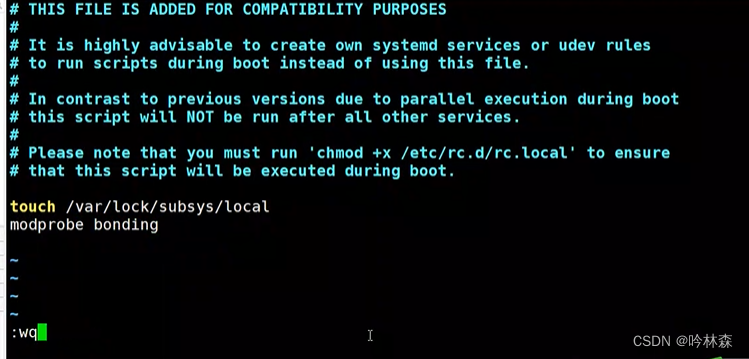
绑定双网卡


 2265
2265


 被折叠的 条评论
为什么被折叠?
被折叠的 条评论
为什么被折叠?
 到【灌水乐园】发言


