-
ListBox控件的常用用法:
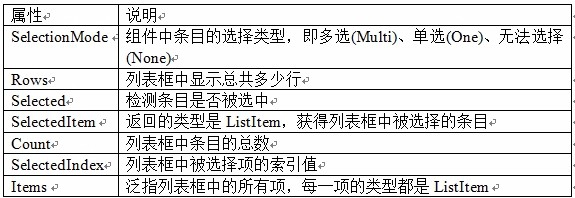
Ø 以下是其属性列表:

-
Ø 取列表框中被选中的值
取列表框中被选中的值可以使用ListBox.SelectedItem.ToString()进行获取,代码例子如下所示:
MessageBox.Show(listBox1.SelectedItem.ToString());
-
Ø 动态的添加列表框中的项
动态的添加列表框中的项可以使用ListBox.Items.Add("所要添加的项"); 来添加,代码例子如下所示:
listBox1.Items.Add("11");
listBox1.Items.Add("22");
listBox1.Items.Add("33");
listBox1.Items.Add("44");
-
Ø 移出指定项,代码如下所示:
//首先判断列表框中的项是否大于0
if(ListBox.Items.Count > 0 )
{
//移出选择的项
ListBox.Items.Remove(ListBox.SelectedItem);
}
-
Ø 清空所有项,使用如下代码:
if(ListBox.Items.Count > 0 )
{
//清空所有项
ListBox.Items.Clear();
}
-
Ø 列表框可以一次选择多项:
若要设置列表框可以一次选择多项,可以设置列表框的SelectionMode属性,即SelectionMode=MultiExtended或MultiSimple,如下所示:


-
Ø 两个列表框联动,即两级联动菜单,使用如下代码:
//判断第一个列表框中被选中的值
switch (listBox1.SelectedItem.ToString())
{
case "22" :
{
listBox1.Items.Clear();
listBox1.Items.Add("A1");
listBox1.Items.Add("A2");
listBox1.Items.Add("A3");
break;
}
default:
{
listBox1.Items.Clear();
listBox1.Items.Add("B1");
listBox1.Items.Add("B2");
listBox1.Items.Add("B3");
break;
}
}
-
Ø 实现列表框中项的移位
实现列表框中项的移位,也就是向上移位和向下移位。具体的思路为:创建一个ListBox对象,并把要移位的项先暂放在这个对象中。如果是向上移位,就是把当前选定项的的上一项的值赋给当前选定的项,然后把刚才新加入的对象的值,再附给当前选定项的前一项。具体代码如下所示:
//ListBox里的项向上移动
try
{
string item = listBox1.SelectedItem.ToString();
int i = listBox1.SelectedIndex;
if (i == 0)
return;
listBox1.Items.Remove(listBox1.SelectedItem.ToString());
listBox1.Items.Insert(i - 1, item);
listBox1.SelectedIndex = i - 1;
}
catch (Exception)
{
MessageBox.Show("未选择项");
}
//ListBox里的项向下移动
try
{
string item = listBox1.SelectedItem.ToString();
int i = listBox1.SelectedIndex;
if (i == listBox1.Items.Count - 1)
return;
listBox1.Items.Remove(listBox1.SelectedItem.ToString());
listBox1.Items.Insert(i + 1, item);
listBox1.SelectedIndex = i + 1;
}
catch (Exception)
{
MessageBox.Show("未选择项");
}
-
Ø 移动指针到指定位置
l 移至首条,将被选中项的索引设置为0就可以了,即ListBox.SelectedIndex=0;
l 移至尾条,将被选中项的索引设置为ListBox.Items.Count-1就可以了,即
ListBox.SelectIndex=ListBox.Items.Count-1;
l 移动到上一条,用当前被选中的索引去减1,代码如下所示:
ListBox.SelectedIndex=ListBox.SelectedIndex - 1;
l 移动到下一条,用当前被选中的索引去加1,代码如下所示:
ListBox.SelectedIndex=ListBox.SelectedIndex + 1;
ListBox笔记
于 2024-08-12 17:12:34 首次发布


 256
256

 被折叠的 条评论
为什么被折叠?


