


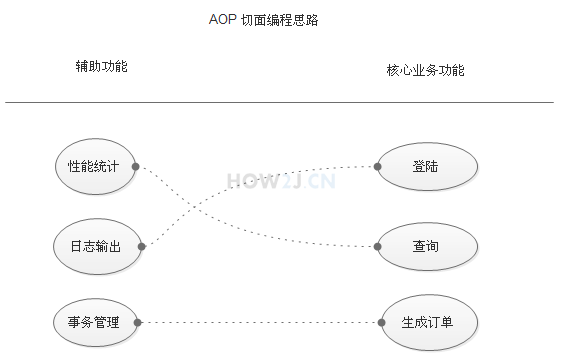
一、练习how2j面向sop的编程,理解面向对象编程的含义
1. 功能分两大类,辅助功能和核心业务功能
2. 辅助功能和核心业务功能彼此独立进行开发
3. 比如登陆功能,即便是没有性能统计和日志输出,也可以正常运行
4. 如果有需要,就把"日志输出" 功能和 "登陆" 功能 编织在一起,这样登陆的时候,就可以看到日志输出了
5. 辅助功能,又叫做切面,这种能够选择性的,低耦合的把切面和核心业务功能结合在一起的编程思想,就叫做切面编程
package com.how2java.service;

public class ProductService {

    public void doSomeService(){

        System.out.println("doSomeService");

    }

}
package com.how2java.test;
import org.springframework.context.ApplicationContext;
import org.springframework.context.support.ClassPathXmlApplicationContext;
import com.how2java.service.ProductService;
public class TestSpring {
public static void main(String[] args) {
ApplicationContext context = new ClassPathXmlApplicationContext(new String[] { "applicationContext.xml" });
ProductService s = (ProductService) context.getBean("s");
s.doSomeService();
}
}package com.how2java.aspect;
import org.aspectj.lang.ProceedingJoinPoint;
public class LoggerAspect {
public Object log(ProceedingJoinPoint joinPoint) throws Throwable {
System.out.println("start log:" + joinPoint.getSignature().getName());
Object object = joinPoint.proceed();
System.out.println("end log:" + joinPoint.getSignature().getName());
return object;
}
}<?xml version="1.0" encoding="UTF-8"?>
<beans xmlns="http://www.springframework.org/schema/beans"
xmlns:xsi="http://www.w3.org/2001/XMLSchema-instance"
xmlns:aop="http://www.springframework.org/schema/aop"
xmlns:tx="http://www.springframework.org/schema/tx"
xmlns:context="http://www.springframework.org/schema/context"
xsi:schemaLocation="
http://www.springframework.org/schema/beans
http://www.springframework.org/schema/beans/spring-beans-3.0.xsd
http://www.springframework.org/schema/aop
http://www.springframework.org/schema/aop/spring-aop-3.0.xsd
http://www.springframework.org/schema/tx
http://www.springframework.org/schema/tx/spring-tx-3.0.xsd
http://www.springframework.org/schema/context
http://www.springframework.org/schema/context/spring-context-3.0.xsd">
<bean name="c" class="com.how2java.pojo.Category">
<property name="name" value="yyy" />
</bean>
<bean name="p" class="com.how2java.pojo.Product">
<property name="name" value="product1" />
<property name="category" ref="c" />
</bean>
<bean name="s" class="com.how2java.service.ProductService">
</bean>
<bean id="loggerAspect" class="com.how2java.aspect.LoggerAspect"/>
<aop:config>
<aop:pointcut id="loggerCutpoint"
expression=
"execution(* com.how2java.service.ProductService.*(..)) "/>
<aop:aspect id="logAspect" ref="loggerAspect">
<aop:around pointcut-ref="loggerCutpoint" method="log"/>
</aop:aspect>
</aop:config>
</beans>package com.how2java.test;
import org.springframework.context.ApplicationContext;
import org.springframework.context.support.ClassPathXmlApplicationContext;
import com.how2java.service.ProductService;
public class TestSpring {
public static void main(String[] args) {
ApplicationContext context = new ClassPathXmlApplicationContext(
new String[] { "applicationContext.xml" });
ProductService s = (ProductService) context.getBean("s");
s.doSomeService();
}
} 
二、练习p262 11-6的案例,体会编程式事务管理
理解:通过编写代码实现事务管理,创建类TransactionExample定义添加数学的方法,在方法中执行两次添加数据库操作并用事务保护操作,以匿名类的方式定义transactioncallback接口的实现来处理事务管理,在transaction operation()方法中执行两次添加操作的语句之间添加两句代码制造人为的异常,即第一条操作语句执行成功,第二条操作语句因为程序的异常无法执行成功。如果事物成功回滚,说明事务配置成功。
1.applicationContext.xml
<?xml version="1.0" encoding="UTF-8"?>
<beans
	xmlns="http://www.springframework.org/schema/beans"
	xmlns:xsi="http://www.w3.org/2001/XMLSchema-instance"
	xsi:schemaLocation="http://www.springframework.org/schema/beans http://www.springframework.org/schema/beans/spring-beans-2.5.xsd">

	<bean id="dataSource"
		class="org.springframework.jdbc.datasource.DriverManagerDataSource">
		<property name="driverClassName">
			<value>com.mysql.jdbc.Driver</value>
		</property>
		<property name="url">
			<value>jdbc:mysql://localhost:3306/how2java
			</value>
		</property>
		<property name="username">
			<value>root</value>
		</property>
		<property name="password">
			<value>root</value>
		</property>
	</bean>

	<bean id="transactionTemplate" class="org.springframework.transaction.support.TransactionTemplate">
		<property name="transactionManager">
			<ref bean="transactionManager"/>
		</property>
		<property name="propagationBehaviorName">
			<value>PROPAGATION_REQUIRED</value>
		</property>
	</bean>

	<bean id="transactionManager"
		class="org.springframework.jdbc.datasource.DataSourceTransactionManager">
		<property name="dataSource">
			<ref bean="dataSource" />
		</property>
	</bean>

	<bean id="transactionExample"
		class="com.mr.transaction.TransactionExample">
		<property name="dataSource">
			<ref bean="dataSource" />
		</property>
		<property name="transactionManager">
			<ref bean="transactionManager" />
		</property>
		<property name="transactionTemplate">
			<ref bean="transactionTemplate"/>
		</property>
	</bean>
</beans>
2.
package com.mr.transaction;
import java.sql.Connection;
import java.sql.Statement;
import javax.sql.DataSource;
import org.springframework.jdbc.datasource.DataSourceUtils;
import org.springframework.transaction.PlatformTransactionManager;
import org.springframework.transaction.TransactionStatus;
import org.springframework.transaction.support.TransactionCallback;
import org.springframework.transaction.support.TransactionTemplate;
public class TransactionExample {
DataSource dataSource;//注入数据源
PlatformTransactionManager transactionManager;//注入事务管理器
TransactionTemplate transactionTemplate;//注入TransactionTemplate模板
public DataSource getDataSource() {
return dataSource;
}
public void setDataSource(DataSource dataSource) {
this.dataSource = dataSource;
}
public PlatformTransactionManager getTransactionManager() {
return transactionManager;
}
public void setTransactionManager(PlatformTransactionManager transactionManager) {
this.transactionManager = transactionManager;
}
public TransactionTemplate getTransactionTemplate() {
return transactionTemplate;
}
public void setTransactionTemplate(TransactionTemplate transactionTemplate) {
this.transactionTemplate = transactionTemplate;
}
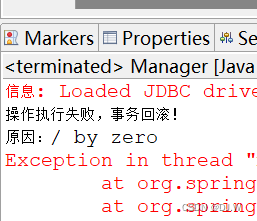
public void transactionOperation() {
transactionTemplate.execute(new TransactionCallback() {
public Object doInTransaction(TransactionStatus status) {
Connection conn = DataSourceUtils.getConnection(dataSource);//获得数据库连接
try {
Statement stmt = conn.createStatement();
//执行两次添加方法
stmt.execute("insert into tb_user(name,age,sex) values('小强','26','男')");
int a=0;//制造异常测试事务是否配置成功
a=9/a;
stmt.execute("insert into tb_user(name,age,sex) values('小红','22','女')");
System.out.println("操作执行成功!");
} catch (Exception e) {
transactionManager.rollback(status);//事务回滚
System.out.println("操作执行失败,事务回滚!");
System.out.println("原因:"+e.getMessage());
}
return null;
}
});
}
}
package com.mr.main;

import org.springframework.context.ApplicationContext;
import org.springframework.context.support.ClassPathXmlApplicationContext;

import com.mr.transaction.TransactionExample;


public class Manager {

    public static void main(String[] args) {
        ApplicationContext factory = new ClassPathXmlApplicationContext("applicationContext.xml");            //装载配置文件
        TransactionExample transactionExample = (TransactionExample) factory.getBean("transactionExample");//获取UserDAO
        transactionExample.transactionOperation();//执行添加方法
    }
}
2.结果
三、练习p263 11-7的案例,体会声明式事务管理
理解:二者的区别是声明式事务管理通过aop实现,在使用时无需编写代码,即可通过实现基于容器的事务管理。
1.applicationContext.xml
<?xml version="1.0" encoding="UTF-8"?>
<beans
	xmlns="http://www.springframework.org/schema/beans"
	xmlns:xsi="http://www.w3.org/2001/XMLSchema-instance"
	xsi:schemaLocation="http://www.springframework.org/schema/beans http://www.springframework.org/schema/beans/spring-beans-2.5.xsd">

	<bean id="dataSource"
		class="org.springframework.jdbc.datasource.DriverManagerDataSource">
		<property name="driverClassName">
			<value>com.mysql.jdbc.Driver</value>
		</property>
		<property name="url">
			<value>jdbc:mysql://localhost:3306/how2java</value>
		</property>
		<property name="username">
			<value>root</value>
		</property>
		<property name="password">
			<value>root</value>
		</property>
	</bean>

	<bean id="transactionManager"
		class="org.springframework.jdbc.datasource.DataSourceTransactionManager">
		<property name="dataSource">
			<ref bean="dataSource" />
		</property>
	</bean>

	<bean id="transactionProxy"
		class="org.springframework.transaction.interceptor.TransactionProxyFactoryBean">
		<property name="transactionManager">
			<ref local="transactionManager" />
		</property>
		<property name="target">
			<bean id="addDAO" class="com.mr.dao.AddDAO">
				<property name="dataSource">
					<ref local="dataSource" />
				</property>
			</bean>
		</property>
		<property name="proxyTargetClass" value="true" />
		<property name="transactionAttributes">
			<props>
				<prop key="add*">PROPAGATION_REQUIRED</prop>
			</props>
		</property>
	</bean>
</beans>
package com.mr.dao;
import org.springframework.jdbc.core.support.JdbcDaoSupport;
import com.mr.user.User;
public class AddDAO extends JdbcDaoSupport {
//添加用户的方法
public void addUser(User user){
//执行添加方法的sql语句
String sql="insert into tb_user (name,age,sex) values('" +
user.getName() + "','" + user.getAge()+ "','" + user.getSex()+ "')";
//执行两次添加方法
getJdbcTemplate().execute(sql);
int a=0;//制造异常测试事务是否配置成功
a=9/a;
getJdbcTemplate().execute(sql);
}
}
package com.mr.user;

public class User {

    private String name;//姓名

    private Integer age;//年龄

    private String sex;//性别

    public String getName() {
        return name;
    }

    public void setName(String name) {
        this.name = name;
    }

    public Integer getAge() {
        return age;
    }

    public void setAge(Integer age) {
        this.age = age;
    }

    public String getSex() {
        return sex;
    }

    public void setSex(String sex) {
        this.sex = sex;
    }
}
package com.mr.main;

import org.springframework.context.ApplicationContext;
import org.springframework.context.support.ClassPathXmlApplicationContext;

import com.mr.dao.AddDAO;
import com.mr.user.User;

public class Manager {
    public static void main(String[] args) {
    	ApplicationContext factory = new ClassPathXmlApplicationContext("applicationContext.xml");  //装载配置文件
        AddDAO addDAO = (AddDAO)factory.getBean("transactionProxy");//获取AddDAO
        User user = new User();//实例化User实体对象
        user.setName("蔚蓝");//设置姓名
        user.setAge(30);//设置年龄
        user.setSex("男");//设置性别
        addDAO.addUser(user);//执行数据库添加方法
    }
}
2.结果
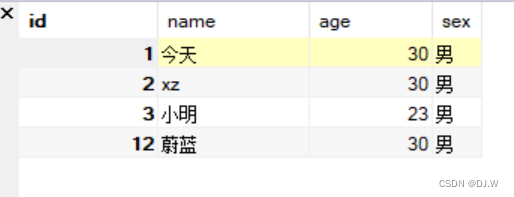


 1051
1051


 被折叠的 条评论
为什么被折叠?
被折叠的 条评论
为什么被折叠?
 到【灌水乐园】发言


