


MQ基础
MQ入门
- 同步调用
- 优点:时效性强,等待结果后才返回
- 缺点:
- 可扩展性差:业务规模不断扩大,越来越臃肿
- 性能低:需要等待别人执行完结果后才向下执行,导致业务耗时长
- 耦合度太高:(级联失败) 一个服务失败会影响另外一个事务回滚,交易失败
- 异步调用
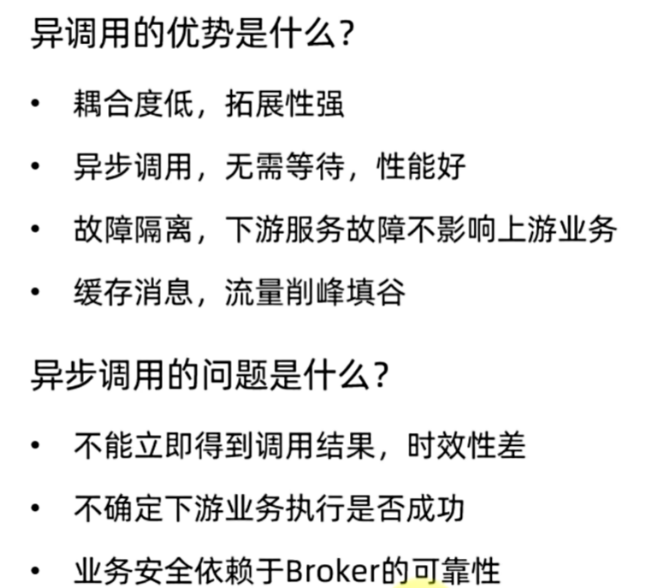
- 优点:
- 耦合度低,扩展性强
- 异步调用,无需等待,性能好
- 故障隔离,下游服务故障不影响上游服务
- 缓存消息,流量削峰填谷
- 缺点:
- 失效性差:不能立即得到结果
- 耦合度低导致业务之间不能确定执行是否成功
- 完全依靠消息代理(Broker)的可靠性
- 优点:
详细
同步调用


异步调用
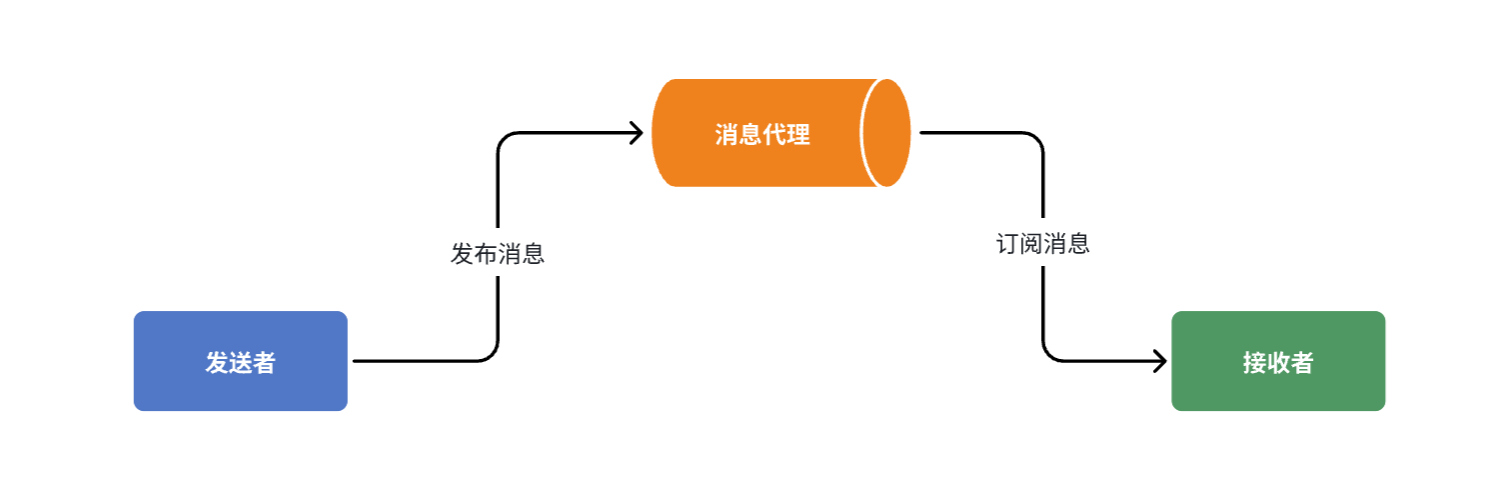
异步调用方式其实就是基于消息通知的方式,一般包含三个角色:
- 消息发送者:投递消息的人,就是原来的调用方
- 消息Broker:管理、暂存、转发消息,你可以把它理解成微信服务器
- 消息接收者:接收和处理消息的人,就是原来的服务提供方

| RabbitMQ | ActiveMQ | RocketMQ | Kafka | |
|---|---|---|---|---|
| 公司/社区 | Rabbit | Apache | 阿里 | Apache |
| 开发语言 | Erlang | Java | Java | Scala&Java |
| 协议支持 | AMQP,XMPP,SMTP,STOMP | OpenWire,STOMP,REST,XMPP,AMQP | 自定义协议 | 自定义协议 |
| 可用性 | 高 | 一般 | 高 | 高 |
| 单机吞吐量 | 一般 | 差 | 高 | 非常高 |
| 消息延迟 | 微秒级 | 毫秒级 | 毫秒级 | 毫秒以内 |
| 消息可靠性 | 高 | 一般 | 高 | 一般 |
前国内消息队列使用最多的还是RabbitMQ,超大型企业大数据等用的比较多的是Kafka
RabbitMQ安装
docker load -i mq.tar 加载下载的镜像
docker run \
 -e RABBITMQ_DEFAULT_USER=itheima \
 -e RABBITMQ_DEFAULT_PASS=123321 \
 -v mq-plugins:/plugins \
 --name mq \
 --hostname mq \
 -p 15672:15672 \
 -p 5672:5672 \
 --network hm-net\
 -d \
 rabbitmq:3.8-management
访问 http://192.168.100.128:15672
Rabbit账户:itheima 密码:123321
RabbitMQ入门
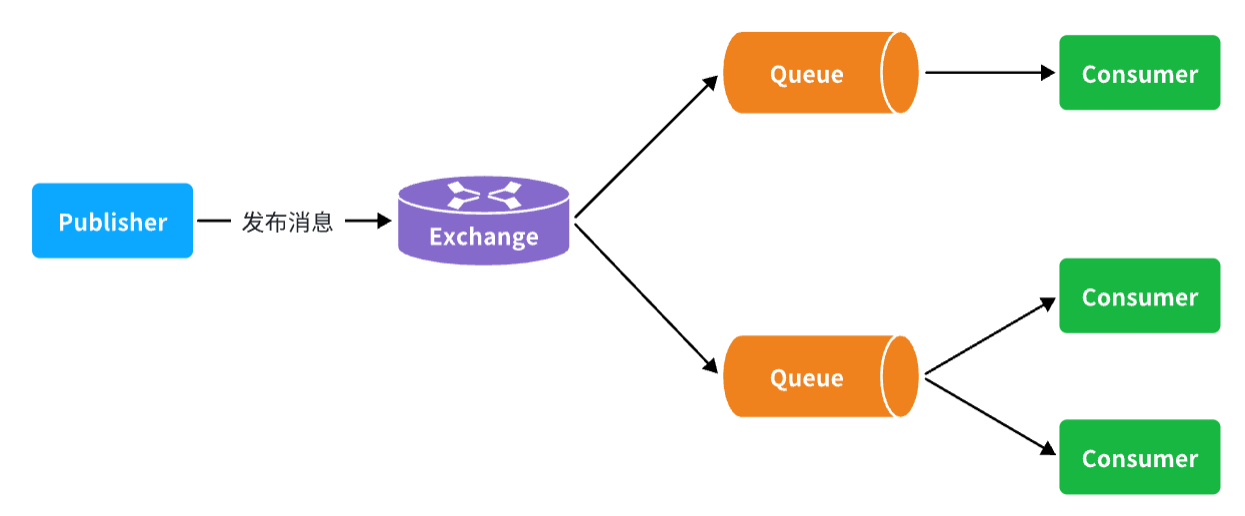
- 交换机:只负责路由转发消息到队列,不存储消息
- 交换机和队列要绑定,才能发送消息
- 流程: 发消息的 -> 交换机 -> 队列 -> 接受消息的
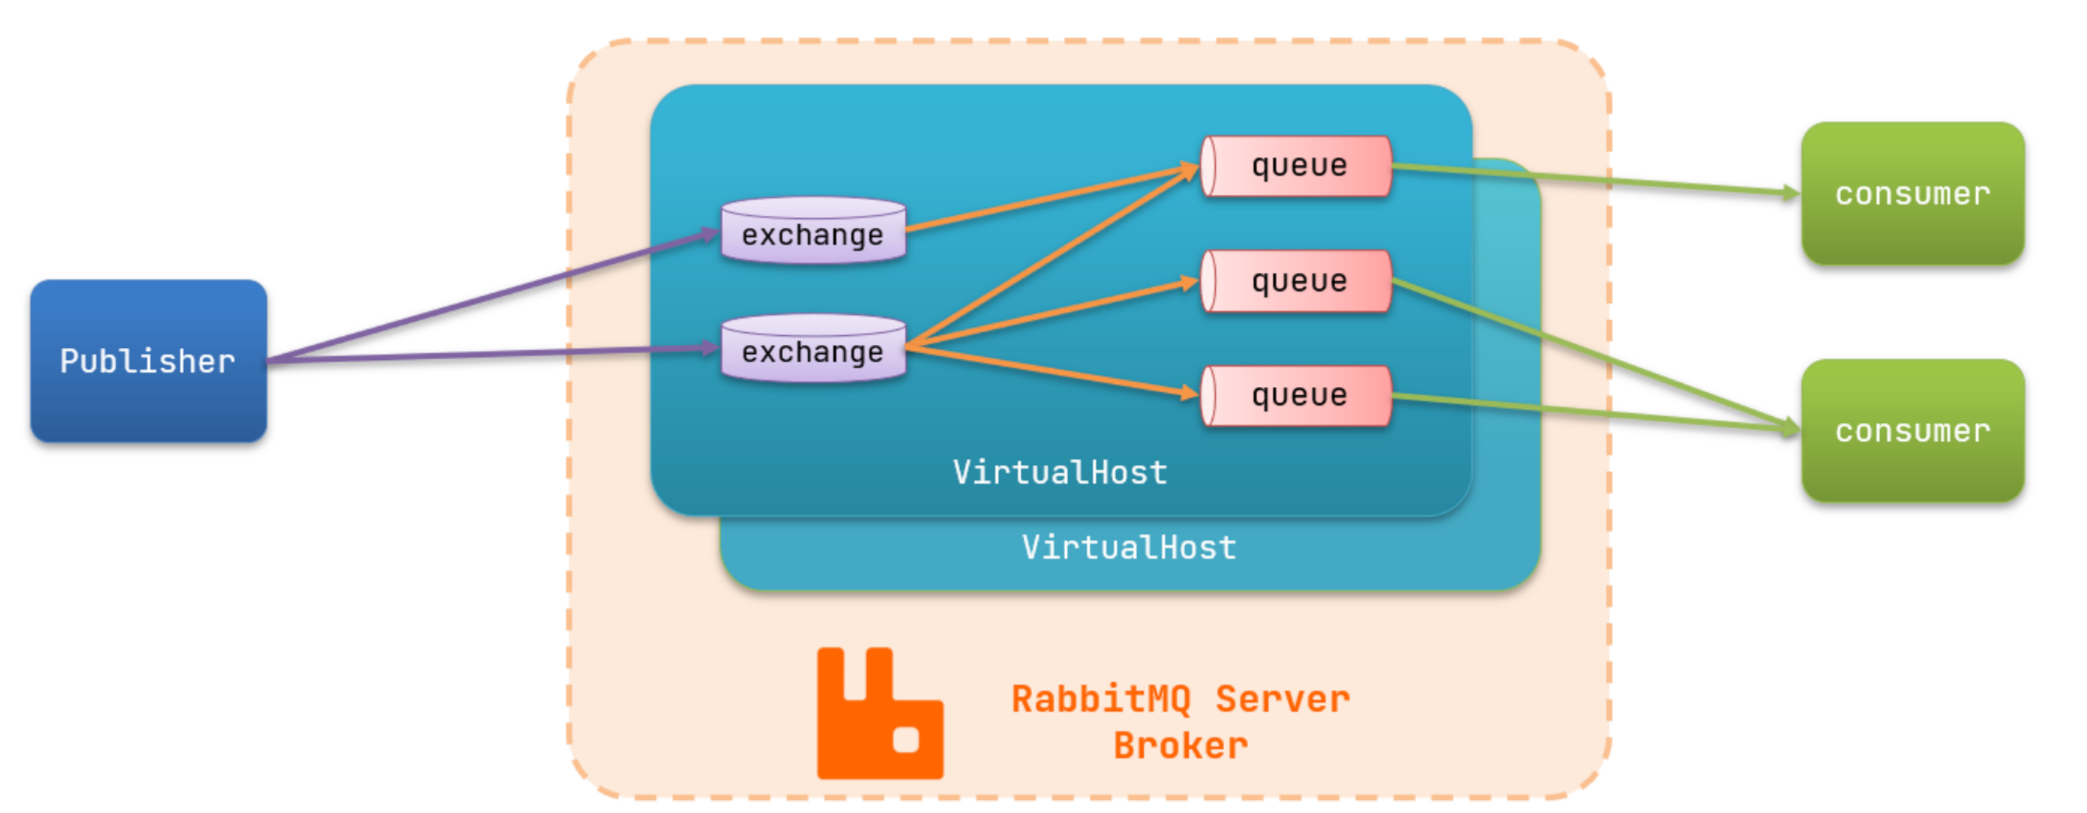
publisher:生产者,也就是发送消息的一方consumer:消费者,也就是消费消息的一方queue:队列,存储消息。生产者投递的消息会暂存在消息队列中,等待消费者处理exchange:交换机,负责消息路由。生产者发送的消息由交换机决定投递到哪个队列。virtual host:虚拟主机,起到数据隔离的作用。每个虚拟主机相互独立,有各自的exchange、queue
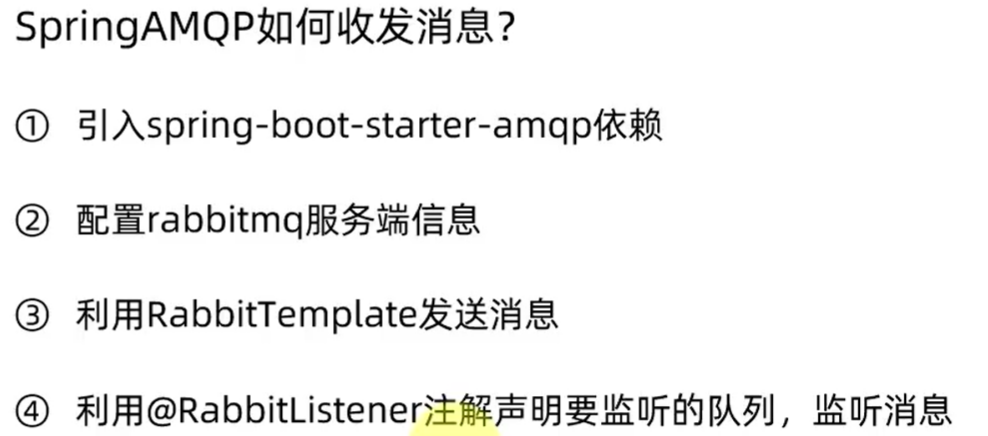
3.SpringAMQP
SpringAMQP
Spring基于RabbitMQ提供的模板
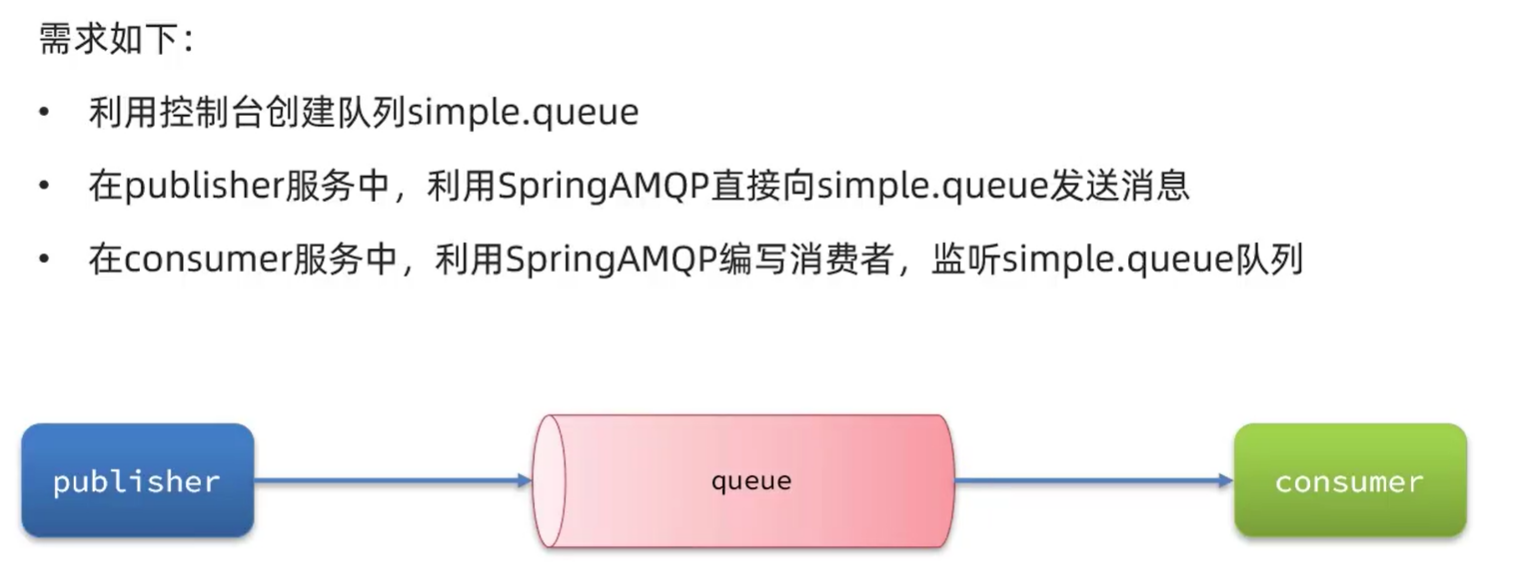
入门案例
- 在MQ控制台创建消息队列
- 在生产者(发送消息的)和消费者(接受消息的)中引入SpringAMQP依赖和配置文件
- 对于生产者:利用RabbiTemplate来发送消息
- 对于消费者:然后方法上利用@RabbitListener注解来监听队列,监听消息
- 类上要有@Component注解
过程
配置
 <!--AMQP依赖,包含RabbitMQ-->
<dependency>
    <groupId>org.springframework.boot</groupId>
    <artifactId>spring-boot-starter-amqp</artifactId>
</dependency>
spring:
  rabbitmq:
    host: 192.168.100.128 # 你的虚拟机IP
    port: 5672 # 端口
    virtual-host: /hmall # 虚拟主机
    username: hmall # 用户名
    password: 123 # 密码
控制台新建一个队列:simple.queue
生产者
@SpringBootTest
class SpringAmqpTest {

    @Autowired
    private RabbitTemplate rabbitTemplate;
    @Test
    public void test(){
        //队列名称
        String queueName="simple.queue";
        //发送的消息
        String message="hello-world!!";
        //发送消息
        rabbitTemplate.convertAndSend(queueName,message);
    }
}
消费者
@Slf4j
@Component
public class SpringRabbitListener {
    @RabbitListener(queues = "simple.queue")
    public void listenSimpleQueue(String message){
        log.info("监听的simple.queue消息为"+message);
    }
}
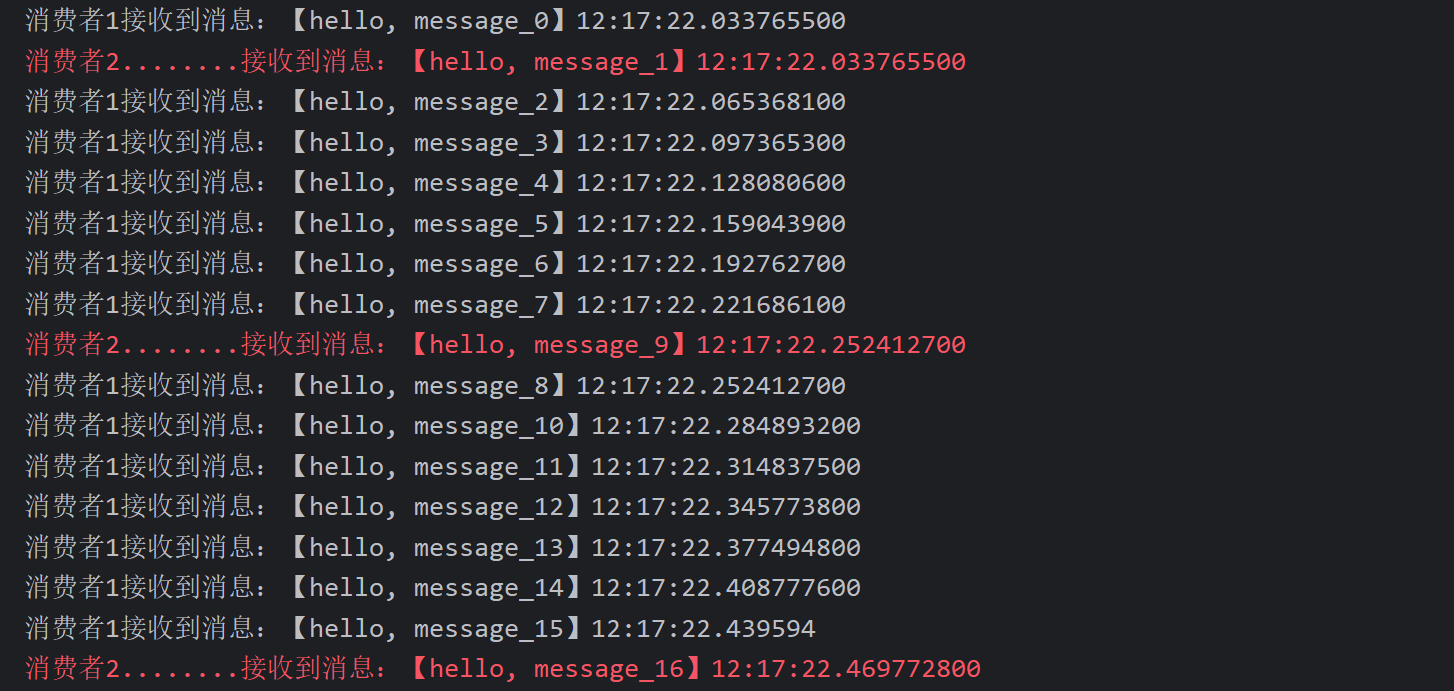
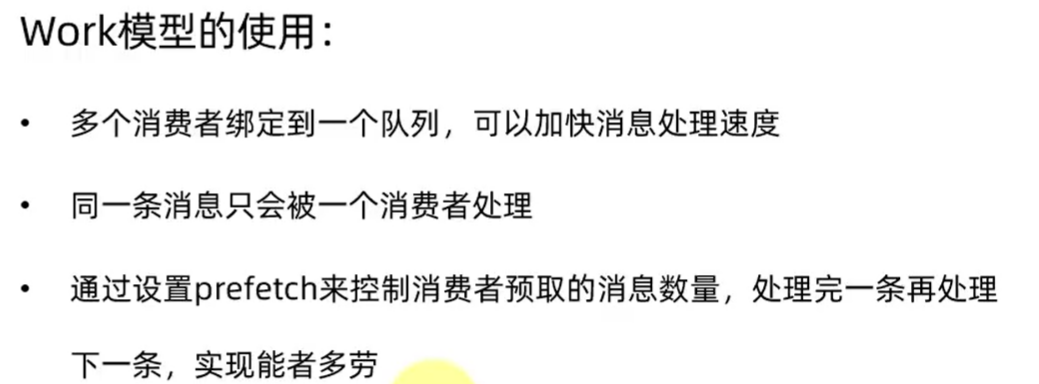
WorQueues模型
-
workqueue:让多个消费者绑定一个队列中,共同消费队列中的消息
-
消息处理方式
-
默认消息会按照轮询(按顺序平均)的方式分配给消费者
-
也可通过配置消费者yml文件prefetch=1参数开启能者多劳(能干的消息处理的多)
-
spring:
  rabbitmq:
    listener:
      simple:
        prefetch: 1 # 每次只能获取一条消息,处理完成才能获取下一个消息
-
-
过程
- 控制台创建新的队列work.queue
默认轮询方法
3.3.1.消息发送
这次我们循环发送,模拟大量消息堆积现象。
在publisher服务中的SpringAmqpTest类中添加一个测试方法:
/**
     * workQueue
     * 向队列中不停发送消息,模拟消息堆积。
     */
@Test
public void testWorkQueue() throws InterruptedException {
    // 队列名称
    String queueName = "simple.queue";
    // 消息
    String message = "hello, message_";
    for (int i = 0; i < 50; i++) {
        // 发送消息,每20毫秒发送一次,相当于每秒发送50条消息
        rabbitTemplate.convertAndSend(queueName, message + i);
        Thread.sleep(20);
    }
}
3.3.2.消息接收
要模拟多个消费者绑定同一个队列,我们在consumer服务的SpringRabbitListener中添加2个新的方法:
@RabbitListener(queues = "work.queue")
public void listenWorkQueue1(String msg) throws InterruptedException {
    System.out.println("消费者1接收到消息:【" + msg + "】" + LocalTime.now());
    Thread.sleep(20);
}

@RabbitListener(queues = "work.queue")
public void listenWorkQueue2(String msg) throws InterruptedException {
    System.err.println("消费者2........接收到消息:【" + msg + "】" + LocalTime.now());
    Thread.sleep(200);
}
注意到这两消费者,都设置了Thead.sleep,模拟任务耗时:
- 消费者1 sleep了20毫秒,相当于每秒钟处理50个消息
- 消费者2 sleep了200毫秒,相当于每秒处理5个消息
3.3.3.测试
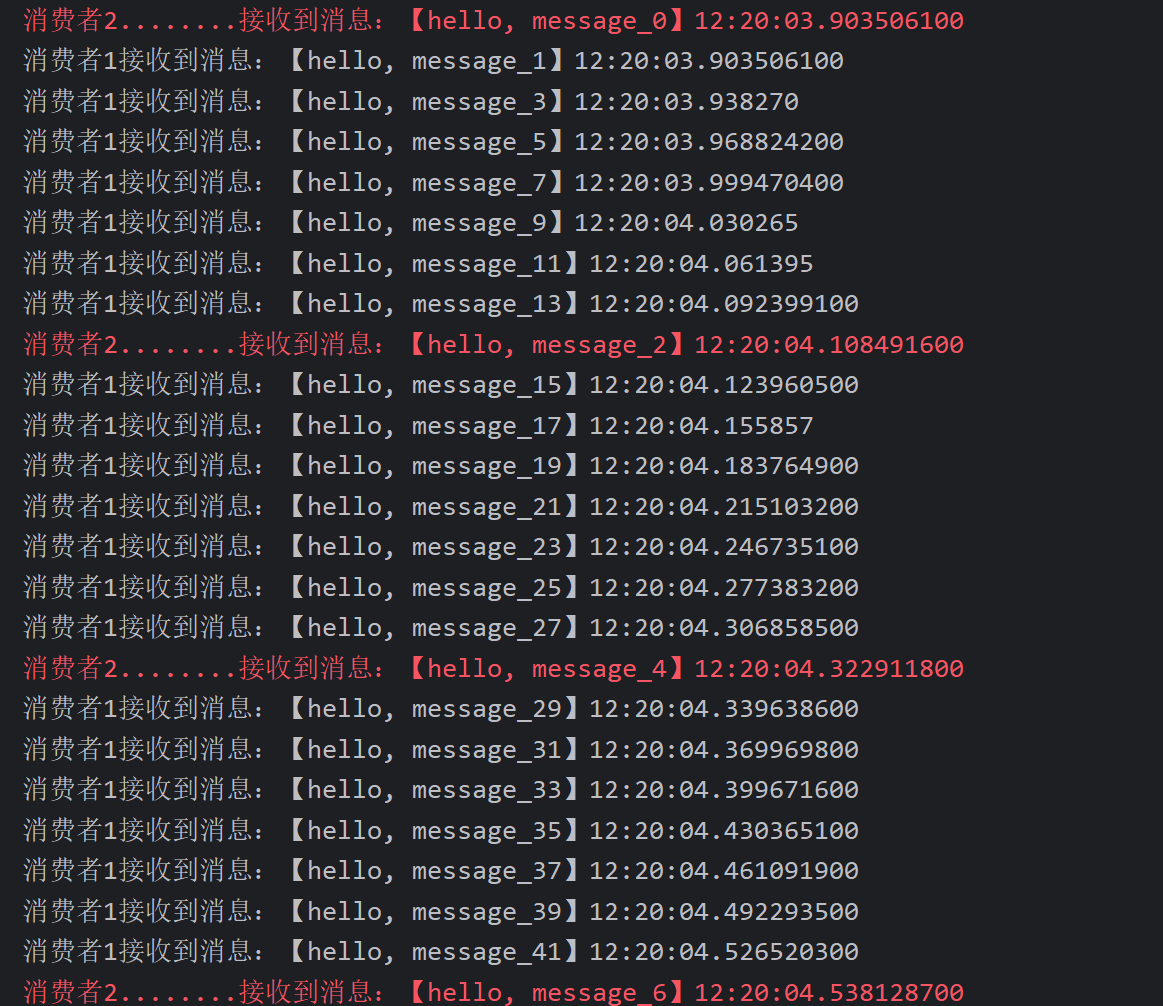
能者多劳
配置消费者的配置文件中的prefetch为1,让能干的多干点
spring:
  rabbitmq:
    listener:
      simple:
        prefetch: 1 # 每次只能获取一条消息,处理完成才能获取下一个消息
- 先启动消费者项目再启动生产者项目
交换机类型
-
只负责转发消息,不具备存储消息的能力
-
Fanout:广播,将消息交给所有绑定到交换机的队列
-
Direct:订阅(指定发送),基于RoutingKey(路由key)发送给订阅了消息的队列
-
Direct交换机根据RoutingKey判断路由给哪个队列
-
rabbitTemplate.convertAndSend(exchangeName,"yellow",message);
-
-
Topic:通过路由key (. # 匹配任何队列)匹配,
-
rabbitTemplate.convertAndSend(exchangeName,"china.你好",message); //匹配china开头的队列 -
交换机接收的消息RoutingKey必须是多个单词,以
.分割- Topic交换机与队列绑定时的bindingKey可以指定通配符
#:代表0个或多个词*:代表1个词
-
- Publisher:生产者,不再发送消息到队列中,而是发给交换机
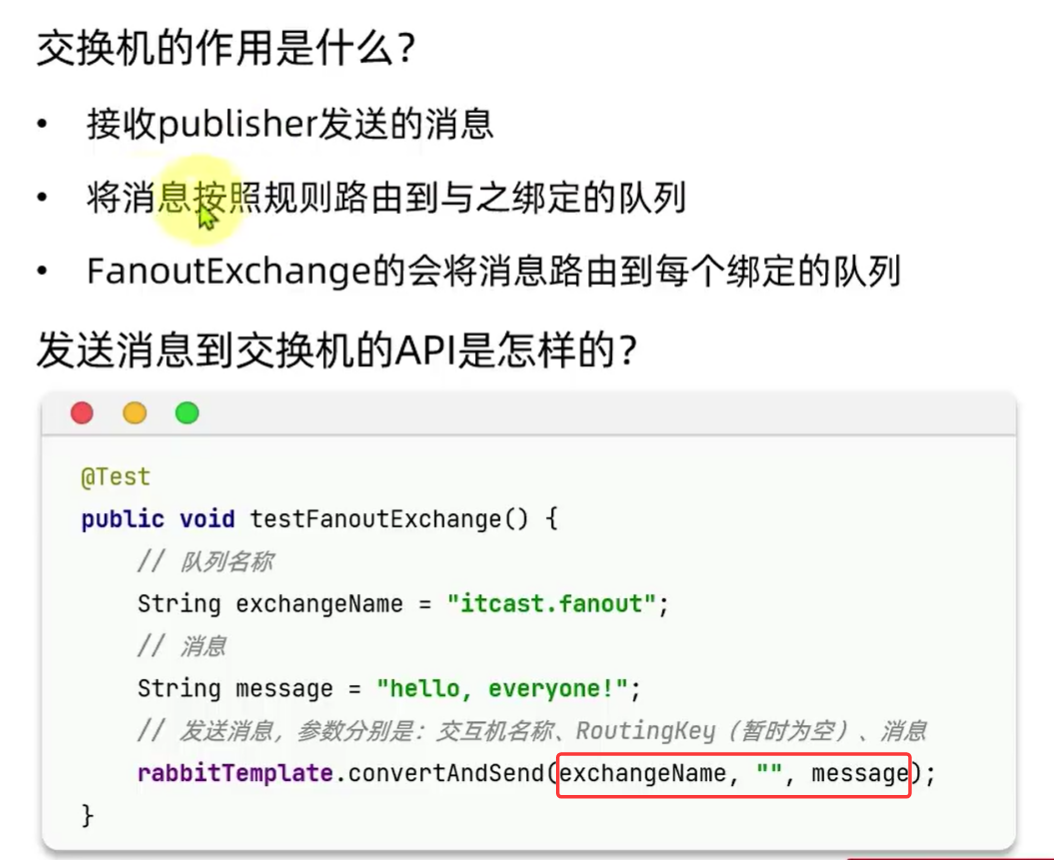
- Exchange:(只负责转发消息,不具备存储消息的能力)交换机,一方面,接收生产者发送的消息。另一方面,知道如何处理消息,例如递交给某个特别队列、递交给所有队列、或是将消息丢弃。到底如何操作,取决于Exchange的类型。
- Queue:消息队列也与以前一样,接收消息、缓存消息。不过队列一定要与交换机绑定。
- Consumer:消费者,与以前一样,订阅队列,没有变化
Fanout交换机
-
Fanout交换机,广播,将消息交给所有绑定到交换机的队列
-
rabbitTemplate.convertAndSend(exchangeName,"",message); //有三个参数
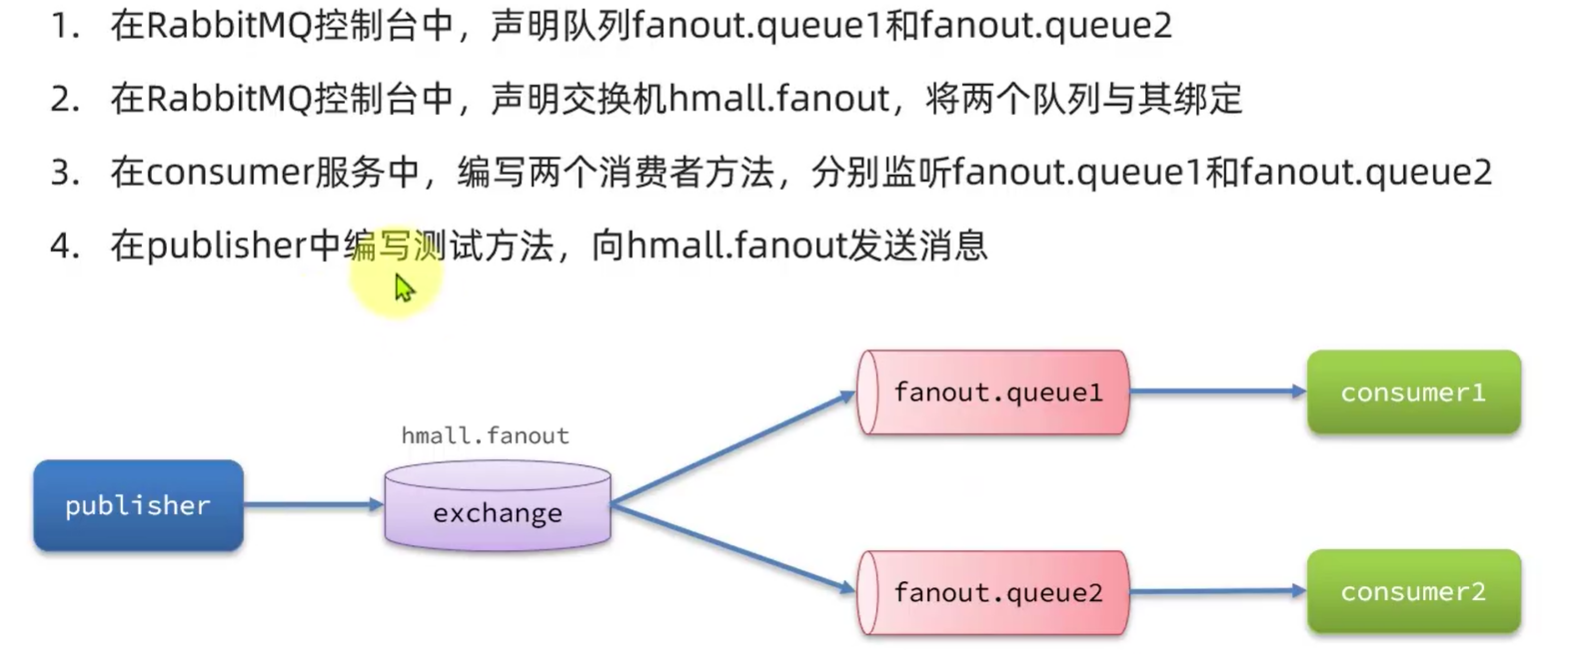
过程
1.控制台创建交换机(hmall.fanout)和队列(fanout.queue1,fanout.queue2) 并完成绑定
2.代码
@RabbitListener(queues = "fanout.queue1")
public void listenFanoutQueue1(String msg) throws InterruptedException {
    System.out.println("消费者1接收到Fanout消息:【" + msg + "】");
}

@RabbitListener(queues = "fanout.queue2")
public void listenFanoutQueue2(String msg) throws InterruptedException {
    System.out.println("消费者2接收到Fanout消息:【" + msg + "】");
}


@Test
public void testFanoutTest(){
    //交换机的名字
    String exchangeName="hmall.fanout";
    //发送的消息
    String message="hello-exchange-fanout";
    //发送消息
    rabbitTemplate.convertAndSend(exchangeName,"",message);
}

Direct交换机
- Direct交换机根据RoutingKey判断路由给哪个队列
- (如果多个队列具有相同的RoutingKey,则与Fanout功能类似)
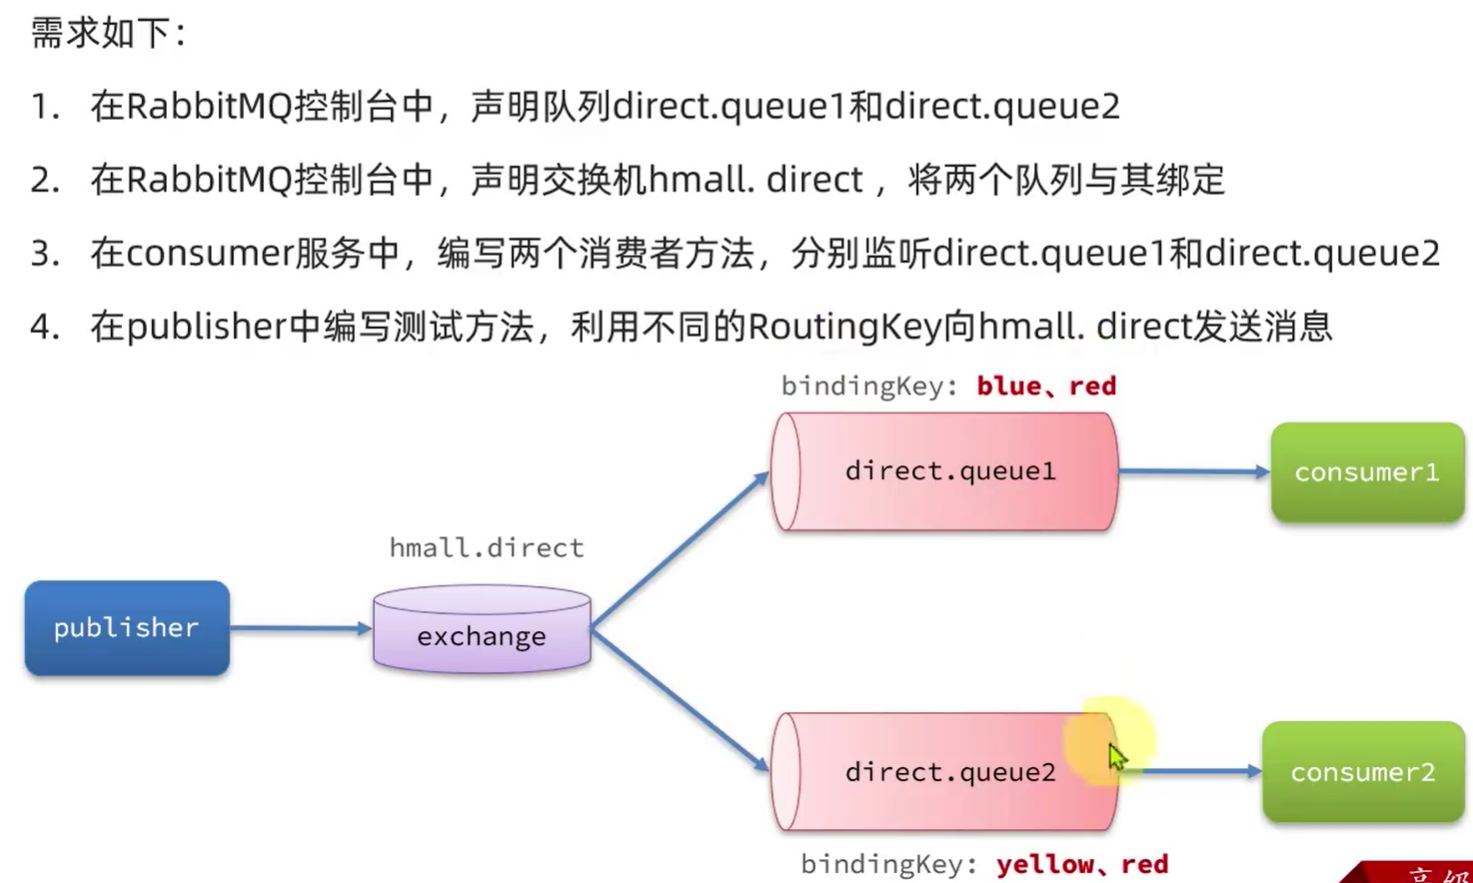
过程
1.控制台创建交换机(hmall.direct)和队列(direct.queue1,direct.queue2)
2.交换机队列绑定,队列1:blue,red 队列2:yellow,red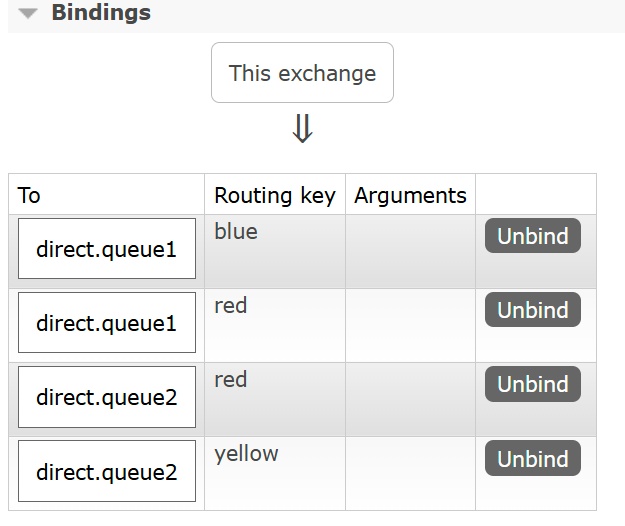
3.代码
 @RabbitListener(queues = "direct.queue1")
    public void listenDirectQueue1(String msg) throws InterruptedException {
        System.out.println("消费者1接收到Fanout消息:【" + msg + "】");
    }

    @RabbitListener(queues = "direct.queue2")
    public void listenDirectQueue2(String msg) throws InterruptedException {
        System.out.println("消费者2接收到Fanout消息:【" + msg + "】");
    }


@Test
    public void testDirectTest(){
        //交换机的名字
        String exchangeName="hmall.direct";
        //发送的消息
        String message="hello-direct";
        //发送消息
        rabbitTemplate.convertAndSend(exchangeName,"yellow",message);
    }

Topic交换机
-
Topic交换机接收的消息RoutingKey必须是多个单词,以
.分割 -
Topic交换机与队列绑定时的bindingKey可以指定通配符
-
#:代表0个或多个词 -
*:代表1个词 -
rabbitTemplate.convertAndSend(exchangeName,"china.你好",message); //匹配china开头的队列
-

1.控制台创建队列topic.queue1和topic.queue2和交换机hmall.topic
2.交换机与队列绑定
3.代码
@RabbitListener(queues = "topic.queue1")
    public void listenTopicQueue1(String msg) throws InterruptedException {
        System.out.println("消费者1接收到的消息:【" + msg + "】");
    }
    @RabbitListener(queues = "topic.queue2")
    public void listenTopicQueue2(String msg) throws InterruptedException {
        System.out.println("消费者2接收到的消息:【" + msg + "】");
    }

@Test
public void testTopicTest(){
    //交换机的名字
    String exchangeName="hmall.topic";
    //发送的消息
    String message="hello-direct";
    //发送消息
    rabbitTemplate.convertAndSend(exchangeName,"china.你好",message);
}

声明交换机和队列
-
在(java代码中)消费者那边代码中声明 交换机,队列,绑定关系
-
fanout
-
direct
-
消费者中基于注解声明队列和交换机并完成绑定
-
@RabbitListener(bindings = @QueueBinding(
        value = @Queue("direct.queue1"),
        exchange = @Exchange(name = "hmall.direct",type = "direct"),
        key={"blue","red"}
))
-
-
topic
-
@RabbitListener(bindings = @QueueBinding(
            value=@Queue("topic.queue1"),
            exchange = @Exchange(name = "hmall.topic",type = "topic"),
            key = "china.#"
    ))
-
-
注:注解方式中绑定的时候,会自动创建队列和交换机
fanout
@Configuration
public class FanoutConfig {
    //声明交换机
    @Bean
    public FanoutExchange fanoutExchange(){
        //return ExchangeBuilder.fanoutExchange("hmall.fanout").build();
        return new FanoutExchange("hmall.fanout");
    }

    //声明队列1
    @Bean
    public Queue fanoutQueue1(){
        //return QueueBuilder.durable("fanout.queue1").build();
        return new Queue("fanout.queue1");
    }
    //绑定队列1和交换机
    @Bean
    public Binding bindingQueue1(Queue fanoutQueue1,FanoutExchange fanoutExchange){
        return BindingBuilder.bind(fanoutQueue1).to(fanoutExchange);
    }


    //声明队列2
    @Bean
    public Queue fanoutQueue2(){
        return new Queue("fanout.queue2");
    }
    //绑定队列2和交换机
    @Bean
    public Binding bindingQueue22(Queue fanoutQueue2,FanoutExchange fanoutExchange){
        return BindingBuilder.bind(fanoutQueue2).to(fanoutExchange);
    }

}
direct
@Bean方法(不推荐)
@Configuration
public class DirectConfig {

    /**
     * 声明交换机
     * @return Direct类型交换机
     */
    @Bean
    public DirectExchange directExchange(){
        return ExchangeBuilder.directExchange("hmall.direct").build();
    }

    /**
     * 第1个队列
     */
    @Bean
    public Queue directQueue1(){
        return new Queue("direct.queue1");
    }

    /**
     * 绑定队列和交换机
     */
    @Bean
    public Binding bindingQueue1WithRed(Queue directQueue1, DirectExchange directExchange){
        return BindingBuilder.bind(directQueue1).to(directExchange).with("red");
    }
    /**
     * 绑定队列和交换机
     */
    @Bean
    public Binding bindingQueue1WithBlue(Queue directQueue1, DirectExchange directExchange){
        return BindingBuilder.bind(directQueue1).to(directExchange).with("blue");
    }

    /**
     * 第2个队列
     */
    @Bean
    public Queue directQueue2(){
        return new Queue("direct.queue2");
    }

    /**
     * 绑定队列和交换机
     */
    @Bean
    public Binding bindingQueue2WithRed(Queue directQueue2, DirectExchange directExchange){
        return BindingBuilder.bind(directQueue2).to(directExchange).with("red");
    }
    /**
     * 绑定队列和交换机
     */
    @Bean
    public Binding bindingQueue2WithYellow(Queue directQueue2, DirectExchange directExchange){
        return BindingBuilder.bind(directQueue2).to(directExchange).with("yellow");
    }
}
注解方式(推荐)
//@RabbitListener(queues = "direct.queue1")
@RabbitListener(bindings = @QueueBinding(
        value = @Queue("direct.queue1"),
        exchange = @Exchange(name = "hmall.direct",type = "direct"),
        key={"blue","red"}
))
public void listenDirectQueue1(String msg) throws InterruptedException {
    System.out.println("消费者1接收到Direct消息:【" + msg + "】");
}

//@RabbitListener(queues = "direct.queue2")
@RabbitListener(bindings = @QueueBinding(
        value=@Queue("direct.queue2"),
        exchange = @Exchange(name = "hmall.direct",type = "direct"),
        key = {"yellow","red"}
))
public void listenDirectQueue2(String msg) throws InterruptedException {
    System.out.println("消费者2接收到Direct消息:【" + msg + "】");
}
topic
基于注解
//@RabbitListener(queues = "topic.queue1")
    @RabbitListener(bindings = @QueueBinding(
            value=@Queue("topic.queue1"),
            exchange = @Exchange(name = "hmall.topic",type = "topic"),
            key = "china.#"
    ))
    public void listenTopicQueue1(String msg) throws InterruptedException {
        System.out.println("消费者1接收到的消息:【" + msg + "】");
    }
    //@RabbitListener(queues = "topic.queue2")
    @RabbitListener(bindings = @QueueBinding(
            value=@Queue("topic.queue2"),
            exchange = @Exchange(name = "hmall.topic",type = "topic"),
            key = "#.news"
    ))
    public void listenTopicQueue2(String msg) throws InterruptedException {
        System.out.println("消费者2接收到的消息:【" + msg + "】");
    }
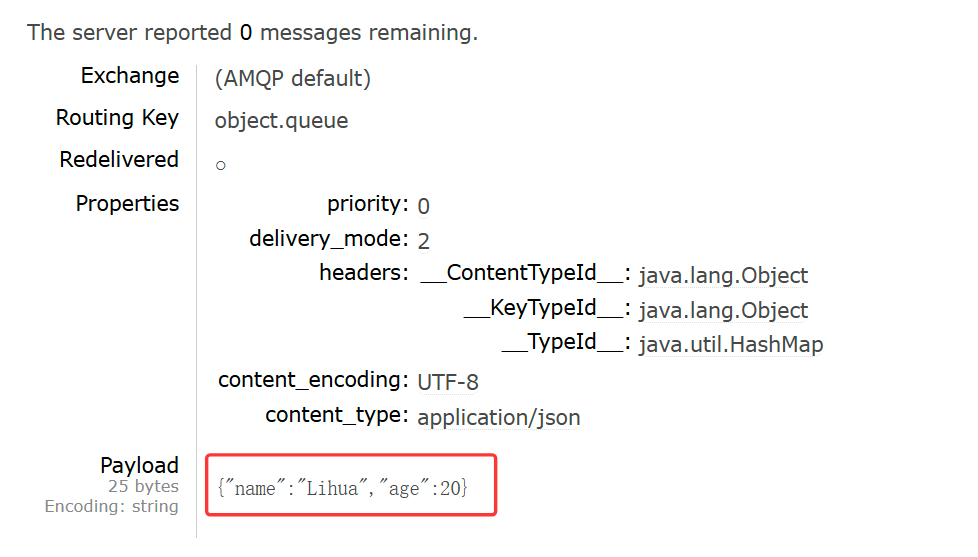
消息转换器
-
配置消息转换器,可以传递各种对象类型,让可读性更强
-
步骤:
-
1.引入配置文件
-
<dependency>
    <groupId>com.fasterxml.jackson.dataformat</groupId>
    <artifactId>jackson-dataformat-xml</artifactId>
    <version>2.9.10</version>
</dependency>
-
-
2.配置配置类@Bean
-
@Bean
    public MessageConverter messageConverter(){
        return new Jackson2JsonMessageConverter();
    }
-
-
生产者
-
public void testObjectMapTest(){
        HashMap<String, Object> msg = new HashMap<>();
        msg.put("name","Lihua");
        msg.put("age",20);
        rabbitTemplate.convertAndSend("object.queue",msg);
    }
-
-
消费者
-
@RabbitListener(queues = "object.queue")
public void listenObjectMapQueue(Map<String,Object>msg)  {
    System.out.println("消费者2接收到的消息:【" + msg + "】");
}
-
-
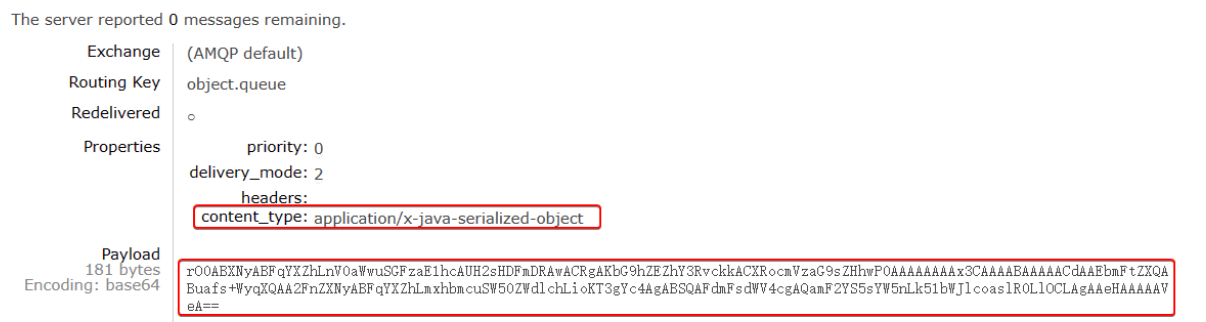
一般情况,默认jdk序列化
- 数据体积过大
- 有安全漏洞
- 可读性差
采用消息转换器后的效果


 被折叠的 条评论
为什么被折叠?
被折叠的 条评论
为什么被折叠?
 到【灌水乐园】发言


