


一、Canvas 简介
Canvas 是 HTML5 中的一个绘图元素,通过 <canvas> 标签可以在网页上创建一个绘图区域。它允许开发者使用 JavaScript 来绘制图形、图像、文本等内容,具有很强的交互性和灵活性,常用于制作游戏、数据可视化、动画等。
二、绘制线条
1. 基本方法
const canvas = document.getElementById('myCanvas');
const ctx = canvas.getContext('2d'); // 获取 2D 绘图上下文

ctx.beginPath(); // 开始一条路径
ctx.moveTo(x1, y1); // 将笔触移动到起点 (x1, y1)
ctx.lineTo(x2, y2); // 从起点绘制一条直线到终点 (x2, y2)
ctx.stroke(); // 绘制线条-
beginPath():创建新的路径,清空之前的路径记录。 -
moveTo():设置路径的起点。 -
lineTo():从当前路径的终点绘制一条直线到指定的点。 -
stroke():根据路径绘制线条,线条的样式可以通过设置ctx.strokeStyle等属性来控制。
2. 示例
ctx.beginPath();
ctx.moveTo(50, 50);
ctx.lineTo(200, 200);
ctx.strokeStyle = 'blue'; // 设置线条颜色为蓝色
ctx.lineWidth = 5; // 设置线条宽度为 5
ctx.stroke();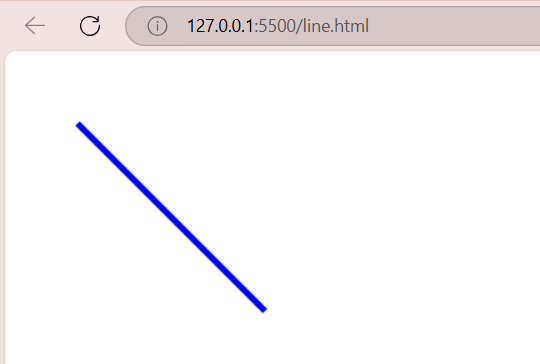
这将在画布上绘制一条从 (50, 50) 到 (200, 200) 的蓝色粗线。
三、绘制矩形
1. 填充矩形
ctx.fillRect(x, y, width, height);-
在指定的 (x, y) 位置绘制一个宽度为
width、高度为height的矩形,并填充颜色。 -
填充颜色可以通过设置
ctx.fillStyle来指定,默认是黑色。
2. 边框矩形
ctx.strokeRect(x, y, width, height);-
绘制矩形的边框,不填充内部。
-
边框样式可以通过设置
ctx.strokeStyle和ctx.lineWidth来控制。
3. 示例
ctx.fillStyle = 'red'; // 设置填充颜色为红色
ctx.fillRect(10, 10, 100, 100); // 绘制填充矩形

ctx.strokeStyle = 'green'; // 设置边框颜色为绿色
ctx.lineWidth = 3; // 设置边框宽度为 3
ctx.strokeRect(120, 10, 100, 100); // 绘制边框矩形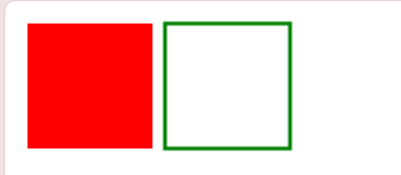
四、绘制弧线和圆弧
1. 方法
ctx.beginPath();
ctx.arc(x, y, radius, startAngle, endAngle, anticlockwise);
ctx.stroke(); // 或 ctx.fill() 填充-
arc():绘制圆弧。-
(x, y):圆心坐标。 -
radius:圆的半径。 -
startAngle和endAngle:起始角度和结束角度,单位是弧度。0 弧度表示圆的右侧水平方向,顺时针角度增加。 -
anticlockwise:布尔值,表示绘制方向。true表示逆时针,false表示顺时针。
-
2. 示例
ctx.beginPath();
ctx.arc(150, 150, 50, 0, Math.PI, false); // 绘制半圆
ctx.strokeStyle = 'purple';
ctx.stroke();

ctx.beginPath();
ctx.arc(250, 150, 50, 0, 2 * Math.PI, false); // 绘制完整圆
ctx.fillStyle = 'orange';
ctx.fill();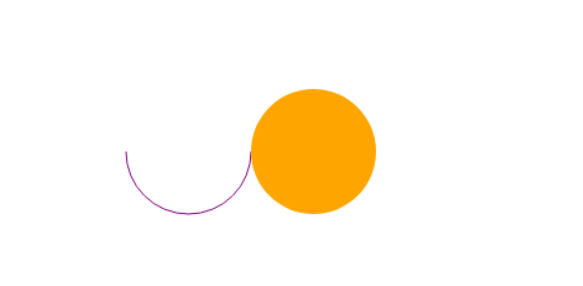
五、贝塞尔曲线
1. 二阶贝塞尔曲线
ctx.beginPath();
ctx.moveTo(startX, startY); // 起点
ctx.quadraticCurveTo(cpX, cpY, endX, endY); // 控制点(cpX, cpY)和终点(endX, endY)
ctx.stroke();-
二阶贝塞尔曲线有一个起点、一个终点和一个控制点。曲线的形状由起点、终点和控制点的位置共同决定。
2. 三阶贝塞尔曲线
ctx.beginPath();
ctx.moveTo(startX, startY); // 起点
ctx.bezierCurveTo(cp1X, cp1Y, cp2X, cp2Y, endX, endY); // 两个控制点(cp1X, cp1Y)和(cp2X, cp2Y),以及终点(endX, endY)
ctx.stroke();-
三阶贝塞尔曲线有一个起点、一个终点和两个控制点,比二阶贝塞尔曲线更加灵活。
3. 示例
// 二阶贝塞尔曲线
ctx.beginPath();
ctx.moveTo(50, 50);
ctx.quadraticCurveTo(100, 10, 150, 50);
ctx.strokeStyle = 'brown';
ctx.stroke();

// 三阶贝塞尔曲线
ctx.beginPath();
ctx.moveTo(200, 50);
ctx.bezierCurveTo(250, 10, 300, 100, 350, 50);
ctx.strokeStyle = 'pink';
ctx.stroke();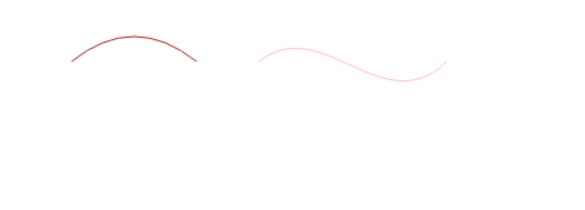
六、绘图样式
1. 线条样式
-
ctx.strokeStyle:设置线条的颜色,默认是黑色。 -
ctx.lineWidth:设置线条的宽度,默认是 1。 -
ctx.lineCap:设置线条端点的样式,可选值为"butt"(默认,平直端点)、"round"(圆形端点)和"square"(正方形端点)。 -
ctx.lineJoin:设置线条连接处的样式,可选值为"miter"(默认,尖角)、"round"(圆角)和"bevel"(斜角)。
2. 填充样式
-
ctx.fillStyle:设置填充颜色,默认是黑色。
3. 示例
ctx.strokeStyle = 'rgba(0, 255, 0, 0.5)'; // 半透明的绿色线条
ctx.lineWidth = 10;
ctx.lineCap = 'round';
ctx.lineJoin = 'round';

ctx.beginPath();
ctx.moveTo(50, 50);
ctx.lineTo(150, 150);
ctx.stroke();

ctx.fillStyle = '#FF0000'; // 红色填充
ctx.fillRect(200, 50, 100, 100);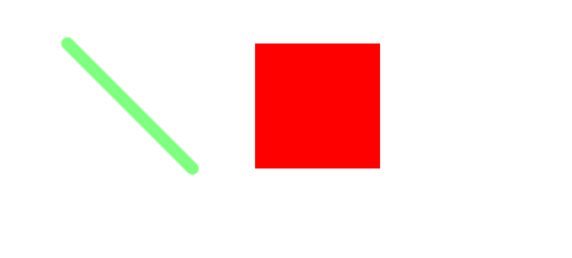
七、渐变
1. 线性渐变
const gradient = ctx.createLinearGradient(x1, y1, x2, y2); // 从点(x1, y1)到点(x2, y2)的线性渐变
gradient.addColorStop(offset, color); // 在指定的偏移量(offset,范围是0到1)添加颜色-
可以通过
addColorStop()方法在渐变的不同位置添加颜色,从而创建丰富的渐变效果。
2. 径向渐变
const gradient = ctx.createRadialGradient(x1, y1, r1, x2, y2, r2); // 从圆心(x1, y1)、半径为r1的圆到圆心(x2, y2)、半径为r2的圆的径向渐变
gradient.addColorStop(offset, color);-
用于创建从一个圆到另一个圆的渐变效果。
3. 示例
// 线性渐变
const linearGradient = ctx.createLinearGradient(0, 0, 300, 0);
linearGradient.addColorStop(0, 'red');
linearGradient.addColorStop(0.5, 'yellow');
linearGradient.addColorStop(1, 'green');
ctx.fillStyle = linearGradient;
ctx.fillRect(10, 10, 300, 100);

// 径向渐变
const radialGradient = ctx.createRadialGradient(150, 150, 50, 150, 150, 100);
radialGradient.addColorStop(0, 'white');
radialGradient.addColorStop(1, 'blue');
ctx.fillStyle = radialGradient;
ctx.fillRect(10, 120, 300, 100);
八、绘制文本
1. 基本方法
ctx.font = 'font-style font-weight font-size font-family'; // 设置文本的字体样式
ctx.fillStyle = 'color'; // 设置文本颜色
ctx.fillText(text, x, y); // 在(x, y)位置绘制文本
ctx.strokeText(text, x, y); // 绘制文本边框-
font属性用于设置文本的字体、大小、样式等,格式类似于 CSS 中的font属性。
2. 示例
ctx.font = '30px Arial';
ctx.fillStyle = 'black';
ctx.fillText('Hello, Canvas!', 50, 50);

ctx.strokeStyle = 'red';
ctx.strokeText('Stroke Text', 50, 100);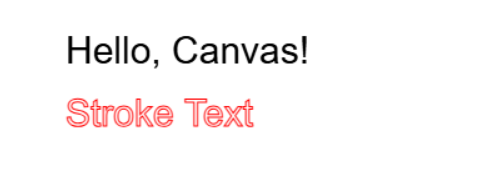
九、绘制图片
1. 方法
const img = new Image(); // 创建图片对象
img.src = 'image-url'; // 设置图片的路径
img.onload = function() {
    ctx.drawImage(img, x, y, width, height); // 在画布上绘制图片
};-
drawImage()方法可以将图片绘制到画布上,可以指定图片的位置、宽度和高度等参数。
2. 示例
const img = new Image();
img.src = 'example.jpg';
img.onload = function() {
    ctx.drawImage(img, 10, 10, 200, 200); // 将图片绘制到画布上,指定位置和大小
};
以上内容涵盖了 Canvas 基础的多个方面,包括绘制简单图形、设置样式、使用渐变、绘制文本和图片等。通过这些基本操作,你可以开始在 Canvas 上进行更复杂的绘图创作。


 被折叠的 条评论
为什么被折叠?
被折叠的 条评论
为什么被折叠?
 到【灌水乐园】发言


