


https://pytorch.org/docs/1.0.0/nn.html# 官方文档
一、神经网络的基本骨架--nn.Module的使用
定义一个子类Model,继承父类Module,重写方法,可以按照自己定义forward方法。
import torch.nn as nn
import torch.nn.functional as F

class Model(nn.Module):
    def __init__(self):
        super(Model, self).__init__()
        self.conv1 = nn.Conv2d(1, 20, 5)
        self.conv2 = nn.Conv2d(20, 20, 5)

    def forward(self, x):
       x = F.relu(self.conv1(x))
       return F.relu(self.conv2(x))
二、卷积操作
卷积核做的是线性运算,核上的每个值与它滑动到的对应位置上的值相乘,然后把这些值相加。
1、一维卷积:
2、二维卷积:
3、三维卷积

①二维卷积中的二维并不是指卷积核是二维的,它与卷积核的维度无关,而是指卷积核只在两个维度上滑动。同理,一维卷积和三维卷积分别指卷积核在一个维度或者三个维度上滑动,正如上面3个图所示;
②卷积核通道数(或者叫卷积核个数,一组卷积核中有通道数个卷积核)=输入层通道数;
③输出层通道数(即特征图通道数或特征图个数)=卷积核组数,也就是说1组卷积核对输入进行卷积计算后只能得到1个特征图,特征图有n个通道则说明需要用n组卷积核对输入进行卷积计算。
如上图所示,假设输入是RGB3个通道的二维图像,那么一组卷积核中包含3个二维卷积核,即卷积核也必须是3个通道的。这3个卷积核分别在输入图像的3个通道上滑动,比如R通道上,每滑动一次,对应元素相乘再相加就可以得到一个数,3个卷积核滑动一次就会得到3个数,将这3个数相加并且加上一个偏置即可得到特征图上的一个值,该组卷积核在输入图像上全部滑动结束,那么就可以得到一个完整的特征图,这个特征图代表从输入图像中提取出来的一种特征。而一般在输入图像上只提取一种特征是完全不够的,往往需要在输入图像上获取更多的特征信息,即要获得多个特征图,那么就需要多组卷积核在图像上进行卷积计算。
下图中使用了两组卷积核计算得到了2个特征图:
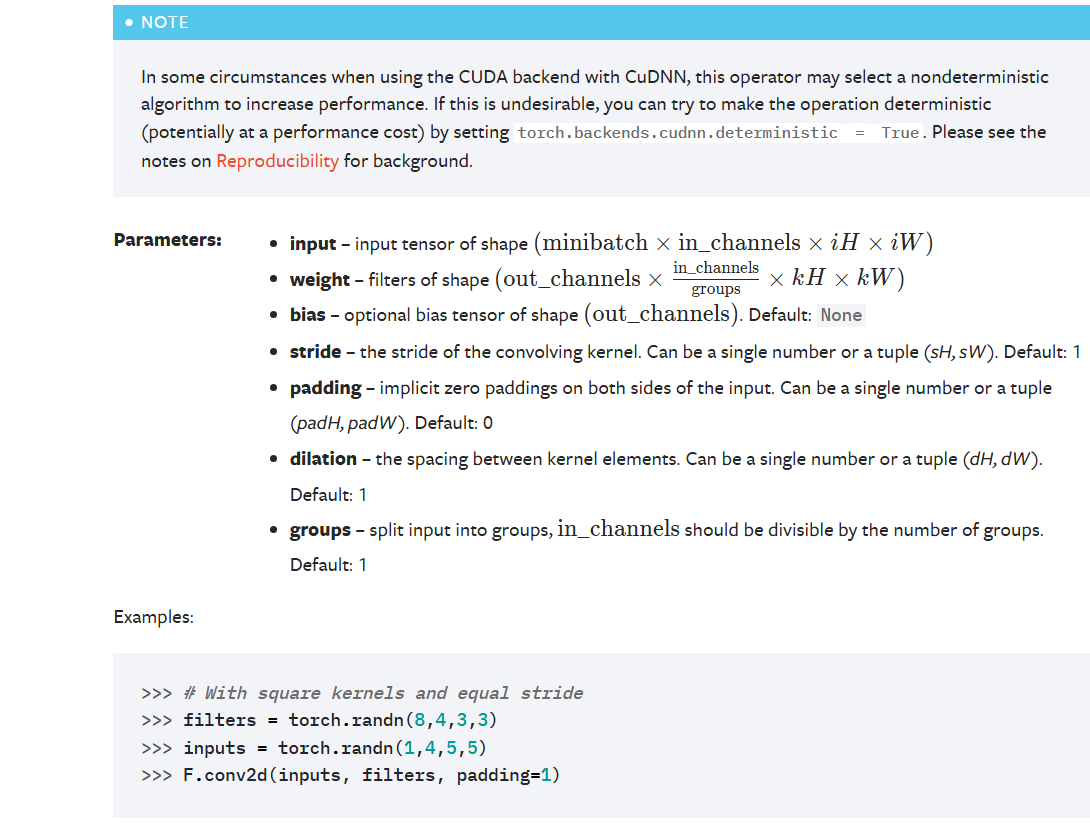
torch.nn.functional.conv2d(input, weight, bias=None, stride=1, padding=0, dilation=1, groups=1) → Tensor
input = torch.tensor([[1, 2, 0, 3, 1],
                      [0, 1, 2, 3, 1],
                      [1, 2, 1, 0, 0],
                      [5, 2, 3, 1, 1],
                      [2, 1, 0, 1, 1]]) #一个5行5列的二维矩阵,转换成为张量tensor格式
kernel = torch.tensor([[1, 2, 1],
                       [0, 1, 0],
                      [2, 1, 0]]) #一个3行3列的二维矩阵,转换成为张量tensor格式

print(input.shape) #torch.Size([5, 5])
print(kernel.shape)#torch.Size([3, 3])  不满足torch.nn.convd2的参数要求

#采用reshape方法进行格式变化

input = torch.reshape(input, (1, 1, 5, 5))
kernel = torch.reshape(kernel, (1, 1, 3, 3))
print('-'*30)
print(input.shape) #torch.Size([1, 1, 5, 5])
print(kernel.shape)#torch.Size([1, 1, 3, 3])

output = F.conv2d(input,kernel)
print(f'output是{output}')

output_1 = F.conv2d(input, kernel, stride=1, padding=1)
print(f'output_1是{output_1}')

output_2 = F.conv2d(input, kernel, stride=2, padding=1)
print(f'output_2是{output_2}')

output_3 = F.conv2d(input, kernel, stride=2, padding=2)
print(f'output_3是{output_3}')
stride=, padding=是两个很重要的参数,决定了如何去卷积,采用多少步长、是否需要填充
output是tensor([[[[10, 12, 12],
          [18, 16, 16],
          [13,  9,  3]]]])
output_1是tensor([[[[ 1,  3,  4, 10,  8],
          [ 5, 10, 12, 12,  6],
          [ 7, 18, 16, 16,  8],
          [11, 13,  9,  3,  4],
          [14, 13,  9,  7,  4]]]])
output_2是tensor([[[[ 1,  4,  8],
          [ 7, 16,  8],
          [14,  9,  4]]]])
output_3是tensor([[[[ 0,  4,  3,  2],
          [ 1, 10, 12,  1],
          [ 1, 13,  3,  2],
          [ 2,  4,  3,  1]]]])
三、神经网络---卷积层
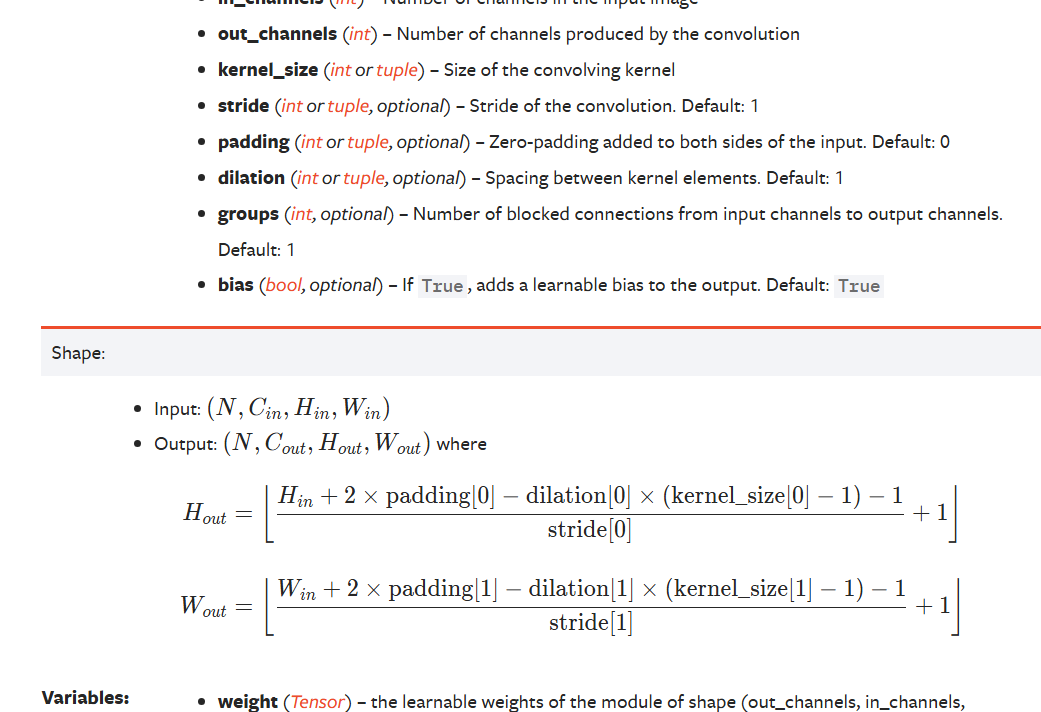
Conv2d
classtorch.nn.Conv2d(in_channels, out_channels, kernel_size, stride=1, padding=0, dilation=1, groups=1, bias=True)
- i:输入尺寸input
- o:输出output
- s:步长sride、
- p:填充padding(一般都是零)
- k:卷积核(kernel)大小
统一计算公式:o = [( i + 2p - k) / s] + 1
import torch
import torchvision
from torch import nn
from torch.nn import Conv2d
from torch.utils.data import DataLoader
from torch.utils.tensorboard import SummaryWriter
from torchvision import transforms
test_dataset=torchvision.datasets.CIFAR10('./Dataset', train=False, transform=transforms.ToTensor(), download=True )
dataloader = DataLoader(test_dataset, batch_size=64, shuffle=False)
class Binbin(nn.Module):
def __init__(self):
super(Binbin, self).__init__()
self.conv1 = Conv2d(3, 6, (3,3), stride=(1,1), padding=0)
# 输入3层RGB通道,输出设置为6层,即需要6组(3,3)卷积核,每一组3个,分别对应3通道
def forward(self, x):
x = self.conv1(x)
return x
binbin = Binbin()
print(binbin)
writer = SummaryWriter('logs')
step = 0
#遍历dataloader中的每一个数据:
for data in dataloader:
imgs, targets = data #现在的imgs是64*3*32*32 torch.Size([64, 3, 32, 32])
output = binbin(imgs)#torch.Size([64, 6, 30, 30])
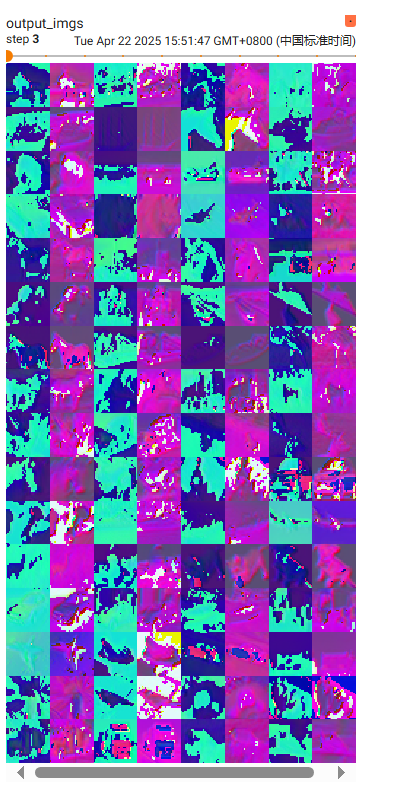
output = torch.reshape(output,(-1,3, 30, 30))#torch.Size([128, 3, 30, 30]) 利用reshape变换格式为(?,3,30,30),方便显示 ?可以自己计算
writer.add_image('input_imgs', imgs, step, dataformats='NCHW')
writer.add_image('output_imgs', output, step, dataformats='NCHW')
step += 1
writer.close()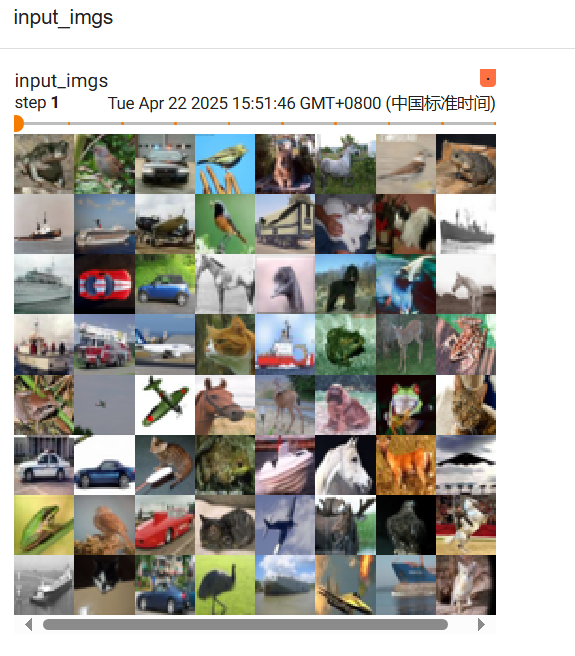


 被折叠的 条评论
为什么被折叠?
被折叠的 条评论
为什么被折叠?
 到【灌水乐园】发言


