


注意:使用picker-view时要给他加上以下样式。不给高度他不显示,高度可以随意更改
picker-view-column {
        height: 600rpx;
        text-align: center;

        view {
            line-height: 34px;
        }
    }
同时使用uni.popup组件时想叫顶部出现圆角必须将uni-popup标签上的背景色改成background-color="rgba(0,0,0,0)" ,然后添加以下样式即可

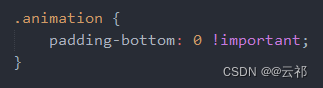
.popup-content {
		border-top-right-radius: 20rpx;
		border-top-left-radius: 20rpx;
		background-color: #eee;
	}
但是可能出现弹出层与底部有距离,解决办法在下:
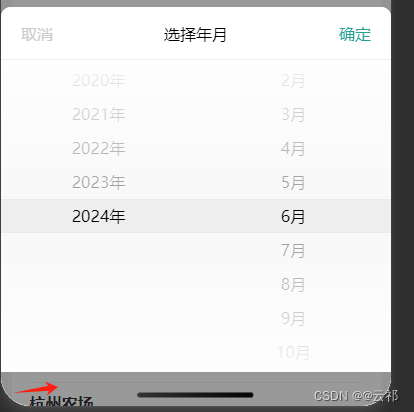
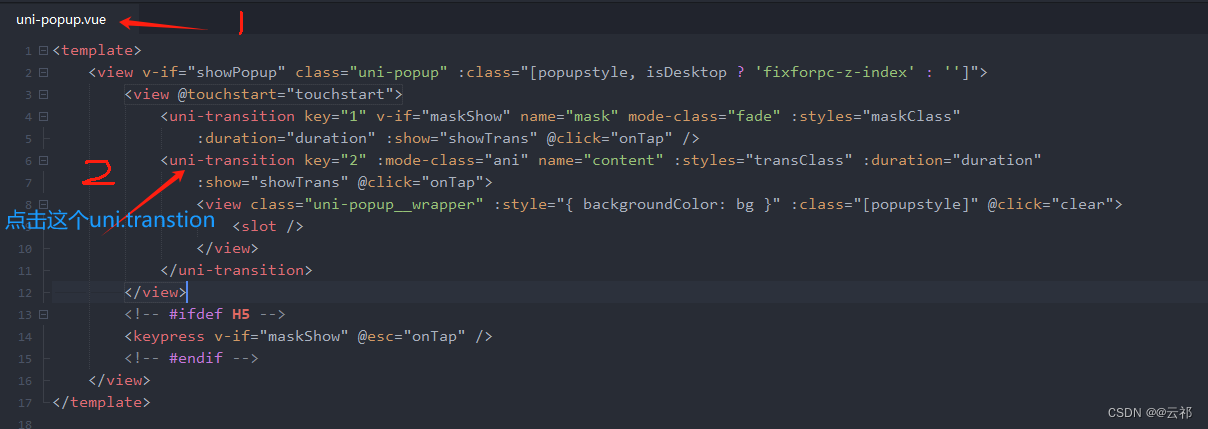
找到uniapp源码,在标签上添加任意类名,在所需要的组件添加以下样式即可

    const show = ref(false)  //这个变量和下方change函数是为了解决打开弹出层滑动时禁止窗口滑动
	const type = ref('');
	const popup = ref(null);
	const date = new Date();
	const years = ref([]);
	const year = ref(date.getFullYear());
	const months = ref([]);
	const month = ref(date.getMonth() + 1);
	const day = ref(date.getDate());

	// 初始化年份和月份数组
	for (let i = 1990; i <= date.getFullYear(); i++) {
		years.value.push(i);
	}
	for (let i = 1; i <= 12; i++) {
		months.value.push(i);
	}

	const value = ref([9999, month.value - 1, day.value - 1]);
	const visible = ref(true);
	const indicatorStyle = `height: 50px;`;
	const currentTab = ref('all');
	const details = ref([]);
    //---------------------------------与第一行解释对应
	const change = (e) => {
		show.value = e.show
	}
    //---------------------------------
    //关闭弹出层
	const closeEdit = () => {
		popup.value.close()
	}
    //确定执行接口操作就好
	const doSave = () => {

	}
    const bindChange = (e) => {
		const val = e.detail.value;
		// year.value = years.value[val[0]];
		// month.value = months.value[val[1]];
        //------------------------------------------------在这里可以拿到选择的年月
		console.log(years.value[val[0]], months.value[val[1]]);
	};
    //----------------------------------------------------这里决定弹出层从那出现
	const toggle = (position) => {
		type.value = position;
		popup.value.open(position);
	};
//与上方js第一行对应解释
<page-meta :page-style="'overflow:'+(show?'hidden':'visible')"></page-meta>
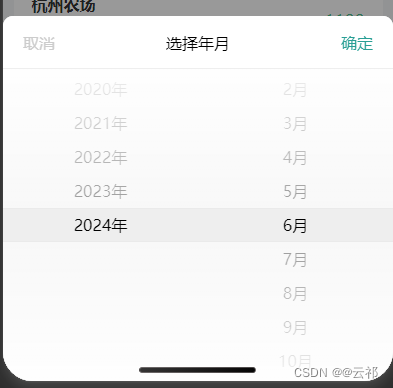
<uni-popup ref="popup" background-color="rgba(0,0,0,0)" safe-area="false" @change="change">
<view class="popup-content" :class="{ 'popup-height': type === 'left' || type === 'right' }">
<view class="popup_head">
<text class="cancel" style="color: #ccc;" @click="closeEdit">取消</text>
<text class="cancel">选择年月</text>
<text class="saveMsg" style="color: #299F95;" @click="doSave">确定</text>
</view>
<picker-view v-if="visible" :indicator-style="indicatorStyle" :value="value" @change="bindChange"
class="picker-view">
<picker-view-column>
<view class="item" v-for="(item, index) in years" :key="index">{{ item }}年</view>
</picker-view-column>
<picker-view-column>
<view class="item" v-for="(item, index) in months" :key="index">{{ item }}月</view>
</picker-view-column>
</picker-view>
</view>
</uni-popup>


 771
771


 被折叠的 条评论
为什么被折叠?
被折叠的 条评论
为什么被折叠?
 到【灌水乐园】发言


