


接着上篇的内容,我们再创建一个项目充当服务消费者,命名为pf-font,如果pf-login视为后端,那么pf-font 就是前端,达到前后端分离的目的。
一、pf-front目录结构
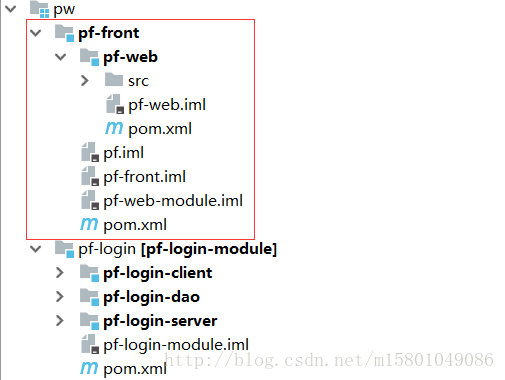
pf-front同样是一个多模块项目,尽管它目前只有一个模块——pf-web,方便后面扩展其他模块。
二、结构组成
1、pf-font的pom.xml
<?xml version="1.0" encoding="UTF-8"?>
<project xmlns="http://maven.apache.org/POM/4.0.0" xmlns:xsi="http://www.w3.org/2001/XMLSchema-instance" xsi:schemaLocation="http://maven.apache.org/POM/4.0.0 http://maven.apache.org/xsd/maven-4.0.0.xsd">
    <modelVersion>4.0.0</modelVersion>

    <groupId>cn.pw</groupId>
    <artifactId>pf-front</artifactId>
    <version>1.0-SNAPSHOT</version>
    <packaging>pom</packaging>

    <properties>
        <project.build.sourceEncoding>UTF-8</project.build.sourceEncoding>
        <project.reporting.outputEncoding>UTF-8</project.reporting.outputEncoding>
        <java.version>1.8</java.version>
        <spring-cloud.version>Dalston.SR4</spring-cloud.version>
        <fastjson-version>1.2.15</fastjson-version>
    </properties>
    <parent>
        <groupId>org.springframework.boot</groupId>
        <artifactId>spring-boot-starter-parent</artifactId>
        <version>1.5.8.RELEASE</version>
        <relativePath/> <!-- lookup parent from repository -->
    </parent>

    <dependencies>
        <dependency>
            <groupId>org.springframework.boot</groupId>
            <artifactId>spring-boot-starter-web</artifactId>
        </dependency>
        <dependency>
            <groupId>org.springframework.cloud</groupId>
            <artifactId>spring-cloud-starter-eureka</artifactId>
        </dependency>
        <dependency>
            <groupId>org.springframework.boot</groupId>
            <artifactId>spring-boot-starter-test</artifactId>
        </dependency>
        <dependency>
            <groupId>org.springframework.cloud</groupId>
            <artifactId>spring-cloud-starter-feign</artifactId>
        </dependency>
        <dependency>
            <groupId>com.alibaba</groupId>
            <artifactId>fastjson</artifactId>
            <version>${fastjson-version}</version>
        </dependency>
        <dependency>
            <groupId>org.springframework.boot</groupId>
            <artifactId>spring-boot-starter-thymeleaf</artifactId>
        </dependency>
    </dependencies>
    <dependencyManagement>
        <dependencies>
            <dependency>
                <groupId>org.springframework.cloud</groupId>
                <artifactId>spring-cloud-dependencies</artifactId>
                <version>${spring-cloud.version}</version>
                <type>pom</type>
                <scope>import</scope>
            </dependency>
        </dependencies>
    </dependencyManagement>
    <modules>
        <module>pf-web</module>
    </modules>
</project>
2、pf-web的pom.xml
<?xml version="1.0" encoding="UTF-8"?>
<project xmlns="http://maven.apache.org/POM/4.0.0" xmlns:xsi="http://www.w3.org/2001/XMLSchema-instance" xsi:schemaLocation="http://maven.apache.org/POM/4.0.0 http://maven.apache.org/xsd/maven-4.0.0.xsd">
    <modelVersion>4.0.0</modelVersion>
    <parent>
        <groupId>cn.pw</groupId>
        <artifactId>pf-front</artifactId>
        <version>1.0-SNAPSHOT</version>
    </parent>

    <artifactId>pf-web</artifactId>
    <build>
        <plugins>
            <plugin>
                <groupId>org.springframework.boot</groupId>
                <artifactId>spring-boot-maven-plugin</artifactId>
            </plugin>
        </plugins>
    </build>
</project>
三、pf-web
1、启动类
package cn.pw.platform.web;

import org.springframework.boot.SpringApplication;
import org.springframework.boot.autoconfigure.SpringBootApplication;
import org.springframework.cloud.client.discovery.EnableDiscoveryClient;
import org.springframework.cloud.netflix.feign.EnableFeignClients;


@SpringBootApplication
@EnableFeignClients
@EnableDiscoveryClient
public class WebApplication {

    public static void main(String[] args) {
        SpringApplication.run(WebApplication.class, args);
    }

}这里我使用@EnableDiscoveryClient而没有使用@EnableEurekaClient,因为后者只能为Eureka作用,而前者则依赖于classpath中的实现,也就是说@EnableDiscoveryClient有多种实现,如eureka, consul, zookeeper,我们需要在application.yml中指定具体的实现。
@EnableFeignClients开启了对Feign的支持 。
当我们在classpath中配置了eureka,
@EnableDiscoveryClient和@EnableEurekaClient作用是一样的。
2、配置文件application.yml
server:
  port: 8680

spring:
  thymeleaf:
    mode: HTML5
    encoding: utf-8
    content-type: text/html
    cache: false
  application:
    name: pf-web

eureka:
  client:
    service-url:
      default-zone: http://127.0.0.1:8761/eureka/
    instance:
      instance-id: ${spring.cloud.client.ipAddress}:{server.port}
      prefer-ip-address: true
这个配置不难看懂,Eureka的配置项中,我们将pf-web自身也注册到了注册中心。
现在启动Eureka Server 和 pf-web ,我们在注册中心的页面可以得到验证 。
四、使用Feign 调用 pf-login 的接口
1、在pf-web中定义Feign的调用接口
package cn.pw.platform.web.feign;

import cn.pw.platform.web.vo.UserVo;
import org.springframework.cloud.netflix.feign.FeignClient;
import org.springframework.web.bind.annotation.GetMapping;
import org.springframework.web.bind.annotation.PathVariable;
import org.springframework.web.bind.annotation.PostMapping;
import org.springframework.web.bind.annotation.RequestBody;

@FeignClient(name="pf-login-server")
public interface LoginClient {
    @GetMapping("/selectUserByName/{userName}")
    UserVo selectUserByName(@PathVariable("userName") String userName);

    @PostMapping("/user/add")
    UserVo addUser(@RequestBody UserVo userVo);
}@FeignClient(name="pf-login-server")指明了要调用的服务名,接口中定义的方法要符合被调服务的接口要求。
2、写一个测试类Controller
package cn.pw.platform.web.controller;

import cn.pw.platform.web.feign.LoginClient;
import org.springframework.beans.factory.annotation.Autowired;
import org.springframework.stereotype.Controller;
import org.springframework.validation.BindingResult;
import org.springframework.web.bind.annotation.*;

@Controller
public class LoginController {
    @Autowired
    private LoginClient loginClient;

    @GetMapping("/searchByName/{name}")
    @ResponseBody
    public UserVo searchByName(@PathVariable("name") String name){
        return loginClient.selectUserByName(name);
    }
}
3、补充 一个参数映射类UserVo用于封装从服务端请求来的参数。
public class UserVo {
    private Long id;
    private String name;
    private String nickName;
    private String password;
    private Integer age;
    private Integer sex;
    //...省略getter setter方法
}
4、测试
逐个启动所需项目,Eureka Server、pf-login、pf-web。
使用postman ,请求 http://localhost:8680/searchByName/libin
结果:
{
“id”: 10,
“name”: “libin”,
“nickName”: null,
“password”: “123456”,
“age”: 18,
“sex”: null
}
和上一篇我们直接调用server,所获取的结果完全一致。


 458
458

 被折叠的 条评论
为什么被折叠?
被折叠的 条评论
为什么被折叠?
 到【灌水乐园】发言


