


 本文介绍了如何使用AirServer软件实现AirPlay功能,并通过编程实现iOS设备与电脑间的多屏显示。文中详细解释了如何检查并利用外接屏幕,以及如何通过Notification监听屏幕连接状态。
1、使用AirServer软件实现AirPlay
AirServer是一个极其强大的软件,能够通过软件的方式完全实现Apple TV的功能。大家可以到Google之,有免费的试用版。下图就是其图标:

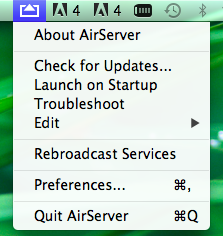
在安装好AirServer后,打开,可以看到标志在Mac的工具栏上:
OK,接下来就是将iPhone与Mac连接起来,可以使用iPhone上的热点,用Mac连接,或者在Mac上建立一个热点,让iPhone连接Wifi。
连接好之后,双击iPhoneHome键,拉到音量调节界面,如下:

点击右边的AirPlay按键,弹出设置界面:
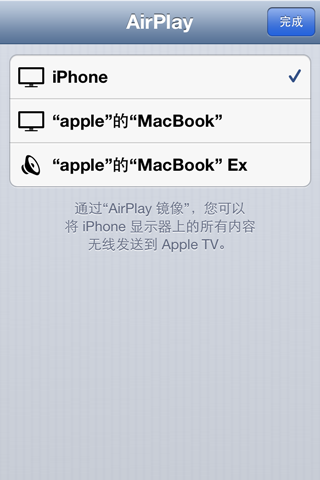
选择第二个,也就是Mac:
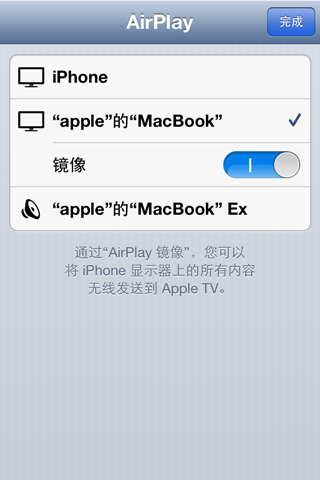
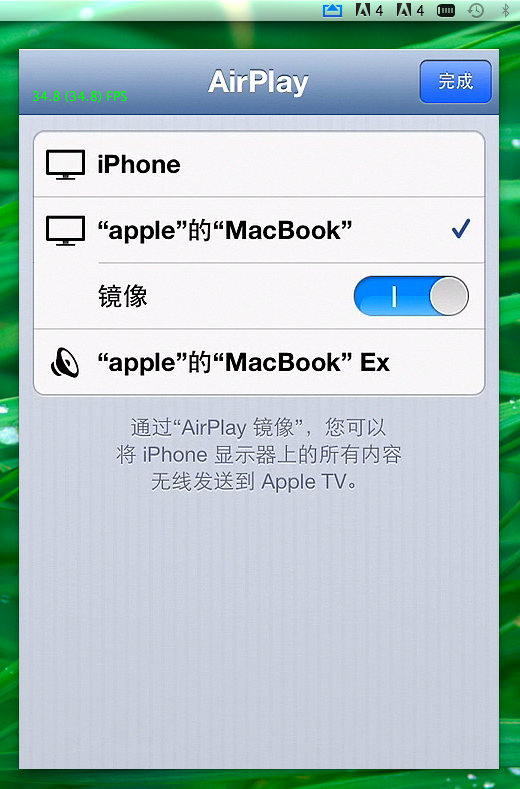
打开镜像,完成。这样没有错误的情况下,在Mac上就实现了AirPlay的镜像,如下图:
接下来你可以播放视频,音乐来测试一下效果。如果有点卡的话,可以考虑重启一下wifi,这样传输速度会快一点。
2、编程实现多屏幕。
在可以使用AirPlay之后,我们要实现多屏幕,也就是在电脑上显示的和iOS设备上显示的内容不一样。
2.1 基本原理
获取新的屏幕信息--->创建一个新的Window--->将新的Window对应的Screen屏幕设置为新的屏幕--->设置新的屏幕的UI显示
我们知道,一般情况下,我们在开发过程中只使用一个window(UIWindow),而且一般在AppDelegate文件中创建,一般情况下我们甚至完全不用理会window。一样的,screen(UIScreen)我们除了通过它来获取一些屏幕信息之外也不会做任何处理,比较屏幕也只有一块。那么现在要实现多屏幕就不一样了。我们要创建新的window,获取新的screen,并且将window和screen联系在一起,这样要在这个window中显示的内容就可以显示在这个新的屏幕当中。
2.2 实现
STEP 1:检查是否有多的屏幕存在,如果有,那么直接设置。一般先在viewController中设置一个UIWindow和UIScreen的实例:
- @property (nonatomic,strong) UIWindow *externalWindow;
- @property (nonatomic,strong) UIScreen *externalScreen;
然后,检查:
- - (void)checkForExistingScreenAndInitializeIfPresent
- {
- if ([UIScreen screens].count > 1) {
- self.externalScreen = [[UIScreen screens] objectAtIndex:1];
- NSLog(@"external screen :%@",self.externalScreen);
- CGRect screenBounds = self.externalScreen.bounds;
- self.externalWindow = [[UIWindow alloc] initWithFrame:screenBounds];
- self.externalWindow.screen = self.externalScreen;
- // Set the initial UI for the window for example
- {
- UILabel *screenLabel = [[UILabel alloc] initWithFrame:screenBounds];
- screenLabel.text = @"Screen 2";
- screenLabel.textAlignment = NSTextAlignmentCenter;
- screenLabel.font = [UIFont systemFontOfSize:100];
- UIViewController *externalViewController = [[UIViewController alloc] init];
- externalViewController.view.frame = screenBounds;
- [externalViewController.view addSubview:screenLabel];
- self.externalWindow.rootViewController = externalViewController;
- }
- self.externalWindow.hidden = NO;
- }
- }
在这里通过screens Method来判断是否屏幕数大于1,如果是意味着有别的屏幕连接到iOS设备,这时获取这个屏幕。
对于window初始化然后关键是要设置其Frame,一般就是设置成屏幕大小,全屏。然后将window的screen设置为外部屏幕。然后就可以进行window相关view,viewController的设置,上面的代码只是一个小例子。最后设置window 的hidden为NO。
对于上面这种情况,主要是针对iOS在启动应用之前就已经AirPlay了,那么,如果是启动应用后才要打开AirPlay呢?
当然有办法------notification
STEP 2:Notification检查屏幕的连接情况。
UIScreen有两个notification可以检查屏幕的连接情况:
UIScreenDidConnectNotification
UIScreenDidDisconnectNotification
一旦屏幕连接上或断开iOS设备,就会发出上面的notification。这样就简单了,设置一下:
- [[NSNotificationCenter defaultCenter] addObserver:self selector:@selector(screenDidConnect:) name:UIScreenDidConnectNotification object:nil];
- [[NSNotificationCenter defaultCenter] addObserver:self selector:@selector(screenDidDisconnect:) name:UIScreenDidDisconnectNotification object:nil];
然后进行相关的处理。
- #pragma mark - Notifications Handler
- - (void)screenDidConnect:(NSNotification *)notification
- {
- NSLog(@"connect");
- self.externalScreen = notification.object;
- // Handle the configuration below......
- }
- - (void)screenDidDisconnect:(NSNotification *)notification
- {
- NSLog(@"disconnect");
- if (self.externalWindow) {
- self.externalWindow.hidden = YES;
- self.externalScreen = nil;
- self.externalWindow = nil;
- }
- }
这样差不多就搞定了。基本上在iOS开发中主要是view的编辑,因为在新的屏幕中分辨率不一样,要进行特定的设置。


 4万+
4万+

 被折叠的 条评论
为什么被折叠?
被折叠的 条评论
为什么被折叠?
 到【灌水乐园】发言


