


目录
环境准备:3个虚拟机
一个安装了nginx的虚拟机ip:172.25.254.100
mysql-node1:172.25.254.10
mysql-node2:172.25.254.20
一 Mysql 在服务器中的部署方法
在企业中90%的服务器操作系统均为Linux
在企业中对于Mysql的安装通常用源码编译的方式来进行
官网:http://www.mysql.com

1.1 在Linux下部署mysql
1.1.1 安装依赖性
[root@mysql-node1 ~]# yum install  cmake gcc-c++ openssl-devel ncurses-devel.x86_64 rpcgen.x86_64 -y
[root@mysql-node1 ~]# ls
111.sh           initial-setup-ks.cfg                      MHA-7.zip                                      公共  视频  文档  音乐
anaconda-ks.cfg  libtirpc-devel-0.2.4-0.16.el7.x86_64.rpm  mysql-router-community-8.4.0-1.el7.x86_64.rpm  模板  图片  下载  桌面
[root@mysql-node1 ~]# yum install mysql-router-community-8.4.0-1.el7.x86_64.rpm -y
1.1.2 源码编译安装mysql
#下载并解压源码包
[root@mysql-node1 ~]# tar zxf mysql-boost-5.7.44.tar.gz
[root@mysql-node1 ~]# cd /root/mysql-5.7.44
[root@mysql-node1 mysql-5.7.44]#
[root@mysql-node1 mysql-5.7.44]# cmake -DCMAKE_INSTALL_PREFIX=/usr/local/mysql -DMYSQL_DATADIR=/data/mysql -DMYSQL_UNIX_ADDR=/data/mysql/mysql.sock -DWITH_INNOBASE_STORAGE_ENGINE=1 -DWITH_EXTRA_CHARSETS=all -DDEFAULT_CHARSET=utf8mb4 -DDEFAULT_COLLATION=utf8mb4_unicode_ci -DWITH_BOOST=/root/mysql-5.7.44/boost/boost_1_59_0/
[root@mysql-node1 mysql-5.7.44]# make -j2
[root@mysql-node1 mysql-5.7.44]# make install
解释:
[root@mysql-node10 mysql-5.7.44]# cmake \
-DCMAKE_INSTALL_PREFIX=/usr/local/mysql \ #指定安装路径
-DMYSQL_DATADIR=/data/mysql \ #指定数据目录
-DMYSQL_UNIX_ADDR=/data/mysql/mysql.sock \ #指定套接字文件
-DWITH_INNOBASE_STORAGE_ENGINE=1 \ #指定启用INNODB存储引擎,默认
用myisam
-DWITH_EXTRA_CHARSETS=all \ #扩展字符集
-DDEFAULT_CHARSET=utf8mb4 \ #指定默认字符集
-DDEFAULT_COLLATION=utf8mb4_unicode_ci \ #指定默认校验字符集
-DWITH_BOOST=/root/mysql-5.7.44/boost/boost_1_59_0/ #指定c++库依赖
[root@mysql-node10 mysql-5.7.44]# make -j2 #-j2 表示有几个
核心就跑几个进程
[root@mysql-node10 mysql-5.7.44# make install
当cmake出错后如果想重新检测,删除 mysql-5.7.44 中 CMakeCache.txt即可
1.1.3 部署mysql
[root@mysql-node1 mysql]# useradd -s /sbin/nologin -M mysql
#创建mysql的数据目录
[root@mysql-node1 ~]# mkdir /data/mysql -p
[root@mysql-node1 ~]# chown mysql.mysql -R /data/mysql
#生成启动脚本
[root@mysql-node1 ~]# cd /usr/local/mysql/support-files/
[root@mysql-node1 support-files]# cp mysql.server /etc/init.d/mysqld
#生成配置文件
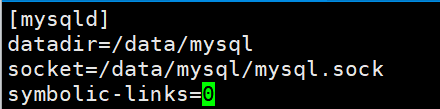
[root@mysql-node1 support-files]# vim /etc/my.cnf
[mysqld]
datadir=/data/mysql #指定数据目录
socket=/data/mysql/mysql.sock #指定套接字
symbolic-links=0 #数据只能存放到数据目录中,禁止链接到数据目录
#修改环境变量
[root@mysql-node1 support-files]# vim ~/.bash_profile
PATH=$PATH:$HOME/bin:/usr/local/mysql/bin
[root@mysql-node1 support-files]# source ~/.bash_profile
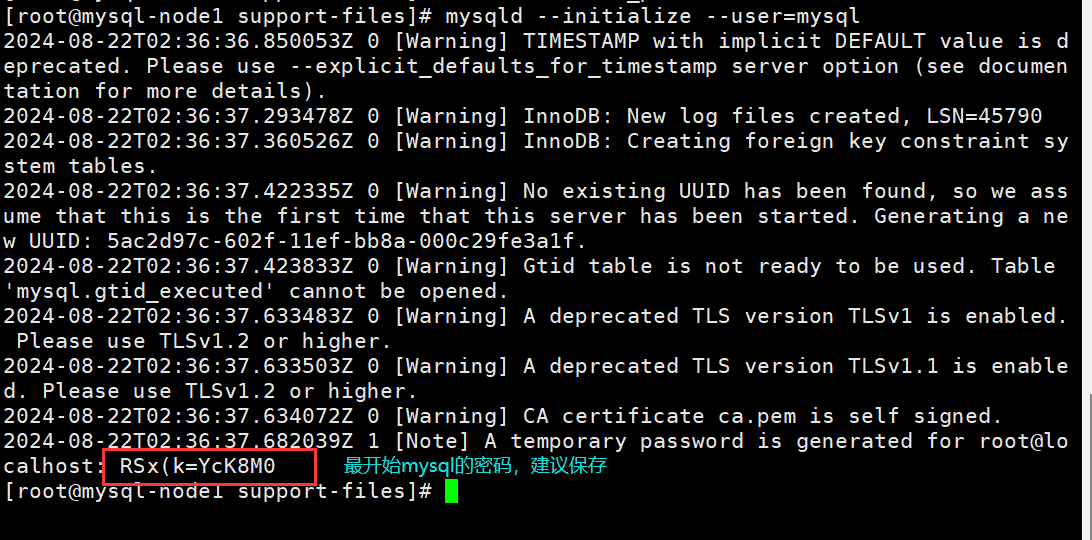
#数据库初始化建立mysql基本数据
[root@mysql-node1 support-files]# mysqld --initialize --user=mysql
#启动
[root@mysql-node1 support-files]#/etc/init.d/mysqld start
Starting MySQL.Logging to '/data/mysql/mysql-node1.err'.
SUCCESS!
#开机自启动
[root@mysql-node1 support-files]# chkconfig mysqld on
[root@mysql-node1 support-files]# chkconfig --list
注:该输出结果只显示 SysV 服务,并不包含
原生 systemd 服务。SysV 配置数据
可能被原生 systemd 配置覆盖。
要列出 systemd 服务,请执行 'systemctl list-unit-files'。
查看在具体 target 启用的服务请执行
'systemctl list-dependencies [target]'。
mysqld 0:关 1:关 2:开 3:开 4:开 5:开 6:关
netconsole 0:关 1:关 2:关 3:关 4:关 5:关 6:关
network 0:关 1:关 2:开 3:开 4:开 5:开 6:关
rhnsd 0:关 1:关 2:开 3:开 4:开 5:开 6:关
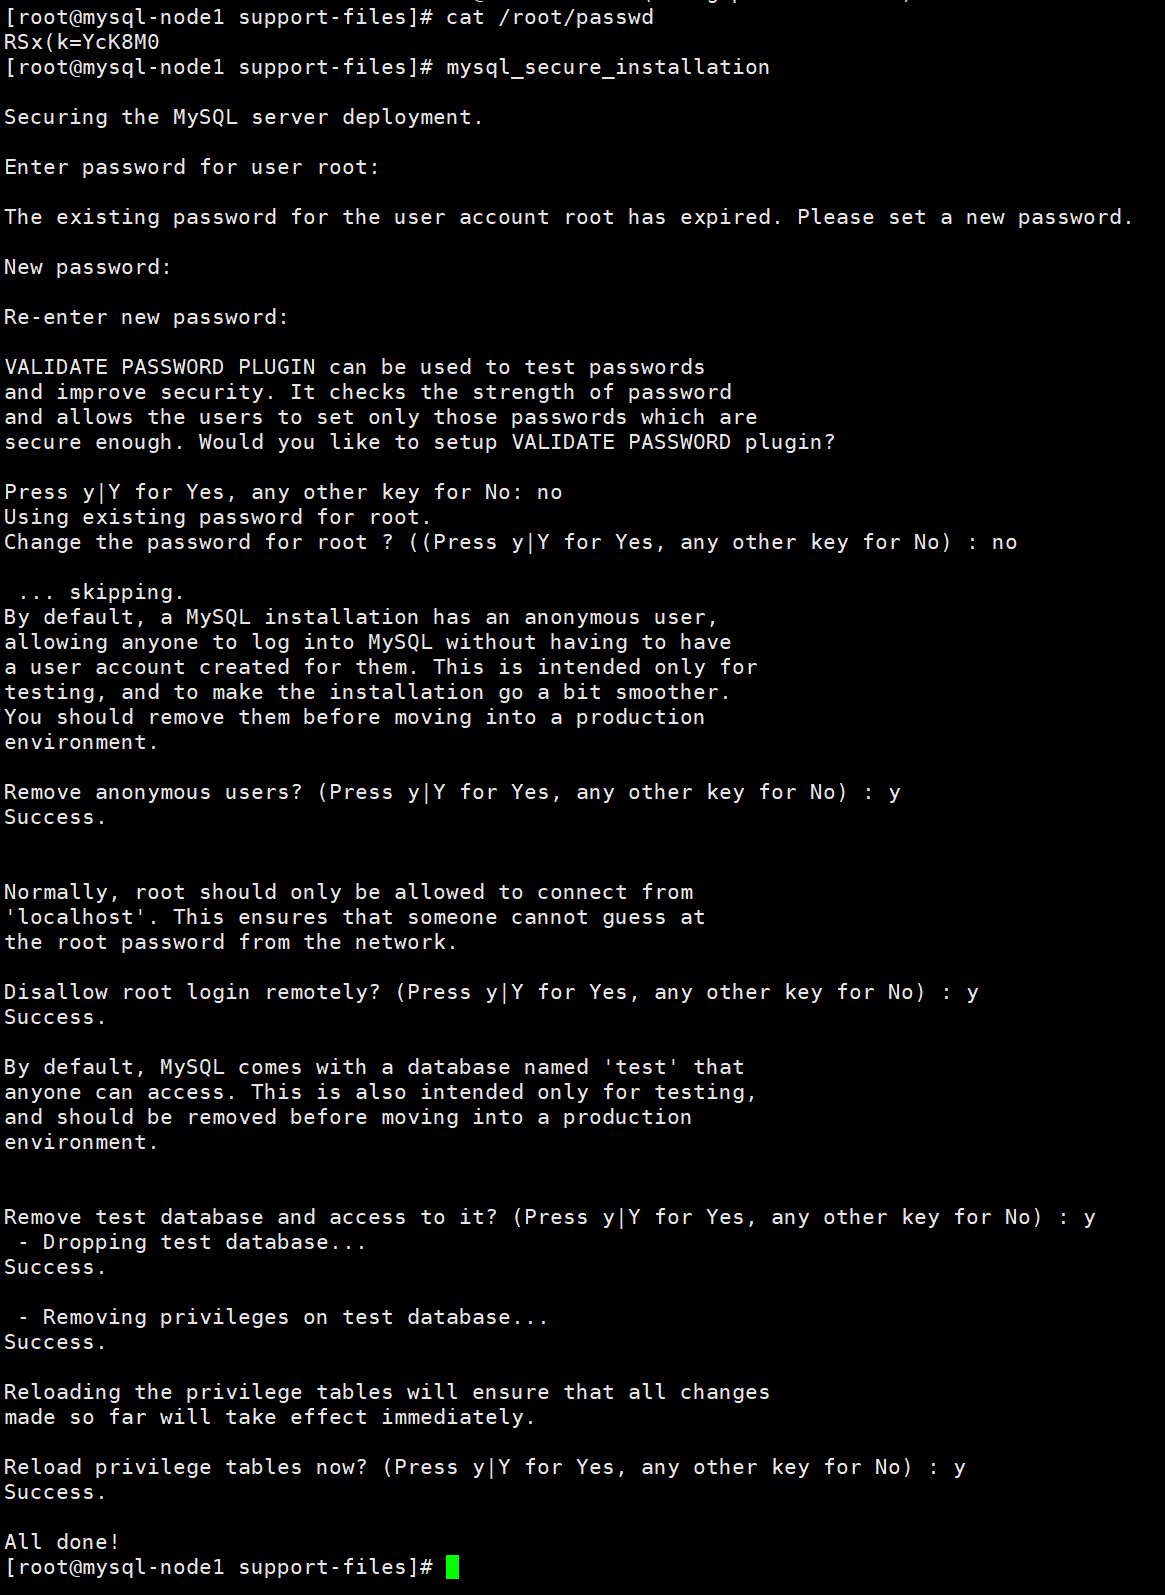
#数据库安全初始化
[root@mysql-node1 support-files]# cat /root/passwd
RSx(k=YcK8M0
[root@mysql-node1 support-files]# mysql_secure_installation
Securing the MySQL server deployment.
Enter password for user root: #输入当前密码
The existing password for the user account root has expired. Please set a new password.
New password: #输入新密码
Re-enter new password: #重复密码
VALIDATE PASSWORD PLUGIN can be used to test passwords
and improve security. It checks the strength of password
and allows the users to set only those passwords which are
secure enough. Would you like to setup VALIDATE PASSWORD plugin?
Press y|Y for Yes, any other key for No: no #是否启用密码插件
Using existing password for root.
Change the password for root ? ((Press y|Y for Yes, any other key for No) : no #是否要重置密码
... skipping.
By default, a MySQL installation has an anonymous user,
allowing anyone to log into MySQL without having to have
a user account created for them. This is intended only for
testing, and to make the installation go a bit smoother.
You should remove them before moving into a production
environment.
Remove anonymous users? (Press y|Y for Yes, any other key for No) : y
Success.
Normally, root should only be allowed to connect from
'localhost'. This ensures that someone cannot guess at
the root password from the network.
Disallow root login remotely? (Press y|Y for Yes, any other key for No) : y
Success.
By default, MySQL comes with a database named 'test' that
anyone can access. This is also intended only for testing,
and should be removed before moving into a production
environment.
Remove test database and access to it? (Press y|Y for Yes, any other key for No) : y
- Dropping test database...
Success.
- Removing privileges on test database...
Success.
Reloading the privilege tables will ensure that all changes
made so far will take effect immediately.
Reload privilege tables now? (Press y|Y for Yes, any other key for No) : y
Success.
All done!
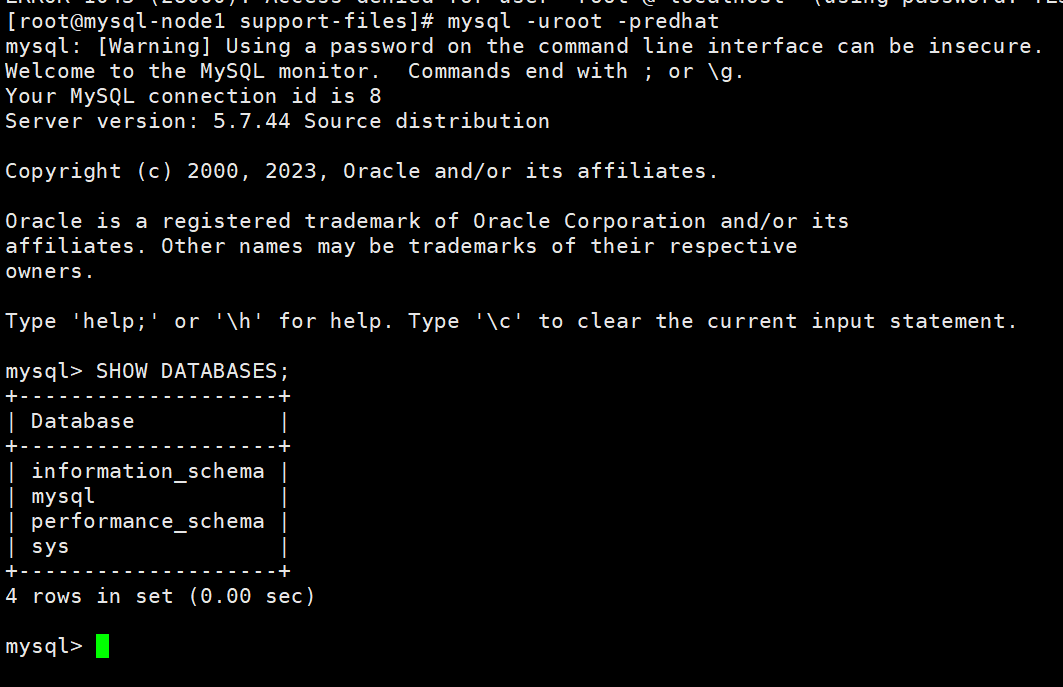
#测试
[root@mysql-node1 support-files]# mysql -uroot -predhat
mysql: [Warning] Using a password on the command line interface can be insecure.
Welcome to the MySQL monitor. Commands end with ; or \g.
Your MySQL connection id is 8
Server version: 5.7.44 Source distribution
Copyright (c) 2000, 2023, Oracle and/or its affiliates.
Oracle is a registered trademark of Oracle Corporation and/or its
affiliates. Other names may be trademarks of their respective
owners.
Type 'help;' or '\h' for help. Type '\c' to clear the current input statement.
mysql> SHOW DATABASES;
+--------------------+
| Database |
+--------------------+
| information_schema |
| mysql |
| performance_schema |
| sys |
+--------------------+
4 rows in set (0.00 sec)
mysql>
生成配置文件
修改环境变量

#数据库初始化建立mysql基本数据
安全初始化
进入mysql
node2也做相同的配置
实验环境中如果初始化有问题,方法(仅实验环境可以用)
![]()
二 mysql的组从复制
2.1 配置mastesr
#设置主机的id
[root@mysql-node1 ~]# vim /etc/my.cnf
[mysqld]
datadir=/data/mysql
socket=/data/mysql/mysql.sock
symbolic-links=0
server-id=10
[root@mysql-node1 ~]# /etc/init.d/mysqld restart
Shutting down MySQL.. SUCCESS!
Starting MySQL. SUCCESS!

[root@mysql-node2 ~]# vim /etc/my.cnf
[mysqld]
datadir=/data/mysql
socket=/data/mysql/mysql.sock
symbolic-links=0
server-id=20
[root@mysql-node2 ~]# /etc/init.d/mysqld restart
Shutting down MySQL. SUCCESS!
Starting MySQL. SUCCESS!

#开启二进制日志
[root@mysql-node1 ~]# vim /etc/my.cnf
[mysqld]
datadir=/data/mysql
socket=/data/mysql/mysql.sock
symbolic-links=0
server-id=10
log-bin=mysql-bin
[root@mysql-node1 ~]# /etc/init.d/mysqld restart
Shutting down MySQL.. SUCCESS!
Starting MySQL. SUCCESS!

[root@mysql-node2 ~]# vim /etc/my.cnf
[mysqld]
datadir=/data/mysql
socket=/data/mysql/mysql.sock
symbolic-links=0
server-id=20
log-bin=mysql-bin
[root@mysql-node2 ~]# /etc/init.d/mysqld restart
Shutting down MySQL.. SUCCESS!
Starting MySQL. SUCCESS!

#登录mysql
[root@mysql-node1 ~]# mysql -u root -predhat
#创建一个用户
mysql> CREATE USER rep1@'%' IDENTIFIED BY 'haha';
Query OK, 0 rows affected (0.00 sec)

mysql> GRANT REPLICATION SLAVE ON *.* TO rep1@'%';
Query OK, 0 rows affected (0.00 sec)

mysql> show master status;
+------------------+----------+--------------+------------------+-------------------+
| File             | Position | Binlog_Do_DB | Binlog_Ignore_DB | Executed_Gtid_Set |
+------------------+----------+--------------+------------------+-------------------+
| mysql-bin.000001 |      595 |              |                  |                   |
+------------------+----------+--------------+------------------+-------------------+
1 row in set (0.01 sec)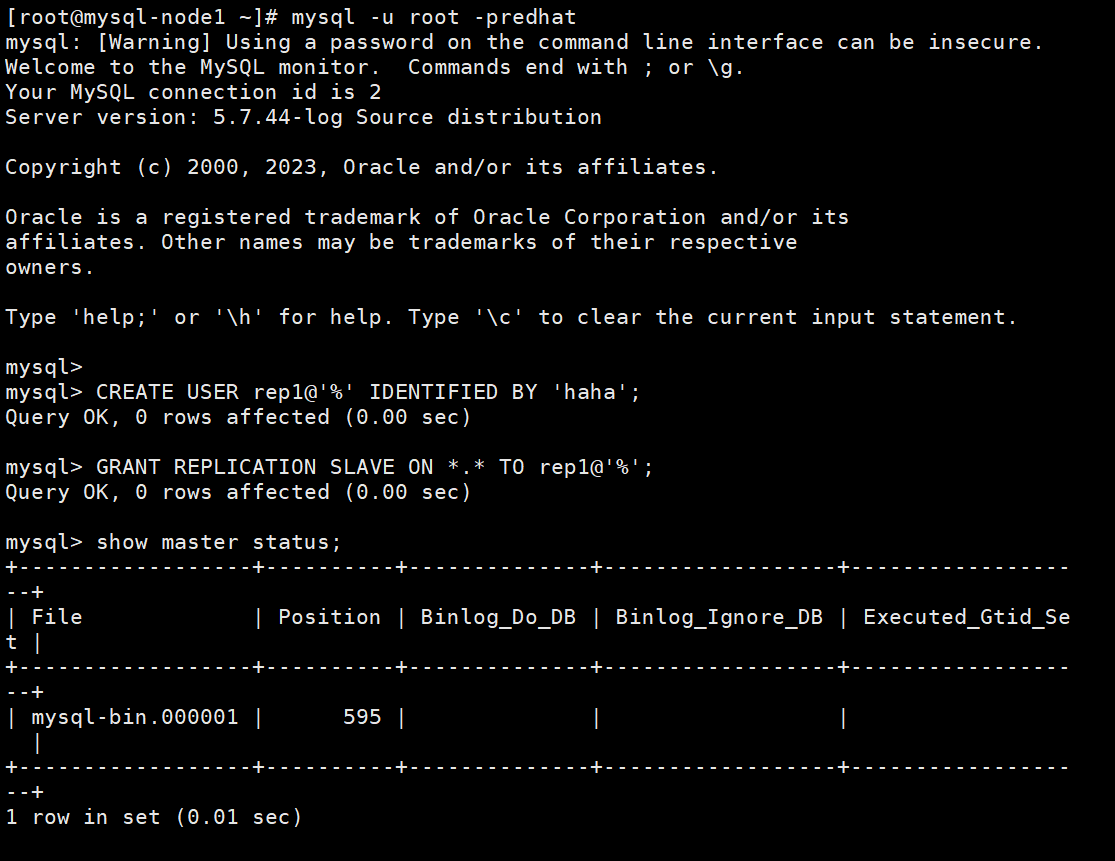
2.2 配置salve
[root@mysql-node2 ~]# mysql -u root -predhat
#注意: master_log_file='mysql-bin.000001'和master_log_pos=1252为node1的mysql中的show master status;的数值
mysql> change master to master_host='172.25.254.10',master_user='rep1',master_password='haha',master_log_file='mysql-bin.000001',master_log_pos=1252;
Query OK, 0 rows affected, 2 warnings (0.00 sec)

mysql> start slave;
Query OK, 0 rows affected (0.00 sec)

mysql> show slave status\G;
*************************** 1. row ***************************
               Slave_IO_State: Waiting for master to send event
                  Master_Host: 172.25.254.10
                  Master_User: rep1
                  Master_Port: 3306
                Connect_Retry: 60
              Master_Log_File: mysql-bin.000001
          Read_Master_Log_Pos: 1252
               Relay_Log_File: mysql-node2-relay-bin.000002
                Relay_Log_Pos: 320
        Relay_Master_Log_File: mysql-bin.000001
             Slave_IO_Running: Yes
            Slave_SQL_Running: Yes
              Replicate_Do_DB:
          Replicate_Ignore_DB:
           Replicate_Do_Table:
       Replicate_Ignore_Table:
      Replicate_Wild_Do_Table:
  Replicate_Wild_Ignore_Table:
                   Last_Errno: 0
                   Last_Error:
                 Skip_Counter: 0
          Exec_Master_Log_Pos: 1252
              Relay_Log_Space: 533
              Until_Condition: None
               Until_Log_File:
                Until_Log_Pos: 0
           Master_SSL_Allowed: No
           Master_SSL_CA_File:
           Master_SSL_CA_Path:
              Master_SSL_Cert:
            Master_SSL_Cipher:
               Master_SSL_Key:
        Seconds_Behind_Master: 0
Master_SSL_Verify_Server_Cert: No
                Last_IO_Errno: 0
                Last_IO_Error:
               Last_SQL_Errno: 0
               Last_SQL_Error:
  Replicate_Ignore_Server_Ids:
             Master_Server_Id: 10
                  Master_UUID: 5ac2d97c-602f-11ef-bb8a-000c29fe3a1f
             Master_Info_File: /data/mysql/master.info
                    SQL_Delay: 0
          SQL_Remaining_Delay: NULL
      Slave_SQL_Running_State: Slave has read all relay log; waiting for more updates
           Master_Retry_Count: 86400
                  Master_Bind:
      Last_IO_Error_Timestamp:
     Last_SQL_Error_Timestamp:
               Master_SSL_Crl:
           Master_SSL_Crlpath:
           Retrieved_Gtid_Set:
            Executed_Gtid_Set:
                Auto_Position: 0
         Replicate_Rewrite_DB:
                 Channel_Name:
           Master_TLS_Version:
1 row in set (0.00 sec)

ERROR:
No query specified

测试
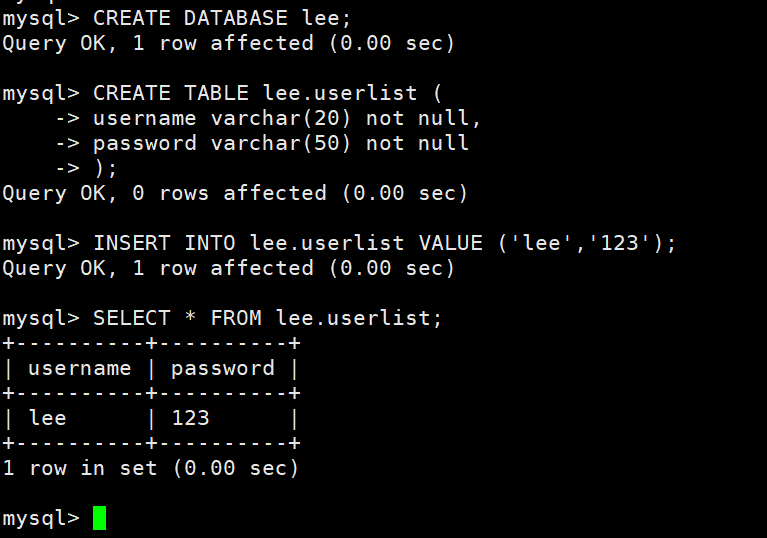
#node1
mysql> CREATE DATABASE lee;
Query OK, 1 row affected (0.00 sec)
mysql> CREATE TABLE lee.userlist (
-> username varchar(20) not null,
-> password varchar(50) not null
-> );
Query OK, 0 rows affected (0.00 sec)
mysql> INSERT INTO lee.userlist VALUE ('lee','123');
Query OK, 1 row affected (0.00 sec)
mysql> SELECT * FROM lee.userlist;
+----------+----------+
| username | password |
+----------+----------+
| lee | 123 |
+----------+----------+
1 row in set (0.00 sec)
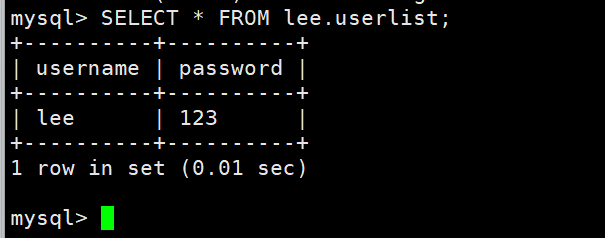
#node2测试
mysql> SELECT * FROM lee.userlist;
+----------+----------+
| username | password |
+----------+----------+
| lee | 123 |
+----------+----------+
1 row in set (0.01 sec)
2.3 当有数据时添加slave2
创建第三个mysql
#传输文件
[root@mysql-node1 ~]# rsync -al /usr/local/mysql root@172.25.254.30:/usr/local
[root@mysql-node3 mysql]# useradd -s /sbin/nologin -M mysql
#创建mysql的数据目录
[root@mysql-node3 ~]# mkdir /data/mysql -p
[root@mysql-node3 ~]# chown mysql.mysql -R /data/mysql
#生成启动脚本
[root@mysql-node3 ~]# cd /usr/local/mysql/support-files/
[root@mysql-node3 support-files]# cp mysql.server /etc/init.d/mysqld
#生成配置文件
[root@mysql-node3 support-files]# vim /etc/my.cnf
[mysqld]
datadir=/data/mysql #指定数据目录
socket=/data/mysql/mysql.sock #指定套接字
symbolic-links=0 #数据只能存放到数据目录中,禁止链接到数据目录
#修改环境变量
[root@mysql-node3 support-files]# vim ~/.bash_profile
PATH=$PATH:$HOME/bin:/usr/local/mysql/bin
[root@mysql-node3 support-files]# source ~/.bash_profile
#数据库初始化建立mysql基本数据
[root@mysql-node3 support-files]# mysqld --initialize --user=mysql
#会出现mysql的密码保存一下
#启动
[root@mysql-node3 support-files]#/etc/init.d/mysqld start
Starting MySQL.Logging to '/data/mysql/mysql-node1.err'.
SUCCESS!
#开机自启动
[root@mysql-node3 support-files]# chkconfig mysqld on
[root@mysql-node3 support-files]# chkconfig --list
注:该输出结果只显示 SysV 服务,并不包含
原生 systemd 服务。SysV 配置数据
可能被原生 systemd 配置覆盖。
要列出 systemd 服务,请执行 'systemctl list-unit-files'。
查看在具体 target 启用的服务请执行
'systemctl list-dependencies [target]'。
mysqld 0:关 1:关 2:开 3:开 4:开 5:开 6:关
netconsole 0:关 1:关 2:关 3:关 4:关 5:关 6:关
network 0:关 1:关 2:开 3:开 4:开 5:开 6:关
rhnsd 0:关 1:关 2:开 3:开 4:开 5:开 6:关
#数据库安全初始化
#刚才保存的密码
[root@mysql-node3 support-files]# cat /root/passwd
RSx(k=YcK8M0
[root@mysql-node3 support-files]# mysql_secure_installation
Securing the MySQL server deployment.
Enter password for user root: #输入当前密码
The existing password for the user account root has expired. Please set a new password.
New password: #输入新密码
Re-enter new password: #重复密码
VALIDATE PASSWORD PLUGIN can be used to test passwords
and improve security. It checks the strength of password
and allows the users to set only those passwords which are
secure enough. Would you like to setup VALIDATE PASSWORD plugin?
Press y|Y for Yes, any other key for No: no #是否启用密码插件
Using existing password for root.
Change the password for root ? ((Press y|Y for Yes, any other key for No) : no #是否要重置密码
... skipping.
By default, a MySQL installation has an anonymous user,
allowing anyone to log into MySQL without having to have
a user account created for them. This is intended only for
testing, and to make the installation go a bit smoother.
You should remove them before moving into a production
environment.
Remove anonymous users? (Press y|Y for Yes, any other key for No) : y
Success.
Normally, root should only be allowed to connect from
'localhost'. This ensures that someone cannot guess at
the root password from the network.
Disallow root login remotely? (Press y|Y for Yes, any other key for No) : y
Success.
By default, MySQL comes with a database named 'test' that
anyone can access. This is also intended only for testing,
and should be removed before moving into a production
environment.
Remove test database and access to it? (Press y|Y for Yes, any other key for No) : y
- Dropping test database...
Success.
- Removing privileges on test database...
Success.
Reloading the privilege tables will ensure that all changes
made so far will take effect immediately.
Reload privilege tables now? (Press y|Y for Yes, any other key for No) : y
Success.
All done!
#测试
[root@mysql-node3 support-files]# mysql -uroot -predhat
mysql: [Warning] Using a password on the command line interface can be insecure.
Welcome to the MySQL monitor. Commands end with ; or \g.
Your MySQL connection id is 5
Server version: 5.7.44 Source distribution
Copyright (c) 2000, 2023, Oracle and/or its affiliates.
Oracle is a registered trademark of Oracle Corporation and/or its
affiliates. Other names may be trademarks of their respective
owners.
Type 'help;' or '\h' for help. Type '\c' to clear the current input statement.
mysql> SHOW DATABASES;
+--------------------+
| Database |
+--------------------+
| information_schema |
| mysql |
| performance_schema |
| sys |
+--------------------+
4 rows in set (0.00 sec)
mysql>


开始:
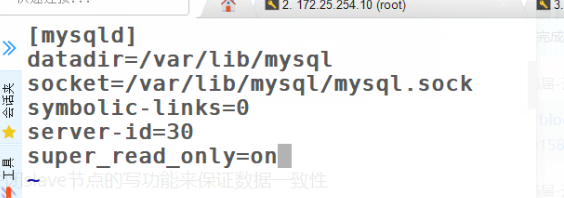
[root@mysql-node3 support-files]# vim /etc/my.cnf
[mysqld]
datadir=/data/mysql
socket=/data/mysql/mysql.sock
symbolic-links=0
server-id=30
[root@mysql-node3 support-files]# /etc/init.d/mysqld restart
Shutting down MySQL. SUCCESS!
Starting MySQL. SUCCESS! 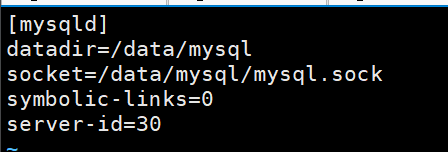
拉平数据
#从master节点备份数据
[root@mysql-node1 ~]# mysqldump -uroot -predhat lee > zhang.sql
#把zhang.sql传到node3
[root@mysql-node1 ~]# scp zhang.sql root@172.25.254.30:/mnt/
root@172.25.254.30's password:
zhang.sql 100% 1943 1.4MB/s 00:00
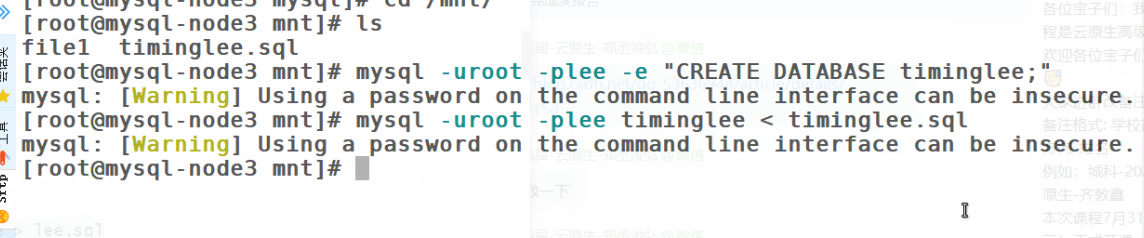
#利用master节点中备份出来的zhang.sql在slave2中拉平数据
[root@mysql-node3 ~]# cd /mnt/
[root@mysql-node3 mnt]# ls
zhang.sql
[root@mysql-node3 mnt]# mysql -uroot -predhat -e "CREATE DATABASE lee;"
mysql: [Warning] Using a password on the command line interface can be insecure.
[root@mysql-node3 mnt]# mysql -uroot -predhat lee < zhang.sql
mysql: [Warning] Using a password on the command line interface can be insecure.
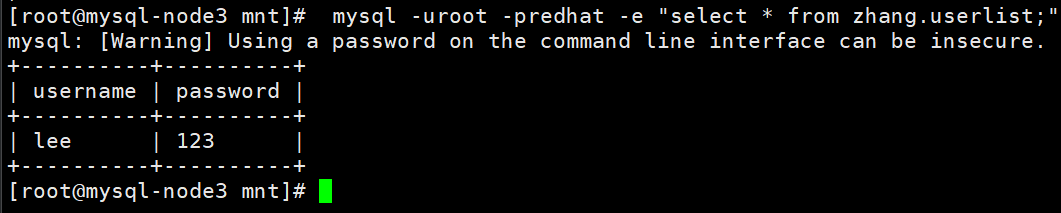
#查看
[root@mysql-node3 mnt]# mysql -uroot -predhat -e "select * from lee.userlist;"
mysql: [Warning] Using a password on the command line interface can be insecure.
+----------+----------+
| username | password |
+----------+----------+
| lee | 123 |
| user3 | 123 |
+----------+----------+
生产环境中备份时需要锁表,保证备份前后的数据一致
mysql> FLUSH TABLES WITH READ LOCK;
备份后再解锁
mysql> UNLOCK TABLES;
mysqldump命令备份的数据文件,在还原时先DROP TABLE,需要合并数据时需要删除此语句
--
-- Table structure for table `userlist`
--
DROP TABLE IF EXISTS `userlist`; #需要合并数据时需要删除此语句
/*!40101 SET @saved_cs_client = @@character_set_client */;
/*!40101 SET character_set_client = utf8 */;
配置slave2的slave功能
#配置slave2的slave功能
#在master中查询日志pos
mysql> change master to master_host='172.25.254.10',master_user='rep1',master_password='haha',master_log_file='mysql-bin.000001',master_log_pos=1895;
Query OK, 0 rows affected, 2 warnings (0.00 sec)

mysql> start slave;
Query OK, 0 rows affected (0.01 sec)

mysql> SHOW SLAVE STATUS\G;
*************************** 1. row ***************************
               Slave_IO_State: Waiting for master to send event
                  Master_Host: 172.25.254.10
                  Master_User: rep1
                  Master_Port: 3306
                Connect_Retry: 60
              Master_Log_File: mysql-bin.000001
          Read_Master_Log_Pos: 1895
               Relay_Log_File: mysql-node3-relay-bin.000002
                Relay_Log_Pos: 320
        Relay_Master_Log_File: mysql-bin.000001
             Slave_IO_Running: Yes
            Slave_SQL_Running: Yes
              Replicate_Do_DB:
          Replicate_Ignore_DB:
           Replicate_Do_Table:
       Replicate_Ignore_Table:
      Replicate_Wild_Do_Table:
  Replicate_Wild_Ignore_Table:
                   Last_Errno: 0
                   Last_Error:
                 Skip_Counter: 0
          Exec_Master_Log_Pos: 1895
              Relay_Log_Space: 533
              Until_Condition: None
               Until_Log_File:
                Until_Log_Pos: 0
           Master_SSL_Allowed: No
           Master_SSL_CA_File:
           Master_SSL_CA_Path:
              Master_SSL_Cert:
            Master_SSL_Cipher:
               Master_SSL_Key:
        Seconds_Behind_Master: 0
Master_SSL_Verify_Server_Cert: No
                Last_IO_Errno: 0
                Last_IO_Error:
               Last_SQL_Errno: 0
               Last_SQL_Error:
  Replicate_Ignore_Server_Ids:
             Master_Server_Id: 10
                  Master_UUID: 5ac2d97c-602f-11ef-bb8a-000c29fe3a1f
             Master_Info_File: /data/mysql/master.info
                    SQL_Delay: 0
          SQL_Remaining_Delay: NULL
      Slave_SQL_Running_State: Slave has read all relay log; waiting for more updates
           Master_Retry_Count: 86400
                  Master_Bind:
      Last_IO_Error_Timestamp:
     Last_SQL_Error_Timestamp:
               Master_SSL_Crl:
           Master_SSL_Crlpath:
           Retrieved_Gtid_Set:
            Executed_Gtid_Set:
                Auto_Position: 0
         Replicate_Rewrite_DB:
                 Channel_Name:
           Master_TLS_Version:
1 row in set (0.00 sec)

ERROR:
No query specified

测试:
[root@mysql-node1 ~]# mysql -uroot -predhat -e "INSERT INTO lee.userlist VALUES('user4','123');"

[root@mysql-node2 ~]# mysql -uroot -predhat -e 'select * from lee.userlist;'
mysql: [Warning] Using a password on the command line interface can be insecure.
+----------+----------+
| username | password |
+----------+----------+
| lee      | 123      |
| user3    | 123      |
| user4    | 123      |
+----------+----------+

[root@mysql-node3 mnt]# mysql -uroot -predhat -e 'select * from lee.userlist;'
mysql: [Warning] Using a password on the command line interface can be insecure.
+----------+----------+
| username | password |
+----------+----------+
| lee      | 123      |
| user3    | 123      |
| user4    | 123      |
+----------+----------+
2.4 延迟复制
延迟复制时用来控制sql线程的,和i/o线程无关
这个延迟复制不是i/o线程过段时间来复制,i/o是正常工作的
是日志已经保存在slave端了,那个sql要等多久进行回放
对node3做一下实验:
mysql> STOP SLAVE SQL_THREAD;
Query OK, 0 rows affected (0.00 sec)

mysql> CHANGE MASTER TO MASTER_DELAY=60;
Query OK, 0 rows affected (0.00 sec)

mysql> START SLAVE SQL_THREAD;
Query OK, 0 rows affected (0.00 sec)

mysql>  SHOW SLAVE STATUS\G;
*************************** 1. row ***************************
               Slave_IO_State: Waiting for master to send event
                  Master_Host: 172.25.254.10
                  Master_User: rep1
                  Master_Port: 3306
                Connect_Retry: 60
              Master_Log_File: mysql-bin.000001
          Read_Master_Log_Pos: 2955
               Relay_Log_File: mysql-node3-relay-bin.000002
                Relay_Log_Pos: 585
        Relay_Master_Log_File: mysql-bin.000001
             Slave_IO_Running: Yes
            Slave_SQL_Running: Yes
              Replicate_Do_DB:
          Replicate_Ignore_DB:
           Replicate_Do_Table:
       Replicate_Ignore_Table:
      Replicate_Wild_Do_Table:
  Replicate_Wild_Ignore_Table:
                   Last_Errno: 0
                   Last_Error:
                 Skip_Counter: 0
          Exec_Master_Log_Pos: 2955
              Relay_Log_Space: 798
              Until_Condition: None
               Until_Log_File:
                Until_Log_Pos: 0
           Master_SSL_Allowed: No
           Master_SSL_CA_File:
           Master_SSL_CA_Path:
              Master_SSL_Cert:
            Master_SSL_Cipher:
               Master_SSL_Key:
        Seconds_Behind_Master: 0
Master_SSL_Verify_Server_Cert: No
                Last_IO_Errno: 0
                Last_IO_Error:
               Last_SQL_Errno: 0
               Last_SQL_Error:
  Replicate_Ignore_Server_Ids:
             Master_Server_Id: 10
                  Master_UUID: 5ac2d97c-602f-11ef-bb8a-000c29fe3a1f
             Master_Info_File: /data/mysql/master.info
                    SQL_Delay: 60     #延迟效果
          SQL_Remaining_Delay: NULL
      Slave_SQL_Running_State: Slave has read all relay log; waiting for more updates
           Master_Retry_Count: 86400
                  Master_Bind:
      Last_IO_Error_Timestamp:
     Last_SQL_Error_Timestamp:
               Master_SSL_Crl:
           Master_SSL_Crlpath:
           Retrieved_Gtid_Set:
            Executed_Gtid_Set:
                Auto_Position: 0
         Replicate_Rewrite_DB:
                 Channel_Name:
           Master_TLS_Version:
1 row in set (0.00 sec)

ERROR:
No query specified
测试:
在master中写入数据后过了延迟时间才能被查询到
2.5 慢查询日志
·慢查询,顾名思义,执行很慢的查询
·当执行SQL超过long_query_time参数设定的时间阈值(默认10s)时,就被认为是慢查询,这个SQL语句就是需要优化的
·慢查询被记录在慢查询日志里
·慢查询日志默认是不开启的
·如果需要优化SQL语句,就可以开启这个功能,它可以让你很容易地知道哪些语句是需要优化的
mysql> SHOW variables like "slow%";
+---------------------+----------------------------------+
| Variable_name       | Value                            |
+---------------------+----------------------------------+
| slow_launch_time    | 2                                |
| slow_query_log      | OFF                              |
| slow_query_log_file | /data/mysql/mysql-node1-slow.log |
+---------------------+----------------------------------+
3 rows in set (0.00 sec)
开启慢查询日志
#对node1
mysql> SET GLOBAL slow_query_log=ON;
Query OK, 0 rows affected (0.00 sec)

mysql> SET long_query_time=4;
Query OK, 0 rows affected (0.00 sec)

mysql> SHOW VARIABLES like "long%";
+-----------------+----------+
| Variable_name   | Value    |
+-----------------+----------+
| long_query_time | 4.000000 |
+-----------------+----------+
1 row in set (0.00 sec)

mysql> SHOW VARIABLES like "slow%";
+---------------------+----------------------------------+
| Variable_name       | Value                            |
+---------------------+----------------------------------+
| slow_launch_time    | 2                                |
| slow_query_log      | ON                               |
| slow_query_log_file | /data/mysql/mysql-node1-slow.log |
+---------------------+----------------------------------+
3 rows in set (0.00 sec)
mysql> exit

#慢查询日志
[root@mysql-node1 ~]# cat /data/mysql/mysql-node1-slow.log
/usr/local/mysql/bin/mysqld, Version: 5.7.44-log (Source distribution). started with:
Tcp port: 3306  Unix socket: /data/mysql/mysql.sock
Time                 Id Command    Argument
测试慢查询
#node1
mysql> select sleep (10);
+------------+
| sleep (10) |
+------------+
|          0 |
+------------+
1 row in set (10.00 sec)

mysql> exit
Bye

#慢查询日志
[root@mysql-node1 ~]# cat /data/mysql/mysql-node1-slow.log
/usr/local/mysql/bin/mysqld, Version: 5.7.44-log (Source distribution). started with:
Tcp port: 3306  Unix socket: /data/mysql/mysql.sock
Time                 Id Command    Argument
# Time: 2024-08-22T07:30:34.222028Z
# User@Host: root[root] @ localhost []  Id:   146
# Query_time: 10.000779  Lock_time: 0.000000 Rows_sent: 1  Rows_examined: 0
SET timestamp=1724311834;
select sleep (10);
2.6 mysql的并行复制
查看slave中的线程信息
#node2
mysql> show processlist;
默认情况下slave中使用的是sql单线程回放
在master中时多用户读写,如果使用sql单线程回放那么会造成组从延迟严重
开启MySQL的多线程回放可以解决上述问题
#在slaves中设定,node2
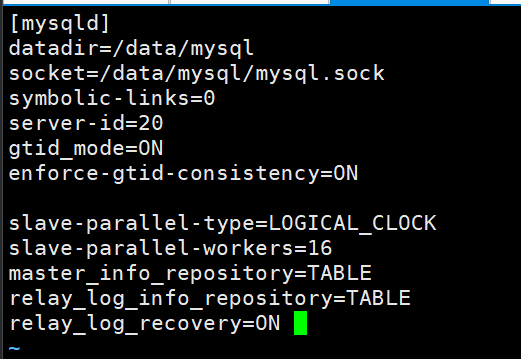
[root@mysql-node2 ~]# vim /etc/my.cnf
[mysqld]
datadir=/data/mysql
socket=/data/mysql/mysql.sock
server-id=2
gtid_mode=ON #打开gtid
enforce-gtid-consistency=ON #保证gtid的强一致性
slave-parallel-type=LOGICAL_CLOCK #基于组提交,
slave-parallel-workers=16 #开启线程数量
master_info_repository=TABLE #master信息在表中记录,默认记录在/data/mysql//master.info
relay_log_info_repository=TABLE #回放日志信息在表中记录,默认记录在/data/mysql/relay-log.info
relay_log_recovery=ON #日志回放恢复功能开启
[root@mysql-node2 ~]# /etc/init.d/mysql restart
Shutting down MySQL. SUCCESS!
Starting MySQL. SUCCESS!
#进入mysql查看
[root@mysql-node2 ~]# mysql -u root -predhat
mysql: [Warning] Using a password on the command line interface can be insecure.
Welcome to the MySQL monitor. Commands end with ; or \g.
Your MySQL connection id is 20
Server version: 5.7.44 Source distribution
Copyright (c) 2000, 2023, Oracle and/or its affiliates.
Oracle is a registered trademark of Oracle Corporation and/or its
affiliates. Other names may be trademarks of their respective
owners.
Type 'help;' or '\h' for help. Type '\c' to clear the current input statement.
mysql> show processlist;
+----+-------------+-----------+------+---------+------+--------------------------------------------------------+------------------+
| Id | User | Host | db | Command | Time | State | Info |
+----+-------------+-----------+------+---------+------+--------------------------------------------------------+------------------+
| 2 | system user | | NULL | Connect | 12 | Slave has read all relay log; waiting for more updates | NULL |
| 3 | system user | | NULL | Connect | 12 | Waiting for an event from Coordinator | NULL |
| 4 | system user | | NULL | Connect | 12 | Waiting for an event from Coordinator | NULL |
| 5 | system user | | NULL | Connect | 12 | Waiting for an event from Coordinator | NULL |
| 6 | system user | | NULL | Connect | 12 | Waiting for an event from Coordinator | NULL |
| 7 | system user | | NULL | Connect | 12 | Waiting for an event from Coordinator | NULL |
| 8 | system user | | NULL | Connect | 12 | Waiting for an event from Coordinator | NULL |
| 9 | system user | | NULL | Connect | 12 | Waiting for an event from Coordinator | NULL |
| 11 | system user | | NULL | Connect | 12 | Waiting for an event from Coordinator | NULL |
| 12 | system user | | NULL | Connect | 12 | Waiting for an event from Coordinator | NULL |
| 13 | system user | | NULL | Connect | 12 | Waiting for an event from Coordinator | NULL |
| 14 | system user | | NULL | Connect | 12 | Waiting for an event from Coordinator | NULL |
| 15 | system user | | NULL | Connect | 12 | Waiting for an event from Coordinator | NULL |
| 16 | system user | | NULL | Connect | 12 | Waiting for an event from Coordinator | NULL |
| 17 | system user | | NULL | Connect | 12 | Waiting for an event from Coordinator | NULL |
| 18 | system user | | NULL | Connect | 12 | Waiting for an event from Coordinator | NULL |
| 19 | system user | | NULL | Connect | 12 | Waiting for an event from Coordinator | NULL |
| 20 | root | localhost | NULL | Query | 0 | starting | show processlist |
+----+-------------+-----------+------+---------+------+--------------------------------------------------------+------------------+
18 rows in set (0.00 sec)
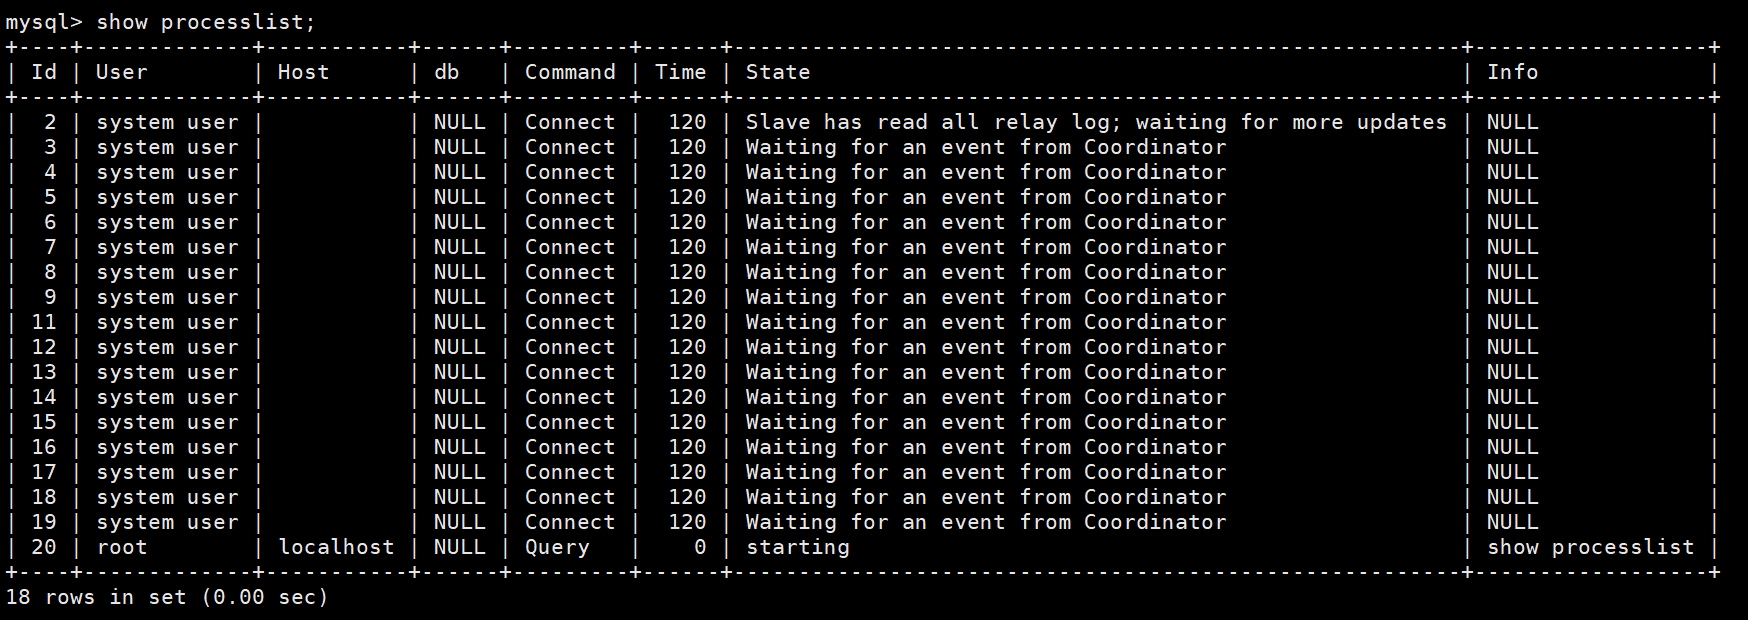
MySQL 组提交(Group commit)是一个性能优化特性,它允许在一个事务日志同步操作中将多个事务的日志记录一起写入。这样做可以减少磁盘I/O的次数,从而提高数据库的整体性能。
2.7 原理刨析
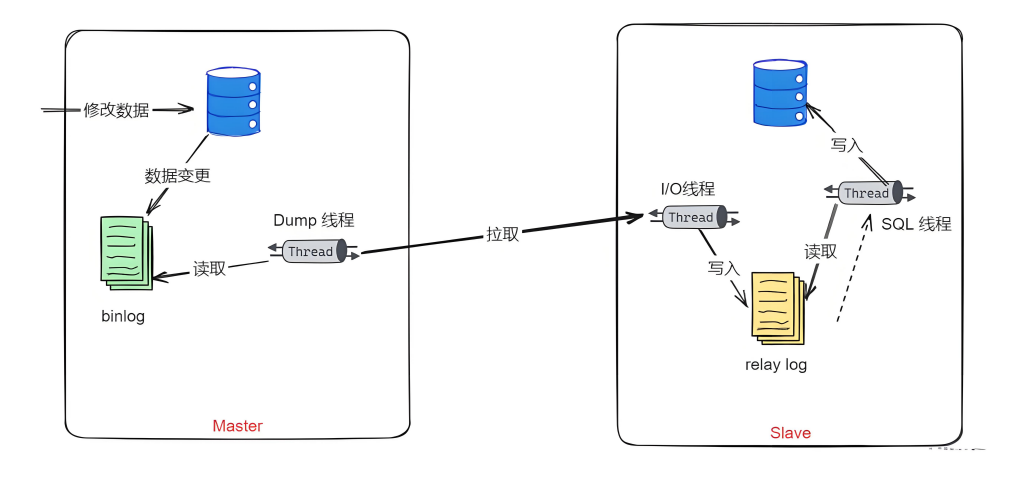
三个线程
实际上主从同步的原理就是基于 binlog 进行数据同步的。在主从复制过程中,会基于3 个线程来操作,一个主库线程,两个从库线程。
·二进制日志转储线程(Binlog dump thread)是一个主库线程。当从库线程连接的时候, 主库可以将二进制日志发送给从库,当主库读取事件(Event)的时候,会在 Binlog 上加锁,读取完成之后,再将锁释放掉。
·从库 I/O 线程会连接到主库,向主库发送请求更新 Binlog。这时从库的 I/O 线程就可以读取到主库的二进制日志转储线程发送的 Binlog 更新部分,并且拷贝到本地的中继日志 (Relay log)。
·从库 SQL 线程会读取从库中的中继日志,并且执行日志中的事件,将从库中的数据与主库保持同步。
复制三步骤
步骤1:Master将写操作记录到二进制日志(binlog)。
步骤2:Slave将Master的binary log events拷贝到它的中继日志(relay log);
步骤3:Slave重做中继日志中的事件,将改变应用到自己的数据库中。 MySQL复制是异步的且串行化的,而且重启后从接入点开始复制。
具体操作
1.slaves端中设置了master端的ip,用户,日志,和日志的Position,通过这些信息取得master的认证及信息
2.master端在设定好binlog启动后会开启binlog dump的线程
3.master端的binlog dump把二进制的更新发送到slave端的
4.slave端开启两个线程,一个是I/O线程,一个是sql线程,
·i/o线程用于接收master端的二进制日志,此线程会在本地打开relaylog中继日志,并且保存到本地磁盘
·sql线程读取本地relog中继日志进行回放
5.什么时候我们需要多个slave?
当读取的而操作远远高与写操作时。我们采用一主多从架构
数据库外层接入负载均衡层并搭配高可用机制
2.8 架构缺陷
主从架构采用的是异步机制
master更新完成后直接发送二进制日志到slave,但是slaves是否真正保存了数据master端不会检测
master端直接保存二进制日志到磁盘
当master端到slave端的网络出现问题时或者master端直接挂掉,二进制日志可能根本没有到达slave
master出现问题slave端接管master,这个过程中数据就丢失了
这样的问题出现就无法达到数据的强一致性,零数据丢失
三 半同步模式
3.1半同步模式原理
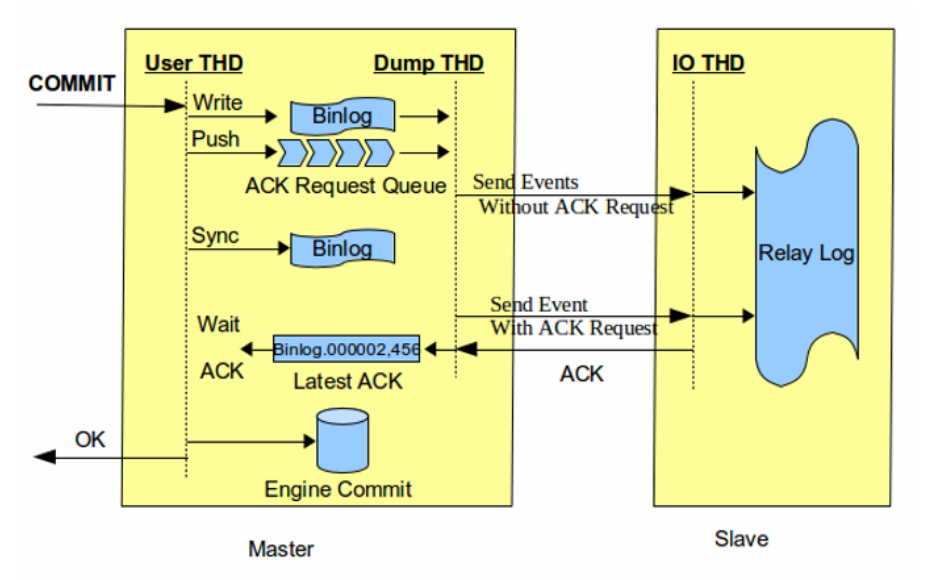
1.用户线程写入完成后master中的dump会把日志推送到slave端
2.slave中的io线程接收后保存到relaylog中继日志
3.保存完成后slave向master端返回ack
4.在未接受到slave的ack时master端时不做提交的,一直处于等待当收到ack后提交到存储引擎
5.在5.6版本中用到的时after_commit模式,after_commit模式时先提交在等待ack返回后输出ok
3.2 gtid模式
当为启用gtid时我们要考虑的问题
在master端的写入时多用户读写,在slave端的复制时单线程日志回放,所以slave端一定会延迟与master端
这种延迟在slave端的延迟可能会不一致,当master挂掉后slave接管,一般会挑选一个和master延迟日志最接近的充当新的master
那么为接管master的主机继续充当slave角色并会指向到新的master上,作为其slave
这时候按照之前的配置我们需要知道新的master上的pos的id,但是我们无法确定新的master和slave之间差多少
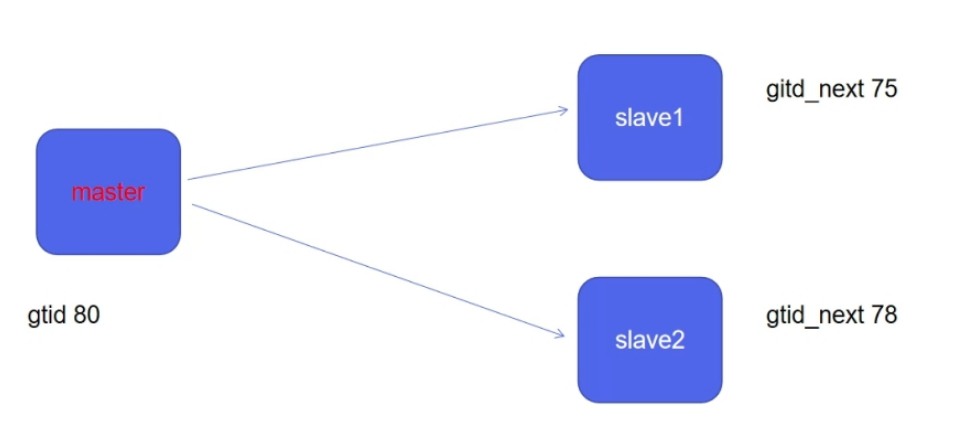
当激活GITD之后
当master出现问题后,slave2和master的数据最接近,会被作为新的master
slave1指向新的master,但是他不会去检测新的master的pos id,只需要继续读取自己gtid_next即可
[root@mysql-node1 ~]# mysqlbinlog -vv /data/mysql/mysql-bin.000003
@@省略内容@@
SET @@SESSION.GTID_NEXT= 'AUTOMATIC' /* added by mysqlbinlog */ /*!*/;
DELIMITER ;
# End of log file
/*!50003 SET COMPLETION_TYPE=@OLD_COMPLETION_TYPE*/;
/*!50530 SET @@SESSION.PSEUDO_SLAVE_MODE=0*/;
[root@mysql-node2 ~]# mysql -plee
mysql> select * from mysql.gtid_executed;
+--------------------------------------+----------------+--------------+
| source_uuid | interval_start | interval_end |
+--------------------------------------+----------------+--------------+
| 768c6b91-4c01-11ef-a514-000c299355ea | 1 | 1 |
+--------------------------------------+----------------+--------------+
1 row in set (0.00 sec)设置gtid
#在master端和slave端开启gtid模式
#node1
[root@mysql-node1 ~]# vim /etc/my.cnf
[mysqld]
datadir=/data/mysql
socket=/data/mysql/mysql.sock
symbolic-links=0
server-id=10
log-bin=mysql-bin
gtid_mode=ON
enforce-gtid-consistency=ON
[root@mysql-node1 ~]# /etc/init.d/mysqld restart
Shutting down MySQL............ SUCCESS!
Starting MySQL. SUCCESS!
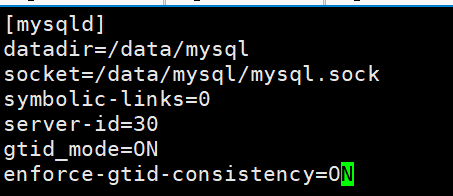
#node3
[root@mysql-node3 ~]# vim /etc/my.cnf
[mysqld]
datadir=/data/mysql
socket=/data/mysql/mysql.sock
symbolic-links=0
server-id=30
gtid_mode=ON
enforce-gtid-consistency=ON
[root@mysql-node3 ~]# /etc/init.d/mysqld restart
Shutting down MySQL.. SUCCESS!
Starting MySQL. SUCCESS!
#node2在上文已经开了gtid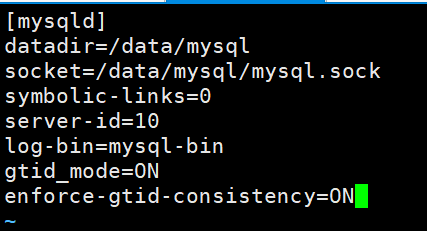
#在master端和slave端开启gtid模式
[root@mysql-node1 ~]# vim /etc/my.cnf
[mysqld]
datadir=/data/mysql
socket=/data/mysql/mysql.sock
server-id=1
log-bin=mysql-bin
gtid_mode=ON
enforce-gtid-consistency=ON
symbolic-links=0
[root@mysql-node1 ~]# /etc/init.d/mysqld restart
[root@mysql-node2 ~]# vim /etc/my.cnf
[mysqld]
datadir=/data/mysql
socket=/data/mysql/mysql.sock
server-id=2
log-bin=mysql-bin
gtid_mode=ON
enforce-gtid-consistency=ON
symbolic-links=0
[root@mysql-node2 ~]# /etc/init.d/mysqld restart
[root@mysql-node3 ~]# vim /etc/my.cnf
[mysqld]
datadir=/data/mysql
socket=/data/mysql/mysql.sock
server-id=3
log-bin=mysql-bin
gtid_mode=ON
enforce-gtid-consistency=ON
symbolic-links=0
[root@mysql-node3 ~]# /etc/init.d/mysqld restart
停止slave端
#node2
[root@mysql-node2 ~]# mysql -u root -predhat
mysql> stop slave;

#node3
[root@mysql-node3 ~]# mysql -u root -predhat
mysql> stop slave;
开启slave端的gtid
#node2
mysql> CHANGE MASTER TO MASTER_HOST='172.25.254.10', MASTER_USER='rep1',MASTER_PASSWORD='haha', MASTER_AUTO_POSITION=1;
Query OK, 0 rows affected, 2 warnings (0.00 sec)

mysql> start slave;
Query OK, 0 rows affected (0.01 sec)

mysql> show slave status\G;
*************************** 1. row ***************************
               Slave_IO_State: Waiting for master to send event
                  Master_Host: 172.25.254.10
                  Master_User: rep1
                  Master_Port: 3306
                Connect_Retry: 60
              Master_Log_File: mysql-bin.000002
          Read_Master_Log_Pos: 154
               Relay_Log_File: mysql-node2-relay-bin.000002
                Relay_Log_Pos: 367
        Relay_Master_Log_File: mysql-bin.000002
             Slave_IO_Running: Yes
            Slave_SQL_Running: Yes
              Replicate_Do_DB:
          Replicate_Ignore_DB:
           Replicate_Do_Table:
       Replicate_Ignore_Table:
      Replicate_Wild_Do_Table:
  Replicate_Wild_Ignore_Table:
                   Last_Errno: 0
                   Last_Error:
                 Skip_Counter: 0
          Exec_Master_Log_Pos: 154
              Relay_Log_Space: 580
              Until_Condition: None
               Until_Log_File:
                Until_Log_Pos: 0
           Master_SSL_Allowed: No
           Master_SSL_CA_File:
           Master_SSL_CA_Path:
              Master_SSL_Cert:
            Master_SSL_Cipher:
               Master_SSL_Key:
        Seconds_Behind_Master: 0
Master_SSL_Verify_Server_Cert: No
                Last_IO_Errno: 0
                Last_IO_Error:
               Last_SQL_Errno: 0
               Last_SQL_Error:
  Replicate_Ignore_Server_Ids:
             Master_Server_Id: 10
                  Master_UUID: 5ac2d97c-602f-11ef-bb8a-000c29fe3a1f
             Master_Info_File: mysql.slave_master_info
                    SQL_Delay: 0
          SQL_Remaining_Delay: NULL
      Slave_SQL_Running_State: Slave has read all relay log; waiting for more updates
           Master_Retry_Count: 86400
                  Master_Bind:
      Last_IO_Error_Timestamp:
     Last_SQL_Error_Timestamp:
               Master_SSL_Crl:
           Master_SSL_Crlpath:
           Retrieved_Gtid_Set:
            Executed_Gtid_Set:
                Auto_Position: 1
         Replicate_Rewrite_DB:
                 Channel_Name:
           Master_TLS_Version:
1 row in set (0.00 sec)

ERROR:
No query specified


#node3
mysql> CHANGE MASTER TO MASTER_HOST='172.25.254.10', MASTER_USER='rep1',MASTER_PASSWORD='haha', MASTER_AUTO_POSITION=1;
Query OK, 0 rows affected, 2 warnings (0.02 sec)

mysql> start slave;
Query OK, 0 rows affected (0.00 sec)

mysql> show slave status\G;
*************************** 1. row ***************************
               Slave_IO_State: Waiting for master to send event
                  Master_Host: 172.25.254.10
                  Master_User: rep1
                  Master_Port: 3306
                Connect_Retry: 60
              Master_Log_File: mysql-bin.000002
          Read_Master_Log_Pos: 154
               Relay_Log_File: mysql-node3-relay-bin.000002
                Relay_Log_Pos: 367
        Relay_Master_Log_File: mysql-bin.000002
             Slave_IO_Running: Yes
            Slave_SQL_Running: Yes
              Replicate_Do_DB:
          Replicate_Ignore_DB:
           Replicate_Do_Table:
       Replicate_Ignore_Table:
      Replicate_Wild_Do_Table:
  Replicate_Wild_Ignore_Table:
                   Last_Errno: 0
                   Last_Error:
                 Skip_Counter: 0
          Exec_Master_Log_Pos: 154
              Relay_Log_Space: 580
              Until_Condition: None
               Until_Log_File:
                Until_Log_Pos: 0
           Master_SSL_Allowed: No
           Master_SSL_CA_File:
           Master_SSL_CA_Path:
              Master_SSL_Cert:
            Master_SSL_Cipher:
               Master_SSL_Key:
        Seconds_Behind_Master: 0
Master_SSL_Verify_Server_Cert: No
                Last_IO_Errno: 0
                Last_IO_Error:
               Last_SQL_Errno: 0
               Last_SQL_Error:
  Replicate_Ignore_Server_Ids:
             Master_Server_Id: 10
                  Master_UUID: 5ac2d97c-602f-11ef-bb8a-000c29fe3a1f
             Master_Info_File: /data/mysql/master.info
                    SQL_Delay: 60
          SQL_Remaining_Delay: NULL
      Slave_SQL_Running_State: Slave has read all relay log; waiting for more updates
           Master_Retry_Count: 86400
                  Master_Bind:
      Last_IO_Error_Timestamp:
     Last_SQL_Error_Timestamp:
               Master_SSL_Crl:
           Master_SSL_Crlpath:
           Retrieved_Gtid_Set:
            Executed_Gtid_Set:
                Auto_Position: 1
         Replicate_Rewrite_DB:
                 Channel_Name:
           Master_TLS_Version:
1 row in set (0.00 sec)

ERROR:
No query specified
3.3.启用半同步模式
在master端配置启用半同步模式
[root@mysql-node1 ~]# vim /etc/my.cnf
[mysqld]
datadir=/data/mysql
socket=/data/mysql/mysql.sock
symbolic-links=0
server-id=10
log-bin=mysql-bin
gtid_mode=ON
enforce-gtid-consistency=ON
rpl_semi_sync_master_enabled=1 #开启半同步功能
[root@mysql-node1 ~]# mysql -u root -predhat
#安装半同步插件
mysql> INSTALL PLUGIN rpl_semi_sync_master SONAME 'semisync_master.so';
Query OK, 0 rows affected (0.00 sec)
#查看插件情况
mysql> select PLUGIN_NAME,PLUGIN_STATUS from INFORMATION_SCHEMA.PLUGINS where PLUGIN_NAME LIKE '%semi%';
+----------------------+---------------+
| PLUGIN_NAME | PLUGIN_STATUS |
+----------------------+---------------+
| rpl_semi_sync_master | ACTIVE |
+----------------------+---------------+
1 row in set (0.00 sec)
#打开半同步功能
mysql> SET GLOBAL rpl_semi_sync_master_enabled = 1;
Query OK, 0 rows affected (0.00 sec)
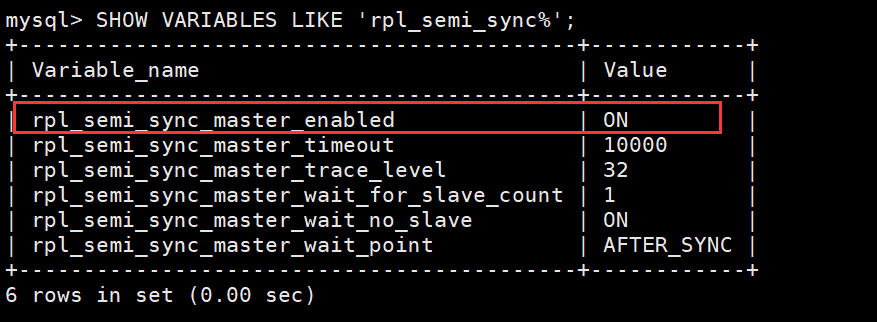
#查看半同步功能状态
mysql> SHOW VARIABLES LIKE 'rpl_semi_sync%';
+-------------------------------------------+------------+
| Variable_name | Value |
+-------------------------------------------+------------+
| rpl_semi_sync_master_enabled | ON |
| rpl_semi_sync_master_timeout | 10000 |
| rpl_semi_sync_master_trace_level | 32 |
| rpl_semi_sync_master_wait_for_slave_count | 1 |
| rpl_semi_sync_master_wait_no_slave | ON |
| rpl_semi_sync_master_wait_point | AFTER_SYNC |
+-------------------------------------------+------------+
6 rows in set (0.00 sec)
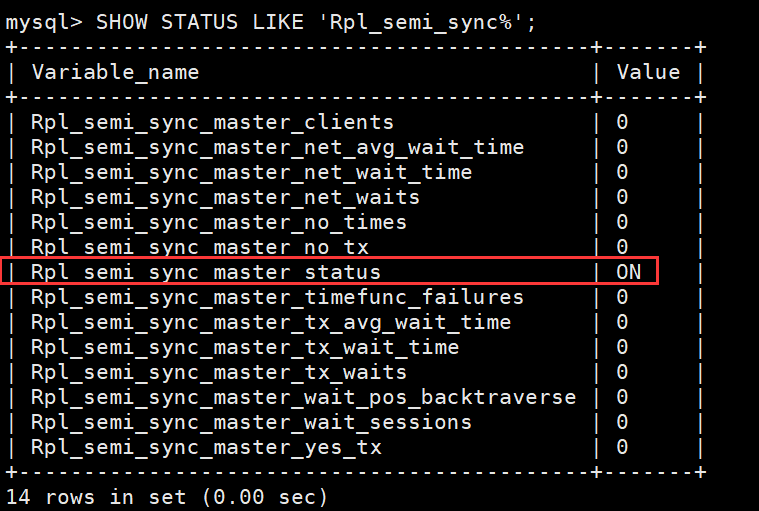
mysql> SHOW STATUS LIKE 'Rpl_semi_sync%';
+--------------------------------------------+-------+
| Variable_name | Value |
+--------------------------------------------+-------+
| Rpl_semi_sync_master_clients | 0 |
| Rpl_semi_sync_master_net_avg_wait_time | 0 |
| Rpl_semi_sync_master_net_wait_time | 0 |
| Rpl_semi_sync_master_net_waits | 0 |
| Rpl_semi_sync_master_no_times | 0 |
| Rpl_semi_sync_master_no_tx | 0 |
| Rpl_semi_sync_master_status | ON |
| Rpl_semi_sync_master_timefunc_failures | 0 |
| Rpl_semi_sync_master_tx_avg_wait_time | 0 |
| Rpl_semi_sync_master_tx_wait_time | 0 |
| Rpl_semi_sync_master_tx_waits | 0 |
| Rpl_semi_sync_master_wait_pos_backtraverse | 0 |
| Rpl_semi_sync_master_wait_sessions | 0 |
| Rpl_semi_sync_master_yes_tx | 0 |
+--------------------------------------------+-------+
14 rows in set (0.00 sec)

在slave端开启半同步功能
[root@mysql-node2 ~]# vim /etc/my.cnf
[mysqld]
datadir=/data/mysql
socket=/data/mysql/mysql.sock
symbolic-links=0
server-id=20
log-bin=mysql-bin
gtid_mode=ON
enforce-gtid-consistency=ON
rpl_semi_sync_master_enabled=1 #开启半同步功能
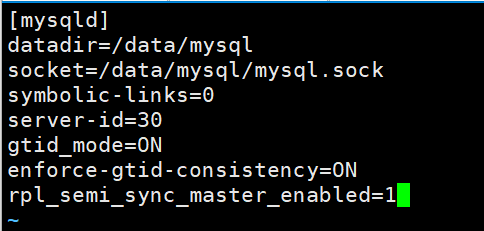
[root@mysql-node3 ~]# vim /etc/my.cnf
[mysqld]
datadir=/data/mysql
socket=/data/mysql/mysql.sock
symbolic-links=0
server-id=30
gtid_mode=ON
enforce-gtid-consistency=ON
rpl_semi_sync_master_enabled=1 #开启半同步功能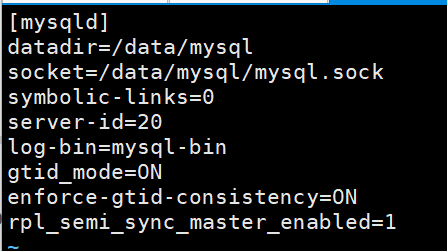
node2开起半同步
[root@mysql-node2 ~]# mysql -u root -predhat
mysql> INSTALL PLUGIN rpl_semi_sync_slave SONAME 'semisync_slave.so';
Query OK, 0 rows affected (0.02 sec)

mysql> SET GLOBAL rpl_semi_sync_slave_enabled =1;
Query OK, 0 rows affected (0.00 sec)

mysql> STOP SLAVE IO_THREAD;
Query OK, 0 rows affected (0.02 sec)

mysql> START SLAVE IO_THREAD;
Query OK, 0 rows affected (0.00 sec)

mysql> SHOW VARIABLES LIKE 'rpl_semi_sync%';
+---------------------------------+-------+
| Variable_name                   | Value |
+---------------------------------+-------+
| rpl_semi_sync_slave_enabled     | ON    |
| rpl_semi_sync_slave_trace_level | 32    |
+---------------------------------+-------+
2 rows in set (0.01 sec)

mysql> SHOW STATUS LIKE 'Rpl_semi_sync%';
+----------------------------+-------+
| Variable_name              | Value |
+----------------------------+-------+
| Rpl_semi_sync_slave_status | ON    |
+----------------------------+-------+
1 row in set (0.00 sec)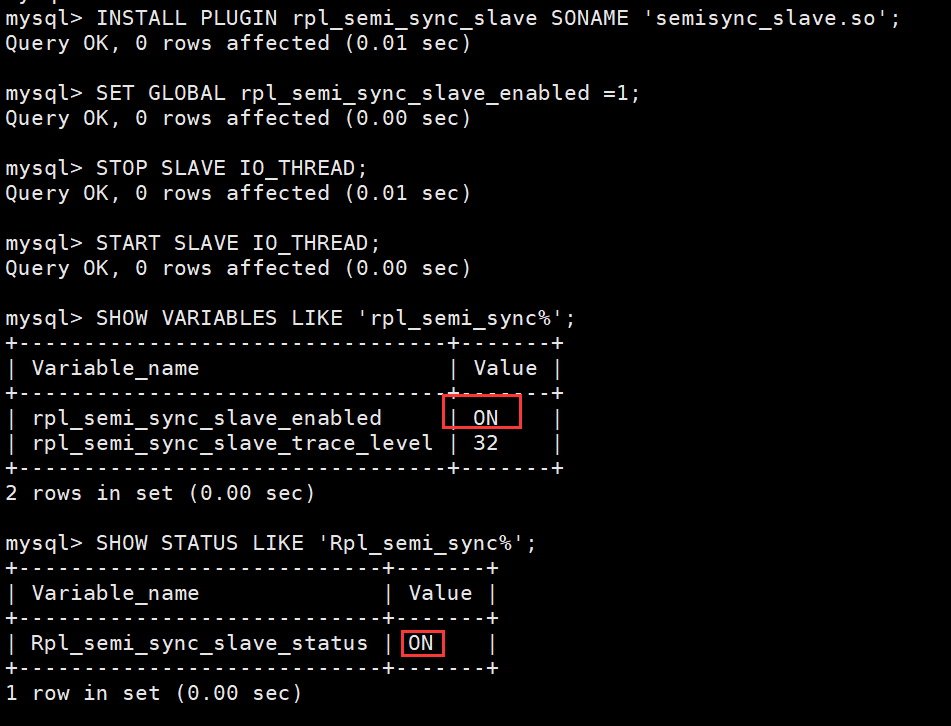
node3开起半同步
[root@mysql-node3 ~]# mysql -u root -predhat
mysql> INSTALL PLUGIN rpl_semi_sync_slave SONAME 'semisync_slave.so';
Query OK, 0 rows affected (0.01 sec)

mysql> SET GLOBAL rpl_semi_sync_slave_enabled =1;
Query OK, 0 rows affected (0.00 sec)

mysql> STOP SLAVE IO_THREAD;
Query OK, 0 rows affected (0.01 sec)

mysql> START SLAVE IO_THREAD;
Query OK, 0 rows affected (0.00 sec)

mysql> SHOW VARIABLES LIKE 'rpl_semi_sync%';
+---------------------------------+-------+
| Variable_name                   | Value |
+---------------------------------+-------+
| rpl_semi_sync_slave_enabled     | ON    |
| rpl_semi_sync_slave_trace_level | 32    |
+---------------------------------+-------+
2 rows in set (0.00 sec)

mysql> SHOW STATUS LIKE 'Rpl_semi_sync%';
+----------------------------+-------+
| Variable_name              | Value |
+----------------------------+-------+
| Rpl_semi_sync_slave_status | ON    |
+----------------------------+-------+
1 row in set (0.00 sec)

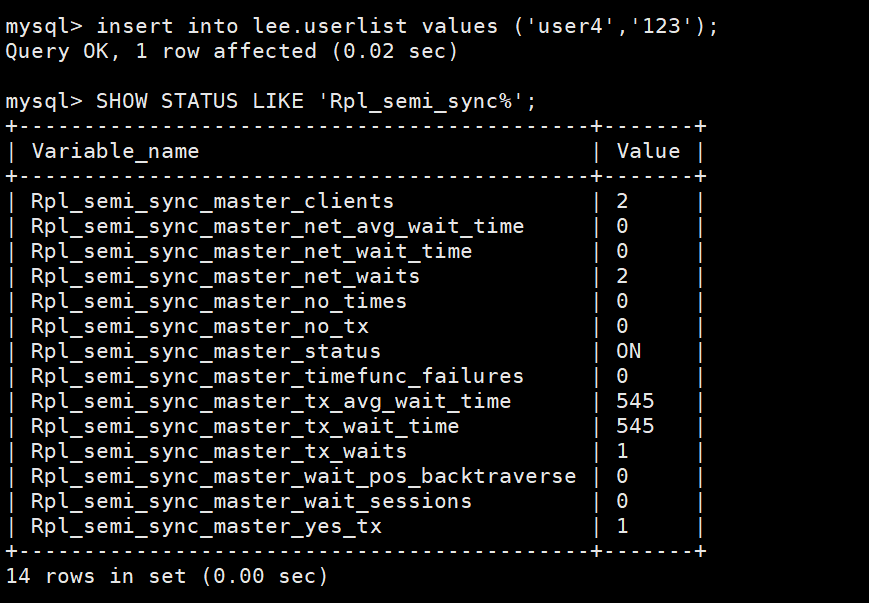
3.4.测试
在master端写入数据
[root@mysql-node1 ~]# mysql -u root -predhat
mysql> insert into lee.userlist values ('user4','123');
Query OK, 1 row affected (0.02 sec)

mysql> SHOW STATUS LIKE 'Rpl_semi_sync%';
+--------------------------------------------+-------+
| Variable_name                              | Value |
+--------------------------------------------+-------+
| Rpl_semi_sync_master_clients               | 2     |
| Rpl_semi_sync_master_net_avg_wait_time     | 0     |
| Rpl_semi_sync_master_net_wait_time         | 0     |
| Rpl_semi_sync_master_net_waits             | 2     |
| Rpl_semi_sync_master_no_times              | 0     |
| Rpl_semi_sync_master_no_tx                 | 0     |   #未同步数据0笔
| Rpl_semi_sync_master_status                | ON    |
| Rpl_semi_sync_master_timefunc_failures     | 0     |
| Rpl_semi_sync_master_tx_avg_wait_time      | 545   |
| Rpl_semi_sync_master_tx_wait_time          | 545   |
| Rpl_semi_sync_master_tx_waits              | 1     |
| Rpl_semi_sync_master_wait_pos_backtraverse | 0     |
| Rpl_semi_sync_master_wait_sessions         | 0     |
| Rpl_semi_sync_master_yes_tx                | 1     |  #已同步数据1笔
+--------------------------------------------+-------+
14 rows in set (0.00 sec)
模拟故障:
#node2
[root@mysql-node2 ~]# mysql -u root -predhat
mysql> STOP SLAVE IO_THREAD;
Query OK, 0 rows affected (0.00 sec)

#node3
[root@mysql-node3 ~]# mysql -u root -predhat
mysql> STOP SLAVE IO_THREAD;
Query OK, 0 rows affected (0.00 sec)

#在master端插入数据
[root@mysql-node1 ~]# mysql -u root -predhat
mysql> insert into lee.userlist values ('user5','555');
Query OK, 1 row affected (10.00 sec)   #10秒超时

mysql> SHOW STATUS LIKE 'Rpl_semi%';
+--------------------------------------------+-------+
| Variable_name                              | Value |
+--------------------------------------------+-------+
| Rpl_semi_sync_master_clients               | 0     |
| Rpl_semi_sync_master_net_avg_wait_time     | 0     |
| Rpl_semi_sync_master_net_wait_time         | 0     |
| Rpl_semi_sync_master_net_waits             | 2     |
| Rpl_semi_sync_master_no_times              | 1     |
| Rpl_semi_sync_master_no_tx                 | 1     |   #一笔数据为同步
| Rpl_semi_sync_master_status                | OFF   |   #自动转为异步模式,当slave恢复
| Rpl_semi_sync_master_timefunc_failures     | 0     |   #会自动恢复
| Rpl_semi_sync_master_tx_avg_wait_time      | 545   |
| Rpl_semi_sync_master_tx_wait_time          | 545   |
| Rpl_semi_sync_master_tx_waits              | 1     |
| Rpl_semi_sync_master_wait_pos_backtraverse | 0     |
| Rpl_semi_sync_master_wait_sessions         | 0     |
| Rpl_semi_sync_master_yes_tx                | 1     |
+--------------------------------------------+-------+
14 rows in set (0.01 sec)

#当启动之后
#node2
mysql> START SLAVE IO_THREAD;
Query OK, 0 rows affected (0.00 sec)

#node3
mysql> START SLAVE IO_THREAD;
Query OK, 0 rows affected (0.01 sec)

#在master端插入数据
mysql> insert into lee.userlist values ('user5','555');
Query OK, 1 row affected (0.01 sec)

mysql> SHOW STATUS LIKE 'Rpl_semi%';
+--------------------------------------------+-------+
| Variable_name                              | Value |
+--------------------------------------------+-------+
| Rpl_semi_sync_master_clients               | 2     |
| Rpl_semi_sync_master_net_avg_wait_time     | 0     |
| Rpl_semi_sync_master_net_wait_time         | 0     |
| Rpl_semi_sync_master_net_waits             | 5     |
| Rpl_semi_sync_master_no_times              | 1     |
| Rpl_semi_sync_master_no_tx                 | 1     |
| Rpl_semi_sync_master_status                | ON    |
| Rpl_semi_sync_master_timefunc_failures     | 0     |
| Rpl_semi_sync_master_tx_avg_wait_time      | 649   |
| Rpl_semi_sync_master_tx_wait_time          | 1299  |
| Rpl_semi_sync_master_tx_waits              | 2     |
| Rpl_semi_sync_master_wait_pos_backtraverse | 0     |
| Rpl_semi_sync_master_wait_sessions         | 0     |
| Rpl_semi_sync_master_yes_tx                | 2     |
+--------------------------------------------+-------+
14 rows in set (0.00 sec)
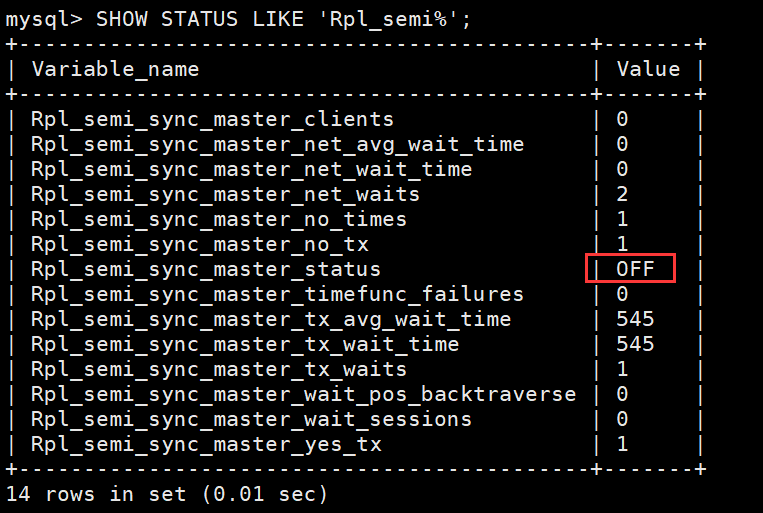
在半同步的情况下,即使slave挂掉了master是不可以写入数据的,但是master会自动转换成异步模式来写入数据,当slave恢复后,master会自动恢复成为半同步来写入数据
四 mysql高可用之组复制 (MGR)
高可用:让mysql集群尽可能的持久运行
MySQL Group Replication(简称 MGR )是 MySQL 官方于 2016 年 12 月推出的一个全新的高可用与高扩展的解决方案
组复制是 MySQL 5.7.17 版本出现的新特性,它提供了高可用、高扩展、高可靠的 MySQL 集群服务
MySQL 组复制分单主模式和多主模式,传统的mysql复制技术仅解决了数据同步的问题,
MGR 对属于同一组的服务器自动进行协调。对于要提交的事务,组成员必须就全局事务序列中给定事务的顺序达成一致
提交或回滚事务由每个服务器单独完成,但所有服务器都必须做出相同的决定
如果存在网络分区,导致成员无法达成事先定义的分割策略,则在解决此问题之前系统不会继续进行,
这是一种内置的自动裂脑保护机制
MGR由组通信系统( Group Communication System ,GCS ) 协议支持该
系统提供故障检测机制、组成员服务以及安全且有序的消息传递
4.1 组复制流程
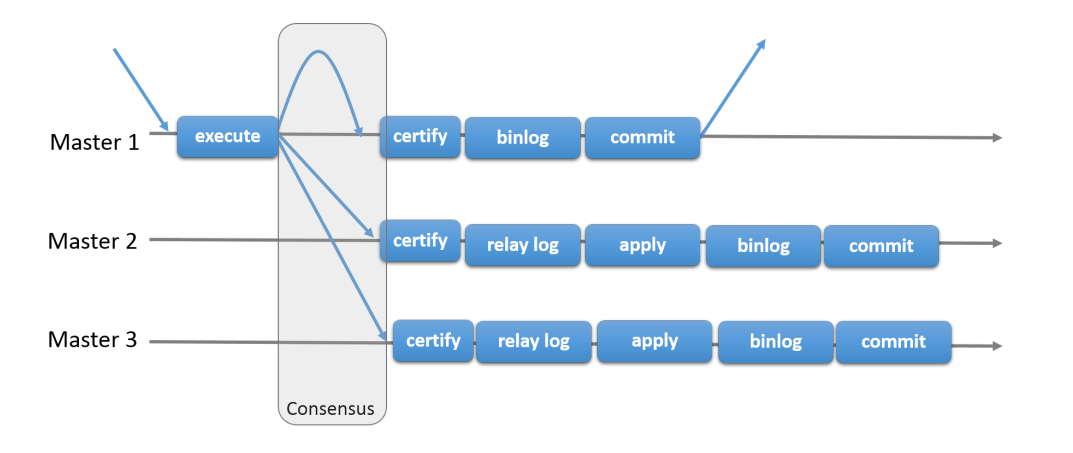
首先我们将多个节点共同组成一个复制组,在执行读写(RW)事务的时候,需要通过一致性协议层 (Consensus 层)的同意,也就是读写事务想要进行提交,必须要经过组里“大多数人”(对应 Node 节点)的同意,大多数指的是同意的节点数量需要大于 (N/2+1),这样才可以进行提交,而不是原发起方一个说了算。而针对只读(RO)事务则不需要经过组内同意,直接 提交 即可
节点数量不能超过9台
4.2 组复制单主和多主模式
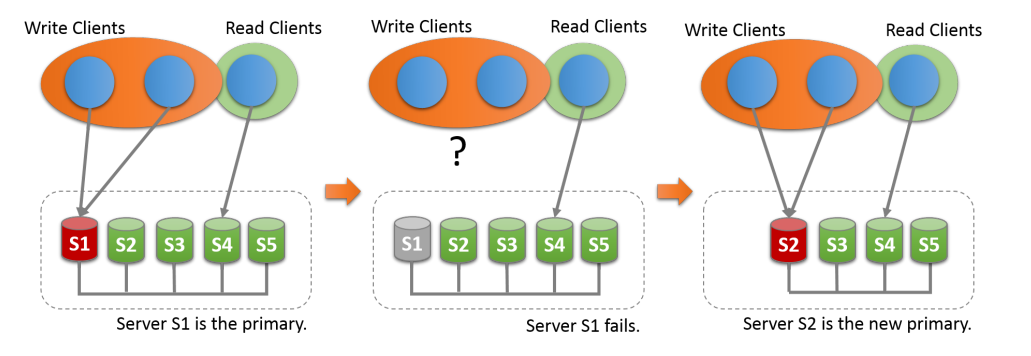
single-primary mode(单写或单主模式)
单写模式 group 内只有一台节点可写可读,其他节点只可以读。当主服务器失败时,会自动选择新的主服务器(master)
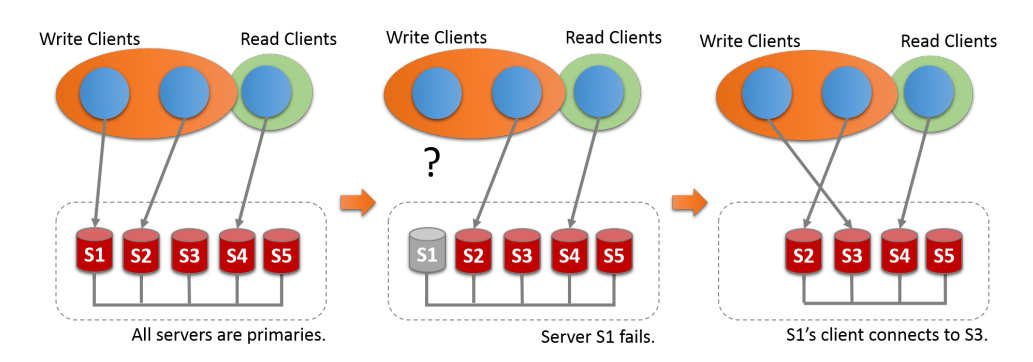
multi-primary mode(多写或多主模式)
组内的所有机器都是 primary 节点,同时可以进行读写操作,并且数据是最终一致的。
4.3.实现mysql组复制
为了避免出错,在所有节点中从新生成数据库数据
编辑主配置文件:
#停止mysql
[root@mysql-node1 ~]# /etc/init.d/mysqld stop
Shutting down MySQL............ SUCCESS!
[root@mysql-node1 ~]# rm -rf /data/mysql/*
#编辑参数
[root@mysql-node1 ~]# vim /etc/my.cnf
[mysqld]
datadir=/data/mysql
socket=/data/mysql/mysql.sock
symbolic-links=0
server-id=10
disabled_storage_engines="MyISAM,BLACKHOLE,FEDERATED,ARCHIVE,MEMORY"
gtid_mode=ON
enforce_gtid_consistency=ON
master_info_repository=TABLE
relay_log_info_repository=TABLE
binlog_checksum=NONE
log_slave_updates=ON
log_bin=binlog
binlog_format=ROW
plugin_load_add='group_replication.so'
transaction_write_set_extraction=XXHASH64
group_replication_group_name="aaaaaaaa-aaaa-aaaa-aaaa-aaaaaaaaaaaa"
group_replication_start_on_boot=off
group_replication_local_address="172.25.254.10:33061"
group_replication_group_seeds="172.25.254.10:33061,172.25.254.20:33061,172.25.254.30:33061"
group_replication_ip_whitelist="172.25.254.0/24,127.0.0.1/8"
group_replication_bootstrap_group=off
group_replication_single_primary_mode=OFF
group_replication_enforce_update_everywhere_checks=ON
group_replication_allow_local_disjoint_gtids_join=1
[root@mysql-node1 ~]# mysqld --user=mysql --initialize
#启动mysql
[root@mysql-node1 ~]# /etc/init.d/mysqld start
[root@mysql-node1 ~]# mysql -u root -p"Ka5NZDfc:.rw"
mysql: [Warning] Using a password on the command line interface can be insecure.
Welcome to the MySQL monitor. Commands end with ; or \g.
Your MySQL connection id is 3
Server version: 5.7.44-log
Copyright (c) 2000, 2023, Oracle and/or its affiliates.
Oracle is a registered trademark of Oracle Corporation and/or its
affiliates. Other names may be trademarks of their respective
owners.
Type 'help;' or '\h' for help. Type '\c' to clear the current input statement.
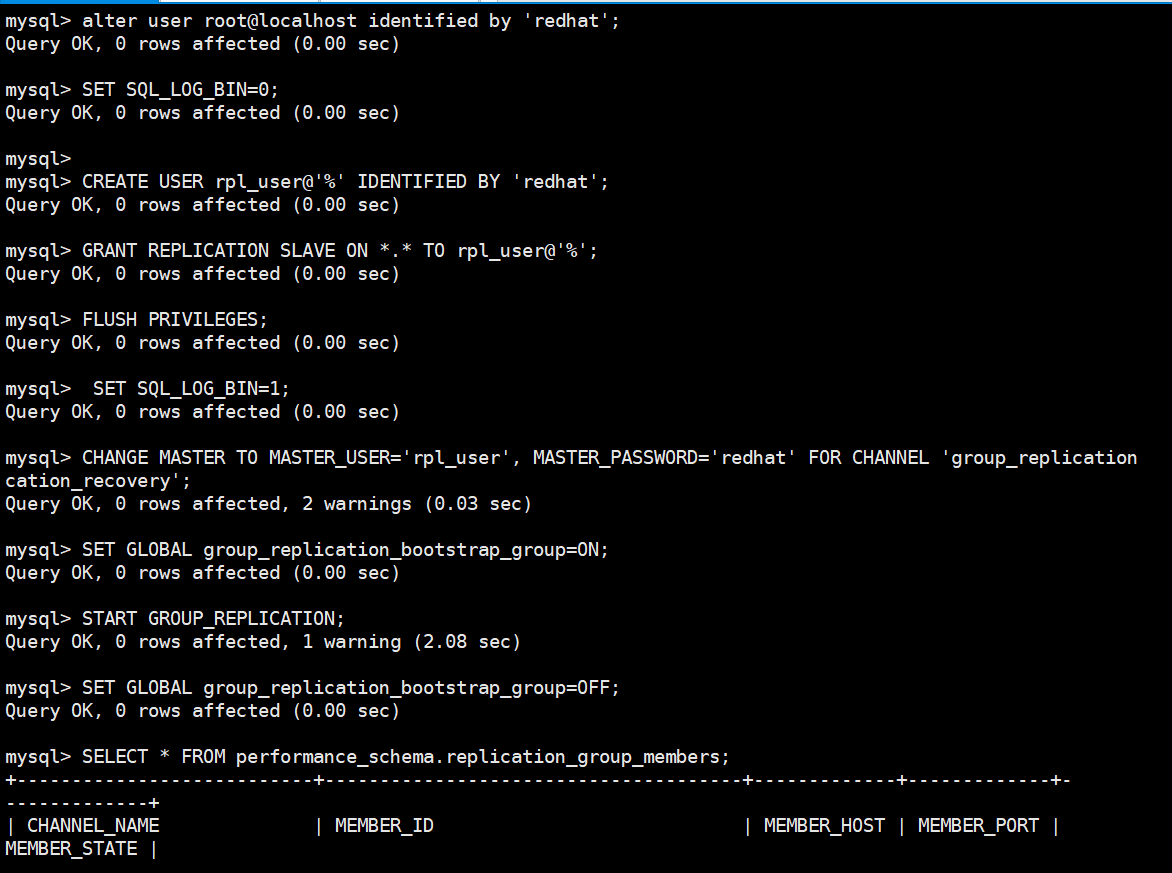
mysql> alter user root@localhost identified by 'redhat';
Query OK, 0 rows affected (0.00 sec)
mysql> SET SQL_LOG_BIN=0;
Query OK, 0 rows affected (0.00 sec)
mysql> CREATE USER rpl_user@'%' IDENTIFIED BY 'redhat';
Query OK, 0 rows affected (0.00 sec)
mysql> GRANT REPLICATION SLAVE ON *.* TO rpl_user@'%';
Query OK, 0 rows affected (0.00 sec)
mysql> FLUSH PRIVILEGES;
Query OK, 0 rows affected (0.00 sec)
mysql> SET SQL_LOG_BIN=1;
Query OK, 0 rows affected (0.00 sec)
mysql> CHANGE MASTER TO MASTER_USER='rpl_user', MASTER_PASSWORD='redhat' FOR CHANNEL 'group_replicationcation_recovery';
Query OK, 0 rows affected, 2 warnings (0.03 sec)
mysql> SET GLOBAL group_replication_bootstrap_group=ON; #用以指定初始成员,值在第一台主机中执行
Query OK, 0 rows affected (0.00 sec)
mysql> START GROUP_REPLICATION; #上线
Query OK, 0 rows affected, 1 warning (2.08 sec)
mysql> SET GLOBAL group_replication_bootstrap_group=OFF;
Query OK, 0 rows affected (0.00 sec)
mysql> SELECT * FROM performance_schema.replication_group_members; #查看组
+---------------------------+--------------------------------------+-------------+-------------+--------------+
| CHANNEL_NAME | MEMBER_ID | MEMBER_HOST | MEMBER_PORT | MEMBER_STATE |
+---------------------------+--------------------------------------+-------------+-------------+--------------+
| group_replication_applier | a23b3e44-61e1-11ef-b1f1-000c29fe3a1f | mysql-node1 | 3306 | ONLINE |
+---------------------------+--------------------------------------+-------------+-------------+--------------+
1 row in set (0.00 sec)
mysql>
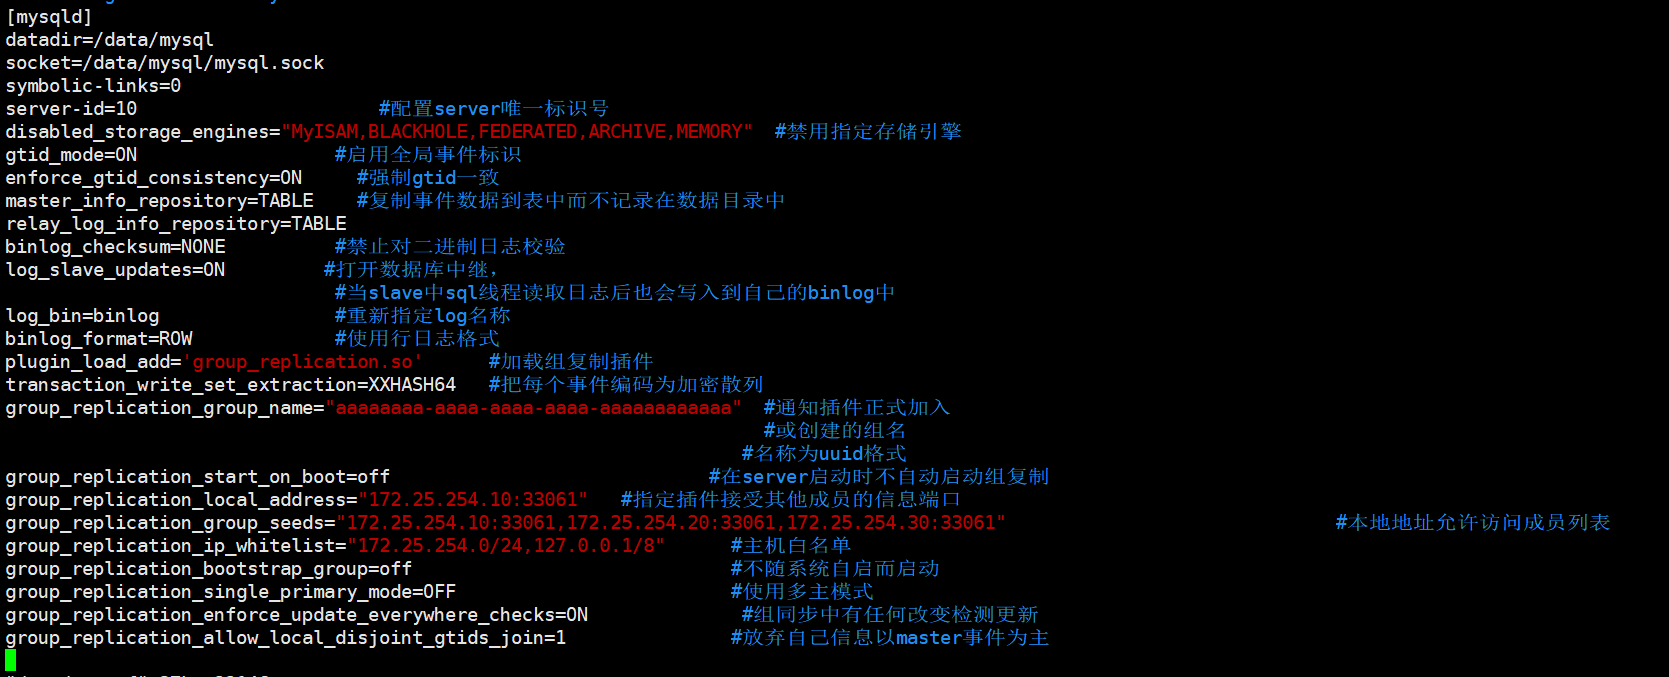

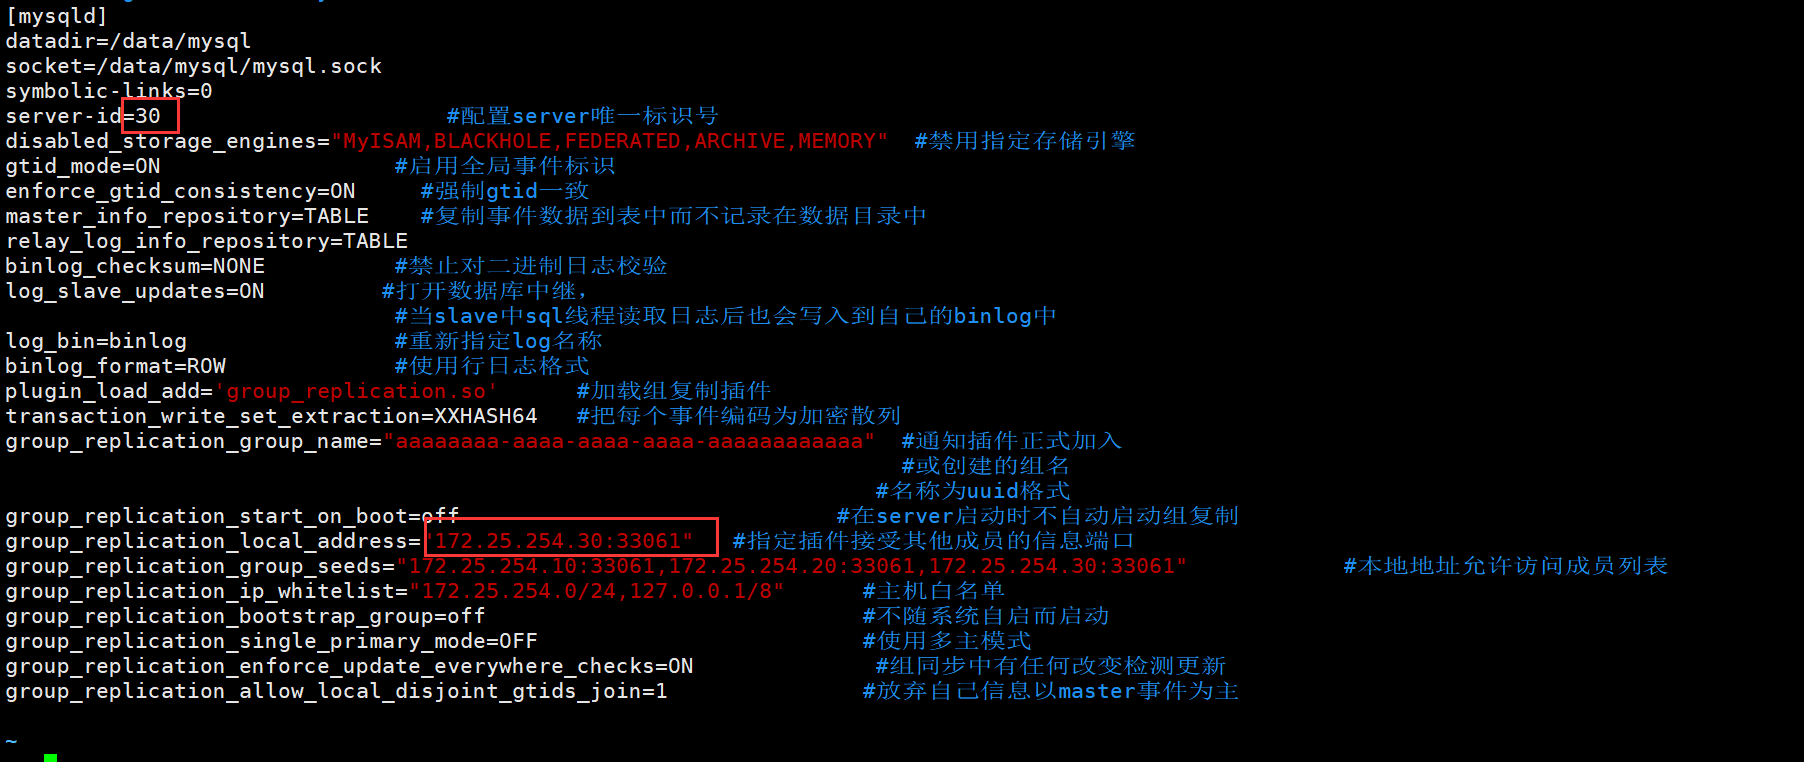
参数讲解:
[mysqld]
datadir=/data/mysql
socket=/data/mysql/mysql.sock
symbolic-links=0
server-id=10                      #配置server唯一标识号
disabled_storage_engines="MyISAM,BLACKHOLE,FEDERATED,ARCHIVE,MEMORY"  #禁用指定存储引擎
gtid_mode=ON                  #启用全局事件标识
enforce_gtid_consistency=ON     #强制gtid一致
master_info_repository=TABLE    #复制事件数据到表中而不记录在数据目录中
relay_log_info_repository=TABLE
binlog_checksum=NONE          #禁止对二进制日志校验
log_slave_updates=ON         #打开数据库中继,
                              #当slave中sql线程读取日志后也会写入到自己的binlog中
log_bin=binlog                #重新指定log名称
binlog_format=ROW             #使用行日志格式
plugin_load_add='group_replication.so'      #加载组复制插件
transaction_write_set_extraction=XXHASH64   #把每个事件编码为加密散列
group_replication_group_name="aaaaaaaa-aaaa-aaaa-aaaa-aaaaaaaaaaaa"  #通知插件正式加入
                                                                     #或创建的组名
                                                                   #名称为uuid格式
group_replication_start_on_boot=off                             #在server启动时不自动启动组复制
group_replication_local_address="172.25.254.10:33061"   #指定插件接受其他成员的信息端口
group_replication_group_seeds="172.25.254.10:33061,172.25.254.20:33061,172.25.254.30:33061"                              #本地地址允许访问成员列表
group_replication_ip_whitelist="172.25.254.0/24,127.0.0.1/8"      #主机白名单
group_replication_bootstrap_group=off                             #不随系统自启而启动
group_replication_single_primary_mode=OFF                         #使用多主模式
group_replication_enforce_update_everywhere_checks=ON              #组同步中有任何改变检测更新
group_replication_allow_local_disjoint_gtids_join=1               #放弃自己信息以master事件为主
做解析,三台都做
[root@mysql-node1 ~]# vim /etc/hosts
127.0.0.1   localhost localhost.localdomain localhost4 localhost4.localdomain4
::1         localhost localhost.localdomain localhost6 localhost6.localdomain6
172.25.254.10   mysql-node1
172.25.254.20   mysql-node2
172.25.254.30   mysql-node3

[root@mysql-node2 ~]# vim /etc/hosts
127.0.0.1   localhost localhost.localdomain localhost4 localhost4.localdomain4
::1         localhost localhost.localdomain localhost6 localhost6.localdomain6
172.25.254.10   mysql-node1
172.25.254.20   mysql-node2
172.25.254.30   mysql-node3

[root@mysql-node3 ~]# vim /etc/hosts
127.0.0.1   localhost localhost.localdomain localhost4 localhost4.localdomain4
::1         localhost localhost.localdomain localhost6 localhost6.localdomain6
172.25.254.10   mysql-node1
172.25.254.20   mysql-node2
172.25.254.30   mysql-node3
配置另外两个主机
node2
#停止mysql
[root@mysql-node2 ~]# /etc/init.d/mysqld stop
Shutting down MySQL............ SUCCESS!
[root@mysql-node2 ~]# rm -rf /data/mysql/*
#编辑参数
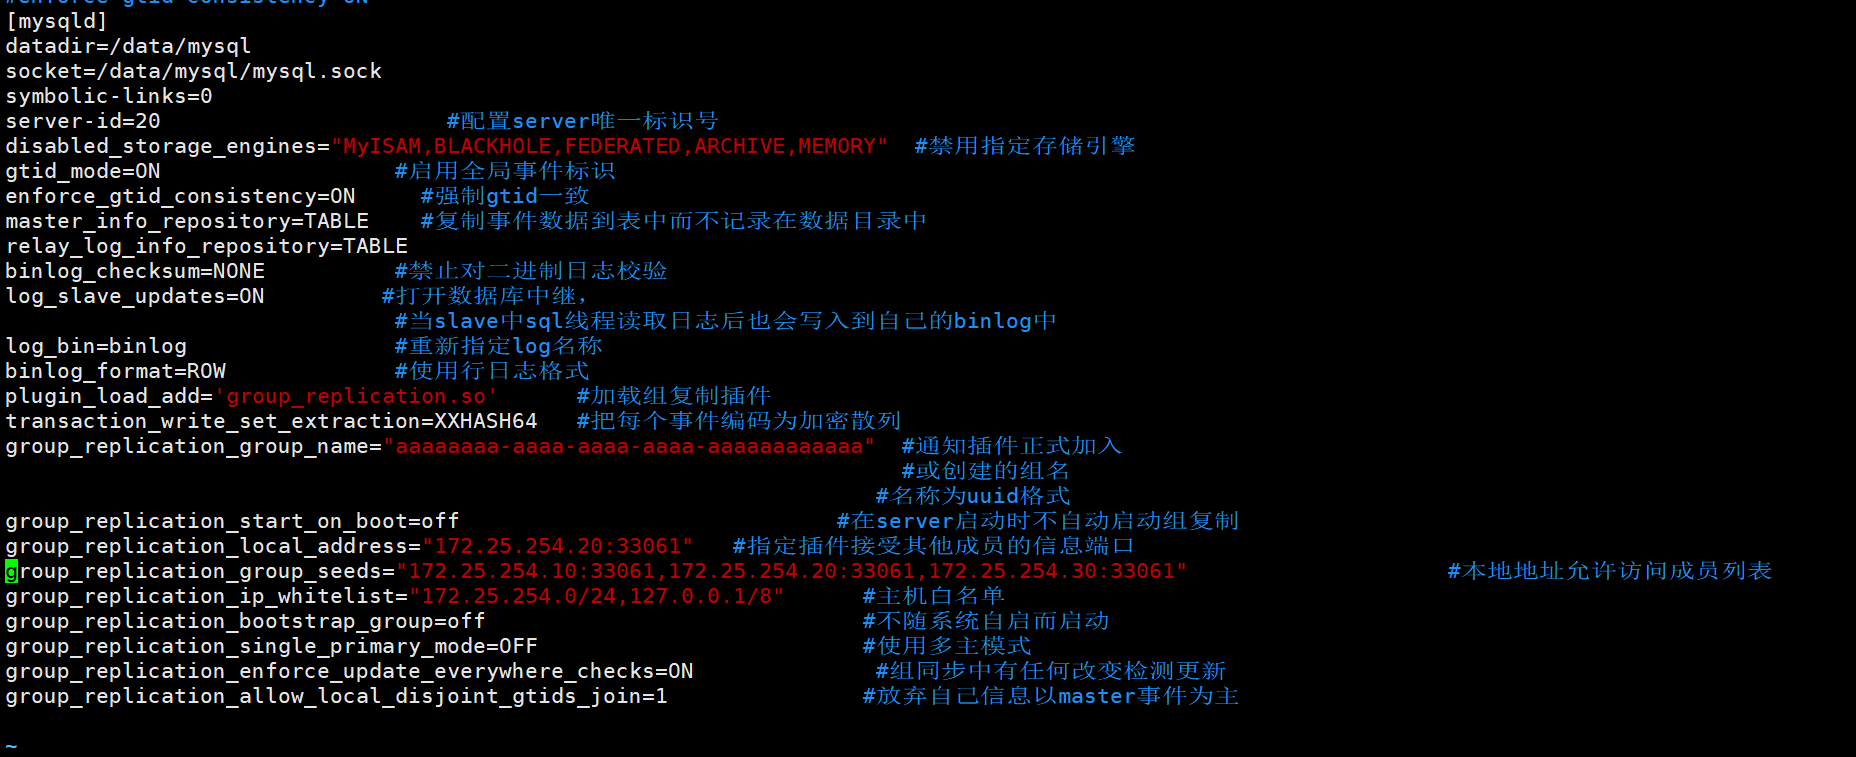
[root@mysql-node2 ~]# vim /etc/my.cnf
[mysqld]
datadir=/data/mysql
socket=/data/mysql/mysql.sock
symbolic-links=0
server-id=20
disabled_storage_engines="MyISAM,BLACKHOLE,FEDERATED,ARCHIVE,MEMORY"
gtid_mode=ON
enforce_gtid_consistency=ON
master_info_repository=TABLE
relay_log_info_repository=TABLE
binlog_checksum=NONE
log_slave_updates=ON
log_bin=binlog
binlog_format=ROW
plugin_load_add='group_replication.so'
transaction_write_set_extraction=XXHASH64
group_replication_group_name="aaaaaaaa-aaaa-aaaa-aaaa-aaaaaaaaaaaa"
group_replication_start_on_boot=off
group_replication_local_address="172.25.254.20:33061"
group_replication_group_seeds="172.25.254.10:33061,172.25.254.20:33061,172.25.254.30:33061"
group_replication_ip_whitelist="172.25.254.0/24,127.0.0.1/8"
group_replication_bootstrap_group=off
group_replication_single_primary_mode=OFF
group_replication_enforce_update_everywhere_checks=ON
group_replication_allow_local_disjoint_gtids_join=1
[root@mysql-node2 ~]# mysqld --user=mysql --initialize
#启动mysql
[root@mysql-node2 ~]# /etc/init.d/mysqld start
[root@mysql-node2 ~]# mysql -u root -p
Enter password:
Welcome to the MySQL monitor. Commands end with ; or \g.
Your MySQL connection id is 2
Server version: 5.7.44-log
Copyright (c) 2000, 2023, Oracle and/or its affiliates.
Oracle is a registered trademark of Oracle Corporation and/or its
affiliates. Other names may be trademarks of their respective
owners.
Type 'help;' or '\h' for help. Type '\c' to clear the current input statement.
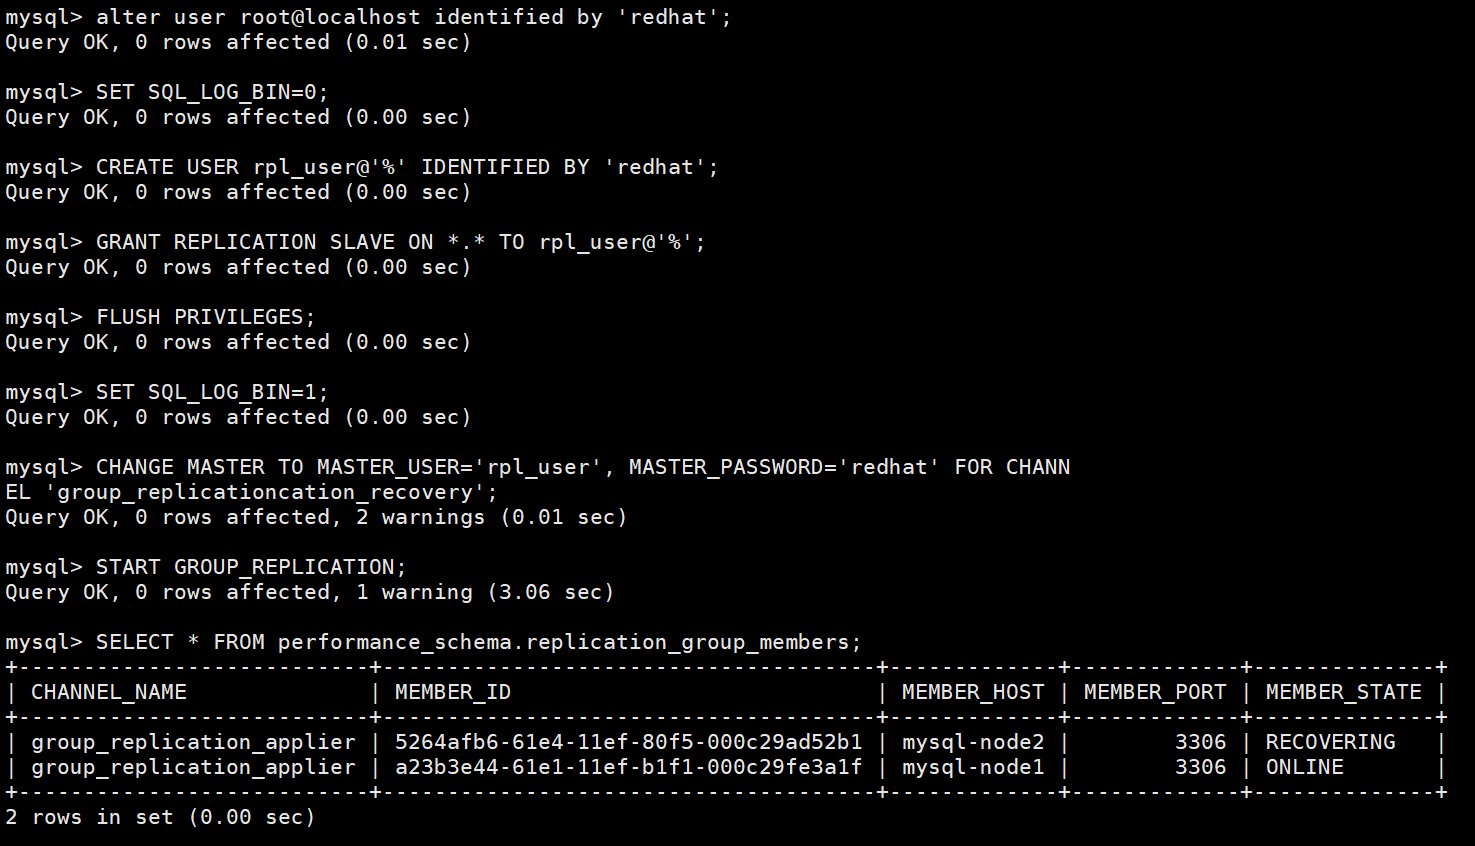
mysql> alter user root@localhost identified by 'redhat';
Query OK, 0 rows affected (0.01 sec)
mysql> SET SQL_LOG_BIN=0;
Query OK, 0 rows affected (0.00 sec)
mysql> CREATE USER rpl_user@'%' IDENTIFIED BY 'redhat';
Query OK, 0 rows affected (0.00 sec)
mysql> GRANT REPLICATION SLAVE ON *.* TO rpl_user@'%';
Query OK, 0 rows affected (0.00 sec)
mysql> FLUSH PRIVILEGES;
Query OK, 0 rows affected (0.00 sec)
mysql> SET SQL_LOG_BIN=1;
Query OK, 0 rows affected (0.00 sec)
mysql> CHANGE MASTER TO MASTER_USER='rpl_user', MASTER_PASSWORD='redhat' FOR CHANNEL 'group_replicationcation_recovery';
Query OK, 0 rows affected, 2 warnings (0.01 sec)
mysql> START GROUP_REPLICATION;
Query OK, 0 rows affected, 1 warning (3.06 sec)
mysql> SELECT * FROM performance_schema.replication_group_members;
+---------------------------+--------------------------------------+-------------+-------------+--------------+
| CHANNEL_NAME | MEMBER_ID | MEMBER_HOST | MEMBER_PORT | MEMBER_STATE |
+---------------------------+--------------------------------------+-------------+-------------+--------------+
| group_replication_applier | 5264afb6-61e4-11ef-80f5-000c29ad52b1 | mysql-node2 | 3306 | ONLINE |
| group_replication_applier | a23b3e44-61e1-11ef-b1f1-000c29fe3a1f | mysql-node1 | 3306 | ONLINE |
+---------------------------+--------------------------------------+-------------+-------------+--------------+
2 rows in set (0.00 sec)
mysql>
node3
#停止mysql
[root@mysql-node3 ~]# /etc/init.d/mysqld stop
Shutting down MySQL............ SUCCESS!

[root@mysql-node3 ~]# rm -rf /data/mysql/*

#编辑参数
[root@mysql-node3 ~]# vim /etc/my.cnf
[mysqld]
datadir=/data/mysql
socket=/data/mysql/mysql.sock
symbolic-links=0
server-id=30
disabled_storage_engines="MyISAM,BLACKHOLE,FEDERATED,ARCHIVE,MEMORY"
gtid_mode=ON
enforce_gtid_consistency=ON
master_info_repository=TABLE
relay_log_info_repository=TABLE
binlog_checksum=NONE
log_slave_updates=ON
log_bin=binlog
binlog_format=ROW
plugin_load_add='group_replication.so'
transaction_write_set_extraction=XXHASH64
group_replication_group_name="aaaaaaaa-aaaa-aaaa-aaaa-aaaaaaaaaaaa"
group_replication_start_on_boot=off
group_replication_local_address="172.25.254.30:33061"
group_replication_group_seeds="172.25.254.10:33061,172.25.254.20:33061,172.25.254.30:33061"
group_replication_ip_whitelist="172.25.254.0/24,127.0.0.1/8"
group_replication_bootstrap_group=off
group_replication_single_primary_mode=OFF
group_replication_enforce_update_everywhere_checks=ON
group_replication_allow_local_disjoint_gtids_join=1

[root@mysql-node3 ~]# mysqld --user=mysql --initialize
#启动mysql
[root@mysql-node3 ~]# /etc/init.d/mysqld start

[root@mysql-node3 ~]# mysql -u root -p
Enter password:
Welcome to the MySQL monitor.  Commands end with ; or \g.
Your MySQL connection id is 2
Server version: 5.7.44-log

Copyright (c) 2000, 2023, Oracle and/or its affiliates.

Oracle is a registered trademark of Oracle Corporation and/or its
affiliates. Other names may be trademarks of their respective
owners.

Type 'help;' or '\h' for help. Type '\c' to clear the current input statement.

mysql> alter user root@localhost identified by 'redhat';  #修改账号密码
Query OK, 0 rows affected (0.01 sec)

mysql> SET SQL_LOG_BIN=0;
Query OK, 0 rows affected (0.00 sec)

mysql> CREATE USER rpl_user@'%' IDENTIFIED BY 'redhat';
Query OK, 0 rows affected (0.00 sec)

mysql> GRANT REPLICATION SLAVE ON *.* TO rpl_user@'%';
Query OK, 0 rows affected (0.00 sec)

mysql> FLUSH PRIVILEGES;
Query OK, 0 rows affected (0.00 sec)

mysql> SET SQL_LOG_BIN=1;
Query OK, 0 rows affected (0.00 sec)

mysql> CHANGE MASTER TO MASTER_USER='rpl_user', MASTER_PASSWORD='redhat' FOR CHANNEL 'group_replicationcation_recovery';
Query OK, 0 rows affected, 2 warnings (0.01 sec)

mysql> START GROUP_REPLICATION;
Query OK, 0 rows affected, 1 warning (3.06 sec)

mysql> SELECT * FROM performance_schema.replication_group_members;
+---------------------------+--------------------------------------+-------------+-------------+--------------+
| CHANNEL_NAME              | MEMBER_ID                            | MEMBER_HOST | MEMBER_PORT | MEMBER_STATE |
+---------------------------+--------------------------------------+-------------+-------------+--------------+
| group_replication_applier | 5264afb6-61e4-11ef-80f5-000c29ad52b5 | mysql-node3 |        3306 | ONLINE       |
| group_replication_applier | 5264afb6-61e4-11ef-80f5-000c29ad52b1 | mysql-node2 |        3306 | ONLINE       |
| group_replication_applier | a23b3e44-61e1-11ef-b1f1-000c29fe3a1f | mysql-node1 |        3306 | ONLINE       |
+---------------------------+--------------------------------------+-------------+-------------+--------------+
2 rows in set (0.00 sec)

mysql>
测试:
在每个节点都可以完成读写
#在mysql-node1中
[root@mysql-node1 ~]# mysql -p
mysql> CREATE DATABASE lee;
Query OK, 1 row affected (0.00 sec)
mysql> CREATE TABLE lee.userlist(
-> username VARCHAR(10) PRIMARY KEY NOT NULL,
-> password VARCHAR(50) NOT NULL
-> );
Query OK, 0 rows affected (0.01 sec)
mysql> INSERT INTO lee.userlist VALUES ('user1','111');
Query OK, 1 row affected (0.00 sec)
mysql> SELECT * FROM lee.userlist;
+----------+----------+
| username | password |
+----------+----------+
| user1 | 111 |
+----------+----------+
1 row in set (0.00 sec)

#在mysql-node2中
[root@mysql-node2 ~]# mysql -p
mysql> INSERT INTO lee.userlist values ('user2','222');
Query OK, 1 row affected (0.00 sec)
mysql> select * from lee.userlist;
+----------+----------+
| username | password |
+----------+----------+
| user1 | 111 |
| user2 | 222 |
+----------+----------+
2 rows in set (0.00 sec)

#mysql—node3中
[root@mysql-node3 ~]# mysql -p
mysql> INSERT INTO lee.userlist values ('user3','333');
Query OK, 1 row affected (0.00 sec)
mysql> select * from lee.userlist;
+----------+----------+
| username | password |
+----------+----------+
| user1 | 111 |
| user2 | 222 |
| user3 | 333 |
+----------+----------+
3 rows in set (0.00 sec)
五 mysql-router(mysql路由)
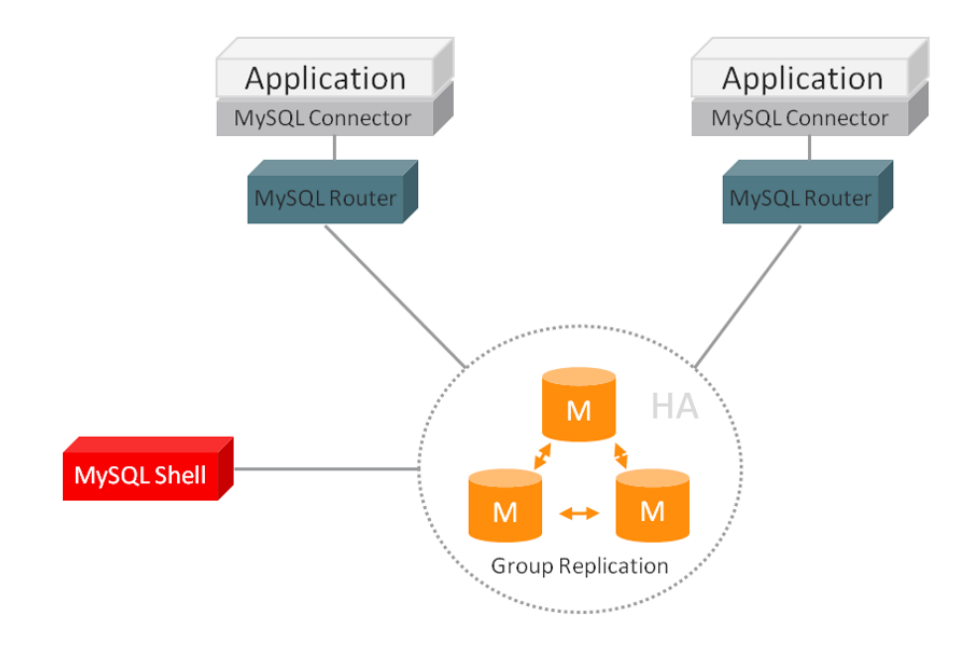
MySQL Router
是一个对应用程序透明的InnoDB Cluster连接路由服务,提供负载均衡、应用连接故障转移和客户端路由。
利用路由器的连接路由特性,用户可以编写应用程序来连接到路由器,并令路由器使用相应的路由策略来处理连接,使其连接到正确的MySQL数据库服务器
Mysql route的部署方式
我们需要在所有的数据库主机之外再开一台主机mysql-router
#安装mysql-router
[root@mysql-node1 ~]# rpm -ivh mysql-router-community-8.4.0-1.el7.x86_64.rpm
#配置mysql-router
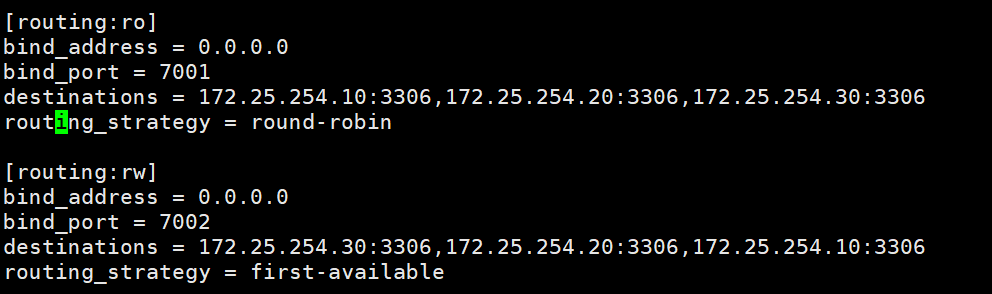
[root@mysql-node1 ~]# vim /etc/mysqlrouter/mysqlrouter.conf
[routing:ro]
bind_address = 0.0.0.0
bind_port = 7001
destinations = 172.25.254.10:3306,172.25.254.20:3306,172.25.254.30:3306
routing_strategy = round-robin
[routing:rw]
bind_address = 0.0.0.0
bind_port = 7002
destinations = 172.25.254.30:3306,172.25.254.20:3306,172.25.254.10:3306
routing_strategy = first-available
[root@mysql-node1 ~]# systemctl start mysqlrouter.service
#其他两个mysql建立远程登录用户
mysql> CREATE USER haha@'%' IDENTIFIED BY 'redhat';
Query OK, 0 rows affected (0.01 sec)
mysql> GRANT ALL ON *.* TO haha@'%';
Query OK, 0 rows affected (0.00 sec)
#测试
[root@mysql-node1 ~]# mysql -uhaha -predhat -h 172.25.254.10 -P 7001
mysql: [Warning] Using a password on the command line interface can be insecure.
Welcome to the MySQL monitor. Commands end with ; or \g.
Your MySQL connection id is 5
Server version: 5.7.44-log Source distribution
Copyright (c) 2000, 2023, Oracle and/or its affiliates.
Oracle is a registered trademark of Oracle Corporation and/or its
affiliates. Other names may be trademarks of their respective
owners.
Type 'help;' or '\h' for help. Type '\c' to clear the current input statement.
mysql> SELECT @@server_id;
+-------------+
| @@server_id |
+-------------+
| 20 |
+-------------+
1 row in set (0.00 sec)
mysql> exit
Bye
[root@mysql-node1 ~]# mysql -uhaha -predhat -h 172.25.254.10 -P 7001
mysql: [Warning] Using a password on the command line interface can be insecure.
Welcome to the MySQL monitor. Commands end with ; or \g.
Your MySQL connection id is 4
Server version: 5.7.44-log Source distribution
Copyright (c) 2000, 2023, Oracle and/or its affiliates.
Oracle is a registered trademark of Oracle Corporation and/or its
affiliates. Other names may be trademarks of their respective
owners.
Type 'help;' or '\h' for help. Type '\c' to clear the current input statement.
mysql> SELECT @@server_id;
+-------------+
| @@server_id |
+-------------+
| 30 |
+-------------+
1 row in set (0.01 sec)
mysql> exit
Bye

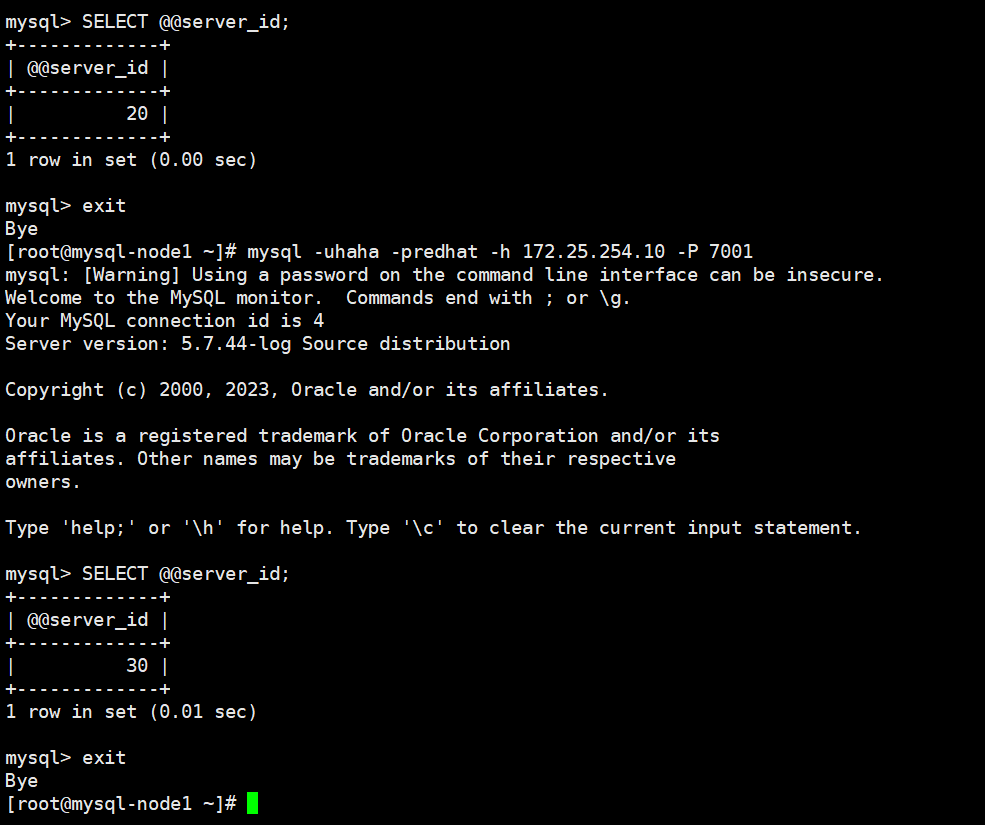
mysql router 并不能限制数据库的读写,访问分流
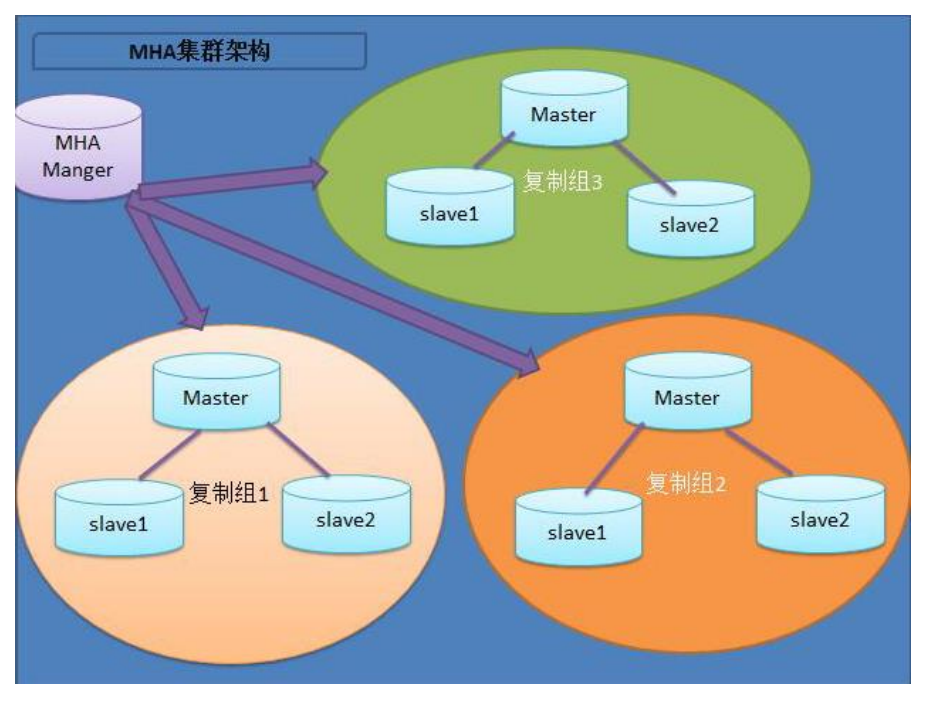
六 mysql高可用之MHA
6.1.MHA概述
为什么要用MHA?
Master的单点故障问题
什么是 MHA?
·MHA(Master High Availability)是一套优秀的MySQL高可用环境下故障切换和主从复制的软件。
·MHA 的出现就是解决MySQL 单点的问题。
·MySQL故障切换过程中,MHA能做到0-30秒内自动完成故障切换操作。
·MHA能在故障切换的过程中最大程度上保证数据的一致性,以达到真正意义上的高可用。
MHA 的组成
·MHA由两部分组成:MHAManager (管理节点) MHA Node (数据库节点),
·MHA Manager 可以单独部署在一台独立的机器上管理多个master-slave集群,也可以部署在一台
slave 节点上。
·MHA Manager 会定时探测集群中的 master 节点。
·当 master 出现故障时,它可以自动将最新数据的 slave 提升为新的 master, 然后将所有其他的
slave 重新指向新的 master
MHA 的特点
·自动故障切换过程中,MHA从宕机的主服务器上保存二进制日志,最大程度的保证数据不丢失
·使用半同步复制,可以大大降低数据丢失的风险,如果只有一个slave已经收到了最新的二进制日志,MHA可以将最新的二进制日志应用于其他所有的slave服务器上,因此可以保证所有节点的数据一致性
·目前MHA支持一主多从架构,最少三台服务,即一主两从
故障切换备选主库的算法
1.一般判断从库的是从(position/GTID)判断优劣,数据有差异,最接近于master的slave,成为备选
主。
2.数据一致的情况下,按照配置文件顺序,选择备选主库。
3.设定有权重(candidate_master=1),按照权重强制指定备选主。
(1)默认情况下如果一个slave落后master 100M的relay logs的话,即使有权重,也会失效。
(2)如果check_repl_delay=0的话,即使落后很多日志,也强制选择其为备选主。
MHA工作原理
·目前MHA主要支持一主多从的架构,要搭建MHA,要求一个复制集群必须最少有3台数据库服务器,一主二从,即一台充当Master,台充当备用Master,另一台充当从库。
·MHA Node 运行在每台 MySQL 服务器上
·MHAManager 会定时探测集群中的master 节点
·当master 出现故障时,它可以自动将最新数据的slave 提升为新的master
·然后将所有其他的slave 重新指向新的master,VIP自动漂移到新的master。
·整个故障转移过程对应用程序完全透明。
[root@mysql-mha ~]# unzip MHA-7.zip
Archive:  MHA-7.zip
   creating: MHA-7/
  inflating: MHA-7/mha4mysql-manager-0.58-0.el7.centos.noarch.rpm
  inflating: MHA-7/mha4mysql-manager-0.58.tar.gz
  inflating: MHA-7/mha4mysql-node-0.58-0.el7.centos.noarch.rpm
  inflating: MHA-7/perl-Config-Tiny-2.14-7.el7.noarch.rpm
  inflating: MHA-7/perl-Email-Date-Format-1.002-15.el7.noarch.rpm
  inflating: MHA-7/perl-Log-Dispatch-2.41-1.el7.1.noarch.rpm
  inflating: MHA-7/perl-Mail-Sender-0.8.23-1.el7.noarch.rpm
  inflating: MHA-7/perl-Mail-Sendmail-0.79-21.el7.noarch.rpm
  inflating: MHA-7/perl-MIME-Lite-3.030-1.el7.noarch.rpm
  inflating: MHA-7/perl-MIME-Types-1.38-2.el7.noarch.rpm
  inflating: MHA-7/perl-Net-Telnet-3.03-19.el7.noarch.rpm
  inflating: MHA-7/perl-Parallel-ForkManager-1.18-2.el7.noarch.rpm
[root@mysql-mha ~]# cd MHA-7/
[root@mysql-mha MHA-7]# ls
mha4mysql-manager-0.58-0.el7.centos.noarch.rpm  perl-Mail-Sender-0.8.23-1.el7.noarch.rpm
mha4mysql-manager-0.58.tar.gz                   perl-Mail-Sendmail-0.79-21.el7.noarch.rpm
mha4mysql-node-0.58-0.el7.centos.noarch.rpm     perl-MIME-Lite-3.030-1.el7.noarch.rpm
perl-Config-Tiny-2.14-7.el7.noarch.rpm          perl-MIME-Types-1.38-2.el7.noarch.rpm
perl-Email-Date-Format-1.002-15.el7.noarch.rpm  perl-Net-Telnet-3.03-19.el7.noarch.rpm
perl-Log-Dispatch-2.41-1.el7.1.noarch.rpm       perl-Parallel-ForkManager-1.18-2.el7.noarch.rpm
免密认证
[root@mysql-mha MHA-7]# ssh-keygen
Generating public/private rsa key pair.
Enter file in which to save the key (/root/.ssh/id_rsa):
Created directory '/root/.ssh'.
Enter passphrase (empty for no passphrase):
Enter same passphrase again:
Your identification has been saved in /root/.ssh/id_rsa.
Your public key has been saved in /root/.ssh/id_rsa.pub.
The key fingerprint is:
SHA256:jxU+uU3TgvRdLtsMxXJ0AuvwQEJy03LOoGCc5isMRp4 root@mysql-mha
The key's randomart image is:
+---[RSA 2048]----+
|   . ...=.. ... o|
| .  *  oo+o  . +.|
|o .+ . . *= . . =|
|.E  . .  ooX o * |
|.o   .  S * B = .|
|  o .    + = o * |
|   .    . o . . o|
|                 |
|                 |
+----[SHA256]-----+
[root@mysql-mha MHA-7]#
[root@mysql-mha MHA-7]# ssh-copy-id -i /root/.ssh/id_rsa.pub root@172.25.254.10
/usr/bin/ssh-copy-id: INFO: Source of key(s) to be installed: "/root/.ssh/id_rsa.pub"
The authenticity of host '172.25.254.10 (172.25.254.10)' can't be established.
ECDSA key fingerprint is SHA256:nIpwoT7C+ZgP7XbjFIZMJ7/JdbOBi6g4H5EvDQ7g22o.
ECDSA key fingerprint is MD5:c1:df:46:3b:1b:59:d0:43:41:5c:7c:0d:d7:68:66:c9.
Are you sure you want to continue connecting (yes/no)? yes
/usr/bin/ssh-copy-id: INFO: attempting to log in with the new key(s), to filter out any that are already installed
/usr/bin/ssh-copy-id: INFO: 1 key(s) remain to be installed -- if you are prompted now it is to install the new keys
root@172.25.254.10's password:

Number of key(s) added: 1

Now try logging into the machine, with:   "ssh 'root@172.25.254.10'"
and check to make sure that only the key(s) you wanted were added.
6.2 MHA部署实施
6.2.1 搭建主两从架构
#node1
[root@mysql-node1 ~]# /etc/init.d/mysqld stop
Shutting down MySQL............ SUCCESS!
[root@mysql-node1 ~]# rm -fr /data/mysql/*
[root@mysql-node1 ~]# vim /etc/my.cnf
[mysqld]
datadir=/data/mysql
socket=/data/mysql/mysql.sock
server-id=10
log-bin=mysql-bin
gtid_mode=ON
log_slave_updates=ON
enforce-gtid-consistency=ON
symbolic-links=0
[root@mysql-node1 ~]# mysqld --user mysql --initialize
[root@mysql-node1 ~]# /etc/init.d/mysqld start
[root@mysql-node1 ~]# mysql_secure_installation
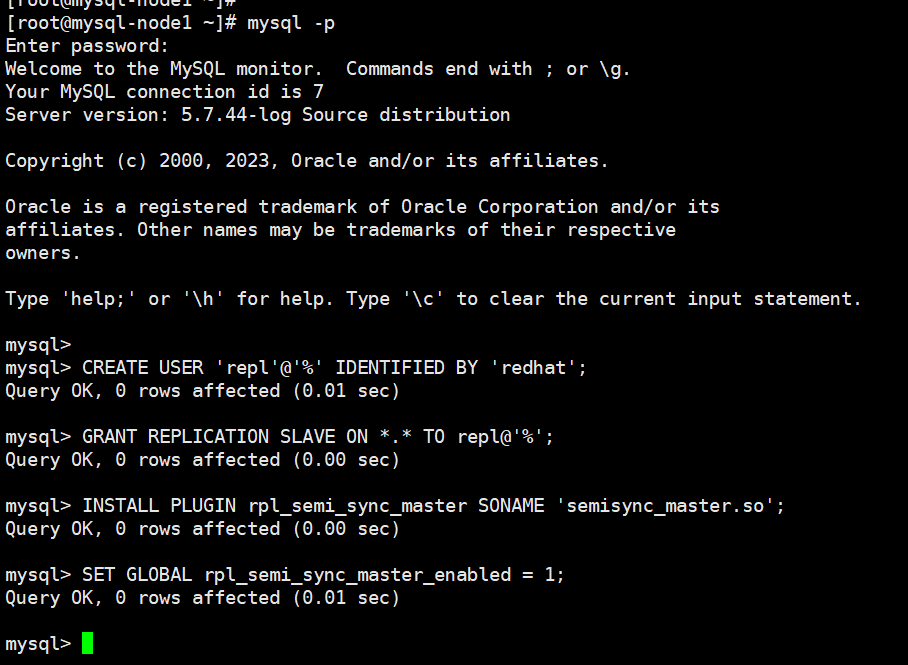
[root@mysql-node1 ~]# mysql -p
mysql> CREATE USER 'repl'@'%' IDENTIFIED BY 'redhat';
Query OK, 0 rows affected (0.00 sec)
mysql> GRANT REPLICATION SLAVE ON *.* TO repl@'%';
Query OK, 0 rows affected (0.01 sec)
mysql> INSTALL PLUGIN rpl_semi_sync_master SONAME 'semisync_master.so';
Query OK, 0 rows affected (0.08 sec)
mysql> SET GLOBAL rpl_semi_sync_master_enabled = 1;
Query OK, 0 rows affected (0.00 sec)
mysql>
#node2和node3
[root@mysql-node2 ~]# /etc/init.d/mysqld stop
[root@mysql-node2 ~]# rm -fr /data/mysql/*
[root@mysql-node2 ~]# vim /etc/my.cnf
[mysqld]
datadir=/data/mysql
socket=/data/mysql/mysql.sock
server-id=20 #30改30
log-bin=mysql-bin
gtid_mode=ON
log_slave_updates=ON
enforce-gtid-consistency=ON
symbolic-links=0
[root@mysql-node2 ~]# mysqld --user mysql --initialize
[root@mysql-node2 ~]# /etc/init.d/mysqld start
[root@mysql-node2 ~]# mysql_secure_installation
[root@mysql-node2 ~]# mysql -u root -p
Enter password:
Welcome to the MySQL monitor. Commands end with ; or \g.
Your MySQL connection id is 5
Server version: 5.7.44-log Source distribution
Copyright (c) 2000, 2023, Oracle and/or its affiliates.
Oracle is a registered trademark of Oracle Corporation and/or its
affiliates. Other names may be trademarks of their respective
owners.
Type 'help;' or '\h' for help. Type '\c' to clear the current input statement.
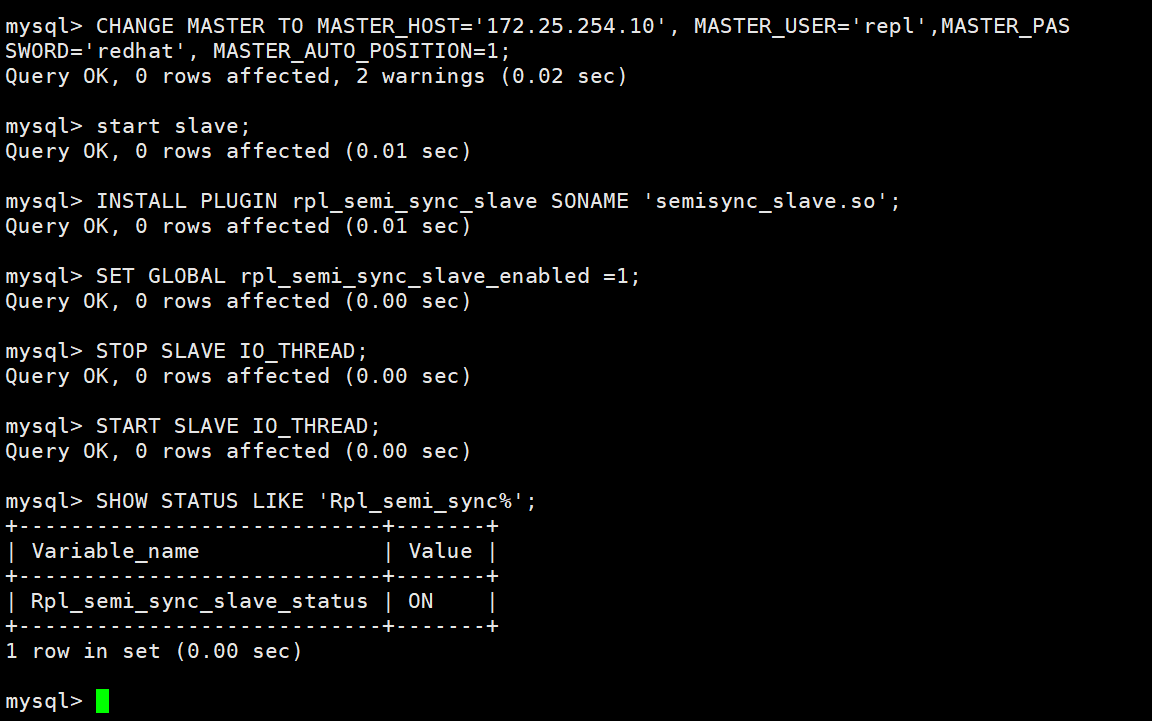
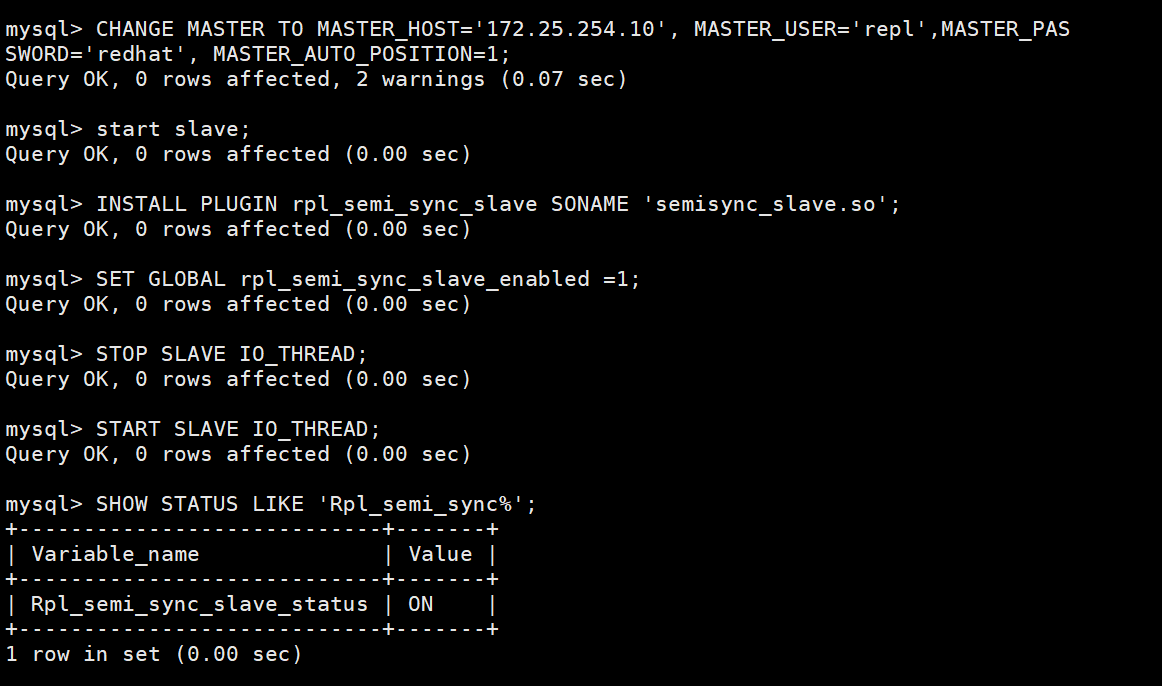
mysql> CHANGE MASTER TO MASTER_HOST='172.25.254.10', MASTER_USER='repl',MASTER_PASSWORD='redhat', MASTER_AUTO_POSITION=1;
Query OK, 0 rows affected, 2 warnings (0.02 sec)
mysql> start slave;
Query OK, 0 rows affected (0.01 sec)
mysql> INSTALL PLUGIN rpl_semi_sync_slave SONAME 'semisync_slave.so';
Query OK, 0 rows affected (0.01 sec)
mysql> SET GLOBAL rpl_semi_sync_slave_enabled =1;
Query OK, 0 rows affected (0.00 sec)
mysql> STOP SLAVE IO_THREAD;
Query OK, 0 rows affected (0.00 sec)
mysql> START SLAVE IO_THREAD;
Query OK, 0 rows affected (0.00 sec)
mysql> SHOW STATUS LIKE 'Rpl_semi_sync%';
+----------------------------+-------+
| Variable_name | Value |
+----------------------------+-------+
| Rpl_semi_sync_slave_status | ON |
+----------------------------+-------+
1 row in set (0.00 sec)
node1
node2
node3
6.2.2安装MHA所需要的软件
#在MHA中
[root@mysql-mha ~]# unzip MHA-7.zip
[root@mysql-mha MHA-7]# ls
mha4mysql-manager-0.58-0.el7.centos.noarch.rpm perl-Mail-Sender-0.8.23-
1.el7.noarch.rpm
mha4mysql-manager-0.58.tar.gz perl-Mail-Sendmail-0.79-
21.el7.noarch.rpm
mha4mysql-node-0.58-0.el7.centos.noarch.rpm perl-MIME-Lite-3.030-
1.el7.noarch.rpm
perl-Config-Tiny-2.14-7.el7.noarch.rpm perl-MIME-Types-1.38-
2.el7.noarch.rpm
perl-Email-Date-Format-1.002-15.el7.noarch.rpm perl-Net-Telnet-3.03-
19.el7.noarch.rpm
perl-Log-Dispatch-2.41-1.el7.1.noarch.rpm perl-Parallel-ForkManager-1.18-
2.el7.noarch.rpm
[root@mysql-mha MHA-7]# yum install *.rpm -y
[root@mysql-mha MHA-7]# scp mha4mysql-node-0.58-0.el7.centos.noarch.rpm root@172.25.254.10:/mnt
[root@mysql-mha MHA-7]# scp mha4mysql-node-0.58-0.el7.centos.noarch.rpm root@172.25.254.20:/mnt
[root@mysql-mha MHA-7]# scp mha4mysql-node-0.58-0.el7.centos.noarch.rpm root@172.25.254.30:/mnt

#在sql-node中
[root@mysql-node1 ~]# yum install /mnt/mha4mysql-node-0.58-0.el7.centos.noarch.rpm -y
[root@mysql-node2 ~]# yum install /mnt/mha4mysql-node-0.58-0.el7.centos.noarch.rpm -y
[root@mysql-node3 ~]# yum install /mnt/mha4mysql-node-0.58-0.el7.centos.noarch.rpm -y
在软件中包含的工具包介绍
1.Manager工具包主要包括以下几个工具:
·masterha_check_ssh #检查MHA的SSH配置状况
·masterha_check_repl #检查MySQL复制状况
·masterha_manger #启动MHA
·masterha_check_status #检测当前MHA运行状态
·masterha_master_monitor #检测master是否宕机
·masterha_master_switch #控制故障转移(自动或者手动)
·masterha_conf_host #添加或删除配置的server信息
2.Node工具包 (通常由masterHA主机直接调用,无需人为执行)
·save_binary_logs #保存和复制master的二进制日志
·apply_diff_relay_logs #识别差异的中继日志事件并将其差异的事件应用于其他的slave
·filter_mysqlbinlog #去除不必要的ROLLBACK事件(MHA已不再使用这个工具)
·purge_relay_logs #清除中继日志(不会阻塞SQL线程)
6.2.3 配置MHA 的管理环境
1.生成配置目录和配置文件
[root@mysql-mha ~]# masterha_manager --help
Usage:
masterha_manager --global_conf=/etc/masterha_default.cnf #全局配置文件,记录公共设定
--conf=/usr/local/masterha/conf/app1.cnf #不同管理配置文件,记录各自配置
See online reference
(http://code.google.com/p/mysql-master-ha/wiki/masterha_manager) fordetails.
因为我们当前只有一套主从,所以我们只需要写一个配置文件即可
rpm包中没有为我们准备配置文件的模板
可以解压源码包后在samples中找到配置文件的模板文件
[root@mysql-mha MHA-7]# cd
[root@mysql-mha ~]# mkdir /etc/masterha
[root@mysql-mha ~]# cd MHA-7/
[root@mysql-mha MHA-7]# tar zxf mha4mysql-manager-0.58.tar.gz
[root@mysql-mha MHA-7]# cd mha4mysql-manager-0.58/samples/conf/
[root@mysql-mha conf]# ls
app1.cnf masterha_default.cnf
[root@mysql-mha conf]# cat masterha_default.cnf app1.cnf > /etc/masterha/app1.cnf
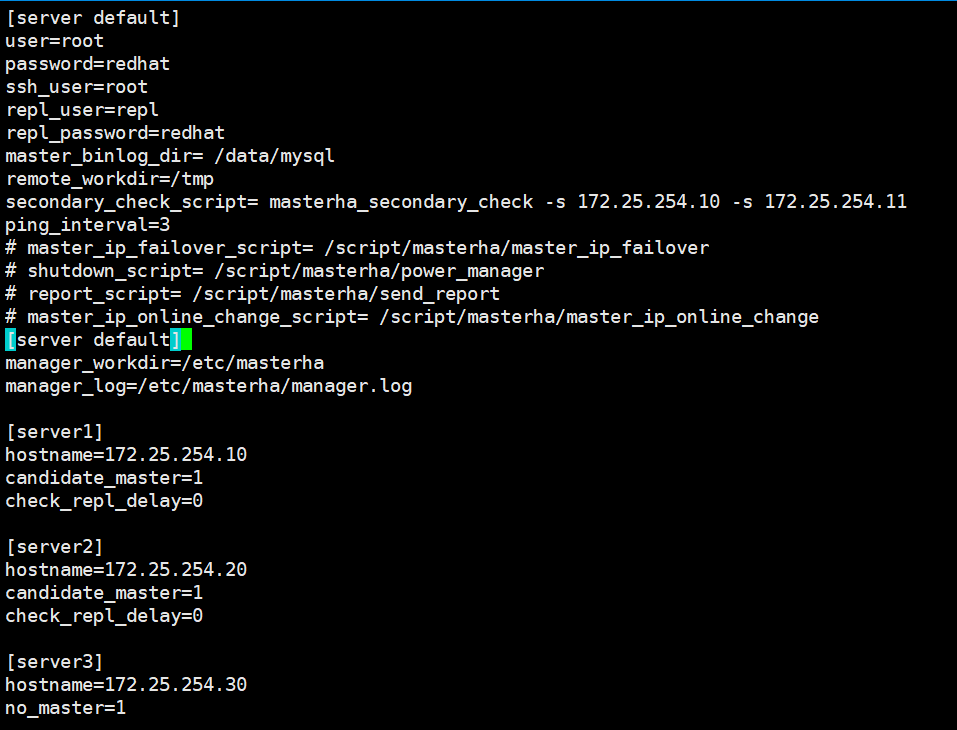
[root@mysql-mha conf]# vim /etc/masterha/app1.cnf
[server default]
user=root
password=redhat
ssh_user=root
repl_user=repl
repl_password=redhat
master_binlog_dir= /data/mysql
remote_workdir=/tmp
secondary_check_script= masterha_secondary_check -s 172.25.254.10 -s 172.25.254.11
ping_interval=3
# master_ip_failover_script= /script/masterha/master_ip_failover
# shutdown_script= /script/masterha/power_manager
# report_script= /script/masterha/send_report
# master_ip_online_change_script= /script/masterha/master_ip_online_change
[server default]
manager_workdir=/etc/masterha
manager_log=/etc/masterha/manager.log
[server1]
hostname=172.25.254.10
candidate_master=1
check_repl_delay=0
[server2]
hostname=172.25.254.20
candidate_master=1
check_repl_delay=0
[server3]
hostname=172.25.254.30
no_master=1
配置讲解:
#生成配置文件
[root@mysql-mha ~]# mkdir /etc/masterha
[root@mysql-mha MHA-7]# tar zxf mha4mysql-manager-0.58.tar.gz
[root@mysql-mha MHA-7]# cd mha4mysql-manager-0.58/samples/conf/
[root@mysql-mha conf]# cat masterha_default.cnf app1.cnf > /etc/masterha/app1.cnf
#编辑配置文件
[root@mysql-mha ~]# vim /etc/masterha/app1.cnf
[server default]
user=root #mysql管理员用户,因为需要做自动化配置
password=lee #mysql密码
ssh_user=root #ssh远程登陆用户
repl_user=repl #mysql主从复制中负责认证的用户
repl_password=lee #mysql主从复制中负责认证的用户密码
master_binlog_dir= /data/mysql #二进制日志目录
remote_workdir=/tmp #远程工作目录
#此参数使为了提供冗余检测,方式是mha主机网络自身的问题无法连接数据库节点,应为集群之外的主机
secondary_check_script= masterha_secondary_check -s 172.25.254.10 -s
172.25.254.11
ping_interval=3 #每隔3秒检测一次
#发生故障后调用的脚本,用来迁移vip
# master_ip_failover_script= /script/masterha/master_ip_failover
#电源管理脚本
# shutdown_script= /script/masterha/power_manager
#当发生故障后用此脚本发邮件或者告警通知
# report_script= /script/masterha/send_report
#在线切换时调用的vip迁移脚本,手动
# master_ip_online_change_script= /script/masterha/master_ip_online_change
manager_workdir=/etc/masterha #mha工作目录
manager_log=/var/etc/masterha/manager.log #mha日志
[server1]
hostname=172.25.254.10
candidate_master=1 #可能作为master的主机
check_repl_delay=0 ##默认情况下如果一个slave落后master 100M的relay logs的话
#MHA将不会选择该slave作为一个新的master
#因为对于这个slave的恢复需要花费很长时间
#通过设置check_repl_delay=0
#MHA触发切换在选择一个新的master的时候将会忽略复制延时
#这个参数对于设置了candidate_master=1的主机非常有用
#因为这个候选主在切换的过程中一定是新的master
[server2]
hostname=172.25.254.20
candidate_master=1 #可能作为master的主机
check_repl_delay=0
[server3]
hostname=172.25.254.30
no_master=1 #不会作为master的主机
给主的MySQL设置
mysql> create user root@'%' identified by 'redhat';
Query OK, 0 rows affected (0.01 sec)

mysql> grant ALL ON *.* to root@'%';
Query OK, 0 rows affected (0.00 sec)
全体实现免密
[root@mysql-mha conf]# cd /root/
[root@mysql-mha ~]# cd .ssh/
[root@mysql-mha .ssh]# scp id_rsa root@172.25.254.10:/root/.ssh/
id_rsa                                                         100% 1679   886.8KB/s   00:00
[root@mysql-mha .ssh]# scp id_rsa root@172.25.254.20:/root/.ssh/
id_rsa                                                         100% 1679   901.1KB/s   00:00
[root@mysql-mha .ssh]# scp id_rsa root@172.25.254.30:/root/.ssh/
id_rsa                                                         100% 1679     1.2MB/s   00:00
[root@mysql-mha .ssh]#
2.检测配置:
a)检测网络及ssh免密
[root@mysql-mha ~]# masterha_check_ssh --conf=/etc/masterha/app1.cnf
Sat Aug 24 17:07:55 2024 - [warning] Global configuration file /etc/masterha_default.cnf not found. Skipping.
Sat Aug 24 17:07:55 2024 - [info] Reading application default configuration from /etc/masterha/app1.cnf..
Sat Aug 24 17:07:55 2024 - [info] Reading server configuration from /etc/masterha/app1.cnf..
Sat Aug 24 17:07:55 2024 - [info] Starting SSH connection tests..
Sat Aug 24 17:07:56 2024 - [debug]
Sat Aug 24 17:07:55 2024 - [debug]  Connecting via SSH from root@172.25.254.10(172.25.254.10:22) to root@172.25.254.20(172.25.254.20:22)..
Sat Aug 24 17:07:56 2024 - [debug]   ok.
Sat Aug 24 17:07:56 2024 - [debug]  Connecting via SSH from root@172.25.254.10(172.25.254.10:22) to root@172.25.254.30(172.25.254.30:22)..
Sat Aug 24 17:07:56 2024 - [debug]   ok.
Sat Aug 24 17:07:57 2024 - [debug]
Sat Aug 24 17:07:56 2024 - [debug]  Connecting via SSH from root@172.25.254.20(172.25.254.20:22) to root@172.25.254.10(172.25.254.10:22)..
Sat Aug 24 17:07:56 2024 - [debug]   ok.
Sat Aug 24 17:07:56 2024 - [debug]  Connecting via SSH from root@172.25.254.20(172.25.254.20:22) to root@172.25.254.30(172.25.254.30:22)..
Sat Aug 24 17:07:57 2024 - [debug]   ok.
Sat Aug 24 17:07:58 2024 - [debug]
Sat Aug 24 17:07:56 2024 - [debug]  Connecting via SSH from root@172.25.254.30(172.25.254.30:22) to root@172.25.254.10(172.25.254.10:22)..
Sat Aug 24 17:07:57 2024 - [debug]   ok.
Sat Aug 24 17:07:57 2024 - [debug]  Connecting via SSH from root@172.25.254.30(172.25.254.30:22) to root@172.25.254.20(172.25.254.20:22)..
Sat Aug 24 17:07:57 2024 - [debug]   ok.
Sat Aug 24 17:07:58 2024 - [info] All SSH connection tests passed successfully.
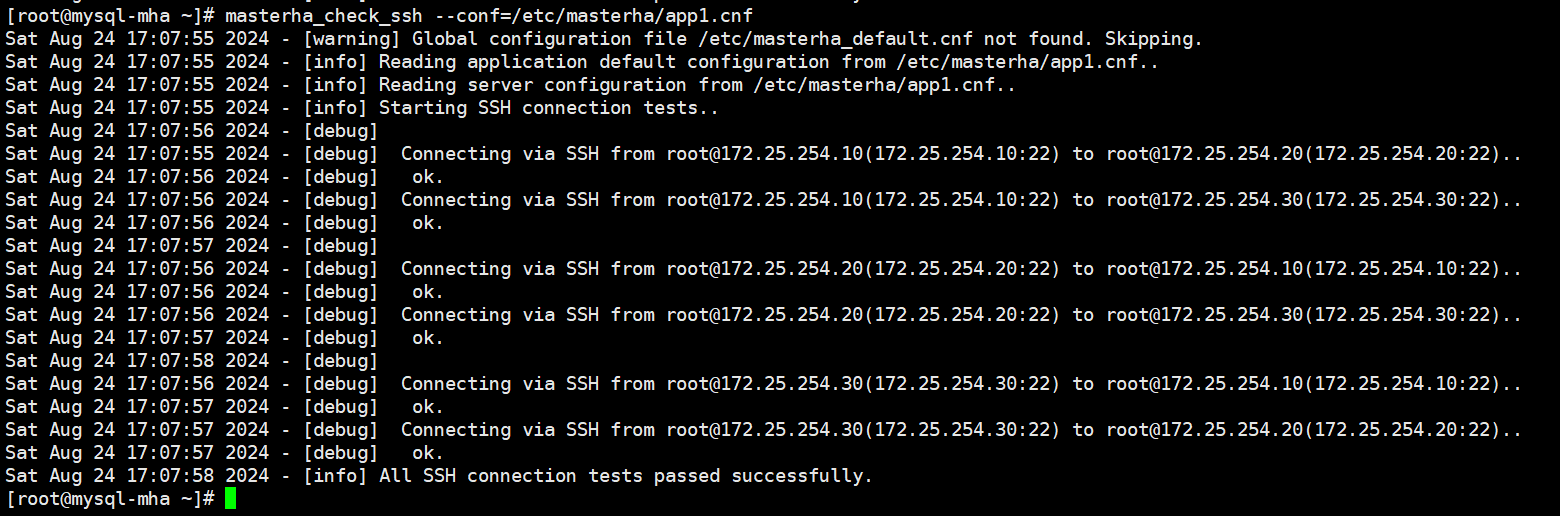
b)检测数据主从复制情况
[root@mysql-mha ~]#  masterha_check_repl --conf=/etc/masterha/app1.cnf
Sat Aug 24 17:09:13 2024 - [warning] Global configuration file /etc/masterha_default.cnf not found. Skipping.
Sat Aug 24 17:09:13 2024 - [info] Reading application default configuration from /etc/masterha/app1.cnf..
Sat Aug 24 17:09:13 2024 - [info] Reading server configuration from /etc/masterha/app1.cnf..
Sat Aug 24 17:09:13 2024 - [info] MHA::MasterMonitor version 0.58.
Sat Aug 24 17:09:14 2024 - [info] GTID failover mode = 1
Sat Aug 24 17:09:14 2024 - [info] Dead Servers:
Sat Aug 24 17:09:14 2024 - [info] Alive Servers:
Sat Aug 24 17:09:14 2024 - [info]   172.25.254.10(172.25.254.10:3306)
Sat Aug 24 17:09:14 2024 - [info]   172.25.254.20(172.25.254.20:3306)
Sat Aug 24 17:09:14 2024 - [info]   172.25.254.30(172.25.254.30:3306)
Sat Aug 24 17:09:14 2024 - [info] Alive Slaves:
Sat Aug 24 17:09:14 2024 - [info]   172.25.254.20(172.25.254.20:3306)  Version=5.7.44-log (oldest major version between slaves) log-bin:enabled
Sat Aug 24 17:09:14 2024 - [info]     GTID ON
Sat Aug 24 17:09:14 2024 - [info]     Replicating from 172.25.254.10(172.25.254.10:3306)
Sat Aug 24 17:09:14 2024 - [info]     Primary candidate for the new Master (candidate_master is set)
Sat Aug 24 17:09:14 2024 - [info]   172.25.254.30(172.25.254.30:3306)  Version=5.7.44-log (oldest major version between slaves) log-bin:enabled
Sat Aug 24 17:09:14 2024 - [info]     GTID ON
Sat Aug 24 17:09:14 2024 - [info]     Replicating from 172.25.254.10(172.25.254.10:3306)
Sat Aug 24 17:09:14 2024 - [info]     Not candidate for the new Master (no_master is set)
Sat Aug 24 17:09:14 2024 - [info] Current Alive Master: 172.25.254.10(172.25.254.10:3306)
Sat Aug 24 17:09:14 2024 - [info] Checking slave configurations..
Sat Aug 24 17:09:14 2024 - [info]  read_only=1 is not set on slave 172.25.254.20(172.25.254.20:3306).
Sat Aug 24 17:09:14 2024 - [info]  read_only=1 is not set on slave 172.25.254.30(172.25.254.30:3306).
Sat Aug 24 17:09:14 2024 - [info] Checking replication filtering settings..
Sat Aug 24 17:09:14 2024 - [info]  binlog_do_db= , binlog_ignore_db=
Sat Aug 24 17:09:14 2024 - [info]  Replication filtering check ok.
Sat Aug 24 17:09:14 2024 - [info] GTID (with auto-pos) is supported. Skipping all SSH and Node package checking.
Sat Aug 24 17:09:14 2024 - [info] Checking SSH publickey authentication settings on the current master..
Sat Aug 24 17:09:14 2024 - [info] HealthCheck: SSH to 172.25.254.10 is reachable.
Sat Aug 24 17:09:14 2024 - [info]
172.25.254.10(172.25.254.10:3306) (current master)
 +--172.25.254.20(172.25.254.20:3306)
 +--172.25.254.30(172.25.254.30:3306)

Sat Aug 24 17:09:14 2024 - [info] Checking replication health on 172.25.254.20..
Sat Aug 24 17:09:14 2024 - [info]  ok.
Sat Aug 24 17:09:14 2024 - [info] Checking replication health on 172.25.254.30..
Sat Aug 24 17:09:14 2024 - [info]  ok.
Sat Aug 24 17:09:14 2024 - [warning] master_ip_failover_script is not defined.
Sat Aug 24 17:09:14 2024 - [warning] shutdown_script is not defined.
Sat Aug 24 17:09:14 2024 - [info] Got exit code 0 (Not master dead).

MySQL Replication Health is OK.

6.2.3 MHA的故障切换
MHA的故障切换过程
共包括以下的步骤:
1.配置文件检查阶段,这个阶段会检查整个集群配置文件配置
2.宕机的master处理,这个阶段包括虚拟ip摘除操作,主机关机操作
3.复制dead master和最新slave相差的relay log,并保存到MHA Manger具体的目录下
4.识别含有最新更新的slave
5.应用从master保存的二进制日志事件(binlog events)
6.提升一个slave为新的master进行复制
7.使其他的slave连接新的master进行复制
切换方式:
master未出现故障手动切换
[root@mysql-mha ~]# masterha_master_switch --conf=/etc/masterha/app1.cnf --master_state=alive --new_master_host=172.25.254.20 --new_master_port=3306 --orig_master_is_new_slave --running_updates_limit=10000
#在master数据节点还在正常工作情况下
[root@mysql-mha ~]# masterha_master_switch \
--conf=/etc/masterha/app1.cnf \          #指定配置文件
--master_state=alive \                   #指定master节点状态
--new_master_host=172.25.254.20 \        #指定新master节点
--new_master_port=3306 \                 #执行新master节点端口
--orig_master_is_new_slave \             #原始master会变成新的slave
--running_updates_limit=10000            #切换的超时时间
#切换过程如下:
[root@mysql-mha conf]# masterha_master_switch --conf=/etc/masterha/app1.cnf --master_state=alive --new_master_host=172.25.254.20 --new_master_port=3306 --orig_master_is_new_slave --running_updates_limit=10000
Sun Aug 25 10:33:58 2024 - [info] MHA::MasterRotate version 0.58.
Sun Aug 25 10:33:58 2024 - [info] Starting online master switch..
Sun Aug 25 10:33:58 2024 - [info]
Sun Aug 25 10:33:58 2024 - [info] * Phase 1: Configuration Check Phase..
Sun Aug 25 10:33:58 2024 - [info]
Sun Aug 25 10:33:58 2024 - [warning] Global configuration file /etc/masterha_default.cnf not found. Skipping.
Sun Aug 25 10:33:58 2024 - [info] Reading application default configuration from /etc/masterha/app1.cnf..
Sun Aug 25 10:33:58 2024 - [info] Reading server configuration from /etc/masterha/app1.cnf..
Sun Aug 25 10:33:59 2024 - [info] GTID failover mode = 1
Sun Aug 25 10:33:59 2024 - [info] Current Alive Master: 172.25.254.10(172.25.254.10:3306)
Sun Aug 25 10:33:59 2024 - [info] Alive Slaves:
Sun Aug 25 10:33:59 2024 - [info] 172.25.254.20(172.25.254.20:3306) Version=5.7.44-log (oldest major version between slaves) log-bin:enabled
Sun Aug 25 10:33:59 2024 - [info] GTID ON
Sun Aug 25 10:33:59 2024 - [info] Replicating from 172.25.254.10(172.25.254.10:3306)
Sun Aug 25 10:33:59 2024 - [info] Primary candidate for the new Master (candidate_master is set)
Sun Aug 25 10:33:59 2024 - [info] 172.25.254.30(172.25.254.30:3306) Version=5.7.44-log (oldest major version between slaves) log-bin:enabled
Sun Aug 25 10:33:59 2024 - [info] GTID ON
Sun Aug 25 10:33:59 2024 - [info] Replicating from 172.25.254.10(172.25.254.10:3306)
Sun Aug 25 10:33:59 2024 - [info] Not candidate for the new Master (no_master is set)
It is better to execute FLUSH NO_WRITE_TO_BINLOG TABLES on the master before switching. Is it ok to execute on 172.25.254.10(172.25.254.10:3306)? (YES/no): yes
Sun Aug 25 10:34:02 2024 - [info] Executing FLUSH NO_WRITE_TO_BINLOG TABLES. This may take long time..
Sun Aug 25 10:34:02 2024 - [info] ok.
Sun Aug 25 10:34:02 2024 - [info] Checking MHA is not monitoring or doing failover..
Sun Aug 25 10:34:02 2024 - [info] Checking replication health on 172.25.254.20..
Sun Aug 25 10:34:02 2024 - [info] ok.
Sun Aug 25 10:34:02 2024 - [info] Checking replication health on 172.25.254.30..
Sun Aug 25 10:34:02 2024 - [info] ok.
Sun Aug 25 10:34:02 2024 - [info] 172.25.254.20 can be new master.
Sun Aug 25 10:34:02 2024 - [info]
From:
172.25.254.10(172.25.254.10:3306) (current master)
+--172.25.254.20(172.25.254.20:3306)
+--172.25.254.30(172.25.254.30:3306)
To:
172.25.254.20(172.25.254.20:3306) (new master)
+--172.25.254.30(172.25.254.30:3306)
+--172.25.254.10(172.25.254.10:3306)
Starting master switch from 172.25.254.10(172.25.254.10:3306) to 172.25.254.20(172.25.254.20:3306)? (yes/NO): yes
Sun Aug 25 10:34:03 2024 - [info] Checking whether 172.25.254.20(172.25.254.20:3306) is ok for the new master..
Sun Aug 25 10:34:03 2024 - [info] ok.
Sun Aug 25 10:34:03 2024 - [info] 172.25.254.10(172.25.254.10:3306): SHOW SLAVE STATUS returned empty result. To check replication filtering rules, temporarily executing CHANGE MASTER to a dummy host.
Sun Aug 25 10:34:03 2024 - [info] 172.25.254.10(172.25.254.10:3306): Resetting slave pointing to the dummy host.
Sun Aug 25 10:34:03 2024 - [info] ** Phase 1: Configuration Check Phase completed.
Sun Aug 25 10:34:03 2024 - [info]
Sun Aug 25 10:34:03 2024 - [info] * Phase 2: Rejecting updates Phase..
Sun Aug 25 10:34:03 2024 - [info]
master_ip_online_change_script is not defined. If you do not disable writes on the current master manually, applications keep writing on the current master. Is it ok to proceed? (yes/NO): yes
Sun Aug 25 10:34:04 2024 - [info] Locking all tables on the orig master to reject updates from everybody (including root):
Sun Aug 25 10:34:04 2024 - [info] Executing FLUSH TABLES WITH READ LOCK..
Sun Aug 25 10:34:04 2024 - [info] ok.
Sun Aug 25 10:34:04 2024 - [info] Orig master binlog:pos is mysql-bin.000002:1589.
Sun Aug 25 10:34:04 2024 - [info] Waiting to execute all relay logs on 172.25.254.20(172.25.254.20:3306)..
Sun Aug 25 10:34:04 2024 - [info] master_pos_wait(mysql-bin.000002:1589) completed on 172.25.254.20(172.25.254.20:3306). Executed 0 events.
Sun Aug 25 10:34:04 2024 - [info] done.
Sun Aug 25 10:34:04 2024 - [info] Getting new master's binlog name and position..
Sun Aug 25 10:34:04 2024 - [info] mysql-bin.000002:2145
Sun Aug 25 10:34:04 2024 - [info] All other slaves should start replication from here. Statement should be: CHANGE MASTER TO MASTER_HOST='172.25.254.20', MASTER_PORT=3306, MASTER_AUTO_POSITION=1, MASTER_USER='repl', MASTER_PASSWORD='xxx';
Sun Aug 25 10:34:04 2024 - [info]
Sun Aug 25 10:34:04 2024 - [info] * Switching slaves in parallel..
Sun Aug 25 10:34:04 2024 - [info]
Sun Aug 25 10:34:04 2024 - [info] -- Slave switch on host 172.25.254.30(172.25.254.30:3306) started, pid: 55188
Sun Aug 25 10:34:04 2024 - [info]
Sun Aug 25 10:34:06 2024 - [info] Log messages from 172.25.254.30 ...
Sun Aug 25 10:34:06 2024 - [info]
Sun Aug 25 10:34:04 2024 - [info] Waiting to execute all relay logs on 172.25.254.30(172.25.254.30:3306)..
Sun Aug 25 10:34:04 2024 - [info] master_pos_wait(mysql-bin.000002:1589) completed on 172.25.254.30(172.25.254.30:3306). Executed 0 events.
Sun Aug 25 10:34:04 2024 - [info] done.
Sun Aug 25 10:34:04 2024 - [info] Resetting slave 172.25.254.30(172.25.254.30:3306) and starting replication from the new master 172.25.254.20(172.25.254.20:3306)..
Sun Aug 25 10:34:04 2024 - [info] Executed CHANGE MASTER.
Sun Aug 25 10:34:05 2024 - [info] Slave started.
Sun Aug 25 10:34:06 2024 - [info] End of log messages from 172.25.254.30 ...
Sun Aug 25 10:34:06 2024 - [info]
Sun Aug 25 10:34:06 2024 - [info] -- Slave switch on host 172.25.254.30(172.25.254.30:3306) succeeded.
Sun Aug 25 10:34:06 2024 - [info] Unlocking all tables on the orig master:
Sun Aug 25 10:34:06 2024 - [info] Executing UNLOCK TABLES..
Sun Aug 25 10:34:06 2024 - [info] ok.
Sun Aug 25 10:34:06 2024 - [info] Starting orig master as a new slave..
Sun Aug 25 10:34:06 2024 - [info] Resetting slave 172.25.254.10(172.25.254.10:3306) and starting replication from the new master 172.25.254.20(172.25.254.20:3306)..
Sun Aug 25 10:34:06 2024 - [info] Executed CHANGE MASTER.
Sun Aug 25 10:34:07 2024 - [info] Slave started.
Sun Aug 25 10:34:07 2024 - [info] All new slave servers switched successfully.
Sun Aug 25 10:34:07 2024 - [info]
Sun Aug 25 10:34:07 2024 - [info] * Phase 5: New master cleanup phase..
Sun Aug 25 10:34:07 2024 - [info]
Sun Aug 25 10:34:07 2024 - [info] 172.25.254.20: Resetting slave info succeeded.
Sun Aug 25 10:34:07 2024 - [info] Switching master to 172.25.254.20(172.25.254.20:3306) completed successfully.
[root@mysql-mha conf]#
检测:
[root@mysql-mha masterha]# masterha_check_repl --conf=/etc/masterha/app1.cnf
Fri Aug 2 18:33:46 2024 - [warning] Global
configuration file /etc/masterha_default.cnf not found. Skipping.
Fri Aug 2 18:33:46 2024 - [info] Reading application default configuration from
/etc/masterha/app1.cnf..
Fri Aug 2 18:33:46 2024 - [info] Reading server configuration from
/etc/masterha/app1.cnf..
Fri Aug 2 18:33:46 2024 - [info] MHA::MasterMonitor version 0.58.
Fri Aug 2 18:33:47 2024 - [info] GTID failover mode = 1
Fri Aug 2 18:33:47 2024 - [info] Dead Servers:
Fri Aug 2 18:33:47 2024 - [info] Alive Servers:
Fri Aug 2 18:33:47 2024 - [info] 172.25.254.10(172.25.254.10:3306)
Fri Aug 2 18:33:47 2024 - [info] 172.25.254.20(172.25.254.20:3306)
Fri Aug 2 18:33:47 2024 - [info] 172.25.254.30(172.25.254.30:3306)
Fri Aug 2 18:33:47 2024 - [info] Alive Slaves:
Fri Aug 2 18:33:47 2024 - [info] 172.25.254.10(172.25.254.10:3306)
Version=5.7.44-log (oldest major version between slaves) log-bin:enabled
Fri Aug 2 18:33:47 2024 - [info] GTID ON
Fri Aug 2 18:33:47 2024 - [info] Replicating from
172.25.254.20(172.25.254.20:3306)
Fri Aug 2 18:33:47 2024 - [info] Primary candidate for the new Master
(candidate_master is set)
Fri Aug 2 18:33:47 2024 - [info] 172.25.254.30(172.25.254.30:3306)
Version=5.7.44-log (oldest major version between slaves) log-bin:enabled
Fri Aug 2 18:33:47 2024 - [info] GTID ON
Fri Aug 2 18:33:47 2024 - [info] Replicating from
172.25.254.20(172.25.254.20:3306)
Fri Aug 2 18:33:47 2024 - [info] Not candidate for the new Master (no_master
is set)
Fri Aug 2 18:33:47 2024 - [info] Current Alive Master:
172.25.254.20(172.25.254.20:3306)
Fri Aug 2 18:33:47 2024 - [info] Checking slave configurations..
Fri Aug 2 18:33:47 2024 - [info] read_only=1 is not set on slave
172.25.254.30(172.25.254.30:3306).
Fri Aug 2 18:33:47 2024 - [info] Checking replication filtering settings..
Fri Aug 2 18:33:47 2024 - [info] binlog_do_db= , binlog_ignore_db=
Fri Aug 2 18:33:47 2024 - [info] Replication filtering check ok.
Fri Aug 2 18:33:47 2024 - [info] GTID (with auto-pos) is supported. Skipping all
SSH and Node package checking.
Fri Aug 2 18:33:47 2024 - [info] Checking SSH publickey authentication settings
on the current master..
Fri Aug 2 18:33:47 2024 - [info] HealthCheck: SSH to 172.25.254.20 is reachable.
Fri Aug 2 18:33:47 2024 - [info]
172.25.254.20(172.25.254.20:3306) (current master)
+--172.25.254.10(172.25.254.10:3306)
+--172.25.254.30(172.25.254.30:3306)
Fri Aug 2 18:33:47 2024 - [info] Checking replication health on 172.25.254.10..
Fri Aug 2 18:33:47 2024 - [info] ok.
Fri Aug 2 18:33:47 2024 - [info] Checking replication health on 172.25.254.30..
Fri Aug 2 18:33:47 2024 - [info] ok.
Fri Aug 2 18:33:47 2024 - [warning] master_ip_failover_script is not defined.
Fri Aug 2 18:33:47 2024 - [warning] shutdown_script is not defined.
Fri Aug 2 18:33:47 2024 - [info] Got exit code 0 (Not master dead).
MySQL Replication Health is OK.
切换回去只需要将20换成10即可。
master故障手动切换
#模拟master故障
[root@mysql-node2 mysql]# /etc/init.d/mysqld stop
#在MHA-master中做故障切换
[root@mysql-mha masterha]#masterha_master_switch --master_state=dead --conf=/etc/masterha/app1.cnf --dead_master_host=172.25.254.20 --dead_master_port=3306 --new_master_host=172.25.254.10 --new_master_port=3306 --ignore_last_failover

#--ignore_last_failover 表示忽略在/etc/masterha/目录中在切换过程中生成的锁文件

#过程如下:
[root@mysql-mha conf]# masterha_master_switch --master_state=dead --conf=/etc/masterha/app1.cnf --dead_master_host=172.25.254.20 --dead_master_port=3306 --new_master_host=172.25.254.10 --new_master_port=3306 --ignore_last_failover
--dead_master_ip=<dead_master_ip> is not set. Using 172.25.254.20.
Sun Aug 25 10:54:02 2024 - [warning] Global configuration file /etc/masterha_default.cnf not found. Skipping.
Sun Aug 25 10:54:02 2024 - [info] Reading application default configuration from /etc/masterha/app1.cnf..
Sun Aug 25 10:54:02 2024 - [info] Reading server configuration from /etc/masterha/app1.cnf..
Sun Aug 25 10:54:02 2024 - [info] MHA::MasterFailover version 0.58.
Sun Aug 25 10:54:02 2024 - [info] Starting master failover.
Sun Aug 25 10:54:02 2024 - [info]
Sun Aug 25 10:54:02 2024 - [info] * Phase 1: Configuration Check Phase..
Sun Aug 25 10:54:02 2024 - [info]
Sun Aug 25 10:54:03 2024 - [info] GTID failover mode = 1
Sun Aug 25 10:54:03 2024 - [info] Dead Servers:
Sun Aug 25 10:54:03 2024 - [info]   172.25.254.20(172.25.254.20:3306)
Sun Aug 25 10:54:03 2024 - [info] Checking master reachability via MySQL(double check)...
Sun Aug 25 10:54:03 2024 - [info]  ok.
Sun Aug 25 10:54:03 2024 - [info] Alive Servers:
Sun Aug 25 10:54:03 2024 - [info]   172.25.254.10(172.25.254.10:3306)
Sun Aug 25 10:54:03 2024 - [info]   172.25.254.30(172.25.254.30:3306)
Sun Aug 25 10:54:03 2024 - [info] Alive Slaves:
Sun Aug 25 10:54:03 2024 - [info]   172.25.254.10(172.25.254.10:3306)  Version=5.7.44-log (oldest major version between slaves) log-bin:enabled
Sun Aug 25 10:54:03 2024 - [info]     GTID ON
Sun Aug 25 10:54:03 2024 - [info]     Replicating from 172.25.254.20(172.25.254.20:3306)
Sun Aug 25 10:54:03 2024 - [info]     Primary candidate for the new Master (candidate_master is set)
Sun Aug 25 10:54:03 2024 - [info]   172.25.254.30(172.25.254.30:3306)  Version=5.7.44-log (oldest major version between slaves) log-bin:enabled
Sun Aug 25 10:54:03 2024 - [info]     GTID ON
Sun Aug 25 10:54:03 2024 - [info]     Replicating from 172.25.254.20(172.25.254.20:3306)
Sun Aug 25 10:54:03 2024 - [info]     Not candidate for the new Master (no_master is set)
Master 172.25.254.20(172.25.254.20:3306) is dead. Proceed? (yes/NO): yes
Sun Aug 25 10:54:08 2024 - [info] Starting GTID based failover.
Sun Aug 25 10:54:08 2024 - [info]
Sun Aug 25 10:54:08 2024 - [info] ** Phase 1: Configuration Check Phase completed.
Sun Aug 25 10:54:08 2024 - [info]
Sun Aug 25 10:54:08 2024 - [info] * Phase 2: Dead Master Shutdown Phase..
Sun Aug 25 10:54:08 2024 - [info]
Sun Aug 25 10:54:08 2024 - [info] HealthCheck: SSH to 172.25.254.20 is reachable.
Sun Aug 25 10:54:08 2024 - [info] Forcing shutdown so that applications never connect to the current master..
Sun Aug 25 10:54:08 2024 - [warning] master_ip_failover_script is not set. Skipping invalidating dead master IP address.
Sun Aug 25 10:54:08 2024 - [warning] shutdown_script is not set. Skipping explicit shutting down of the dead master.
Sun Aug 25 10:54:08 2024 - [info] * Phase 2: Dead Master Shutdown Phase completed.
Sun Aug 25 10:54:08 2024 - [info]
Sun Aug 25 10:54:08 2024 - [info] * Phase 3: Master Recovery Phase..
Sun Aug 25 10:54:08 2024 - [info]
Sun Aug 25 10:54:08 2024 - [info] * Phase 3.1: Getting Latest Slaves Phase..
Sun Aug 25 10:54:08 2024 - [info]
Sun Aug 25 10:54:08 2024 - [info] The latest binary log file/position on all slaves is mysql-bin.000002:2145
Sun Aug 25 10:54:08 2024 - [info] Retrieved Gtid Set: c8ec6a9d-628c-11ef-8ffe-000c29ad52b1:1-3
Sun Aug 25 10:54:08 2024 - [info] Latest slaves (Slaves that received relay log files to the latest):
Sun Aug 25 10:54:08 2024 - [info]   172.25.254.10(172.25.254.10:3306)  Version=5.7.44-log (oldest major version between slaves) log-bin:enabled
Sun Aug 25 10:54:08 2024 - [info]     GTID ON
Sun Aug 25 10:54:08 2024 - [info]     Replicating from 172.25.254.20(172.25.254.20:3306)
Sun Aug 25 10:54:08 2024 - [info]     Primary candidate for the new Master (candidate_master is set)
Sun Aug 25 10:54:08 2024 - [info]   172.25.254.30(172.25.254.30:3306)  Version=5.7.44-log (oldest major version between slaves) log-bin:enabled
Sun Aug 25 10:54:08 2024 - [info]     GTID ON
Sun Aug 25 10:54:08 2024 - [info]     Replicating from 172.25.254.20(172.25.254.20:3306)
Sun Aug 25 10:54:08 2024 - [info]     Not candidate for the new Master (no_master is set)
Sun Aug 25 10:54:08 2024 - [info] The oldest binary log file/position on all slaves is mysql-bin.000002:2145
Sun Aug 25 10:54:08 2024 - [info] Retrieved Gtid Set: c8ec6a9d-628c-11ef-8ffe-000c29ad52b1:1-3
Sun Aug 25 10:54:08 2024 - [info] Oldest slaves:
Sun Aug 25 10:54:08 2024 - [info]   172.25.254.10(172.25.254.10:3306)  Version=5.7.44-log (oldest major version between slaves) log-bin:enabled
Sun Aug 25 10:54:08 2024 - [info]     GTID ON
Sun Aug 25 10:54:08 2024 - [info]     Replicating from 172.25.254.20(172.25.254.20:3306)
Sun Aug 25 10:54:08 2024 - [info]     Primary candidate for the new Master (candidate_master is set)
Sun Aug 25 10:54:08 2024 - [info]   172.25.254.30(172.25.254.30:3306)  Version=5.7.44-log (oldest major version between slaves) log-bin:enabled
Sun Aug 25 10:54:08 2024 - [info]     GTID ON
Sun Aug 25 10:54:08 2024 - [info]     Replicating from 172.25.254.20(172.25.254.20:3306)
Sun Aug 25 10:54:08 2024 - [info]     Not candidate for the new Master (no_master is set)
Sun Aug 25 10:54:08 2024 - [info]
Sun Aug 25 10:54:08 2024 - [info] * Phase 3.3: Determining New Master Phase..
Sun Aug 25 10:54:08 2024 - [info]
Sun Aug 25 10:54:08 2024 - [info] 172.25.254.10 can be new master.
Sun Aug 25 10:54:08 2024 - [info] New master is 172.25.254.10(172.25.254.10:3306)
Sun Aug 25 10:54:08 2024 - [info] Starting master failover..
Sun Aug 25 10:54:08 2024 - [info]
From:
172.25.254.20(172.25.254.20:3306) (current master)
 +--172.25.254.10(172.25.254.10:3306)
 +--172.25.254.30(172.25.254.30:3306)

To:
172.25.254.10(172.25.254.10:3306) (new master)
 +--172.25.254.30(172.25.254.30:3306)

Starting master switch from 172.25.254.20(172.25.254.20:3306) to 172.25.254.10(172.25.254.10:3306)? (yes/NO): yes
Sun Aug 25 10:54:09 2024 - [info] New master decided manually is 172.25.254.10(172.25.254.10:3306)
Sun Aug 25 10:54:09 2024 - [info]
Sun Aug 25 10:54:09 2024 - [info] * Phase 3.3: New Master Recovery Phase..
Sun Aug 25 10:54:09 2024 - [info]
Sun Aug 25 10:54:09 2024 - [info]  Waiting all logs to be applied..
Sun Aug 25 10:54:09 2024 - [info]   done.
Sun Aug 25 10:54:09 2024 - [info] Getting new master's binlog name and position..
Sun Aug 25 10:54:09 2024 - [info]  mysql-bin.000002:2145
Sun Aug 25 10:54:09 2024 - [info]  All other slaves should start replication from here. Statement should be: CHANGE MASTER TO MASTER_HOST='172.25.254.10', MASTER_PORT=3306, MASTER_AUTO_POSITION=1, MASTER_USER='repl', MASTER_PASSWORD='xxx';
Sun Aug 25 10:54:09 2024 - [info] Master Recovery succeeded. File:Pos:Exec_Gtid_Set: mysql-bin.000002, 2145, a7d7ddc1-628c-11ef-a766-000c29fe3a1f:1-7,
c8ec6a9d-628c-11ef-8ffe-000c29ad52b1:1-3
Sun Aug 25 10:54:09 2024 - [warning] master_ip_failover_script is not set. Skipping taking over new master IP address.
Sun Aug 25 10:54:09 2024 - [info] Setting read_only=0 on 172.25.254.10(172.25.254.10:3306)..
Sun Aug 25 10:54:09 2024 - [info]  ok.
Sun Aug 25 10:54:09 2024 - [info] ** Finished master recovery successfully.
Sun Aug 25 10:54:09 2024 - [info] * Phase 3: Master Recovery Phase completed.
Sun Aug 25 10:54:09 2024 - [info]
Sun Aug 25 10:54:09 2024 - [info] * Phase 4: Slaves Recovery Phase..
Sun Aug 25 10:54:09 2024 - [info]
Sun Aug 25 10:54:09 2024 - [info]
Sun Aug 25 10:54:09 2024 - [info] * Phase 4.1: Starting Slaves in parallel..
Sun Aug 25 10:54:09 2024 - [info]
Sun Aug 25 10:54:09 2024 - [info] -- Slave recovery on host 172.25.254.30(172.25.254.30:3306) started, pid: 55444. Check tmp log /var/log/masterha/app1/172.25.254.30_3306_20240825105402.log if it takes time..
Sun Aug 25 10:54:11 2024 - [info]
Sun Aug 25 10:54:11 2024 - [info] Log messages from 172.25.254.30 ...
Sun Aug 25 10:54:11 2024 - [info]
Sun Aug 25 10:54:09 2024 - [info]  Resetting slave 172.25.254.30(172.25.254.30:3306) and starting replication from the new master 172.25.254.10(172.25.254.10:3306)..
Sun Aug 25 10:54:09 2024 - [info]  Executed CHANGE MASTER.
Sun Aug 25 10:54:10 2024 - [info]  Slave started.
Sun Aug 25 10:54:10 2024 - [info]  gtid_wait(a7d7ddc1-628c-11ef-a766-000c29fe3a1f:1-7,
c8ec6a9d-628c-11ef-8ffe-000c29ad52b1:1-3) completed on 172.25.254.30(172.25.254.30:3306). Executed 0 events.
Sun Aug 25 10:54:11 2024 - [info] End of log messages from 172.25.254.30.
Sun Aug 25 10:54:11 2024 - [info] -- Slave on host 172.25.254.30(172.25.254.30:3306) started.
Sun Aug 25 10:54:11 2024 - [info] All new slave servers recovered successfully.
Sun Aug 25 10:54:11 2024 - [info]
Sun Aug 25 10:54:11 2024 - [info] * Phase 5: New master cleanup phase..
Sun Aug 25 10:54:11 2024 - [info]
Sun Aug 25 10:54:11 2024 - [info] Resetting slave info on the new master..
Sun Aug 25 10:54:11 2024 - [info]  172.25.254.10: Resetting slave info succeeded.
Sun Aug 25 10:54:11 2024 - [info] Master failover to 172.25.254.10(172.25.254.10:3306) completed successfully.
Sun Aug 25 10:54:11 2024 - [info]

----- Failover Report -----

app1: MySQL Master failover 172.25.254.20(172.25.254.20:3306) to 172.25.254.10(172.25.254.10:3306) succeeded

Master 172.25.254.20(172.25.254.20:3306) is down!

Check MHA Manager logs at mysql-mha for details.

Started manual(interactive) failover.
Selected 172.25.254.10(172.25.254.10:3306) as a new master.
172.25.254.10(172.25.254.10:3306): OK: Applying all logs succeeded.
172.25.254.30(172.25.254.30:3306): OK: Slave started, replicating from 172.25.254.10(172.25.254.10:3306)
172.25.254.10(172.25.254.10:3306): Resetting slave info succeeded.
Master failover to 172.25.254.10(172.25.254.10:3306) completed successfully.
[root@mysql-mha conf]#
恢复故障mysql节点
[root@mysql-node2 tmp]# /etc/init.d/mysqld start
Starting MySQL. SUCCESS!
[root@mysql-node2 tmp]# mysql -p
mysql> CHANGE MASTER TO MASTER_HOST='172.25.254.10', MASTER_USER='repl',MASTER_PASSWORD='redhat', MASTER_AUTO_POSITION=1;
mysql> start slave;
mysql> show slave status\G


#测试一主两从是否正常
[root@mysql-mha masterha]# masterha_check_repl --conf=/etc/masterha/app1.cnf
Fri Aug 2 20:15:29 2024 - [info] Checking replication health on 172.25.254.20..
Fri Aug 2 20:15:29 2024 - [info] ok.
Fri Aug 2 20:15:29 2024 - [info] Checking replication health on 172.25.254.30..
Fri Aug 2 20:15:29 2024 - [info] ok.
Fri Aug 2 20:15:29 2024 - [warning] master_ip_failover_script is not defined.
Fri Aug 2 20:15:29 2024 - [warning] shutdown_script is not defined.
Fri Aug 2 20:15:29 2024 - [info] Got exit code 0 (Not master dead).
MySQL Replication Health is OK.
自动切换
[root@mysql-mha masterha]# rm -fr app1.failover.complete #删掉切换锁文件
#监控程序通过指定配置文件监控master状态,当master出问题后自动切换并退出避免重复做故障切换

#添加一个11的端口
[root@mysql-node1 ~]# ip a a 172.25.254.11/24 dev eth0
[root@mysql-mha masterha]# masterha_manager --conf=/etc/masterha/app1.cnf


[root@mysql-mha masterha]# cat /etc/masterha/manager.log
#恢复故障节点
主就转到了20

恢复故障节点
[root@mysql-node2 mysql]# /etc/init.d/mysqld start

mysql> CHANGE MASTER TO MASTER_HOST='172.25.254.20', MASTER_USER='repl',MASTER_PASSWORD='redhat', MASTER_AUTO_POSITION=1;
mysql> start slave;
mysql> show slave status\G
清除锁文件
[root@mysql-mha masterha]# rm -rf app1.failover.complete manager.log6.2.3 为MHA添加VIP功能
#上传脚本
[root@mysql-mha ~]# cp master_ip_failover master_ip_online_change /usr/local/bin/
[root@mysql-mha ~]# chmod +x /usr/local/bin/master_ip_*

#修改脚本在脚本中只需要修改下vip即可
[root@mysql-mha ~]# vim /usr/local/bin/master_ip_failover
my $vip = '172.25.254.100/24';
my $ssh_start_vip = "/sbin/ip addr add $vip dev eth0";
my $ssh_stop_vip = "/sbin/ip addr del $vip dev eth0";

[root@mysql-mha ~]# vim /usr/local/bin/master_ip_online_change
my $vip = '172.25.254.100/24';
my $ssh_start_vip = "/sbin/ip addr add $vip dev eth0";
my $ssh_stop_vip = "/sbin/ip addr del $vip dev eth0";
my $exit_code = 0;

[root@mysql-mha masterha]# masterha_manager --conf=/etc/masterha/app1.cnf  #启动监控程序
[root@mysql-node2 tmp]# ip a a 172.25.254.100/24 dev eth0 #在master节点添加VIP

模拟故障
[root@mysql-node2 ~]# /etc/init.d/mysqld stop #关闭主节点服务
[root@mysql-mha masterha]# cat manager.log
恢复故障主机
[root@mysql-node2 mysql]# /etc/init.d/mysqld start

mysql> CHANGE MASTER TO MASTER_HOST='172.25.254.10', MASTER_USER='repl',MASTER_PASSWORD='redhat', MASTER_AUTO_POSITION=1;
Query OK, 0 rows affected, 2 warnings (0.02 sec)
mysql> start slave;
mysql> show slave status\G

[root@mysql-mha ~]# cd /etc/masterha/
[root@mysql-mha masterha]# rm -rf app1.failover.complete manager.log

#查看node1是否有vip
[root@mysql-node1 ~]# ip ad
1: lo: <LOOPBACK,UP,LOWER_UP> mtu 65536 qdisc noqueue state UNKNOWN group default qlen 1000
    link/loopback 00:00:00:00:00:00 brd 00:00:00:00:00:00
    inet 127.0.0.1/8 scope host lo
       valid_lft forever preferred_lft forever
    inet6 ::1/128 scope host
       valid_lft forever preferred_lft forever
2: eth0: <BROADCAST,MULTICAST,UP,LOWER_UP> mtu 1500 qdisc pfifo_fast state UP group default qlen 1000
    link/ether 00:0c:29:fe:3a:1f brd ff:ff:ff:ff:ff:ff
    inet 172.25.254.10/24 brd 172.25.254.255 scope global noprefixroute eth0
       valid_lft forever preferred_lft forever
    inet 172.25.254.100/24 scope global secondary eth0
       valid_lft forever preferred_lft forever
    inet6 fe80::20c:29ff:fefe:3a1f/64 scope link
       valid_lft forever preferred_lft forever
3: virbr0: <BROADCAST,MULTICAST> mtu 1500 qdisc noqueue state DOWN group default qlen 1000
    link/ether 52:54:00:f1:ee:92 brd ff:ff:ff:ff:ff:ff
4: virbr0-nic: <BROADCAST,MULTICAST> mtu 1500 qdisc pfifo_fast master virbr0 state DOWN group default qlen 1000
    link/ether 52:54:00:f1:ee:92 brd ff:ff:ff:ff:ff:ff
手动切换后查看vip变化
[root@mysql-mha masterha]# masterha_master_switch --conf=/etc/masterha/app1.cnf --master_state=alive --new_master_host=172.25.254.20 --new_master_port=3306 --orig_master_is_new_slave --running_updates_limit=10000
[root@mysql-node2 ~]# ip a
1: lo: <LOOPBACK,UP,LOWER_UP> mtu 65536 qdisc noqueue state UNKNOWN group default
qlen 1000
link/loopback 00:00:00:00:00:00 brd 00:00:00:00:00:00
inet 127.0.0.1/8 scope host lo
valid_lft forever preferred_lft forever
inet6 ::1/128 scope host
valid_lft forever preferred_lft forever
2: eth0: <BROADCAST,MULTICAST,UP,LOWER_UP> mtu 1500 qdisc pfifo_fast state UP
group default qlen 1000
link/ether 00:0c:29:cb:63:ce brd ff:ff:ff:ff:ff:ff
inet 172.25.254.20/24 brd 172.25.254.255 scope global noprefixroute eth0
valid_lft forever preferred_lft forever
inet 172.25.254.100/24 scope global secondary eth0
valid_lft forever preferred_lft forever


 1667
1667

 被折叠的 条评论
为什么被折叠?
被折叠的 条评论
为什么被折叠?
 到【灌水乐园】发言


