


目录
(1)、在模块中采用变量的形式定义 mutations 事件类型
(1)、在模块中采用变量的形式定义 actions 事件类型
(3)、组合 Action——action 与 Promise 或 async / await
六、在 vue 中 使用 vuex——进阶版(vuex 的最佳实践)
(1)、ProductList.vue 业务组件 — products.js 模块
(3)、cart.js 模块 — ShoppingCart.vue 业务组件
2、不要 commit props 里的初始值,换个思路更合适
一、什么是 Vuex
Vuex 是一种 状态管理模式。
vuex的功能:
- 动态注册响应式数据
- 命名空间管理数据
- 通过插件记录数据的更改
安装 Vuex:
npm i -S vuex@next二、为什么使用 vuex ?(vuex 的使用场景)
vue 采用的是单向数据流:
数据驱动视图的更新,用户在视图上操作,触发actions,通过action的方法更改state里的数据。形成一个数据单向流动的闭环。

由于vue是单向数据流,所以,当一个数据被多个组件使用时,而且这个数据还可能被修改,此时这个数据怎么管理呢?
我们想到的是:可以通过共同的父组件作为通信桥梁,实现兄弟组件之间的数据共享,同时,对数据进行集中式管理(如下图)。

通过属性的层层传递的思路是好的,但是实现起来繁琐,而且代码的健壮性不强。于是,只能另辟蹊径:
- 小型状态管理,可以使用 provide/inject。
- 大型状态管理,建议使用 vuex。
至此,vuex 的使用场景就出来了:在需要集中式管理数据的大型项目中,用 vuex 来管理业务组件(不是通用组件)。
【拓展】
- 业务组件:常常需要跨层级通信(非父子组件间的通信),建议集中式管理数据,可以选用 vuex。
- 通用组件:父子组件间的通信,直接用 props 属性和 $emit 实例方法就行。
三、vuex 的运行机制
vuex 采用的也是单向数据流。

由上图可见,vuex 不像 provide/inject 那样写在组件内部,vuex 已经与组件解除强相关了,独立提供响应式数据。
对 vuex 的运行机制的解读:

四、在 vue 中 使用 vuex——基础版
安装一下 vuex:
npm i vuex -S然后在main.js中注册 vuex:
import Vuex from 'vuex'
Vue.use(Vuex);
在此,先不将vuex的store单独抽离成一个文件夹,直接在main.js中探索使用vuex。下面,我们通过一个小案例来尝试运用一下vuex:
// main.js
import Vue from 'vue'
import App from './App.vue'
import Vuex from 'vuex'

Vue.config.productionTip = false
Vue.use(Vuex);

const store = new Vuex.Store({
  state: {
    count: 0,
  },
  // 同步处理
  mutations: {
    increment(state){
      state.count++;
    },
    // increment(state, n){
    //   state.count += n;
    // },
  },
  // 异步处理
  actions: {
    increment({state}){
      setTimeout(()=>{
        state.count++;
      }, 3000)
    },
  },
  // vuex 中的计算属性,支持缓存
  getters: {
    doubleCount(state){
      return state.count*2;
    }
  }
})

new Vue({
  store,
  render: h => h(App),
}).$mount('#app')
// App.vue
<template>
<div id="app">
{{count}}
<br/>
{{$store.getters.doubleCount}}
<br/>
<!-- <button @click="$store.commit('increment', 2)">count++</button> -->
<button @click="$store.commit('increment')">count++</button>
<button @click="$store.dispatch('increment')">count++</button>
</div>
</template>
<script>
export default {
name: 'App',
computed: {
count(){
return this.$store.state.count;
}
},
}
</script>五、vuex 的核心成员
| 使用方法 | 使用方法的简写 | 描述 | |
|---|---|---|---|
| state | this.$store.state.XXX 取值 | mapState | 提供一个响应式数据 |
| getters | this.$store.getters.XXX 取值 | mapGetters | 借助 Vue 的计算属性 computed 来实现缓存 |
| mutations | this.$store.commit("XXX") 赋值 | mapMutations | 更改 state 方法 |
| actions | this.$store.dispatch("XXX") 赋值 | mapActions | 触发 mutation 方法 |
| module | Vue.set 动态添加 state 到响应式数据中 |
1、state
state是存储的单一状态,是存储的基本数据。
(1)、在模块中定义 state 数据
state: {
  count: 0,
},
(2)、在组件中获取 state 中的数据的方式
- template模板的插值表达式中:
{{$store.state.count}}- JavaScript中:
this.$store.state.count2、getters
getters 是 store 的计算属性,是对 state 里的数据加工后生成的新数据。
getters里的方法可以接收 2 个参数,第一个参数是 state,第二个参数是(可选的)其他 getter。
特点与注意:
- 就像computed计算属性一样,getter返回的值会根据它的依赖被缓存起来,且只有当它的依赖值发生改变才会被重新计算。
- 在模块中定义的采用变量的形式定义 getters 的事件,在组件中,该事件名可以直接作为变量使用。
(1)、在模块中采用变量的形式定义 getters 的事件
在组件中,该事件名可以直接作为变量使用)
state: {
  count: 0,
},
getters: {
  doubleCount(state){
    return state.count*2;
  }
}
(2)、在组件中使用 getters 的事件
- template模板的插值表达式中:
{{$store.getters.doubleCount}}- JavaScript中:
this.$store.getters.doubleCount3、mutations
更改 Vuex 的 store 中的状态的唯一方法是提交 mutation。
每个 mutation 都有一个字符串的 事件类型 (type) 和 一个 回调函数 (handler)。这个回调函数就是我们实际进行状态更改的地方。
mutations 里的方法可以接收 2 个参数,第一个参数是 state,第二个参数是额外的参数,即 mutation 的 载荷(payload)。
mutations 提交更改数据,使用store.commit方法更改state存储的状态。
特点与注意:
- 同步操作,在插件中记录数据的变化,方便通过插件去调试代码。
- 对于mutation的事件类型,建议使用常量代替变量。
- 最好提前在你的 store 中初始化好所有所需属性。
- 当需要在对象上添加新属性时,你应该:
- 使用 Vue.set(obj, 'newProp', 123),或者以新对象替换老对象。例如,利用对象展开运算符我们可以这样写:
state.obj = { ...state.obj, newProp: 123 }(1)、在模块中采用变量的形式定义 mutations 事件类型
mutations: {
  increment (state, n) {
    state.count += n
  }
}
(2)、在组件中提交 Mutation
- 载荷方式:
store.commit('increment', 2)- 对象方式:
store.commit({
  type: 'increment',
  amount: 2
})
(3)、使用常量替代 Mutation 事件类型
使用常量替代 Mutation 事件类型,把这些常量放在单独的文件中可以让你的代码合作者对整个 app 包含的 mutation 一目了然。
// mutationTypes.js
export const SOME_MUTATION = 'SOME_MUTATION'
// store.js
import Vuex from 'vuex'
import { SOME_MUTATION } from './mutationTypes'

const store = new Vuex.Store({
  state: { ... },
  mutations: {
    // 我们可以使用 ES6 风格的计算属性命名功能来使用一个常量作为函数名
    [SOME_MUTATION] (state) {
      // mutate state
    }
  }
})
4、actions
特点与注意:
- actions 提交的是 mutations,而不是直接变更状态。
- actions 可以包含任意异步操作,比如通过 ajax 获取数据等。
(1)、在模块中采用变量的形式定义 actions 事件类型
actions: {
  incrementAsync (context) {
    setTimeout(() => {
      context.commit('increment')
    }, 1000)
  }
}
上面代码中,actions 里的函数接受一个与 store 实例具有相同方法和属性的 context 对象。因此,你可以调用 context.commit 提交一个 mutation,或者通过 context.state 和 context.getters 来获取 state 和 getters。
当我们需要多次调用 commit 的时候,建议使用 ES6 的参数解构:
actions: {
  incrementAsync ({ commit }) {
    setTimeout(() => {
      commit('increment')
    }, 1000)
  }
}
(2)、在组件中分发 action
- 以载荷形式分发:
store.dispatch('incrementAsync', {
  amount: 10
})- 以对象形式分发:
store.dispatch({
  type: 'incrementAsync',
  amount: 10
})
(3)、组合 Action——action 与 Promise 或 async / await
store.dispatch 可以处理被触发的 action 的处理函数返回的 Promise,并且 store.dispatch 仍旧返回 Promise:
actions: {
  actionA ({ commit }) {
    return new Promise((resolve, reject) => {
      setTimeout(() => {
        commit('someMutation')
        resolve()
      }, 1000)
    })
  }
}
然后,你可以:
store.dispatch('actionA').then(() => {
  // ...
})
在另外一个 action 中也可以:
actions: {
  // ...
  actionB ({ dispatch, commit }) {
    return dispatch('actionA').then(() => {
      commit('someOtherMutation')
    })
  }
}
于是,如果我们利用 async / await,我们可以如下组合 action:
// 假设 getData() 和 getOtherData() 返回的是 Promise

actions: {
  async actionA ({ commit }) {
    commit('gotData', await getData())
  },
  async actionB ({ dispatch, commit }) {
    await dispatch('actionA') // 等待 actionA 完成
    commit('gotOtherData', await getOtherData())
  }
}
注意: 一个 store.dispatch 在不同模块中可以触发多个 action 函数。在这种情况下,只有当所有触发函数完成后,返回的 Promise 才会执行。
5、module
module 是 store 分割的模块,每个模块拥有自己的 state、getters、mutations、actions。
特点与注意:
- 建议开启命名空间——namespaced: true。
- 嵌套模块不要太深,尽量扁平化。
- 灵活应用 createNamespacedHelpers() 方法——在开启命名空间后,通过 mapXXX 系列派发事件的时候,或者是 getter 值的时候,都需要带上指定的命名空间,如果你觉得这样很繁琐,这时候,可以使用 createNamespacedHelpers() 方法生成一个 mapXXX 的系列。
(1)、模块内部的 mutation 和 getter
对于模块内部的 mutation 和 getter,接收的第一个参数是模块的局部状态对象——state。
const moduleA = {
  state: () => ({
    count: 0
  }),
  mutations: {
    increment (state) {
      // 这里的 `state` 对象是模块的局部状态
      state.count++
    }
  },

  getters: {
    doubleCount (state) {
      return state.count * 2
    }
  }
}
对于模块内部的 getter,根节点状态会作为第三个参数暴露出来:
const moduleA = {
  // ...
  getters: {
    sumWithRootCount (state, getters, rootState) {
      return state.count + rootState.count
    }
  }
}
(2)、模块内部的 action
对于模块内部的 action,局部状态通过 context.state 暴露出来,根节点状态则为 context.rootState:
const moduleA = {
  // ...
  actions: {
    incrementIfOddOnRootSum ({ state, commit, rootState }) {
      if ((state.count + rootState.count) % 2 === 1) {
        commit('increment')
      }
    }
  }
}
(3)、模块的命名空间
默认情况下,模块内部的 action、mutation 和 getter 是注册在全局命名空间的——这样使得多个模块能够对同一 mutation 或 action 作出响应。
如果希望你的模块具有更高的封装度和复用性,你可以通过添加 namespaced: true 的方式使其成为带命名空间的模块。当模块被注册后,它的所有 getter、action 及 mutation 都会自动根据模块注册的路径调整命名。
const store = new Vuex.Store({
  modules: {
    account: {
      namespaced: true,

      // 模块内容(module assets)
      state: () => ({ ... }), // 模块内的状态已经是嵌套的了,使用 `namespaced` 属性不会对其产生影响
      getters: {
        isAdmin () { ... } // -> getters['account/isAdmin']
      },
      actions: {
        login () { ... } // -> dispatch('account/login')
      },
      mutations: {
        login () { ... } // -> commit('account/login')
      },

      // 嵌套模块
      modules: {
        // 继承父模块的命名空间
        myPage: {
          state: () => ({ ... }),
          getters: {
            profile () { ... } // -> getters['account/profile']
          }
        },

        // 进一步嵌套命名空间
        posts: {
          namespaced: true,

          state: () => ({ ... }),
          getters: {
            popular () { ... } // -> getters['account/posts/popular']
          }
        }
      }
    }
  }
})
进一步学习 module 请戳这里:Module | Vuex
6、vuex 的 mapXXX 系列辅助函数
(1)、mapState
当一个组件需要获取多个状态的时候,将这些状态都声明为计算属性会有些重复和冗余。为了解决这个问题,我们可以使用 mapState 辅助函数帮助我们生成计算属性。
// 在单独构建的版本中辅助函数为 Vuex.mapState
import { mapState } from 'vuex'

export default {
  // ...
  computed: mapState({
    // 箭头函数可使代码更简练
    count: state => state.count,

    // 传字符串参数 'count' 等同于 `state => state.count`
    countAlias: 'count',

    // 为了能够使用 `this` 获取局部状态,必须使用常规函数
    countPlusLocalState (state) {
      return state.count + this.localCount
    }
  })
}
当映射的计算属性的名称与 state 的子节点名称相同时,我们也可以给 mapState 传一个字符串数组。
computed: mapState([
  // 映射 this.count 为 store.state.count
  'count'
])
mapState 函数返回的是一个对象。我们如何将它与局部计算属性混合使用呢?使用对象展开运算符(...):
computed: {
  localComputed () { /* ... */ },
  // 使用对象展开运算符将此对象混入到外部对象中
  ...mapState({
    // ...
  })
}
(2)、mapGetters
mapGetters 辅助函数用来将 store 中的 getter 映射到局部计算属性:
import { mapGetters } from 'vuex'

export default {
  // ...
  computed: {
  // 使用对象展开运算符将 getter 混入 computed 对象中
    ...mapGetters([
      'doneTodosCount',
      'anotherGetter',
      // ...
    ])
  }
}
如果你想将一个 getter 属性另取一个名字,使用对象形式:
...mapGetters({
  // 把 `this.doneCount` 映射为 `this.$store.getters.doneTodosCount`
  doneCount: 'doneTodosCount'
})
(3)、mapMutations
mapMutations 辅助函数用来将组件中的 methods 映射为 store.commit 调用(需要在根节点注入 store)。
import { mapMutations } from 'vuex'

export default {
  // ...
  methods: {
    ...mapMutations([
      'increment', // 将 `this.increment()` 映射为 `this.$store.commit('increment')`

      // `mapMutations` 也支持载荷:
      'incrementBy' // 将 `this.incrementBy(amount)` 映射为 `this.$store.commit('incrementBy', amount)`
    ]),
    ...mapMutations({
      add: 'increment' // 将 `this.add()` 映射为 `this.$store.commit('increment')`
    })
  }
}
(4)、mapActions
mapActions 辅助函数将组件的 methods 映射为 store.dispatch 调用(需要先在根节点注入 store)。
import { mapActions } from 'vuex'

export default {
  // ...
  methods: {
    ...mapActions([
      'increment', // 将 `this.increment()` 映射为 `this.$store.dispatch('increment')`

      // `mapActions` 也支持载荷:
      'incrementBy' // 将 `this.incrementBy(amount)` 映射为 `this.$store.dispatch('incrementBy', amount)`
    ]),
    ...mapActions({
      add: 'increment' // 将 `this.add()` 映射为 `this.$store.dispatch('increment')`
    })
  }
}
六、在 vue 中 使用 vuex——进阶版(vuex 的最佳实践)
了解了 vuex 的核心后,我们尝试着用更加贴合实际开发的法式(包括:独立 api、独立 store 后分割模块、对 mutation 的事件类型使用常量代替变量、给每个模块开启命名空间等等)来使用vuex。
1、第一步:独立 api、独立 store 后分割模块
使用 Vuex 的项目结构如下:
├── index.html
├── main.js
├── api
│   └── ... # 抽取出API请求
├── components
│   ├── App.vue
│   └── ...
└── store
    ├── index.js          # 我们组装模块并导出 store 的地方
    ├── actions.js        # 根级别的 action(若开启模块的命名空间,就不必创建此文件了)
    ├── mutations.js      # 根级别的 mutation(若开启模块的命名空间,就不必创建此文件了)
    ├── mutationTypes.js  # 模块中使用常量替代 mutation 事件类型时,需要创建此文件,用来统一管理这些常量
    └── modules
        ├── cart.js       # 购物车模块
        └── products.js   # 产品模块
从上图可以看出:
- 我们将 api 抽离成一个单独的文件夹,集中式管理API请求;
- 我们将 store 抽离成一个单独的文件夹,集中式管理业务组件的数据;
- 我们采用了“分割模块”的思想来实现。
【拓展】
本“vuex 的最佳实践”案例是开启模块的命名空间的,所以不用在 store 下创建根级别的 action 和 mutation 文件。
在本“vuex 的最佳实践”案例中,api接口文件夹里有一个shop.js文件,内容如下:
/**
 * 模拟客户机-服务器处理
 */
// 模拟服务器返回的数据
const _products = [
  {"id": 1, "title": "华为 Mate 20", "price": 3999, "inventory": 2},
  {"id": 2, "title": "小米 9", "price": 2999, "inventory": 0},
  {"id": 3, "title": "OPPO R17", "price": 2999, "inventory": 5}
]

export default {
  // 获取所有商品
  getProducts (cb) {
    // 模拟异步请求
    setTimeout(() => cb(_products), 100)
  },
  // 购买商品
  buyProducts ( products, cb, errorCb) {
    // 模拟异步请求
    setTimeout(() => {
      // 模拟随机检查,成功执行成功的回调,失败执行失败的回调。
      Math.random() > 0.5
        ? cb()
        : errorCb()
    }, 100)
  }
}
2、第二步:将 vuex 注入 vue,并挂载到全局实例上
在 store 的 index.js 文件中引入 vuex,并注入 vue,然后在 main.js 中注册 store。
- 在 store 的 index.js 文件中引入 vuex,并注入 vue
// index.js
import Vue from "vue";
import Vuex from "vuex";

Vue.use(Vuex);

export default new Vuex.Store({
  state: {
    // 如果有管理用户信息这个需求的话,最好将其放在总的state里进行管理
    userInfo: {
      email: "xxxxxx@qq.com",
    },
  },
});
- 在 main.js 中注册 store。
// main.js
import Vue from 'vue'
import App from './App.vue'
import store from './store'// 引入store,默认会指向 index

Vue.config.productionTip = false

new Vue({
  store,// 将 store 绑定到 vue 实例上,使其全局可用
  render: h => h(App),
}).$mount('#app')
3、第三步:业务组件与模块一对一开发
在本 “vuex 的最佳实践”案例中,采用了 mapXXX 系列辅助函数。
(1)、ProductList.vue 业务组件 — products.js 模块
业务组件 ProductList.vue 中:
// 产品列表
<template>
  <ul>
    <li
      v-for="product in products"
      :key="product.id">
      {{ product.title }} - {{ product.price }}
      <br>
      <button
        :disabled="!product.inventory"
        @click="addProductToCart(product)">
        加入购物车
      </button>
    </li>
  </ul>
</template>

<script>
// 使用 mapXXX 系列代替注释掉的原来(this.$store.XXX)的书写方式
import { mapState, mapActions } from 'vuex'
export default {
  computed: mapState({
    products: state => state.products.all,
  }),
  // computed: {
  //   products(){
  //     return this.$store.state.products.all
  //   }
  // },
  methods: mapActions('cart', [
    'addProductToCart'
  ]),
  // methods: {
  //   addProductToCart(product){
  //     this.$store.dispatch('cart/addProductToCart', product)
  //   }
  // },
  created () {
    this.$store.dispatch('products/getAllProducts')
  },
}
</script>
products.js 模块:
import shop from "../../api/shop";
// import { PRODUCTS } from "../mutations";

const state = {
  all: [],
};

const getters = {};
/** @type {*} */
const actions = {
  /**
   * 处理异步的地方
  */
  // 获取所有的产品
  getAllProducts({ commit }) {
    // 调用api里的shop里的getProducts方法
    shop.getProducts((products) => {
      commit(PRODUCTS.SET_PRODUCTS, products);
      // commit("setProducts", products);
    });
  },
};

const mutations = {
  /**
   * mutations事件类型采用“常量代替变量”,注释掉的部分是变量,
   * 并将常量统一汇总到store/mutations里,便于管理。
  */
  [PRODUCTS.SET_PRODUCTS](state, products) {
    state.all = products;
  },
  // setProducts(state, products){
  //   state.all = products;
  // },
  [PRODUCTS.DECREMENT_PRODUCT_INVENTORY](state, { id }) {
    const product = state.all.find((product) => product.id === id);
    product.inventory--;
  },
  // decrementProductInventory(state, { id }){
  //   const product = state.all.find((product) => product.id === id);
  //   product.inventory--;
  // }
};

export default {
  namespaced: true,
  state,
  getters,
  actions,
  mutations,
};
(2)、mutationTypes.js 文件
这里只是展示一下,方便上下文阅读代码:
export const CART = {
  PUSH_PRODUCT_TO_CART: "pushProductToCart",
  INCREMENT_ITEM_QUANTITY: "incrementItemQuantity",
  SET_CART_ITEMS: "setCartItems",
  SET_CHECKOUT_STATUS: "setCheckoutStatus",
};

export const PRODUCTS = {
  SET_PRODUCTS: "setProducts",
  DECREMENT_PRODUCT_INVENTORY: "decrementProductInventory",
};
(3)、cart.js 模块 — ShoppingCart.vue 业务组件
cart.js 模块:
import shop from "../../api/shop";
import { CART, PRODUCTS } from "../mutationTypes";

const state = {
  items: [],
  checkoutStatus: null,
};

const getters = {
  cartProducts: (state, getters, rootState) => {
    return state.items.map(({ id, quantity }) => {
      const product = rootState.products.all.find(
        (product) => product.id === id
      );
      return {
        title: product.title,
        price: product.price,
        quantity,
      };
    });
  },
  cartTotalPrice: (state, getters) => {
    return getters.cartProducts.reduce((total, product) => {
      return total + product.price * product.quantity;
    }, 0);
  },
};

const actions = {
  checkout({ commit, state }, products) {
    // 把当前购物车的物品备份起来
    const savedCartItems = [...state.items];
    // 发出结账请求,然后清空购物车
    commit(CART.SET_CHECKOUT_STATUS, null);
    // empty cart
    commit(CART.SET_CART_ITEMS, { items: [] });
    // 购物 API 接受一个成功回调和一个失败回调
    shop.buyProducts(
      products,
      // 成功操作
      () => commit(CART.SET_CHECKOUT_STATUS, "successful"),
      // 失败操作
      () => {
        commit(CART.SET_CHECKOUT_STATUS, "failed");
        // rollback to the cart saved before sending the request
        commit(CART.SET_CART_ITEMS, { items: savedCartItems });
      }
    );
  },
  addProductToCart({ state, commit }, product) {
    commit(CART.SET_CHECKOUT_STATUS, null);
    if (product.inventory > 0) {
      const cartItem = state.items.find((item) => item.id === product.id);
      if (!cartItem) {
        commit(CART.PUSH_PRODUCT_TO_CART, { id: product.id });
      } else {
        commit(CART.INCREMENT_ITEM_QUANTITY, cartItem);
      }
      // remove 1 item from stock
      commit(
        `products/${PRODUCTS.DECREMENT_PRODUCT_INVENTORY}`,
        { id: product.id },
        { root: true }
      );
    }
  },
};

const mutations = {
  [CART.PUSH_PRODUCT_TO_CART](state, { id }) {
    state.items.push({
      id,
      quantity: 1,
    });
  },
  // pushProductToCart(state, { id }){
  //   state.items.push({
  //     id,
  //     quantity: 1,
  //   });
  // },
  [CART.INCREMENT_ITEM_QUANTITY](state, { id }) {
    const cartItem = state.items.find((item) => item.id === id);
    cartItem.quantity++;
  },
  // incrementItemQuantity(state, { id }){
  //   const cartItem = state.items.find((item) => item.id === id);
  //   cartItem.quantity++;
  // },
  [CART.SET_CART_ITEMS](state, { items }) {
    state.items = items;
  },
  // setCartItems(state, { items }){
  //   state.items = items;
  // },
  [CART.SET_CHECKOUT_STATUS](state, status) {
    state.checkoutStatus = status;
  },
  // setCheckoutStatus(state, status){
  //   state.checkoutStatus = status;
  // }
};

export default {
  namespaced: true,
  state,
  getters,
  actions,
  mutations,
};
业务组件 ShoppingCart.vue 中:
// 购买清单
<template>
  <div class="cart">
    <h2>清单</h2>
    <p v-show="!products.length"><i>请添加产品到购物车</i></p>
    <ul>
      <li
        v-for="product in products"
        :key="product.id">
        {{ product.title }} - {{ product.price }} x {{ product.quantity }}
      </li>
    </ul>
    <p>合计: {{ total }}</p>
    <p><button :disabled="!products.length" @click="checkout(products)">提交</button></p>
    <p v-show="checkoutStatus">提交 {{ checkoutStatus }}.</p>
  </div>
</template>

<script>
// 使用 mapXXX 系列代替注释掉的原来(this.$store.XXX)的书写方式
import { mapState, mapGetters, mapActions } from 'vuex'
export default {
  computed: {
    ...mapState({
      checkoutStatus: state => state.cart.checkoutStatus
    }),
    // ...mapGetters('cart', {
    //   products: 'cartProducts',
    //   total: 'cartTotalPrice'
    // }),
    ...mapGetters({
      products: 'cart/cartProducts',
      total: 'cart/cartTotalPrice'
    })
  },
  // computed: {
  //   checkoutStatus(){
  //     return this.$store.state.cart.checkoutStatus
  //   },
  //   products() {
  //     return this.$store.getters['cart/cartProducts']
  //   },
  //   total() {
  //     return this.$store.getters['cart/cartTotalPrice']
  //   }
  // },
  methods: mapActions("cart", [
    "checkout"
  ]),
  // methods: {
  //   checkout (products) {
  //     this.$store.dispatch('cart/checkout', products)
  //   }
  // },
}
</script>
七、vuex 原理解析
1、vuex 是通过什么方式提供响应式数据的?
Vuex 的双向绑定通过调用 new Vue实现,然后将 this.$store 对象通过 Vue.mixin 注入到 Vue 所有组件的 beforeCreate 生命周期中,最后通过 Object.defineProperty() 方法对数据进行劫持——通过在 state.get() 或 state.set() 方法来获取或设置组件中的数据。
import Vue from 'vue'
const Store = function Store (options = {}) {
    const {state = {}, mutations = {}} = options;
    // 借用 vue 实现数据的响应式绑定
    this._vm = new Vue({
        data: {
            $$state: state
        },
    })
    this._mutations = mutations
}
// 在Store的原型上创建commit方法,调用_mutations里的方法
Store.prototype.commit = function (type, payload) {
    if(this._mutations[type]){
        this._mutations[type](this.state, payload)// 传递state和一个额外的参数
    }
}
/**
 * Object.defineProperties() 方法直接在一个对象上定义新的属性或修改现有属性,并返回该对象。
 * 重写Store原型上的state的get方法,令其指向this._vm._data.$$state。
 */
Object.defineProperties(Store.prototype, {
    state: {
        get: function () {
            return this._vm._data.$$state
        }
    }
})
export default {Store}
2、$store 是如何挂载到实例 this 上的?
在vue项目中先安装vuex,核心代码如下:
import Vuex from 'vuex';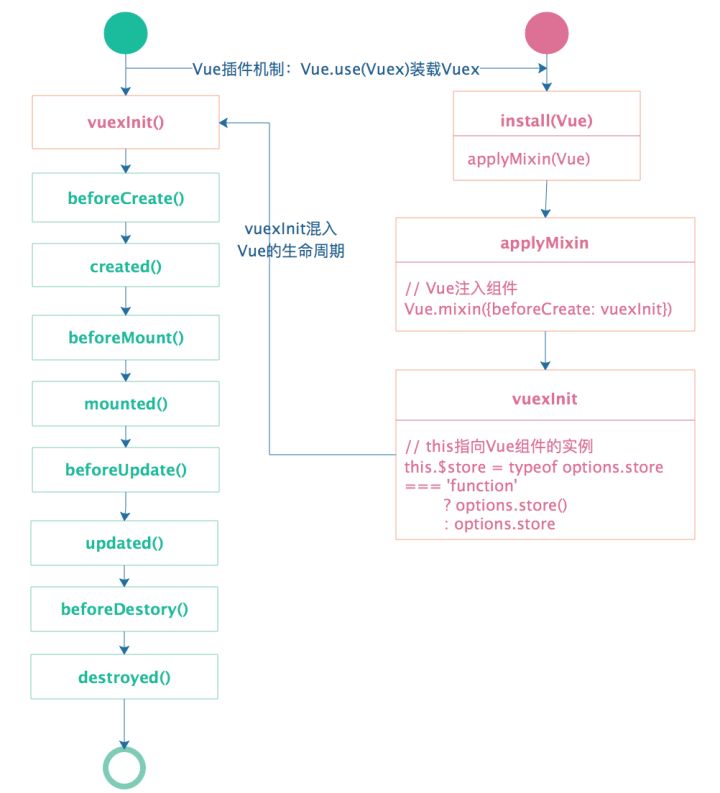
Vue.use(vuex);// vue的插件机制利用vue的插件机制,使用Vue.use(vuex)时,会调用vuex的install方法,装载vuex,install方法的代码如下:
export function install (_Vue) {
  if (Vue && _Vue === Vue) {
    if (process.env.NODE_ENV !== 'production') {
      console.error(
        '[vuex] already installed. Vue.use(Vuex) should be called only once.'
      )
    }
    return
  }
  Vue = _Vue
  applyMixin(Vue)
}applyMixin方法使用vue混入机制,vue的生命周期beforeCreate钩子函数前混入vuexInit方法,核心代码如下:
Vue.mixin({ beforeCreate: vuexInit });

function vuexInit () {
    const options = this.$options
    // store injection
    if (options.store) {
      this.$store = typeof options.store === 'function'
        ? options.store()
        : options.store
    } else if (options.parent && options.parent.$store) {
      this.$store = options.parent.$store
    }
}
分析源码,我们知道了vuex是利用vue的mixin混入机制,在beforeCreate钩子前混入vuexInit方法,vuexInit方法实现了store注入vue组件实例,并注册了vuex store的引用属性$store。store注入过程如下图所示:
八、Vue3 的 Vuex——pinia
pinia 被誉为 vuex5。
请参阅这篇文章 Vuex5——pinia
九、vuex 遇到的问题与解决方案
1、需要使用 state 里某个变量上一次的值
用 getter 来解决这个问题。getter 是 vuex 的“计算属性”。
例如:
const store = createStore({
  state: {
    todos: [
      { id: 1, text: '...', done: true },
      { id: 2, text: '...', done: false }
    ],
    currentDo: '',
  },
  getter: {
    doneTodos (state) {
      return state.todos.filter(todo => todo.done);
    }
  },
  mutations: {
    changeCurrentDo(state, payload) {
      state.currentDo = payload.currentItem || doneTodos;
    }
  }
})
2、不要 commit props 里的初始值,换个思路更合适
假设,需要在 vue 的 mounted 生命周期中执行一次 commit 来更新 state 里的变量, 但该值并没有更新,首次拿到的还是初始值,这就造成 vuex 的赋值时机延迟了。
根本原因是:子组件渲染的时候父组件还未取到值,导致子组件取不到数据——子组件 created 和 mounted 只执行一次 ,在父组件初始化时,已经给子组件传了一个空值,导致异步请求数据发生变化时,子组件的值不再变化。
问题再现:
store 中:
const store = createStore({
  state: {
    list: []
  },
  mutations: {
    changeList(state, payload) {
      const { baseValList } = payload;
      Vue.set(state, 'list', baseVal);
    }
  }
})
父组件中:
<template>
<div>
  <CustomCompnent :baseValList='[{id:1}]' />
</div>
</template>
子组件中:
<script>
export default {
  props: {
    baseValList:{
      type: Array
      default: () => ([])
    }
  },
  mounted(){
    this.$store.commit('changeList', { baseValList: this.baseValList});
  }
}
</script>
此时,发现:“在 mounted 里调用的 commit 总是会先将 baseValList 的初始值(即:[])在 changeList 里赋值给 list,之后才会将 [{id:1}] 赋值给 list。”
如果你的需求是:当 baseValList 不为空时才显示,那么你可以在父组件上增加一个v-if 来解决上述问题。否则下面这种解决方案会导致 baseValList 为空数组时该子组件消失了。
<template>
<div>
  <CustomCompnent :baseValList='[{id:1}]' v-if='baseValList && baseValList.length'/>
</div>
</template>从更高的维度上来看:既然用了 vuex 那为什么还传 props 呢?此时完全可以不必再传 props。直接在父组件中 commit 这个 baseValList 到 vuex 中即可。
【推荐文章】


 100
100


 被折叠的 条评论
为什么被折叠?
被折叠的 条评论
为什么被折叠?
 到【灌水乐园】发言


