


目录
一、什么是WSGI
WSGI(Web Server Gateway Interface)并不是一个具体的框架,而是一个用于连接Web服务器和Web应用程序的标准接口规范。WSGI的设计目的是使Web服务器和Web应用程序之间的通信更加简单和通用化。它是为各种Python web框架提供统一的接口标准。
一些基于WSGI标准的框架包括:
- Flask:一个轻量级的Web框架,使用WSGI作为其底层服务器接口。
- Django:一个完整的Web框架,也是使用WSGI标准与Web服务器进行通信。
- Pyramid:一个灵活的Web框架,也是基于WSGI标准构建的。
- Bottle:一个微小而简单的Web框架,同样使用WSGI作为其服务器接口。
- CherryPy:一个功能强大的Web框架,通过WSGI与服务器进行交互。
这些框架中的每一个都提供了一个WSGI应用程序对象,可以通过WSGI服务器来运行和提供给外部的请求。通过使用WSGI接口,这些框架可以与任何符合WSGI标准的Web服务器进行交互,并实现跨服务器平台的灵活性和兼容性。
1.1 WSGI接口的组成部分
使用WSGI接口,可以实现Web应用程序与各种Web服务器之间的解耦,使得同一个应用程序可以在不同的Web服务器上运行,而不需要改变应用程序的代码。下面是WSGI接口的主要组成部分:
- Application对象:WSGI应用程序是一个可调用的对象,通常是一个函数,也可以是一个带有 call 方法的类实例。当Web服务器接收到请求时,它会调用应用程序对象来处理请求并生成响应。
- Environ字典:Web服务器将请求的相关信息封装在Environ字典中,并作为参数传递给应用程序对象。Environ字典包含了关于请求的各种元数据,如请求方法、URL路径、请求头等。
- Start_response函数:在应用程序内部,通过调用start_response函数来发送响应头信息。start_response函数接收响应状态码和响应头字段作为参数,并返回一个用于发送响应体的可调用对象(类似于迭代器)。
- 返回值:应用程序对象需要返回一个响应体(body)的可迭代对象。可迭代对象的每个元素都表示响应体的一部分内容。
例如定义一个最简单web请求响应
def application(environ, start_response):
    start_response('200 OK', [('Content-Type', 'text/html')])
    return 'Hello World!'
上面的application()函数就是符合WSGI标准的一个HTTP处理函数,它接收两个参数:
- environ:一个包含所有HTTP请求信息的dict对象;
- start_response:一个发送HTTP响应的函数。
整个application()函数本身没有涉及到任何解析HTTP的部分,也就是说,把底层web服务器解析部分和应用程序逻辑部分进行了分离,这样开发者就可以专心做一个领域了
不过,等等,这个application()函数怎么调用?如果我们自己调用,两个参数environ和start_response我们没法提供,返回的str也没法发给浏览器。
所以application()函数必须由WSGI服务器来调用。有很多符合WSGI规范的服务器。而我们此时的web服务器项目的目的就是做一个既能解析静态网页还可以解析动态网页的服务器
1.2 关于environ
在WSGI协议中,Web服务器和Web框架之间的通信是通过传递一个名为environ的字典实现的。这个environ字典包含了关于HTTP请求的各种元数据以及其他相关信息。
下面是一些常见的environ字典的键值对:
- REQUEST_METHOD: HTTP请求方法,如GET、POST等。
- SCRIPT_NAME: 应用程序根路径的脚本名称。
- PATH_INFO: 一个字符串,表示请求的路径。
- QUERY_STRING: URL中的查询字符串部分。
- CONTENT_TYPE: 请求的内容类型。
- CONTENT_LENGTH: 请求的内容长度。
- SERVER_NAME: Web服务器的主机名或IP地址。
- SERVER_PORT: Web服务器的端口号。
- REMOTE_ADDR: 客户端的IP地址。
- HTTP_*: 根据请求头的名称,其它的HTTP请求头信息都作为HTTP_前缀的键值对存在。例如,HTTP_USER_AGENT表示客户端的User-Agent信息。
二、简易的web框架实现
2.1 文件结构
├── web_server.py
├── web
│   └── my_web.py
└── html
    └── index.html
    .....
2.2 在web/my_web.py定义动态响应内容
import time


# 这个函数会在web_server.py的main方法中调用
def application(environ, start_response):
    status = '200 OK'
    response_headers = [('Content-Type', 'text/html')]
    # 设置响应的状态码和响应头
    start_response(status, response_headers)
    # 返回值就是响应体
    return str(environ) + '==Hello world from a simple WSGI application!--->%s\n' % time.ctime()
2.3 在html/index.html中定义静态页面内容
<!DOCTYPE html>
<html lang="en">
<head>
<meta charset="UTF-8">
<title>Title</title>
</head>
<body>
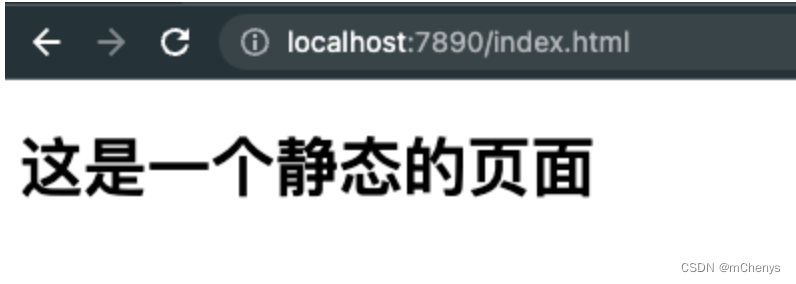
<h1>这是一个静态的页面</h1>
</body>
</html>
2.4 在web_server.py中实现web服务器框架
import time
import socket
import sys
import re
import multiprocessing


class WSGIServer(object):
    """定义一个WSGI服务器的类"""

    def __init__(self, port, documents_root, app):

        # 1. 创建套接字
        self.server_socket = socket.socket(socket.AF_INET, socket.SOCK_STREAM)
        # 2. 绑定本地信息
        # 允许在关闭端口后,立即重用该端口 ,参数1表示启用
        self.server_socket.setsockopt(socket.SOL_SOCKET, socket.SO_REUSEADDR, 1)
        self.server_socket.bind(("", port))
        # 3. 变为监听套接字
        # 指定等待的最大连接数为128
        self.server_socket.listen(128)

        # 设定资源文件的路径
        self.documents_root = documents_root

        # 设定web框架可以调用的 函数(对象)
        self.app = app

    def run_forever(self):
        """运行服务器"""

        # 等待对方链接
        while True:
            # 等待客户端的接入
            new_socket, new_addr = self.server_socket.accept()
            # 如果在3秒内没有收到客户端的数据或完成操作,将会抛出socket.timeout异常。
            new_socket.settimeout(3)  # 3s
            # 创建一个新的进程来完成这个客户端的请求任务
            new_process = multiprocessing.Process(target=self.deal_with_request, args=(new_socket,))
            new_process.start()
            # 关闭主进程的new_socket
            new_socket.close()

    def deal_with_request(self, client_socket):
        """以长链接的方式,为这个浏览器服务器"""

        while True:
            try:
                # 获取客户端的请求数据
                request = client_socket.recv(1024).decode("utf-8")
            except Exception as ret:
                print("========>", ret)
                client_socket.close()
                return

            # 判断浏览器是否关闭
            if not request:
                client_socket.close()
                return
            # 按行进行切分得到的一个列表
            request_lines = request.splitlines()
            # enumerate函数可以在迭代中同时获取元素的索引和值。
            for i, line in enumerate(request_lines):
                print(i, line)

            # 提取请求的文件(index.html)
            # GET /a/b/c/d/e/index.html HTTP/1.1
            ret = re.match(r"([^/]*)([^ ]+)", request_lines[0])
            if ret:
                print("正则提取数据:", ret.group(1))  # GET
                print("正则提取数据:", ret.group(2))  # /a/b/c/d/e/index.html
                file_name = ret.group(2)
                if file_name == "/":
                    file_name = "/index.html"

            # 如果不是以py结尾的文件,认为是普通的文件
            if not file_name.endswith(".py"):

                # 读取文件数据
                try:
                    f = open(self.documents_root + file_name, "rb")
                except:
                    response_body = "file not found, 请输入正确的url"

                    response_header = "HTTP/1.1 404 not found\r\n"
                    response_header += "Content-Type: text/html; charset=utf-8\r\n"
                    response_header += "Content-Length: %d\r\n" % (len(response_body.encode("utf-8")))
                    response_header += "\r\n"

                    response = response_header + response_body

                    # 将header返回给浏览器
                    client_socket.send(response.encode('utf-8'))

                else:
                    content = f.read()
                    f.close()

                    response_body = content

                    response_header = "HTTP/1.1 200 OK\r\n"
                    response_header += "Content-Length: %d\r\n" % (len(response_body.encode("utf-8")))
                    response_header += "\r\n"

                    # 将header返回给浏览器
                    client_socket.send(response_header.encode('utf-8') + response_body)

            # 以.py结尾的文件,就认为是浏览需要动态的页面
            else:
                # 准备一个字典,里面存放需要传递给web框架的数据
                env = {'测试数据': '来自动态请求'}
                # 调用my_web.py中的application函数对象,传入env字典,和set_response_headers函数对象, 存储web返回的数据
                response_body = self.app(env, self.set_response_headers)

                # 合并header和body
                response_header = "HTTP/1.1 {status}\r\n".format(status=self.headers[0])
                response_header += "Content-Type: text/html; charset=utf-8\r\n"
                response_header += "Content-Length: %d\r\n" % len(response_body.encode("utf-8"))
                for temp_head in self.headers[1]:
                    # 遍历headers列表中的元组,并将其解包添加到响应头中
                    response_header += "{0}:{1}\r\n".format(*temp_head)

                # 拼接响应体的内容
                response = response_header + "\r\n"
                response += response_body

                client_socket.send(response.encode('utf-8'))

    """这个方法最终会被my_web.py中的application函数内调用"""

    def set_response_headers(self, status, headers):
        """这个方法,会在 web框架中被默认调用"""
        response_header_default = [
            ("Data", time.ctime()),
            ("Server", "Lizhi-python mini web server")
        ]

        # 将状态码/相应头信息存储起来
        # [字符串, [xxxxx, xxx2]]
        self.headers = [status, response_header_default + headers]


# 设置静态资源访问的路径
g_static_document_root = "./html"
# 设置动态资源访问的路径
g_dynamic_document_root = "./web"


def main():
    """控制web服务器整体"""
    # 例如: python3 web_server.py 7890 my_web:application中 sys.argv[0] = web_server.py, 以此类推
    if len(sys.argv) == 3:
        # 获取web服务器的port
        port = sys.argv[1]
        if port.isdigit():  # 判断是否端口只包含了数字字符
            port = int(port)
        # 获取web服务器需要动态资源时,访问的web框架名字
        web_frame_module_app_name = sys.argv[2]
    else:
        print("运行方式如: python3 xxx.py 7890 my_web_frame_name:application")
        return

    print("http服务器使用的port:%s" % port)

    # 将动态路径即存放py文件的路径,添加到path中,这样python就能够找到这个路径了
    # sys.path 是一个 Python 模块搜索路径的列表,它包含了用于导入模块的搜索路径。
    # 当你导入一个模块时,Python 解释器会按照 sys.path 列表中的顺序去搜索相应的模块。
    sys.path.append(g_dynamic_document_root)

    ret = re.match(r"([^:]*):(.*)", web_frame_module_app_name)
    if ret:
        # 获取模块名, 例如 my_web:application 中的 my_web
        web_frame_module_name = ret.group(1)
        # 获取可以调用web框架的应用名称, my_web:application 中的 application
        app_name = ret.group(2)

    # 动态导入web框架的主模块, 即my_web
    web_frame_module = __import__(web_frame_module_name)
    # 获取那个可以直接调用的函数(对象) ,即在my_web.py中定义的application函数
    # getattr() 可用于动态地获取给定对象的属性或方法
    app = getattr(web_frame_module, app_name)

    # print(app)  # for test

    # 启动http服务器, 并将端口号,静态资源名字和my_web.py中的application函数对象(app)传入WSGIServer
    http_server = WSGIServer(port, g_static_document_root, app)
    # 运行http服务器
    http_server.run_forever()


if __name__ == "__main__":
    main()
2.5 测试
- 打开终端 ,输入python3 web_server.py 7890 my_web:application
- 打开浏览器, 输入http://localhost:7890/index.html ,访问的将是静态资源
- 在浏览器, 输入http://localhost:7890/web.py访问的将是动态资源

三、让简易的web框架动态请求支持多页面
还记得WSGI接口的environ这个字典吗, 它是Web服务器和Web框架之间的通信桥梁, 因此要实现动态请求支持多页面,可以利用PATH_INFO字段。
3.1 修改web_server.py
在deal_with_request方法中的if not file_name.endswith(“.py”)的else分支中添加如下代码:
# 准备一个字典,里面存放需要传递给web框架的数据
env = dict()
env['PATH_INFO'] = file_name
# 调用my_web.py中的application函数对象,传入env字典,和set_response_headers函数对象, 存储web返回的数据
response_body = self.app(env, self.set_response_headers)
3.2 修改web/my_web.py
import time

# 存放各种页面的根路径
template_root = "./templates"


def index(file_name):
    """返回index.py需要的页面内容"""
    try:
        file_name = file_name.replace(".py", ".html")
        f = open(template_root + file_name)
    except Exception as ret:
        return "%s" % ret
    else:
        content = f.read()
        f.close()
        return content


def center(file_name):
    """返回center.py需要的页面内容"""
    try:
        file_name = file_name.replace(".py", ".html")
        f = open(template_root + file_name)
    except Exception as ret:
        return "%s" % ret
    else:
        content = f.read()
        f.close()
        return content


# 这个函数会在web_server.py的main方法中调用
def application(environ, start_response):
    status = '200 OK'
    response_headers = [('Content-Type', 'text/html')]
    # 设置响应的状态码和响应头
    start_response(status, response_headers)

    # 返回值就是响应体, 这里根据environ['PATH_INFO']获取要访问的页面名字
    file_name = environ['PATH_INFO']
    if file_name == "/index.py":
        return index(file_name)
    elif file_name == "/center.py":
        return center(file_name)
    else:
        return str(environ) + '==Hello world from a simple WSGI application!--->%s\n' % time.ctime()
3.3 在根路径下添加页面
在项目根路径下创建templates文件夹, 然后新建index.html和center.index
<!--  index.html  -->
<!DOCTYPE html>
<html lang="en">
<head>
    <meta charset="UTF-8">
    <title>首页</title>
</head>
<body>
<h1>这是一个首页</h1>
</body>
</html>


<!--  center.html  -->
<!DOCTYPE html>
<html lang="en">
<head>
    <meta charset="UTF-8">
    <title>居中页面</title>
</head>
<body>
<h1>这是居中页</h1>
</body>
</html>
3.4 测试
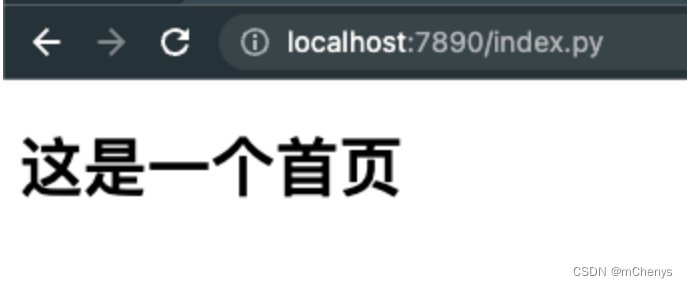
在浏览器, 输入http://localhost:7890/index.py访问的将是index.html的内容
输入http://localhost:7890/center.py访问的将是center.html的内容

四、让简易的web框架支持路由功能
路由功能的实现是基于装饰器来实现的, 因此主要修改的文件是web/my_web.py文件
template_root = "./templates"

# 定义存储url->处理函数的字典(路由表)
g_url_route = dict()


# 定义装饰器
def route(url):
    def decorator(func):
        # 存储url和func的关系
        g_url_route[url] = func

        # 定义函数的参数处理函数
        def inner_func(file_name):
            return func(file_name)

        return inner_func

    return decorator


@route("/index.py")
def index(file_name):
    """返回index.py需要的页面内容"""
    try:
        file_name = file_name.replace(".py", ".html")
        f = open(template_root + file_name)
    except Exception as ret:
        return "%s" % ret
    else:
        content = f.read()
        f.close()
        return content


@route("/center.py")
def center(file_name):
    """返回center.py需要的页面内容"""
    try:
        file_name = file_name.replace(".py", ".html")
        f = open(template_root + file_name)
    except Exception as ret:
        return "%s" % ret
    else:
        content = f.read()
        f.close()
        return content


# 这个函数会在web_server.py的main方法中调用
def application(environ, start_response):
    status = '200 OK'
    response_headers = [('Content-Type', 'text/html')]
    # 设置响应的状态码和响应头
    start_response(status, response_headers)

    # 返回值就是响应体
    file_name = environ['PATH_INFO']

    # if file_name == "/index.py":
    #     return index(file_name)
    # elif file_name == "/center.py":
    #     return center(file_name)
    # else:
    #     return str(environ) + '==Hello world from a simple WSGI application!--->%s\n' % time.ctime()
    try:
        # 直接从路由表中查询对应的函数去处理
        return g_url_route[file_name](file_name)
    except Exception as ret:
        return f"404 Error page not found {ret}"
访问方式不变, 正常访问是:
http://localhost:7890/index.py
http://localhost:7890/center.py
如果访问其他页面就会返回错误

五、静态、伪静态和动态页面的区别
目前开发的网站其实真正意义上都是动态网站,只是URL上有些区别,一般URL分为静态URL、动态URL、伪静态URL,他们的区别是什么?
5.1 静态URL
静态URL类似 域名/news/2023-5-18/110.html 我们一般称为真静态URL,每个网页有真实的物理路径,也就是真实存在服务器里的。
- 优点是:
网站打开速度快,因为它不用进行运算;另外网址结构比较友好,利于记忆。 - 缺点是:
最大的缺点是如果是中大型网站,则产生的页面特别多,不好管理。至于有的开发者说占用硬盘空间大,我觉得这个可有忽略不计,占用不了多少空间的,况且目前硬盘空间都比较大。还有的开发者说会伤硬盘,这点也可以忽略不计。 - 一句话总结:
静态网站对SEO的影响:静态URL对SEO肯定有加分的影响,因为打开速度快,这个是本质。
5.2 动态URL
动态URL类似 域名/NewsMore.asp?id=5 或者 域名/DaiKuan.php?id=17,带有?号的URL,我们一般称为动态网址,每个URL只是一个逻辑地址,并不是真实物理存在服务器硬盘里的。
- 优点是:
适合中大型网站,修改页面很方便,因为是逻辑地址,所以占用硬盘空间要比纯静态网站小。 - 缺点是:
因为要进行运算,所以打开速度稍慢,不过这个可有忽略不计,目前有服务器缓存技术可以解决速度问题。最大的缺点是URL结构稍稍复杂,不利于记忆。 - 一句话总结:
动态URL对SEO的影响:目前百度SE已经能够很好的理解动态URL,所以对SEO没有什么减分的影响(特别复杂的URL结构除外)。所以你无论选择动态还是静态其实都无所谓,看你选择的程序和需求了。
5.3 伪静态URL
伪静态URL类似 域名/course/74.html 这个URL和真静态URL类似。他是通过伪静态规则把动态URL伪装成静态网址。也是逻辑地址,不存在物理地址。
- 优点是:
URL比较友好,利于记忆。非常适合大中型网站,是个折中方案。 - 缺点是:
设置麻烦,服务器要支持重写规则,小企业网站或者玩不好的就不要折腾了。另外进行了伪静态网站访问速度并没有变快,因为实质上它会额外的进行运算解释,反正增加了服务器负担,速度反而变慢,不过现在的服务器都很强大,这种影响也可以忽略不计。还有可能会造成动态URL和静态URL都被搜索引擎收录,不过可以用robots禁止掉动态地址。 - 一句话总结:
对SEO的影响:和动态URL一样,对SEO没有什么减分影响。
六、完善简易的web框架
6.1 添加数据库
-- 创建数据库
CREATE DATABASE stock_db charset=utf8;

-- 选择数据库
USE stock_db;

-- 创建focus表
CREATE TABLE IF NOT EXISTS focus (
   id INT UNSIGNED NOT NULL AUTO_INCREMENT PRIMARY KEY,
   note_info VARCHAR(200) DEFAULT '',
   info_id INT UNSIGNED DEFAULT NULL
);

-- 插入数据
INSERT INTO focus VALUES
(2,'你确定要买这个?',36),
(3,'利好',37),
(9,'',88),
(10,'',89),
(13,'',1);

-- 创建info表
CREATE TABLE IF NOT EXISTS info (
  id int(10) unsigned NOT NULL AUTO_INCREMENT PRIMARY KEY,
  code varchar(6) NOT NULL COMMENT '股票代码',
  short varchar(10) NOT NULL COMMENT '股票简称',
  chg varchar(10) NOT NULL COMMENT '涨跌幅',
  turnover varchar(255) NOT NULL COMMENT '换手率',
  price decimal(10,2) NOT NULL COMMENT '最新价',
  highs decimal(10,2) NOT NULL COMMENT '前期高点',
  time date DEFAULT NULL
);

-- 插入数据
INSERT INTO info VALUES
(1,'000007','全新好','10.01%','4.40%',16.05,14.60,'2017-07-18'),
(2,'000036','华联控股','10.04%','10.80%',11.29,10.26,'2017-07-20'),
(3,'000039','中集集团','1.35%','1.78%',18.07,18.06,'2017-06-28'),
(4,'000050','深天马A','4.38%','4.65%',22.86,22.02,'2017-07-19'),
(5,'000056','皇庭国际','0.39%','0.65%',12.96,12.91,'2017-07-20'),
(6,'000059','华锦股份','3.37%','7.16%',12.26,12.24,'2017-04-11'),
(7,'000060','中金岭南','1.34%','3.39%',12.08,11.92,'2017-07-20'),
(8,'000426','兴业矿业','0.41%','2.17%',9.71,9.67,'2017-07-20'),
(9,'000488','晨鸣纸业','6.30%','5.50%',16.37,15.59,'2017-07-10'),
(10,'000528','柳工','1.84%','3.03%',9.42,9.33,'2017-07-19'),
(11,'000540','中天金融','0.37%','5.46%',8.11,8.08,'2017-07-20'),
(12,'000581','威孚高科','3.49%','3.72%',27.00,26.86,'2017-06-26'),
(13,'000627','天茂集团','5.81%','12.51%',10.93,10.33,'2017-07-20'),
(14,'000683','远兴能源','6.42%','21.27%',3.48,3.29,'2017-07-19'),
(15,'000703','恒逸石化','0.24%','1.65%',16.92,16.88,'2017-07-20'),
(16,'000822','山东海化','6.60%','8.54%',9.05,8.75,'2017-07-06'),
(17,'000830','鲁西化工','1.38%','4.80%',7.36,7.26,'2017-07-20'),
(18,'000878','云南铜业','1.26%','3.23%',14.50,14.47,'2017-07-19'),
(19,'000905','厦门港务','5.44%','10.85%',15.90,15.60,'2017-04-20'),
(20,'000990','诚志股份','0.53%','1.00%',16.99,16.90,'2017-07-20'),
(21,'002019','亿帆医药','1.19%','2.81%',17.05,16.85,'2017-07-20'),
(22,'002078','太阳纸业','2.05%','1.90%',8.45,8.29,'2017-07-19'),
(23,'002092','中泰化学','7.25%','6.20%',15.53,14.48,'2017-07-20'),
(24,'002145','中核钛白','2.43%','7.68%',6.75,6.61,'2017-07-19'),
(25,'002285','世联行','8.59%','5.66%',9.23,8.50,'2017-07-20'),
(26,'002311','海大集团','1.13%','0.24%',18.81,18.63,'2017-07-19'),
(27,'002460','赣锋锂业','9.41%','9.00%',63.70,58.22,'2017-07-20'),
(28,'002466','天齐锂业','3.62%','3.66%',68.44,66.05,'2017-07-20'),
(29,'002470','金正大','2.30%','0.99%',8.00,7.82,'2017-07-20'),
(30,'002496','辉丰股份','3.15%','4.29%',5.24,5.08,'2017-04-10'),
(31,'002497','雅化集团','0.38%','12.36%',13.10,13.05,'2017-07-20'),
(32,'002500','山西证券','0.44%','3.70%',11.49,11.44,'2017-07-20'),
(33,'002636','金安国纪','2.70%','11.59%',19.80,19.42,'2017-07-19'),
(34,'300032','金龙机电','0.66%','0.72%',15.28,15.18,'2017-07-20'),
(35,'300115','长盈精密','0.60%','0.59%',33.50,33.41,'2017-07-19'),
(36,'300268','万福生科','-10.00%','0.27%',31.77,13.57,'2017-04-10'),
(37,'300280','南通锻压','3.31%','0.66%',32.20,32.00,'2017-04-11'),
(38,'300320','海达股份','0.28%','0.82%',18.26,18.21,'2017-07-20'),
(39,'300408','三环集团','1.69%','0.81%',23.42,23.17,'2017-07-19'),
(40,'300477','合纵科技','2.84%','5.12%',22.10,22.00,'2017-07-12'),
(41,'600020','中原高速','5.46%','4.48%',5.60,5.31,'2017-07-20'),
(42,'600033','福建高速','1.01%','1.77%',4.00,3.99,'2017-06-26'),
(43,'600066','宇通客车','4.15%','1.49%',23.08,23.05,'2017-06-13'),
(44,'600067','冠城大通','0.40%','2.97%',7.56,7.53,'2017-07-20'),
(45,'600110','诺德股份','2.08%','4.26%',16.16,15.83,'2017-07-20'),
(46,'600133','东湖高新','9.65%','21.74%',13.64,12.44,'2017-07-20'),
(47,'600153','建发股份','3.65%','2.03%',13.35,13.21,'2017-07-10'),
(48,'600180','瑞茂通','2.20%','1.07%',14.86,14.54,'2017-07-20'),
(49,'600183','生益科技','6.94%','4.06%',14.94,14.12,'2017-07-19'),
(50,'600188','兖州煤业','1.53%','0.99%',14.56,14.43,'2017-07-19');
6.2 让响应改成伪静态响应
- 修改web_server.py的WSGIServer的deal_with_request方法,让它支持html后缀的页面请求
- 修改web_server.py的WSGIServer的__init__支持静态路径的设置
- 添加web_server.conf配置文件,用于指定静态资源和动态资源的根路径
import socket
import sys
import re
import multiprocessing


class WSGIServer(object):
    """定义一个WSGI服务器的类"""

    def __init__(self, port, app, static_path):

        # 创建套接字
        self.server_socket = socket.socket(socket.AF_INET, socket.SOCK_STREAM)
        # 绑定本地信息
        # 允许在关闭端口后,立即重用该端口 ,参数1表示启用
        self.server_socket.setsockopt(socket.SOL_SOCKET, socket.SO_REUSEADDR, 1)
        self.server_socket.bind(("", port))
        # 变为监听套接字
        # 指定等待的最大连接数为128
        self.server_socket.listen(128)

        # 设定资源文件的路径
        self.static_path = static_path

        # 设定web框架可以调用的 函数(对象)
        self.app = app

    def run_forever(self):
        """运行服务器"""

        # 等待对方链接
        while True:
            # 等待客户端的接入
            new_socket, new_addr = self.server_socket.accept()
            # 如果在3秒内没有收到客户端的数据或完成操作,将会抛出socket.timeout异常。
            new_socket.settimeout(3)  # 3s
            # 创建一个新的进程来完成这个客户端的请求任务
            new_process = multiprocessing.Process(target=self.deal_with_request, args=(new_socket,))
            new_process.start()
            # 关闭主进程的new_socket
            new_socket.close()

    def deal_with_request(self, client_socket):
        # 获取客户端的请求数据
        request = client_socket.recv(10 * 1024).decode("utf-8")

        # 按行进行切分得到的一个列表
        request_lines = request.splitlines()

        # 提取请求的文件(index.html)
        # GET /a/b/c/d/e/index.html HTTP/1.1
        ret = re.match(r"([^/]*)([^ ]+)", request_lines[0])
        file_name = "/"
        if ret:
            print("请求方式:", ret.group(1))  # GET
            print("请求路径:", ret.group(2))  # /a/b/c/d/e/index.html
            file_name = ret.group(2)
            if file_name == "/":
                file_name = "/index.html"

        # 返回http格式的数据,给浏览器
        # 如果请求的资源不是以.html结尾,那么就认为是静态资源(css/js/png,jpg等)
        if not file_name.endswith(".html"):
            try:
                f = open(self.static_path + file_name, "rb")
            except:
                response = "HTTP/1.1 404 NOT FOUND\r\n"
                response += "\r\n"
                response += "------file not found-----"
                client_socket.send(response.encode("utf-8"))
            else:
                response_header = "HTTP/1.1 200 OK\r\n"
                response_header += "\r\n"
                # 将response_header发送给浏览器
                client_socket.send(response_header.encode("utf-8"))
                # 将内容发送给浏览器
                chunk_size = 1024  # Adjust this value as needed
                while True:
                    html_content = f.read(chunk_size)
                    if not html_content:
                        break  # End of file
                    client_socket.send(html_content)
                f.close()
        else:
            # 如果是以.html结尾,那么就认为是动态资源的请求
            env = dict()  # 这个字典中存放的是web服务器要传递给 web框架的数据信息
            env['PATH_INFO'] = file_name

            # 执行web框架的application方法
            body = self.app(env, self.set_response_header)

            # 拼接响应头
            response_header = "HTTP/1.1 %s\r\n" % self.status

            for temp in self.headers:
                response_header += "%s:%s\r\n" % (temp[0], temp[1])

            response_header += "\r\n"

            response = response_header + body
            # 发送response给浏览器
            client_socket.send(response.encode("utf-8"))

        # 关闭套接
        client_socket.close()

    """这个方法最终会被my_web.py中的application函数内调用"""

    def set_response_header(self, status, headers):
        self.status = status
        self.headers = [("server", "mini_web v8.8")]
        self.headers += headers


def main():
    """控制web服务器整体"""
    # 例如: python3 web_server.py 7890 my_web:application中 sys.argv[0] = web_server.py, 以此类推
    if len(sys.argv) == 3:
        # 获取web服务器的port
        port = sys.argv[1]
        if port.isdigit():  # 判断是否端口只包含了数字字符
            port = int(port)
        # 获取web服务器需要动态资源时,访问的web框架名字
        web_frame_module_app_name = sys.argv[2]
    else:
        print("运行方式如: python3 xxx.py 7890 my_web_frame_name:application")
        return

    print("http服务器使用的port:%s" % port)

    # 读取服务器路径的配置文件
    with open("./web_server.conf") as f:
        conf_info = eval(f.read())

    # 此时 conf_info是一个字典里面的数据为:
    # {
    #     "static_path":"./html",
    #     "dynamic_path":"./web"
    # }

    # 将动态路径即存放py文件的路径,添加到path中,这样python就能够找到这个路径了
    # sys.path 是一个 Python 模块搜索路径的列表,它包含了用于导入模块的搜索路径。
    # 当你导入一个模块时,Python 解释器会按照 sys.path 列表中的顺序去搜索相应的模块。
    sys.path.append(conf_info['dynamic_path'])

    ret = re.match(r"([^:]*):(.*)", web_frame_module_app_name)
    if ret:
        # 获取模块名, 例如 my_web:application 中的 my_web
        web_frame_module_name = ret.group(1)
        # 获取可以调用web框架的应用名称, my_web:application 中的 application
        app_name = ret.group(2)

    # 动态导入web框架的主模块, 即my_web
    web_frame_module = __import__(web_frame_module_name)
    # 获取那个可以直接调用的函数(对象) ,即在my_web.py中定义的application函数
    # getattr() 可用于动态地获取给定对象的属性或方法
    app = getattr(web_frame_module, app_name)

    # 启动http服务器, 并将端口号,静态资源名字和my_web.py中的application函数对象(app)传入WSGIServer
    http_server = WSGIServer(port, app, conf_info['static_path'])
    # 运行http服务器
    http_server.run_forever()


if __name__ == "__main__":
    main()
在项目根路径添加web_server.conf配置文件
{
     "static_path":"./html",
     "dynamic_path":"./web"
}
修改web/my_web.py的路由参数
@route("/index.html")
def index(file_name):
    省略...

@route("/center.html")
def center(file_name):
    省略...
6.3 让响应查询数据库
修改web/my_web.py文件, 让index和center页面支持数据库访问数据
import re

import pymysql

template_root = "./templates"

# 定义存储url->处理函数的字典(路由表)
g_url_route = dict()


# 定义装饰器
def route(url):
    def decorator(func):
        # 存储url和func的关系
        g_url_route[url] = func

        # 定义函数的参数处理函数
        def inner_func(file_name):
            return func(file_name)

        return inner_func

    return decorator


@route("/index.html")
def index(file_name):
    try:
        f = open(template_root + file_name)
    except Exception as ret:
        return "%s" % ret
    else:
        # 读取index.html中的内容
        content = f.read()
        f.close()
        # 查询info表
        db = pymysql.connect(host='localhost', port=3306, user='root', password='00000000', database='stock_db',
                             charset='utf8')
        cursor = db.cursor()
        sql = """select * from info;"""
        cursor.execute(sql)
        data_from_mysql = cursor.fetchall()
        cursor.close()
        db.close()

        # 定义要返回的html模板
        html_template = """
            <tr>
                <td>%d</td>
                <td>%s</td>
                <td>%s</td>
                <td>%s</td>
                <td>%s</td>
                <td>%s</td>
                <td>%s</td>
                <td>%s</td>
                <td>
                    <input type="button" value="添加" id="toAdd" name="toAdd" systemidvaule="%s">
                </td>
            </tr>
        """

        # 拼接查询到的结果
        html = ""
        for info in data_from_mysql:
            # info是一个元组类型,例如(1, '000007', '全新好', '10.01%', '4.40%', Decimal('16.05'), 通过[]可以取出里面的值
            html += html_template % (info[0], info[1], info[2], info[3], info[4], info[5], info[6], info[7], info[1])
        # 通过html字符串替换index.html中的{%content%}字符串
        content = re.sub(r"\{%content%\}", html, content)
        return content


@route("/center.html")
def center(file_name):
    """返回center.html需要的页面内容"""
    try:
        f = open(template_root + file_name)
    except Exception as ret:
        return "%s" % ret
    else:
        content = f.read()
        f.close()

        db = pymysql.connect(host='localhost', port=3306, user='root', password='00000000', database='stock_db',
                             charset='utf8')
        cursor = db.cursor()
        sql = """
            select i.code,i.short,i.chg,i.turnover,i.price,i.highs,j.note_info
            from info
            as i
            inner join focus as j
            on i.id=j.info_id;
        """
        cursor.execute(sql)
        data_from_mysql = cursor.fetchall()
        cursor.close()
        db.close()

        # 定义要返回的html模板
        html_template = """
           <tr>
               <td>%s</td>
               <td>%s</td>
               <td>%s</td>
               <td>%s</td>
               <td>%s</td>
               <td>%s</td>
               <td>%s</td>
               <td>
                   <a type="button" href="/update/%s.html"> 修改 </a>
               </td>
               <td>
                   <input type="button" value="删除" id="toDel" name="toDel" systemidvaule="%s">
               </td>
           </tr>
        """

        # 拼接查询到的结果
        html = ""

        for info in data_from_mysql:
            html += html_template % (info[0], info[1], info[2], info[3], info[4], info[5], info[6], info[0], info[0])

        content = re.sub(r"\{%content%\}", html, content)

        return content


# 这个函数会在web_server.py的main方法中调用
def application(environ, start_response):
    status = '200 OK'
    response_headers = [('Content-Type', 'text/html')]
    # 设置响应的状态码和响应头
    start_response(status, response_headers)

    # 返回值就是响应体
    file_name = environ['PATH_INFO']

    try:
        # 直接从路由表中查询对应的函数去处理
        return g_url_route[file_name](file_name)
    except Exception as ret:
        return f"404 Error page not found {ret}"
6.3 修改index.html和center.html页面
(1) index.html
<!DOCTYPE html>
<html lang="en">
<head>
    <meta charset="UTF-8">
    <title>首页</title>
</head>
<body>
<div>
    <table>
        <tr>
            <th>序号</th>
            <th>股票代码</th>
            <th>股票简称</th>
            <th>涨跌幅</th>
            <th>换手率</th>
            <th>最新价(元)</th>
            <th>前期高点</th>
            <th>前期高点日期</th>
            <th>添加自选</th>
        </tr>
        {%content%}
    </table>
</div>
</body>
</html>
(2) 修改center.html页面
<!DOCTYPE html>
<html lang="en">
<head>
    <!--    -->
    <meta charset="UTF-8">
    <title>居中页面</title>
</head>
<body>
<div>
    <table>
        <tr>
            <th>股票代码</th>
            <th>股票简称</th>
            <th>涨跌幅</th>
            <th>换手率</th>
            <th>最新价(元)</th>
            <th>前期高点</th>
            <th style="color:red">备注信息</th>
            <th>修改备注</th>
            <th>del</th>
        </tr>
        {%content%}
    </table>
</div>
</body>
</html>
此时, 在浏览器中输入http://localhost:7890/index.html 看到的内容如下:

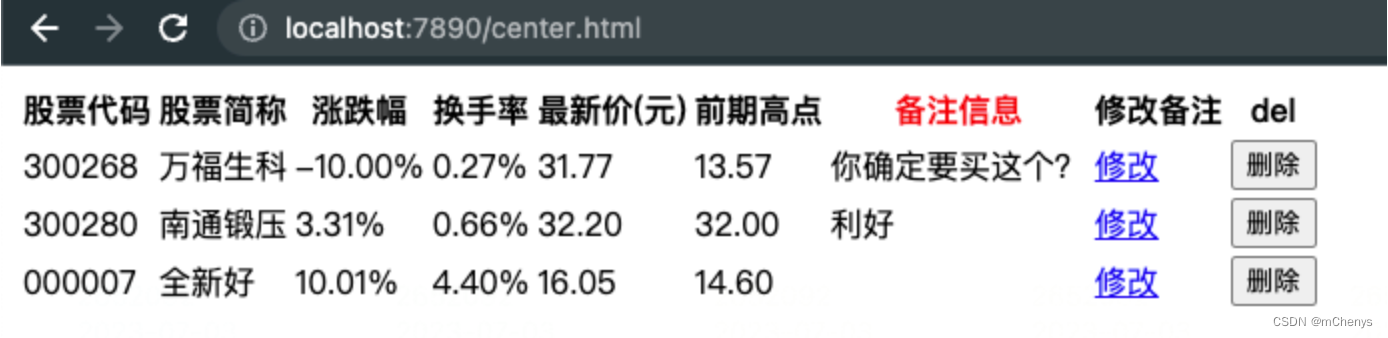
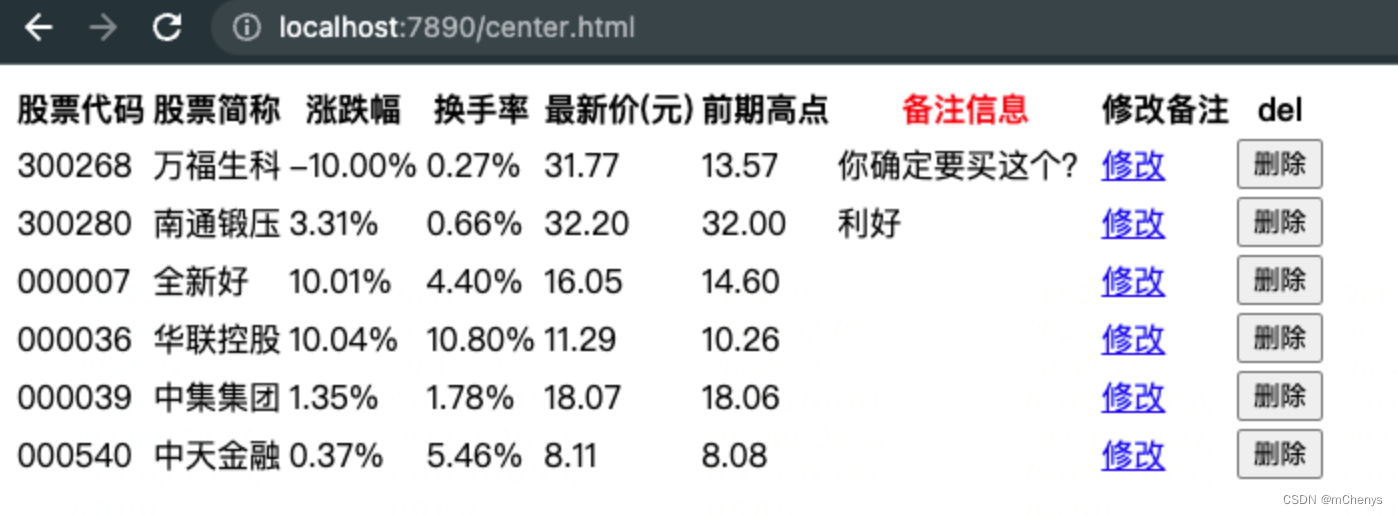
输入http://localhost:7890/center.html看到的内容如下:
6.4 让路由支持正则
继续修改web/my_web.py文件, 修改@route的参数和application方法匹配正则
import re

import pymysql

# 定义存储url->处理函数的字典(路由表)
g_url_route = dict()


# 定义装饰器
def route(url):
    def decorator(func):
        # 存储url和func的关系
        g_url_route[url] = func

        # 定义函数的参数处理函数
        def inner_func(*args, **kwargs):
            return func(*args, **kwargs)

        return inner_func

    return decorator


@route(r"/index.html")
def index(ret):
    with open("./templates/index.html") as f:
        # 读取index.html中的内容
        content = f.read()
    # 查询info表
    db = pymysql.connect(host='localhost', port=3306, user='root', password='00000000', database='stock_db',
                         charset='utf8')
    cursor = db.cursor()
    sql = """select * from info;"""
    cursor.execute(sql)
    data_from_mysql = cursor.fetchall()
    cursor.close()
    db.close()

    # 定义要返回的html模板
    html_template = """
            <tr>
                <td>%d</td>
                <td>%s</td>
                <td>%s</td>
                <td>%s</td>
                <td>%s</td>
                <td>%s</td>
                <td>%s</td>
                <td>%s</td>
                <td>
                    <input type="button" value="添加" id="toAdd" name="toAdd" systemidvaule="%s">
                </td>
            </tr>
        """

    # 拼接查询到的结果
    html = ""
    for info in data_from_mysql:
        # info是一个元组类型,例如(1, '000007', '全新好', '10.01%', '4.40%', Decimal('16.05'), 通过[]可以取出里面的值
        html += html_template % (info[0], info[1], info[2], info[3], info[4], info[5], info[6], info[7], info[1])
    # 通过html字符串替换index.html中的{%content%}字符串
    content = re.sub(r"\{%content%\}", html, content)
    return content


@route(r"/center.html")
def center(ret):
    """返回center.html需要的页面内容"""
    with open("./templates/center.html") as f:
        # 读取index.html中的内容
        content = f.read()

    db = pymysql.connect(host='localhost', port=3306, user='root', password='00000000', database='stock_db',
                         charset='utf8')
    cursor = db.cursor()
    sql = """
            select i.code,i.short,i.chg,i.turnover,i.price,i.highs,j.note_info
            from info
            as i
            inner join focus as j
            on i.id=j.info_id;
        """
    cursor.execute(sql)
    data_from_mysql = cursor.fetchall()
    cursor.close()
    db.close()

    # 定义要返回的html模板
    html_template = """
           <tr>
               <td>%s</td>
               <td>%s</td>
               <td>%s</td>
               <td>%s</td>
               <td>%s</td>
               <td>%s</td>
               <td>%s</td>
               <td>
                   <a type="button" href="/update/%s.html"> 修改 </a>
               </td>
               <td>
                   <input type="button" value="删除" id="toDel" name="toDel" systemidvaule="%s">
               </td>
           </tr>
        """

    # 拼接查询到的结果
    html = ""

    for info in data_from_mysql:
        html += html_template % (info[0], info[1], info[2], info[3], info[4], info[5], info[6], info[0], info[0])

    content = re.sub(r"\{%content%\}", html, content)

    return content


# 这个函数会在web_server.py的main方法中调用
def application(environ, start_response):
    # 设置响应的状态码和响应头
    start_response('200 OK', [('Content-Type', 'text/html')])

    # 返回值就是响应体
    file_name = environ['PATH_INFO']
    try:
        # 从路由表中获取key和value
        # {
        #   r"/index.html":index,
        #   r"/center.html":center,
        # }
        for url, call_func in g_url_route.items():
            # 获取的url就是route注解的参数
            ret = re.match(url, file_name)
            if ret:
                return call_func(ret)
        else:
            return "请求的url(%s)没有对应的函数...." % file_name
    except Exception as ret:
        return "产生了异常:%s" % str(ret)
6.5 新增添加关注操作
(1) 修改web/my_web.py文件,增加添加关注的路由处理
@route(r"/add/(\d+)\.html")
def add_focus(ret):
    # 1. 获取股票代码
    stock_code = ret.group(1)

    # 2. 判断试下是否有这个股票代码
    conn = pymysql.connect(host='localhost', port=3306, user='root', password='00000000', database='stock_db',
                           charset='utf8')
    cs = conn.cursor()
    sql = """select * from info where code=%s;"""
    cs.execute(sql, (stock_code,))
    # 如果要是没有这个股票代码,那么就认为是非法的请求
    if not cs.fetchone():
        cs.close()
        conn.close()
        return "没有这支股票,大哥 ,我们是创业公司,请手下留情..."

    # 3. 判断以下是否已经关注过
    sql = """ select * from info as i inner join focus as f on i.id=f.info_id where i.code=%s;"""
    cs.execute(sql, (stock_code,))
    # 如果查出来了,那么表示已经关注过
    if cs.fetchone():
        cs.close()
        conn.close()
        return "已经关注过了,请勿重复关注..."

    # 4. 添加关注
    sql = """insert into focus (info_id) select id from info where code=%s;"""
    cs.execute(sql, (stock_code,))
    conn.commit()
    cs.close()
    conn.close()

    return "关注成功...."
(2) 修改index.html文件,添加js代码处理添加按钮的点击事件
<head>
    <meta charset="UTF-8">
    <title>首页</title>
    <script src="/js/jquery-1.12.4.min.js"></script>
    <script>
        $(document).ready(function(){

                $("input[name='toAdd']").each(function(){
                    var currentAdd = $(this);
                    currentAdd.click(function(){
                        code = $(this).attr("systemIdVaule");
                        // 发起get请求,请求路径是 /add/xx.html
                        $.get("/add/" + code + ".html", function(data, status){
                            alert("数据: " + data + "\n状态: " + status);
                        });
                    });
                });
        });


    </script>
</head>
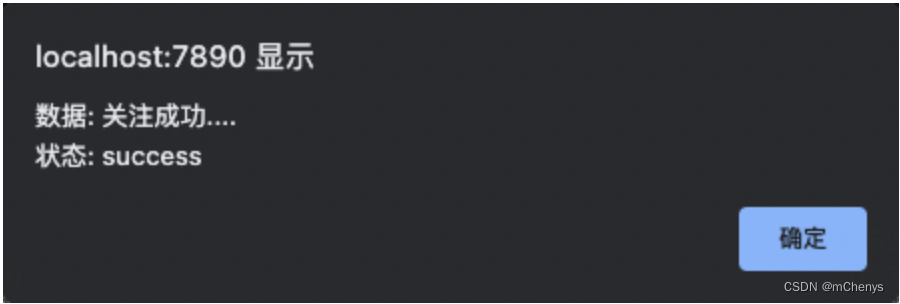
当访问index.html后, 点击一个已关注的股票, 提示如下:

如果未关注过的,提示如下:
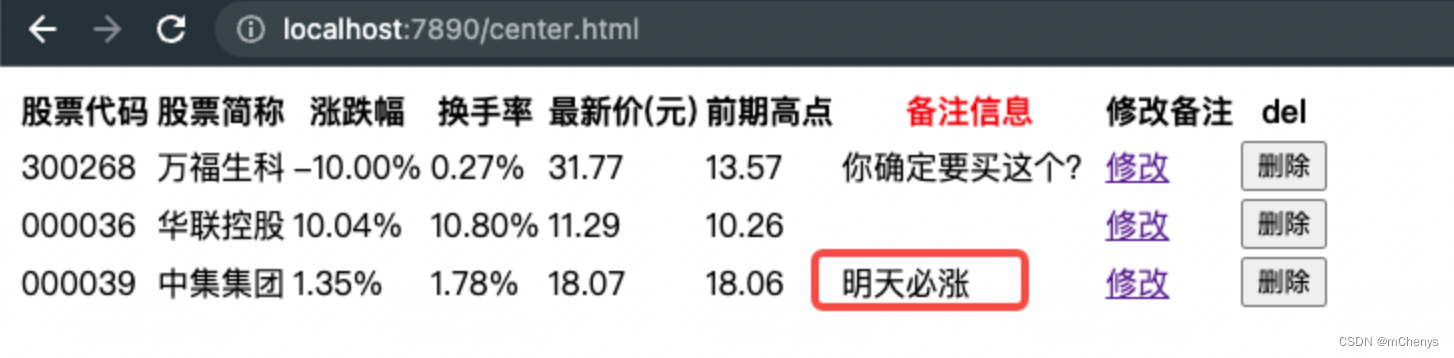
此时访问center.html页面可以看到刚刚添加关注的股票
6.6 添加删除关注操作
(1) 修改web/my_web.py文件,增加删除关注的路由处理
@route(r"/del/(\d+)\.html")
def del_focus(ret):
    # 1. 获取股票代码
    stock_code = ret.group(1)

    # 2. 判断试下是否有这个股票代码
    conn = pymysql.connect(host='localhost', port=3306, user='root', password='00000000', database='stock_db',
                           charset='utf8')
    cs = conn.cursor()
    sql = """select * from info where code=%s;"""
    cs.execute(sql, (stock_code,))
    # 如果要是没有这个股票代码,那么就认为是非法的请求
    if not cs.fetchone():
        cs.close()
        conn.close()
        return "没有这支股票,大哥 ,我们是创业公司,请手下留情..."

    # 3. 判断以下是否已经关注过
    sql = """ select * from info as i inner join focus as f on i.id=f.info_id where i.code=%s;"""
    cs.execute(sql, (stock_code,))
    # 如果没有关注过,那么表示非法的请求
    if not cs.fetchone():
        cs.close()
        conn.close()
        return "%s 之前未关注,请勿取消关注..." % stock_code

    # 4. 取消关注
    # sql = """insert into focus (info_id) select id from info where code=%s;"""
    sql = """delete from focus where info_id = (select id from info where code=%s);"""
    cs.execute(sql, (stock_code,))
    conn.commit()
    cs.close()
    conn.close()

    return "取消关注成功...."
(2) 修改center.html文件,添加js代码处理删除按钮的点击事件
<head>
    <meta charset="UTF-8">
    <title>关注页面</title>
    <script src="/js/jquery-1.12.4.min.js"></script>
    <script>
        $(document).ready(function(){

                $("input[name='toDel']").each(function(){
                    var currentAdd = $(this);
                    currentAdd.click(function(){
                        code = $(this).attr("systemIdVaule");
                        // 发起get请求,请求路径是 /del/xx.html
                        $.get("/del/" + code + ".html", function(data, status){
                            alert("数据: " + data + "\n状态: " + status);
                            // 重新加载页面
                            window.location.reload()
                        });

                    });
                });
        });

    </script>
</head>
此时访问center.html, 点击删除按钮,提示如下:

6.7 添加修改关注操作
(1) 添加templates/update.html页面,用于展示修改页面
<!DOCTYPE html>
<html lang="en">
<head>
    <meta charset="UTF-8">
    <title>修改备注页面</title>
    <script src="/js/jquery-1.12.4.min.js"></script>
    <script>
        $(document).ready(function(){
            $("#update").click(function(){
                // 获取note_info标签的value值,这个值是一个文本,即股票的备注信息
                var item = $("#note_info").val();
                // 发起get请求,请求路径是 /update/{股票id}/{备注信息}.html
                $.get("/update/{%code%}/" + item + ".html", function(data, status){
                    alert("数据: " + data + "\n状态: " + status);
                    // 修改后跳去center.html页面
                    self.location='/center.html';
                });
            });
        });

    </script>
</head>
<body>
<div class="input-group">
    <span>正在修改:</span>
    <span>{%code%}</span>
    <input id="note_info" type="text" value="{%note_info%}">
    <input id="update" type="button" value="确认修改"/>
</div>
</body>
</html>
(2) 修改web/my_web.py文件,增加查看修改页面路由
@route(r"/update/(\d+)\.html")
def show_update_page(ret):
    """显示修改的那个页面"""
    # 1. 获取股票代码
    stock_code = ret.group(1)

    # 2. 打开模板
    with open("./templates/update.html") as f:
        # 读取update.html页面内容
        content = f.read()

    # 3. 根据股票代码查询相关的备注信息
    conn = pymysql.connect(host='localhost', port=3306, user='root', password='00000000', database='stock_db',
                           charset='utf8')
    cs = conn.cursor()
    sql = """select f.note_info from focus as f inner join info as i on i.id=f.info_id where i.code=%s;"""
    cs.execute(sql, (stock_code,))
    stock_infos = cs.fetchone()
    # 获取这个股票对应的备注信息
    note_info = stock_infos[0]
    cs.close()
    conn.close()
    # 替换update.html页面的{%note_info%}字符串
    content = re.sub(r"\{%note_info%\}", note_info, content)
    # 替换update.html页面的{%code%}字符串
    content = re.sub(r"\{%code%\}", stock_code, content)

    return content
(3) 修改web/my_web.py文件,增加查看确认修改页面路由
from urllib.parse import unquote

@route(r"/update/(\d+)/(.*)\.html")
def save_update_page(ret):
    """"保存修改的信息"""
    stock_code = ret.group(1)
    # 这里使用unquote可以处理中文变成%的解码
    comment = unquote(ret.group(2), encoding="utf-8")

    conn = pymysql.connect(host='localhost', port=3306, user='root', password='00000000', database='stock_db',
                           charset='utf8')
    cs = conn.cursor()
    sql = """update focus set note_info=%s where info_id = (select id from info where code=%s);"""
    cs.execute(sql, (comment, stock_code))
    conn.commit()
    cs.close()
    conn.close()

    return "修改成功..."
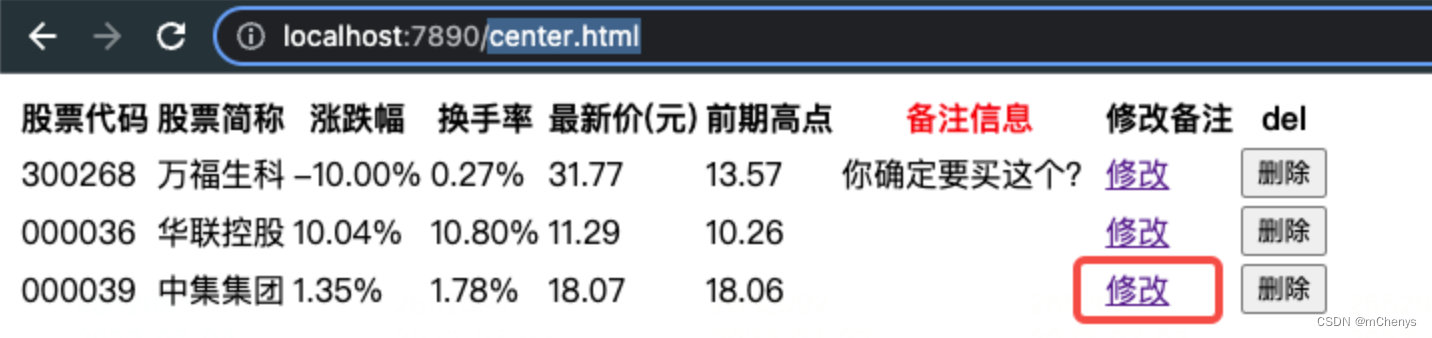
此时刷新center.html页面,然后点击一条没有添加备注的股票记录旁边的修改按钮
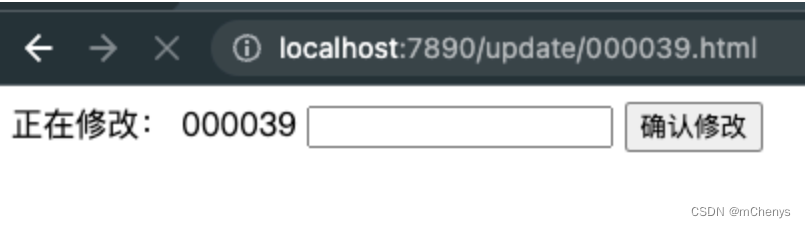
会跳去update.html页面
在输入框中随便输入一些备注信息
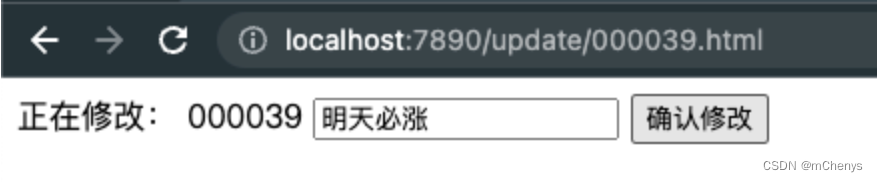
点击"确认修改", 出现下面弹窗
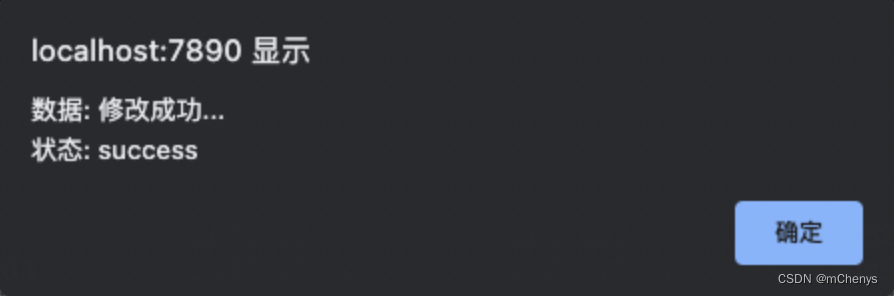
确定后,会返回center.html页面
七、日志模块
Python中有个logging模块可以完成相关信息的记录,在debug时用它往往事半功倍,
设置日志级别和格式是使用Python内置的logging模块进行日志记录的一种常用方法。使用basicConfig函数设置日志级别,并可指定日志的格式。
日志级别用于控制日志记录的详细程度,可选的日志级别由低到高包括:
- DEBUG:用于调试和开发过程中的详细信息。
- INFO:提供程序的运行信息,用于跟踪程序的主要流程。
- WARNING:指示潜在的错误或异常情况。
- ERROR:指示运行时错误,但不会导致程序终止。
- CRITICAL:指示严重错误,可能导致程序中断。
日志格式定义了记录在日志中的每个日志消息的布局, 常用格式有:
- %(asctime)s:记录的时间(日期和时间)。
- %(filename)s:记录消息的文件名。
- %(lineno)d:记录消息的行号。
- %(levelname)s:日志记录级别。
- %(message)s:日志消息的主体内容。
日志输出有两种方式,一种输出控制台,另一种是记录到文件中,如日志文件。
7.1 将日志输出到控制台
import logging

# 设置日志级别和格式
logging.basicConfig(level=logging.WARNING,
                    format='%(asctime)s - %(filename)s[line:%(lineno)d] - %(levelname)s: %(message)s')

# 开始使用log功能
logging.info('这是 loggging info message')
logging.debug('这是 loggging debug message')
logging.warning('这是 loggging a warning message')
logging.error('这是 an loggging error message')
logging.critical('这是 loggging critical message')
运行结果
2023-07-04 09:36:08,741 - main.py[line:9] - WARNING: 这是 loggging a warning message
2023-07-04 09:36:08,741 - main.py[line:10] - ERROR: 这是 an loggging error message
2023-07-04 09:36:08,741 - main.py[line:11] - CRITICAL: 这是 loggging critical message
由此可见,上面代码设置日志的输出等级是WARNING级别,那就只有WARNING级别以上的日志才会输出。
7.2 将日志输出到文件
只需要在logging.basicConfig函数中设置好输出文件的文件名和写文件的模式。例如:
import logging

logging.basicConfig(level=logging.WARNING,
                    filename='./log.txt',
                    filemode='w',
                    format='%(asctime)s - %(filename)s[line:%(lineno)d] - %(levelname)s: %(message)s')
# use logging
logging.info('这是 loggging info message')
logging.debug('这是 loggging debug message')
logging.warning('这是 loggging a warning message')
logging.error('这是 an loggging error message')
logging.critical('这是 loggging critical message')
运行后, 会在当前代码根目录下生成一个log.txt文件, 内容如下:

7.3 将日子输出到控制台和文件
这就需要一个叫作Logger 的对象来帮忙,logging.Logger是Python中日志记录的核心类之一,它提供了记录日志消息的方法和属性。可以通过实例化logging.Logger类来创建一个日志记录器对象。通过logging.FileHandler类可以创建文件记录器, 通过logging.StreamHandler可以创建控制台记录器。
import logging

# 创建日志记录器对象
logfile = './log.txt'
logger = logging.getLogger("my_logger")

# 设置日志级别和格式
logger.setLevel(logging.WARNING)
formatter = logging.Formatter('%(asctime)s - %(filename)s[line:%(lineno)d] - %(levelname)s: %(message)s')

# 创建文件处理器,并设置日志级别和格式,默认的文件写入模式是a(可以追加)
file_handler = logging.FileHandler(logfile, mode='a')
file_handler.setLevel(logging.WARNING)
file_handler.setFormatter(formatter)

# 将文件处理器添加到日志记录器
logger.addHandler(file_handler)

# 创建控制台log处理器
control_handler = logging.StreamHandler()
control_handler.setLevel(logging.WARNING)
control_handler.setFormatter(formatter)

# 将控制台log处理器添加到日志记录器
logger.addHandler(control_handler)

# 记录日志消息
logger.debug('这是 logger debug message')
logger.info('这是 logger info message')
logger.warning('这是 logger warning message')
logger.error('这是 logger error message')
logger.critical('这是 logger critical message')


 348
348


 被折叠的 条评论
为什么被折叠?
被折叠的 条评论
为什么被折叠?
 到【灌水乐园】发言


