


UITextField
控制⽂本输⼊和显⽰的控件。UITextField核⼼功能主要包含3个⽅⾯:⽂本显⽰、输⼊控制和外观配置。
UITextField和UILabel相⽐,UILabel主要⽤于⽂字显⽰,不能编辑,UITextField允许⽤户编辑⽂字(输⼊)
创建步骤
1、开辟空间并初始化(如果本类有初始化⽅法,使⽤⾃⼰的;否则使⽤⽗类的)。
2、设置⽂本显⽰、输⼊相关的属性
3、添加到⽗视图上,⽤以显⽰
4、释放
代码演示:
     // 初始化
    UITextField *textField = [[UITextField alloc]initWithFrame:CGRectMake(100, 100, 200, 50)];
   //  textField.backgroundColor = [UIColor yellowColor];
   //  textField.alpha = 0.5;
    // 设置一些属性
    textField.text = @"+86 ";
    textField.textColor = [UIColor blueColor];
    // 对齐方式
    textField.textAlignment = NSTextAlignmentCenter;
    // 设置大小
    textField.font = [UIFont systemFontOfSize:20];
    // 占位字(只有当没有输入的字才会显示)
    textField.placeholder = @"请输入用户名";
    // 是否允许输入(默认)
    textField.enabled = YES;
    // 是否开始输⼊的时候清空输⼊框内容
    textField.clearsOnBeginEditing = YES;
    // 密文输入
    textField.secureTextEntry = YES;
    // 弹出键盘的类型(枚举值)
    textField.keyboardType = UIKeyboardTypeDefault;
    // 键盘右下⾓return按钮类型
    textField.returnKeyType = UIReturnKeyNext;
    // 边框样式
    textField.borderStyle = UITextBorderStyleRoundedRect;
    // 删除按钮 何时存在(默认永不出现)
    textField.clearButtonMode = UITextFieldViewModeWhileEditing;
   // 显示视图
    [self.window addSubview:textField];
    // 释放
    [textField release];
文本显示
text :要显示的文本内容
textField.text = @"aaa";textColor:文本内容的颜色
textField.textColor = [UIColor redColor];textAlignment:文本的对齐方式(水平方向)
textField.textAlignment = NSTextAlignmentLeft;font:文本字体
 textField.font = [UIFont systemFontOfSize:20];
 // 或者
 textField.font =  [UIFont fontWithName:@“HelveticaBold”size:20];//⿊体加粗,20号字。
placeholder:占位字符串
textField.placeholder = @"请输入用户名";
输入控制
enabled:是否允许输入
textField.enabled =NO;//不允许输⼊,不弹出建键盘
textField.enabled =YES;//默认是YES。允许输⼊
clearsOnBeginEditing:是否开始输入的时候清空输入框内容
textField.clearsOnBeginEditing = YES;//清空
textField.clearsOnBeginEditing = NO;//不清空
secureTextEntry:是否以圆点格式显示
textField.secureTextEntry = YES;//密码模式
textField.secureTextEntry = NO;//普通模式
keyboardType:弹出键盘的类型(枚举值)
textField.keyboardType = UIKeyboardTypeNumberPad;//数字键盘returnKeyType:键盘右下角return按钮类型(枚举值)
textField.returnKeyType = UIReturnKeyNext;inputView:自定义输入视图(默认是键盘)
textField.inputView = myInputView;inputAccessoryView:输入视图上方的辅助视图(默认nil)
textField.inputAccessoryView = myAccessoryView;
外观控制
borderStyle:边框样式(枚举值)
textField.borderStyle = UITextBorderStyleRoundedRect;clearButtonMode:清除按钮模式(枚举值)
textField.clearButtonMode =UITextFieldViewModeAlways; //总是显⽰清除按钮leftView:输入框左视图
textField.leftView = leftView;leftViewMode:左视图的显示模式
textField.leftViewMode = UITextFieldViewModeAlways; //总是显⽰左视图rightView:输入框右视图
textField.rightView = rightView;rightViewMode:右视图的显示模式
textField.rightViewMode = UITextFieldViewModeAlways;
UIButton
是响应⽤户点击的控件。
创建步骤
1、创建button对象(如果本类有初始化⽅法,使⽤⾃⼰的;否则使⽤⽗类的)。
2、设置按钮显⽰相关的属性
3、为按钮添加点击事件
4、添加按钮到⽗视图上,⽤以显⽰
5、按钮⽆需释放(因为使⽤的是类⽅法创建的button)
代码演示:
UIButton *button = [UIButton buttonWithType:UIButtonTypeCustom];
// 设置位置
button.frame = CGRectMake(90, 100, 100, 100);
// 设置颜色
button.backgroundColor = [UIColor blackColor];
// 设置某个状态下的标题
[button setTitle:@"普通" forState:(UIControlStateNormal)];
[button setTitle:@"高亮" forState:(UIControlStateHighlighted)];
[button setTitle:@"选中" forState:(UIControlStateSelected)];
// 给button添加一个方法
[button addTarget:self action:@selector(buttonClick:) forControlEvents:(UIControlEventTouchUpInside)];

[self.window addSubview:button];
添加事件
addTarget:action:forControlEvents:为按钮添加事件,指定按钮点击之后,执⾏target的action⽅法
[button addTarget:self action:@selector(buttonClick:) forControlEvents:(UIControlEventTouchUpInside)];removeTarget:action:forControlEvents:移除按钮的点击事件
[button removeTarget:self action:@selector(buttonClick:) forControlEvents:UIControlEventTouchUpInside];
外观控制
setTitle:forState:——设置指定状态下的标题
[button setTitle:@"普通" forState:(UIControlStateNormal)];titleForState:——获取指定状态下的标题
NSString *normalTitle = [ button titleForState:UIControlStateNormal];setTitleColor:forState:——设置指定状态下的标题颜⾊
[button setTitleColor:[UIColor cyanColor] forState:(UIControlStateNormal)];titleColorForState:——获取指定状态下的标题颜⾊
UIColor *normalTitleColor = [button
titleColorForState:UIControlStateNormal];setTitleShadowColor:forState: ——设置指定状态下的标题阴影颜⾊
[button setTitleShadowColor:[UIColor redColor] forState:UIControlStateNormal];titleShadowColor:forState:——获取指定状态下的标题阴影颜⾊
UIColor *normalTitleShadowColor =[button titleColorForState:UIControlStateNormal];setImage:forState:——设置指定状态下的前景图⽚
// 如果不是png格式的图片,需要把后缀加上
UIImage *image = [UIImage imageNamed:@"Normal"];
imageForState:——获取指定状态下的前景图⽚
UIImage *normalImage = [button imageForState:UIControlStateNormal];setBackgroundImage:forState:——获取指定状态下的标题颜⾊
[button setBackgroundImage:[UIImage imageNamed:@"Normal"] forState:(UIControlStateNormal)];backgroundImageForState:——获取指定状态下的背景图⽚
UIImage *normalBackgroundImage =[button backgroundImageForState:UIControlStateNormal];
delegate
键盘回收
例如:实现3个textField的轮流输入,点击return可以回收键盘
1.在.h⽂件接受UITextFieldDelegate协议
2.在.m⽂件实现textFieldShouldReturn:⽅法。利用响应者,实现点击return,光标移到下一个UITextField
    for (int i = 0; i < 3; i++) {
    UITextField *textField = [[UITextField alloc]initWithFrame:CGRectMake(100, 100 + (i * 60), 200, 50)];
    textField.borderStyle = UITextBorderStyleRoundedRect;
    textField.tag = 100 + i;
   (1)
    [self.window addSubview:textField];
    [textField release];
}
3.给return按钮添加键盘回收的方法
- (BOOL)textFieldShouldReturn:(UITextField *)textField;
{
    // 取消第一响应者
    [textField resignFirstResponder];
    // 取出下一个textfield
    UITextField *field = (UITextField *)[self.window viewWithTag:textField.tag + 1];
    // 成为第一响应者
    [field becomeFirstResponder];
    // 判断是不是最后一个UITextField
    if(textField.tag == 102){
        [field resignFirstResponder];
       }
   return YES;
}
4.给textField添加代理
textField.delegate = self; // 添加在(1)处
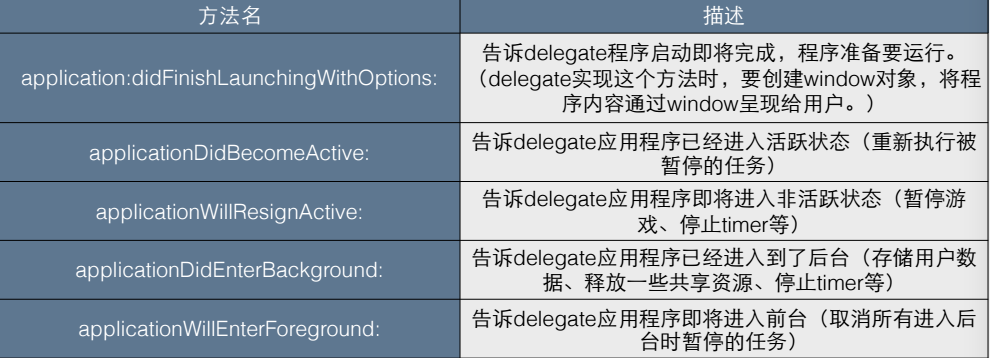
程序启动流程
- main函数是程序入口
执⾏UIApplicationMain函数时做了跳转,转到了AppDelete中
- UIApplicationMain在程序⼊⼝函数main函数中调⽤,主要实现了3个功能:
创建应⽤程序(UIApplication)实例
创建应⽤程序代理实例:主要检测应⽤程序的状态并做出相应的处理。
建⽴事件循环(runloop:死循环,不断检测程序运⾏状态,是否被触摸、晃动等)
- UIApplicationMain在程序⼊⼝函数main函数中调⽤,主要实现了3个功能:
注:UIApplicationDelegate是⼀个OC的协议。⾥⾯声明了⼀堆⽅法,这些⽅法都与应⽤程序运⾏状态有关,它们由应⽤程序代理实现UIApplication对象负责调⽤。


 781
781

 被折叠的 条评论
为什么被折叠?
被折叠的 条评论
为什么被折叠?
 到【灌水乐园】发言


