


SpringBoot热部署、模板引擎
热部署 devtools
好处:修改代码后,无需重启服务器
全局属性文件:application.properties
#热部署    devtools
spring.devtools.restart.enabled=true
spring.devtools.restart.additional-paths=src/main/java
idea更改工具配置
第一步File > Settings > Compiler > Build Project automatically
第二步:ctrl + shift + alt + / , 选择Registry , 勾上Compiler autoMake allow when app running

最后添加依赖pom.xml
<!--热部署-->
		<dependency>
			<groupId>org.springframework.boot</groupId>
			<artifactId>spring-boot-devtools</artifactId>
			<scope>runtime</scope>	<!--运行时范围-->
			<optional>true</optional>
		</dependency>
模板引擎 Thymeleaf
全局属性文件application.properties
#模板引擎
spring.thymeleaf.enabled=true
spring.thymeleaf.encoding=utf-8
    #前缀
spring.thymeleaf.prefix=classpath:/templates/
    #后缀
spring.thymeleaf.suffix=.html
    #严格的语法检查
spring.thymeleaf.mode=HTML
    #缓存(建议:开发期为false,项目发布时true)
spring.thymeleaf.cache=false
注:static文件夹下为静态资源,可直接访问,除了文件夹名为img,springboot会默认拦截
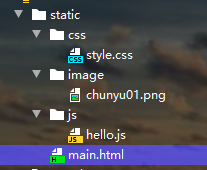
测试:
hello.js
alert("hello.js")
style.css
body{
    background-color: green;
}
main.html
<!DOCTYPE html>
<html lang="zh">
<head>
    <meta charset="UTF-8">
    <title>首页</title>
    <link rel="stylesheet" href="css/style.css">
    <script src="js/hello.js"></script>
</head>
<body>
        <h1>静态网页</h1>
        <img src="image/chunyu01.png">
</body>
</html>
运行后:
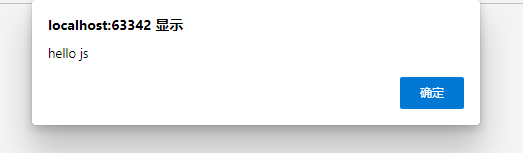

------------------------------------------------------------------------------------------>>>成功!!!
动态网页:
创建一个controller测试传值
@Controller
public class HelloController {
@GetMapping("/user") //只支持get请求
public String hello1(){
//进前台页
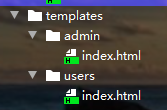
return "users/index";
}
@GetMapping("/admin") //只支持get请求
public String hello2(ModelMap map){
//进后台页
map.put("info","<i>我传过来的数据</i>");
Users user1=new Users(1,"碰磕","666",new Date());
map.put("users",user1);
map.put("role","admin");
//集合
Users user2=new Users(2,"碰磕2","4444",new Date());
Users user3=new Users(3,"Mr_xiao","444",new Date());
List list=new ArrayList();
list.add(user1);
list.add(user2);
list.add(user3);
map.put("userlist",list);
return "admin/index";
}
}
实体类users
public class Users {
    int uid;
    String uname;
    String upass;
    Date birthday;

    public Users(int uid, String uname, String upass, Date birthday) {
        this.uid = uid;
        this.uname = uname;
        this.upass = upass;
        this.birthday = birthday;
    }

    public int getUid() {
        return uid;
    }

    public void setUid(int uid) {
        this.uid = uid;
    }

    public String getUname() {
        return uname;
    }

    public void setUname(String uname) {
        this.uname = uname;
    }

    public String getUpass() {
        return upass;
    }

    public void setUpass(String upass) {
        this.upass = upass;
    }

    public Date getBirthday() {
        return birthday;
    }

    public void setBirthday(Date birthday) {
        this.birthday = birthday;
    }

    @Override
    public String toString() {
        return "\nUsers{" +
                "uid=" + uid +
                ", uname='" + uname + '\'' +
                ", upass='" + upass + '\'' +
                ", birthday=" + birthday +
                '}';
    }
}
admin\index.html获取数据
<!DOCTYPE html>
<!--引入命名空间-->
<html lang="zh" xmlns:th="http://www.thymeleaf.org">
<head>
    <meta charset="UTF-8">
    <title>Title</title>
</head>
<body>
    <h1>后台动态网页</h1>
    <h3 th:text="hello">基本数据</h3>
    <h3 th:text="${info}">基本数据</h3>
    <h3 th:utext="${info}">识别标签</h3>
    传对象:姓名:<span th:text="${users.uname}">姓名</span>密码:<span th:text="${users.upass}">密码</span>
    生日:<span th:text="${users.birthday}">生日</span><!--Tue Nov 09 10:49:30 CST 2021-->
    生日:<span th:text="${#dates.format(users.birthday,'yyyy年MM月dd号')}"></span>
    去掉对象名:
    <div th:object="${users}">
        <span th:text="*{uname}"></span><span th:text="*{upass}"></span>
        <span th:text="*{#dates.format(birthday,'yyyy年MM月dd号')}"></span>
    </div>
    <h1>IF 标签+src标签</h1>
    <img th:if="${users!=null}" th:src="@{/image/chunyu01.png}" width="400px" height="400px" /> <!--th:src @表示绝对路径-->
    <h1>switch标签</h1>
    <div th:switch="${role}">
        <span th:case="admin">管理员</span>
        <span th:case="teacher">老师</span>
        <span th:case="*">学生</span>     <!--*表示其他-->
    </div>
    <h1>循环标签</h1>
        <table>
            <tr>
                <td>编号</td>
                <td>姓名</td>
                <td>密码</td>
                <td>生日</td>
            </tr>
            <tr th:each="u : ${userlist}">
                <td th:text="${u.uid}">ID</td>
                <td th:text="${u.uname}">NAME</td>
                <td th:text="${u.upass}">PASS</td>
                <td th:text="${#dates.format(u.birthday,'yyyy-MM-dd')}">BIRTHDAY</td>
            </tr>
        </table>
</body>
</html>
注:一定要记得引入命名空间
练习
作业:循环显示页码
PageInfo{
int pages=20; //总页
int cur=3; //当前页
int sz[]={1,2,3,4,5}; // 页码数组
}
首页 1 2 【3】 4 5 尾页
最终效果图:

创建实体类pageinfo
public class PageInfo {
    int pages=20;  //总页
    int cur=3;     //当前页
    int sz[]={1,2,3,4,5};  // 页码数组

    public int getPages() {
        return pages;
    }

    public void setPages(int pages) {
        this.pages = pages;
    }

    public int getCur() {
        return cur;
    }

    public void setCur(int cur) {
        this.cur = cur;
    }

    public int[] getSz() {
        return sz;
    }

    public void setSz(int[] sz) {
        this.sz = sz;
    }

    @Override
    public String toString() {
        return "\nPageInfo{" +
                "pages=" + pages +
                ", cur=" + cur +
                ", sz=" + Arrays.toString(sz) +
                '}';
    }
}
controller
 @GetMapping("/user")  //只支持get请求
    public String hello1(ModelMap map){
        PageInfo page=new PageInfo();
        map.put("page",page);
        //进前台页
        return "users/index";
    }
前台页显示数据
<!DOCTYPE html>
<!--引入命名空间-->
<html lang="zh" xmlns:th="http://www.thymeleaf.org">
<head>
    <meta charset="UTF-8">
    <title>Title</title>
    <style>
        .btn{
            background-color: red;
        }
        .boder{
            float: left;
            border: 1px solid blue;
            margin: 5px;
            cursor: pointer;
        }
    </style>
</head>
<body>
    <h1>前台动态网页</h1>
    <h1>分页</h1>
    <a href="user/1" th:text="首页" class="boder"></a>
    <div th:each="s : ${page.sz}">
        <a th:href="${'user/'+s}" th:class="${s==page.cur ? 'btn boder':'boder'}" th:text="${s}"></a>
    </div>
    <a th:text="尾页" th:href="${'user/'+page.pages}" class="boder"></a>
</body>
</html>
--------------------------------------------------->完成!!!
作业完成图:

总结
热部署、模板引擎参照上分进行配置即可
- 模板引擎部分标签:
- 文本标签:th:text 识别标签的文本标签:th:utext
- 日期时间转换:th:text="${#dates.format(日期类型属性,‘yyyy-MM-dd’)}"
- IF标签、src标签:th:if="${users!=null}"th:src="@{/image/chunyu01.png}"@表示绝对路径
- switch标签:th:switch="${参数}"th:case="值"如果参数值与case值相等则会显示该标签的内容
- 循环标签:{th:each="u:${参数}"th:text=${u.属性}}


 565
565


 被折叠的 条评论
为什么被折叠?
被折叠的 条评论
为什么被折叠?
 到【灌水乐园】发言


