


一,前言
- 样式操作: .css()方法。
- 大小操作: 设置或获取元素的Width和Height。
- 位置操作: 设置或获取元素相对于document,父级元素,滚动条的位置。
二,CSS操作
(1)样式操作
.css():设置或获取元素的样式,支持对象作为参数。
<!DOCTYPE html>
<html lang="en">

<head>
  <meta charset="UTF-8">
  <meta name="viewport" content="width=device-width, initial-scale=1.0">
  <title>Document</title>
</head>
<script src="../static/js/jquery-3.7.1.min.js"></script>
<style>
  .container {
    background-color: aqua;
    height: 100px;

  }
</style>

<body>
  <div class="container">盒子</div>
  <p>我是文字</p>
  <button id="btn1">添加样式</button>
  <script>
    console.log($(".container").css("background-color"))
    $("#btn1").on("click", function () {
      $("p").css("font-size", "20px");
      $("p").css({
        color: "red",
        fontWeight: "bold"
      })
    })
  </script>
</body>

</html>
使用对象作为参数时,样式命名符合驼峰式命名法。.css()方法好处是随时随地的去写,缺点就是复用性不高,耦合性太强,代码量上来的话修改难度大。实际开发中一般采用分离写法。通过addClass()方法整体添加。
(2)大小操作
- height(),width():获取元素本身的高度,宽度(不包含padding,border,margin)
- innerHeight(),innerWidth():获取元素本身高度,宽度 + padding(不包含border,margin)
- outerHeight,outerWidth():获取元素本身高度,宽度 + padding + border + margin(当参数为true时)
<!DOCTYPE html>
<html lang="en">
<head>
<meta charset="UTF-8">
<meta name="viewport" content="width=device-width, initial-scale=1.0">
<title>Document</title>
</head>
<script src="../static/js/jquery-3.7.1.min.js"></script>
<style>
.container {
background-color: aqua;
height: 200px;
width: 200px;
padding: 5px;
margin: 5px;
border: 5px solid red;
}
</style>
<body>
<div class="container"></div>
<script>
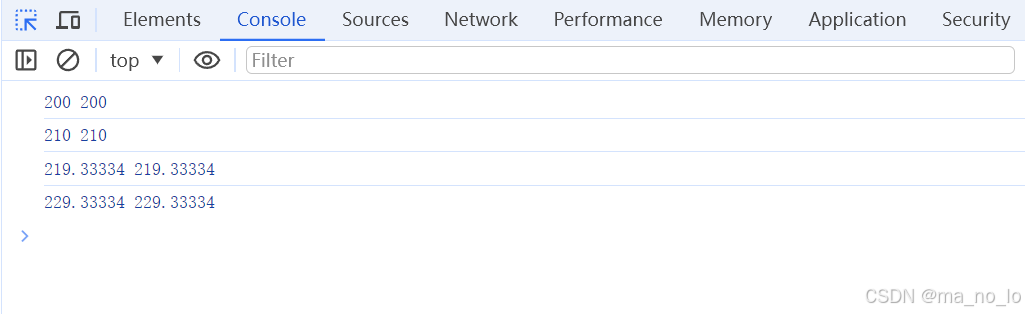
console.log($(".container").height(), $(".container").width());
console.log($(".container").innerHeight(), $(".container").innerWidth());
console.log($(".container").outerHeight(), $(".container").outerWidth());
console.log($(".container").outerHeight(true), $(".container").outerWidth(true));
</script>
</body>
</html>
(3)位置操作
.offset():获取或设置元素相对于document位置(左上角的点的坐标)
.position():获取相对于父级的相对坐标(左上角)
.scrollLeft():获取元素的当前水平滚动条的位置。设置每个匹配元素的水平滚动条位置
.scrollTop():获取元素的当前垂直滚动条的位置。设置每个匹配元素的垂直滚动条位置
.offset()
<!DOCTYPE html>
<html lang="en">
<head>
<meta charset="UTF-8">
<meta name="viewport" content="width=device-width, initial-scale=1.0">
<title>Document</title>
</head>
<script src="../static/js/jquery-3.7.1.min.js"></script>
<style>
* {
padding: 0;
margin: 0;
}
.container {
background-color: aqua;
height: 200px;
width: 200px;
}
</style>
<body>
<div class="container"></div>
<button id="moveLeft">←</button>
<button id="moveRight">→</button>
<button id="moveUp">↑</button>
<button id="moveDown">↓</button>
<script>
console.log($(".container").offset());
</script>
</body>
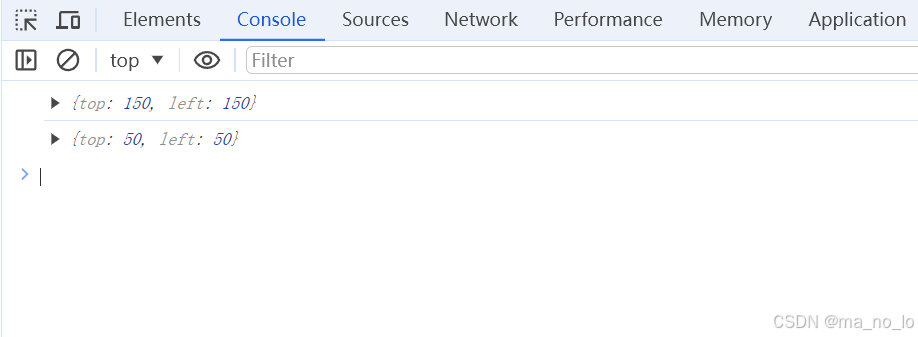
</html>不填参数时offset()获取匹配元素左上角相对于document的坐标
接下来,我们设计一个通过上下左右按钮来控制方块移动的网页:
<!DOCTYPE html>
<html lang="en">

<head>
  <meta charset="UTF-8">
  <meta name="viewport" content="width=device-width, initial-scale=1.0">
  <title>Document</title>
</head>
<script src="../static/js/jquery-3.7.1.min.js"></script>
<style>
  * {
    padding: 0;
    margin: 0;
  }

  .container {
    background-color: aqua;
    height: 200px;
    width: 200px;
  }
</style>

<body>
  <div class="container"></div>
  <button id="moveLeft">←</button>
  <button id="moveRight">→</button>
  <button id="moveUp">↑</button>
  <button id="moveDown">↓</button>
  <script>
    let offset = $(".container").offset()
    $("#moveLeft").on("click", function (e) {
      $(".container").offset({
        top: offset.top,
        left: offset.left - 10
      });
      offset = offset = $(".container").offset()
    }
    )
    $("#moveRight").on("click", function (e) {
      $(".container").offset({
        top: offset.top,
        left: offset.left + 10
      });
      offset = offset = $(".container").offset()
    })
    $("#moveUp").on("click", function (e) {
      $(".container").offset({
        top: offset.top - 10,
        left: offset.left
      });
      offset = offset = $(".container").offset()
    })
    $("#moveDown").on("click", function (e) {
      $(".container").offset({
        top: offset.top + 10,
        left: offset.left
      });
      offset = offset = $(".container").offset()
    })

  </script>
</body>

</html>
提一嘴,offsetParent()方法可以获取被定位元素的最近祖先元素,不是用来设置定位元素的父级的。
.position()
<!DOCTYPE html>
<html lang="en">

<head>
  <meta charset="UTF-8">
  <meta name="viewport" content="width=device-width, initial-scale=1.0">
  <title>Document</title>
</head>
<script src="../static/js/jquery-3.7.1.min.js"></script>
<style>
  * {
    padding: 0;
    margin: 0;
  }

  .container {
    background-color: aqua;
    height: 200px;
    width: 200px;
    position: relative;
    top: 100px;
    left: 100px;
  }

  .content {
    background-color: red;
    height: 100px;
    width: 100px;
    position: absolute;
    left: 50px;
    top: 50px;
  }
</style>

<body>
  <div class="container">
    <div class="content"></div>
  </div>
  <script>
    console.log($(".content").offset());
    console.log($(".content").position());


  </script>


</body>

</html>
.scrollLfet与.scrollTop()方法
<!DOCTYPE html>
<html lang="en">

<head>
  <meta charset="UTF-8">
  <meta name="viewport" content="width=device-width, initial-scale=1.0">
  <title>Document</title>
</head>
<script src="../static/js/jquery-3.7.1.min.js"></script>
<style>
  .container {
    background: #CCCCCC;
    border: 3px solid #666666;
    margin: 5px;
    padding: 5px;
    width: 200px;
    height: 200px;
    overflow: auto;
  }

  p {
    margin: 10px;
    padding: 5px;
    border: 2px solid #666;
    width: 1000px;
    height: 1000px;
  }
</style>

<body>
  <div class="container">
    <h1>标题</h1>
    <p>内容</p>
  </div>
  <span class="text"></span>
  <script>
    $(".container").scrollLeft(300);
    var scrollLeft =
      $(".container").scrollLeft();
    console.log(scrollLeft);
  </script>


</body>

</html>
三,总结
样式操作和大小操作都属于比较简单,也比较少用的内容,但是位置操作,当然不止这些,在事件中用的比较多,不管是在防抖还是其他优化中都有出现,包括很多页面动态效果都会使用到位置操作,难度也对应高一些。


 1112
1112

 被折叠的 条评论
为什么被折叠?
被折叠的 条评论
为什么被折叠?
 到【灌水乐园】发言


