


一、关于动态计算UITableViewCell高度的问题
#import "ViewController.h"
#import "TestTableViewCell.h"

@interface ViewController ()<UITableViewDataSource,UITableViewDelegate>
@property (nonatomic, strong) UITableView *tv;
@property (nonatomic, strong) NSMutableArray *dataArr;
@end

@implementation ViewController

- (NSMutableArray *)dataArr {
    NSLog(@"%s",__func__);
    if (_dataArr == nil) {
        _dataArr = [[NSMutableArray alloc] initWithArray:@[@"aaa",@"bbb",@"ccc",@"ddd"]];
    }
    return _dataArr;
}

- (void)viewDidLoad {
    [super viewDidLoad];
    NSLog(@"%s",__func__);
    [self creatUI];

}
- (void)creatUI {
NSLog(@"%s",__func__);
    self.tv = [[UITableView alloc] initWithFrame:self.view.bounds];
    self.tv.delegate = self;
    self.tv.dataSource = self;
    //动态计算高度去除自带分割线
    self.tv.separatorStyle = UITableViewCellSeparatorStyleNone;
    NSLog(@"========");
    [self.tv registerNib:[UINib nibWithNibName:NSStringFromClass([TestTableViewCell class]) bundle:nil] forCellReuseIdentifier:@"test"];
    [self.view addSubview:self.tv];

}
#pragma -mark UITableViewDataSource
- (NSInteger)numberOfSectionsInTableView:(UITableView *)tableView {
    NSLog(@"%s",__func__);

    return 1;
}
- (NSInteger)tableView:(UITableView *)tableView numberOfRowsInSection:(NSInteger)section {
    NSLog(@"%s",__func__);
    return self.dataArr.count;
}
- (CGFloat)tableView:(UITableView *)tableView heightForRowAtIndexPath:(NSIndexPath *)indexPath {
    NSLog(@"%s",__func__);
    return 50;
}
- (UITableViewCell *)tableView:(UITableView *)tableView cellForRowAtIndexPath:(NSIndexPath *)indexPath {
    NSLog(@"%s",__func__);
    TestTableViewCell *cell = [tableView dequeueReusableCellWithIdentifier:@"test"];
    if (cell == nil) {
        cell = [[TestTableViewCell alloc] initWithStyle:UITableViewCellStyleDefault reuseIdentifier:@"test"];
    }
    [cell updateCellBy:_dataArr[indexPath.row]];
    NSLog(@"=======%f",cell.frame.size.height);
    return cell;
}
- (void)didReceiveMemoryWarning {
    [super didReceiveMemoryWarning];
    // Dispose of any resources that can be recreated.
}

@end
#import <UIKit/UIKit.h>
@interface TestTableViewCell : UITableViewCell
@property (strong, nonatomic) IBOutlet UILabel *nameLb;
- (void)updateCellBy:(NSString *)str;
@end#import "TestTableViewCell.h"
@implementation TestTableViewCell
- (void)awakeFromNib {
NSLog(@"%s",__func__);
}
- (void)layoutSubviews {
NSLog(@"%s",__func__);
}
- (void)setSelected:(BOOL)selected animated:(BOOL)animated {
[super setSelected:selected animated:animated];
// Configure the view for the selected state
}
- (void)updateCellBy:(NSString *)str {
self.nameLb.text = str;
NSLog(@"%s",__func__);
}执行函数 得到如下顺序:
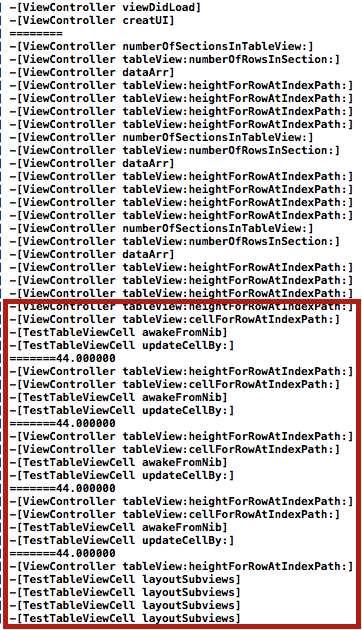
由于UITableViewCell的Size是被忽略的,由TableView的宽 和 RowHeight 决定
所以动态计算UITableViewCell的行高由-[ViewController tableView:heightForRowAtIndexPath:]决定,此外,layoutSubviews最后执行,似乎可以做一些额外的事情。
在分析完调用的顺序后,现在来实现一下动态的展示Cell中的Label的内容
Step 1:创建一个模型,如下
#import <Foundation/Foundation.h>
#import <UIKit/UIKit.h>
@interface CellModel : NSObject
//对应Cell中nameLb的内容
@property (nonatomic, copy) NSString *name;
//计算这个内容的高度
@property (nonatomic, assign) CGFloat height;
@end
#import "CellModel.h"
@implementation CellModel
- (void)setName:(NSString *)name {
_name = name;
CGSize constained = CGSizeMake([UIScreen mainScreen].bounds.size.width, CGFLOAT_MAX);
//从iOS6适配
CGSize size = [name sizeWithFont:[UIFont boldSystemFontOfSize:15.f] constrainedToSize:constained lineBreakMode:NSLineBreakByWordWrapping];
//加1 (余量)没有这个量显示不完全
self.height = size.height + 1;
}
@endStep2 : Cell里面的Label要想显示多行,当然要设置属性,如下:
- (void)awakeFromNib {
    self.nameLb.lineBreakMode = UILineBreakModeCharacterWrap;
    self.nameLb.font = [UIFont boldSystemFontOfSize:15.f];
    self.nameLb.numberOfLines = 0;
    //根据Label里的文字来自动适应尺寸
    [self.nameLb sizeToFit];
}
Step3 : 重新给数组赋值,里面装Model
- (NSMutableArray *)dataArr {
if (_dataArr == nil) {
_dataArr = [[NSMutableArray alloc] init];
CellModel *model = [[CellModel alloc] init];
model.name = @"11111111111111111";
CellModel *model1 = [[CellModel alloc] init];
model1.name = @"iosiosiosiosiosiosiosiosiosiosiosiosiosiosiosiosiosiosiosiosiosiosiosiosios";
CellModel *model2 = [[CellModel alloc] init];
model2.name = @"苹果苹果苹果苹果苹果苹果苹果苹果苹果苹果苹果苹果苹果苹果苹果苹果苹果苹果苹果苹果苹果苹果苹果苹果苹果苹果";
[_dataArr addObject:model1];
[_dataArr addObject:model2];
[_dataArr addObject:model];
}
return _dataArr;
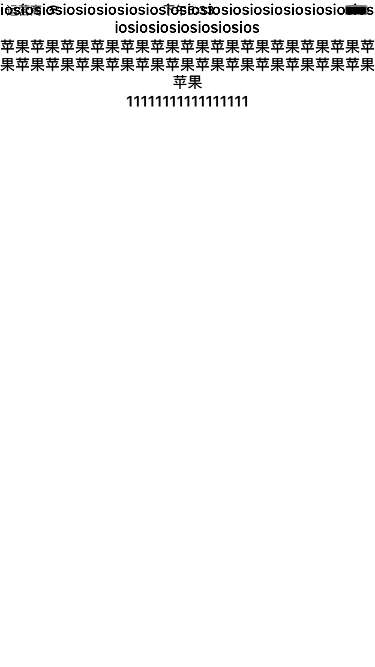
}Step 4 : 在表格返回高度的函数里,通过模型返回计算好的高度.
- (CGFloat)tableView:(UITableView *)tableView heightForRowAtIndexPath:(NSIndexPath *)indexPath {
    CellModel *model = self.dataArr[indexPath.row];
    return model.height
    ;
}
效果如下:
对于动态计算高度,我个人倾向把工作交给UITabelViewCell,原因如下:
由于需要动态计算高度,我们就要知道规定的宽度,假如Cell中的子控件很多,我们可以直接在UITabelViewCell的实现文件里清晰的知道我们要限定的宽度是多少。
二、常见的基本设置
设置cell选中的背景颜色
    UIView *selectView = [[UIView alloc] init];
    selectView.backgroundColor = [UIColor redColor];
    cell.selectedBackgroundView = selectView;
设置cell的指示器
系统默认:
cell.accessoryType = UITableViewCellAccessoryCheckmark;自定义
cell.accessoryView = [[UISwitch alloc] init];三、Cell的重用方法
1、手动创建
static NSString *mantleCreat = @"mantleCreat";
    UITableViewCell *cell = [tableView dequeueReusableCellWithIdentifier:mantleCreat];
    if (cell == nil) {

        cell = [[UITableViewCell alloc] initWithStyle:UITableViewCellFocusStyleDefault reuseIdentifier:mantleCreat];
    }
    return cell;
2、注册Cell,无需手动创建
//全局
NSString *Automatic = @“automatic”;
//注册
[self.tv registerClass:[UITableViewCell class] forCellReuseIdentifier:Automatic];

//去重用池取
UITableViewCell *cell = [tableView dequeueReusableCellWithIdentifier:Automatic];
三、nib文件
方法一:
(1)自定义cell的nib文件
(2)在nib文件中给Cell添加标示

(3)
static NSString *cellID = @"cellID";
    NibCell *cell = [tableView dequeueReusableCellWithIdentifier:cellID];
    if (cell == nil) {
        cell = [[NSBundle mainBundle] loadNibNamed:NSStringFromClass([OutSideTableViewCell class]); owner:nil options:nil];
    }
    return cell;
方法二:注册
//全局cell
NSString *cellID = @"cellID";
//注册
[self.tv registerNib:[UINib nibWithNibName:NSStringFromClass([OutSideTableViewCell class]) bundle:nil] forCellReuseIdentifier:cellID];

OutSideTableViewCell *cell = [tableView dequeueReusableCellWithIdentifier:cellID];
retu cell;
关于去除自带的手势解决方案 (在下面的循环里设置enable = NO是不管用的)
 for (UIGestureRecognizer *gesture in tableView.gestureRecognizers) {
            [tableView removeGestureRecognizer:gesture];
        }


 2202
2202

 被折叠的 条评论
为什么被折叠?
被折叠的 条评论
为什么被折叠?
 到【灌水乐园】发言


