


本文实验环境基于: CentOS Linux release 7.6.1810 (Core)
1. IP隧道技术介绍
Linux系统内核实现的IP隧道技术主要有三种(PPP、PPTP和L2TP等协议或软件不是基于内核模块的):ipip、gre、sit 。这三种隧道技术都需要内核模块 tunnel4.ko 的支持。
-
ipip需要内核模块 ipip.ko ,该方式最为简单!但是你不能通过IP-in-IP隧道转发广播或者IPv6数据包。你只是连接了两个一般情况下无法直接通讯的IPv4网络而已。至于兼容性,这部分代码已经有很长一段历史了,它的兼容性可以上溯到1.3版的内核。据网上查到信息,Linux的IP-in-IP隧道不能与其他操作系统或路由器互相通讯。它很简单,也很有效。 -
GRE需要内核模块 ip_gre.ko ,GRE是最初由CISCO开发出来的隧道协议,能够做一些IP-in-IP隧道做不到的事情。比如,你可以使用GRE隧道传输多播数据包和IPv6数据包。 -
sit他的作用是连接 ipv4 与 ipv6 的网络。个人感觉不如gre使用广泛 。
2. 测试需求
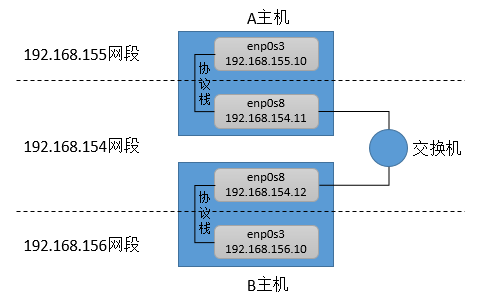
如上图,弄了两个虚拟机。
A主机两个网卡的IP: 192.168.155.10、192.168.154.11
B主机两个网卡的IP: 192.168.156.10、192.168.154.12
最后希望能A主机能ping通B主机的192.168.156.10地址,B主机能ping通A主机的192.168.155.10地址。
3. 实现一:采用 ip_gre
3.1 在A主机执行以下命令
# 会自动添加gre0和gretap0网络设备,重启机器后设备消失
modprobe ip_gre
# 手动添加tun0隧道设备,该隧道采用gre模式,连接的远端地址为192.168.154.12,本地地址为192.168.154.11
ip tunnel add tun0 mode gre remote 192.168.154.12 local 192.168.154.11 ttl 64
# 开启tun0
ip link set tun0 up
# 设置192.168.156.0/24的路由配置
ip route add 192.168.156.0/24 dev tun0
注意: ip route add 192.168.156.0/24 dev tun0命令可以换成ip addr add 192.168.155.10 peer 192.168.156.10 dev tun0命令,这个命名设置tun0设备的ip地址为192.168.155.10(这里和ensp0s3设备的ip一致,也可以设置为不一致),同时设置点对点连接的IP地址为192.168.156.10。同时这一步会自动增加一条路由192.168.156.10 dev tun0 proto kernel scope link src 192.168.155.10,关键是自动生成的这条路由起作用了。
3.2 在B主机执行以下命令
modprobe ip_gre
ip tunnel add tun0 mode gre remote 192.168.154.11 local 192.168.154.12 ttl 64
ip link set tun0 up
ip route add 192.168.155.0/24 dev tun0
iptables -F
同理: ip route add 192.168.155.0/24 dev tun0命令可以换成ip addr add 192.168.156.10 peer 192.168.155.10 dev tun0命令
3.3 测试
在A主机执行测试
ping 192.168.156.10
在B主机执行测试
ping 192.168.155.10
3.4 数据包流向
下面以在A主机执行ping 192.168.156.10分析数据包的流向,并分别在A、B主机抓包分析
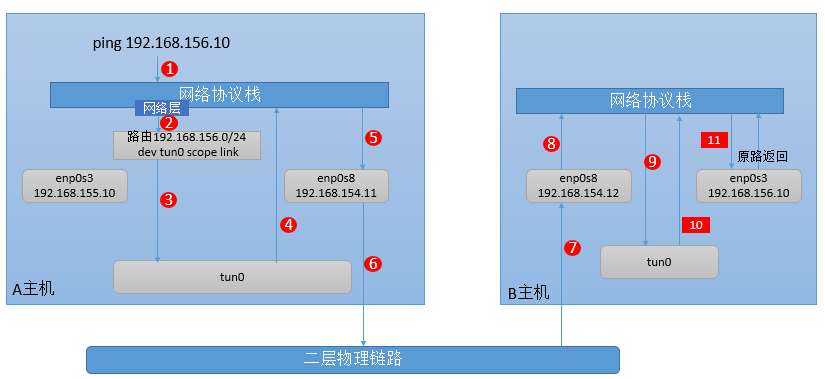
3.4.1 A主机抓包分析
抓取enp0s8的数据
tcpdump -i enp0s8 -ne 'host not 192.168.154.1'
抓取enp0s8的数据结果
17:30:12.465060 08:00:27:01:7f:b9 > 08:00:27:e4:97:96, ethertype IPv4 (0x0800), length 122: 192.168.154.11 > 192.168.154.12: GREv0, proto IPv4 (0x0800), length 88: 192.168.155.10 > 192.168.156.10: ICMP echo request, id 3848, seq 1, length 64
17:30:12.465463 08:00:27:e4:97:96 > 08:00:27:01:7f:b9, ethertype IPv4 (0x0800), length 122: 192.168.154.12 > 192.168.154.11: GREv0, proto IPv4 (0x0800), length 88: 192.168.156.10 > 192.168.155.10: ICMP echo reply, id 3848, seq 1, length 64
17:30:17.472994 08:00:27:01:7f:b9 > 08:00:27:e4:97:96, ethertype ARP (0x0806), length 42: Request who-has 192.168.154.12 tell 192.168.154.11, length 28
17:30:17.473161 08:00:27:e4:97:96 > 08:00:27:01:7f:b9, ethertype ARP (0x0806), length 60: Reply 192.168.154.12 is-at 08:00:27:e4:97:96, length 46
-
在网卡enp0s8的数据包中发现数据的流向是
192.168.154.11 > 192.168.154.12,也就是IP隧道点对点的IP地址,协议为GREv0,长度为88。数据的内容为192.168.155.10 > 192.168.156.10: ICMP echo request, id 3848, seq 1, length 64。通过这个数据可以看出IP隧道是在原始数据的整个包(含IP头)再封装了一层IP头。从而印证了IP 隧道(IP tunneling)是将一个IP报文封装在另一个IP报文的技术。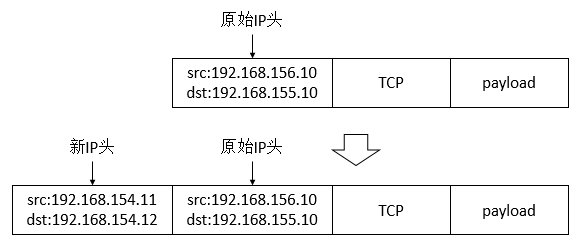
抓取tun0的数据
tcpdump -i tun0 -ne
抓取tun0的数据结果
17:30:12.465050 Out ethertype IPv4 (0x0800), length 100: 192.168.155.10 > 192.168.156.10: ICMP echo request, id 3848, seq 1, length 64
17:30:12.465500  In ethertype IPv4 (0x0800), length 100: 192.168.156.10 > 192.168.155.10: ICMP echo reply, id 3848, seq 1, length 64
-
这里可以看到tun0接收和返回的数据就
没有IP隧道的头了,直接是原始的目的地址和源地址(192.168.156.10和192.168.155.10)
3.4.2 B主机抓包分析
抓取enp0s8的数据
tcpdump -i enp0s8 -ne 'host not 192.168.154.1'
抓取enp0s8的数据结果
17:30:14.410721 08:00:27:01:7f:b9 > 08:00:27:e4:97:96, ethertype IPv4 (0x0800), length 122: 192.168.154.11 > 192.168.154.12: GREv0, proto IPv4 (0x0800), length 88: 192.168.155.10 > 192.168.156.10: ICMP echo request, id 3848, seq 1, length 64
17:30:14.410840 08:00:27:e4:97:96 > 08:00:27:01:7f:b9, ethertype IPv4 (0x0800), length 122: 192.168.154.12 > 192.168.154.11: GREv0, proto IPv4 (0x0800), length 88: 192.168.156.10 > 192.168.155.10: ICMP echo reply, id 3848, seq 1, length 64
17:30:19.418512 08:00:27:01:7f:b9 > 08:00:27:e4:97:96, ethertype ARP (0x0806), length 60: Request who-has 192.168.154.12 tell 192.168.154.11, length 46
17:30:19.418523 08:00:27:e4:97:96 > 08:00:27:01:7f:b9, ethertype ARP (0x0806), length 42: Reply 192.168.154.12 is-at 08:00:27:e4:97:96, length 28
抓取tun0的数据
tcpdump -i tun0 -ne
抓取tun0的数据结果
17:30:14.410795  In ethertype IPv4 (0x0800), length 100: 192.168.155.10 > 192.168.156.10: ICMP echo request, id 3848, seq 1, length 64
17:30:14.410829 Out ethertype IPv4 (0x0800), length 100: 192.168.156.10 > 192.168.155.10: ICMP echo reply, id 3848, seq 1, length 64
-
注意这里
没有抓到目的网卡enp0s3(192.168.156.10)的包。猜测的可能原因是GRE在协议栈中把数据处理了,所以tcpdump抓不到enp0s3的包。还有一个可能的原因是enp0s3逻辑上流出的方向应该是到网线,而不是协议栈,所以tcpdump抓不到enp0s3的包。
4. 实现二:采用 IPIP
4.1 在A主机执行以下命令
modprobe ipip
ip tunnel add tun0 mode ipip remote 192.168.154.12 local 192.168.154.11 ttl 64
ip link set tun0 up
ip route add 192.168.156.0/24 dev tun0
4.2 在B主机执行以下命令
modprobe ipip
ip tunnel add tun0 mode ipip remote 192.168.154.11 local 192.168.154.12 ttl 64
ip link set tun0 up
ip route add 192.168.155.0/24 dev tun0
4.3 测试、数据包流向
和ip_gre模式类似。
5. 实现三:ipip一对多的配置
参考: https://morven.life/notes/networking-3-ipip/
5.1 在A主机执行以下命令
modprobe ipip
# 开启ipip后,默认会创建tunl0,所以这里我们就不再建tun0设备了。应为在一个主机中只能建一次ip为0.0.0.0,brd广播地址为0.0.0.0的隧道设备
ip link set tunl0 up
# 这里设置访问192.168.156.0/24网段的网关是192.168.154.12,设置好之后tunl0隧道就会通过路由表的配置将数据转发给192.168.154.12
ip route add 192.168.156.0/24 via 192.168.154.12 dev tunl0 onlink
5.2 在B主机执行以下命令
modprobe ipip
ip link set tunl0 up
ip route add 192.168.155.0/24 via 192.168.154.11 dev tunl0 onlink
5.3 测试
与前面的测试结果一致
5.4 数据包流向
与前面的数据包流向一致。只是需要把tunl0设备换成tun0设备。
5.4.1 A主机抓包数据
# enp0s8网卡抓包命令
tcpdump -i enp0s8 -ne 'host not 192.168.154.1'

# enp0s8网卡抓包数据
11:00:47.369825 08:00:27:01:7f:b9 > 08:00:27:e4:97:96, ethertype IPv4 (0x0800), length 118: 192.168.154.11 > 192.168.154.12: 192.168.155.10 > 192.168.156.10: ICMP echo request, id 3890, seq 1, length 64 (ipip-proto-4)
11:00:47.370130 08:00:27:e4:97:96 > 08:00:27:01:7f:b9, ethertype IPv4 (0x0800), length 118: 192.168.154.12 > 192.168.154.11: 192.168.156.10 > 192.168.155.10: ICMP echo reply, id 3890, seq 1, length 64 (ipip-proto-4)

# tunl0网卡抓包命令
tcpdump -i tunl0 -n

# tunl0网卡抓包数据
11:00:47.369813 ip: 192.168.155.10 > 192.168.156.10: ICMP echo request, id 3890, seq 1, length 64
11:00:47.370197 ip: 192.168.156.10 > 192.168.155.10: ICMP echo reply, id 3890, seq 1, length 64
5.4.2 B主机抓包数据
# enp0s8网卡抓包命令
tcpdump -i enp0s8 -ne 'host not 192.168.154.1'

# enp0s8网卡抓包数据
11:00:47.460654 08:00:27:01:7f:b9 > 08:00:27:e4:97:96, ethertype IPv4 (0x0800), length 118: 192.168.154.11 > 192.168.154.12: 192.168.155.10 > 192.168.156.10: ICMP echo request, id 3890, seq 1, length 64 (ipip-proto-4)
11:00:47.460727 08:00:27:e4:97:96 > 08:00:27:01:7f:b9, ethertype IPv4 (0x0800), length 118: 192.168.154.12 > 192.168.154.11: 192.168.156.10 > 192.168.155.10: ICMP echo reply, id 3890, seq 1, length 64 (ipip-proto-4)
11:00:52.476786 08:00:27:01:7f:b9 > 08:00:27:e4:97:96, ethertype ARP (0x0806), length 60: Request who-has 192.168.154.12 tell 192.168.154.11, length 46
11:00:52.476801 08:00:27:e4:97:96 > 08:00:27:01:7f:b9, ethertype ARP (0x0806), length 42: Reply 192.168.154.12 is-at 08:00:27:e4:97:96, length 28

# tunl0网卡抓包命令
tcpdump -i tunl0 -ne

# tunl0网卡抓包数据
11:00:47.460701 ip: 192.168.155.10 > 192.168.156.10: ICMP echo request, id 3890, seq 1, length 64
11:00:47.460719 ip: 192.168.156.10 > 192.168.155.10: ICMP echo reply, id 3890, seq 1, length 64
5.5 原理分析
这里一对多IP隧道的关键是
-
- 一对多IP隧道设备的IP是0.0.0.0,广播地址也是0.0.0.0。而我们之前设置是的点对点的IP隧道,比如
remote 192.168.154.12 local 192.168.154.11。通过ip a可以查看两种设置结果的区别:tunl0设置的是link/ipip 0.0.0.0 brd 0.0.0.0,tun0设置的是link/ipip 192.168.154.11 peer 192.168.154.12。
- 一对多IP隧道设备的IP是0.0.0.0,广播地址也是0.0.0.0。而我们之前设置是的点对点的IP隧道,比如
4: tunl0@NONE: <NOARP,UP,LOWER_UP> mtu 1480 qdisc noqueue state UNKNOWN group default qlen 1000
    link/ipip 0.0.0.0 brd 0.0.0.0
6: tun0@NONE: <POINTOPOINT,NOARP> mtu 1480 qdisc noop state DOWN group default qlen 1000
    link/ipip 192.168.154.11 peer 192.168.154.12
-
- 一对多IP隧道需要设置路由时指定网关
192.168.156.0/24 via 192.168.154.12 dev tunl0 onlink,这样数据才能在隧道中利用配置的路由协议把数据发送到网关。而一对一隧道配置的时候,不需要指定路由的网关,如192.168.156.0/24 dev tun0,因为在隧道中指定了remote 192.168.154.12 local 192.168.154.11。
- 一对多IP隧道需要设置路由时指定网关


 863
863


 被折叠的 条评论
为什么被折叠?
被折叠的 条评论
为什么被折叠?
 到【灌水乐园】发言


