


1.前言
xml配置
传统的spring web项目需要在web.xml中配置springmvc。
    <servlet>
        <servlet-name>springmvc</servlet-name>
        <servlet-class>org.springframework.web.servlet.DispatcherServlet</servlet-class>
        <init-param>
            <param-name>contextClass</param-name>
            <param-value>org.springframework.web.context.support.AnnotationConfigWebApplicationContext</param-value>
        </init-param>
    </servlet>

    <servlet-mapping>
        <servlet-name>springmvc</servlet-name>
        <url-pattern>/*</url-pattern>
    </servlet-mapping>
SPI实现
SPI的mvc项目,无需配置繁杂的xml文件,只需添加注解。
//根容器
//不扫描Controller,交给web容器去完成
@ComponentScan(value = "com.marisa",excludeFilters = {
        @ComponentScan.Filter(type= FilterType.ANNOTATION,value = Controller.class)
})
@Configuration
public class ApplicationConfig {
}

//web容器
@Configuration
//对指定的包进行扫描,加载spring容器
@ComponentScan(value = "com.marisa.controller")
//启用Spring MVC
@EnableWebMvc
public class MvcConfig implements WebMvcConfigurer {
......
}
SPI介绍
//定义接口
package com.kzki.spi
public interface HelloSPI {
    void sayHello();
}

//不同厂商的实现
public class SpringHello implements HelloSPI {
    public void sayHello() {
        System.out.println("Spring Hello");
    }
}
public class ApacheHello implements HelloSPI {
    public void sayHello() {
        System.out.println("Apache Hello");
    }
}
在META-INF/services/目录里创建一文件名叫 com.kzki.spi.HelloSPI的文件。文件内容为
com.kzki.spi.impl.SpringHello
com.kzki.spi.impl.ApacheHello
主方法入口
   //加载配置实现spi
    public static void main(String[] args) {
        ServiceLoader<HelloSPI> serviceLoader = ServiceLoader.load(HelloSPI.class);
        // 执行不同厂商的业务实现,具体根据业务需求配置
        for (HelloSPI helloSPI : serviceLoader) {
            helloSPI.sayHello();
        }
    }
2.tomcat简介
启动的顺序:Listener->Filter->Servlet
++Listener生命周期++:程序启动到程序停止运行。
tomcat提供了监听器接口。在tomcat启动前初始化上下文,contextInitialized发生在所有的servlet与filter之前,销毁发生在servlet与filter删除之后。
public interface ServletContextListener extends EventListener {

    /**
     ** Notification that the web application initialization process is starting.
     * All ServletContextListeners are notified of context initialization before
     * any filter or servlet in the web application is initialized.
     * @param sce Information about the ServletContext that was initialized
     */
    public void contextInitialized(ServletContextEvent sce);

    /**
     ** Notification that the servlet context is about to be shut down. All
     * servlets and filters have been destroy()ed before any
     * ServletContextListeners are notified of context destruction.
     * @param sce Information about the ServletContext that was destroyed
     */
    public void contextDestroyed(ServletContextEvent sce);
}
++Filter生命周期++:
- init():程序启动调用init()方法(一旦触发,但是永远只调用一次)
- doFilter():方法每次的访问请求如果符合拦截条件都会调用(程序第一次进入一个新的Servlet,会运行在Servlet调用init()方法后执行),但是不管第几次,都在调用doGet(),doPost()方法之前。
- destroy():程序停止调用Filter的方法(永远只调用一次,服务器移除或者彻底关闭,并且在Servlet destory() 之后)。
++Servlet生命周期++:
init()触发时机:当LoadOnStartup为正整数时,表示容器启动时加载,且数字越小代表优先级越高;若为负数,则容器启动时不加载,url第一次访问,才会调用servlet的init()方法初始化(只执行一次)。每次程序执行都会根据请求调用doGet()或者doPost()方法,程序停止调用触发destory()方法(服务器移除或者彻底关闭)。
3.源码分析
3.1.tomcat启动前的准备。
ServletContainerInitializers接口
tomcat启动前利用SPI技术去META-INF.services目录找到所有实现了ServletContainerInitializers接口的类,然后依次执行实现类的onStartup()方法。
SpringServletContainerInitializer实现了ServletContainerInitializers,因此会被调用onStartup()方法方法。配置文件在spring-web jar包如下,如下图所示:
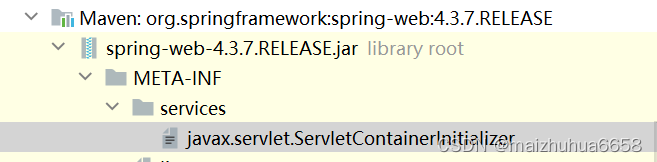
该文件里面内容是:org.springframework.web.SpringServletContainerInitializer
执行过程:
- 执行SpringServletContainerInitializer#onStartup(),会去遍历实现了WebApplicationInitializer接口的类
- 执行AbstractDispatcherServletInitializer#onStartup(),如下图,分为两步:
public void onStartup(ServletContext servletContext) throws ServletException {
     //注册自定义的ContextLoaderListener
		super.onStartup(servletContext);
     //注册web容器
		registerDispatcherServlet(servletContext);
}
- tomcat添加listener,这边重点记住tomcat的listener添加的容器是AnnotationConfigWebApplicationContext类型的根容器ApplicationConfig.class。
		WebApplicationContext rootAppContext = createRootApplicationContext();
		if (rootAppContext != null) {
			ContextLoaderListener listener = new ContextLoaderListener(rootAppContext);
			listener.setContextInitializers(getRootApplicationContextInitializers());
			servletContext.addListener(listener);
		}
- tomcat添加servlet与filter。servlet是DispatcherServlet。由于LoadOnStartup(1),所以在tomcat容器启动的时候就会执行Dispatcherservlet的init()方法。
备注:Frameservletservlet的webApplicationContext变量添加AnnotationConfigWebApplicationContext类型的容器,容器的annotatedClasses变量值传入的是MvcConfig.class
protected void registerDispatcherServlet(ServletContext servletContext) {
		//servlet名称设置为“dispatcher”
               String servletName = getServletName();
                //查找MVCConfig配置
		WebApplicationContext servletAppContext = createServletApplicationContext();
		//创建dispatcherServlet,传入web容器
		FrameworkServlet dispatcherServlet = createDispatcherServlet(servletAppContext);
		//创建tomcat的servlet,之后会走过servlet的生命周期
		ServletRegistration.Dynamic registration = servletContext.addServlet(servletName, dispatcherServlet);
		registration.setLoadOnStartup(1);//优先级
		registration.addMapping(getServletMappings());
		registration.setAsyncSupported(isAsyncSupported());
		//如果需要添加filter,需要重写Filter[] getServletFilters(),或使用FilterRegistration.Dynamic registerServletFilter方法
		Filter[] filters = getServletFilters();
		if (!ObjectUtils.isEmpty(filters)) {
			for (Filter filter : filters) {
				registerServletFilter(servletContext, filter);
			}
		}
		customizeRegistration(registration);
	}
3.2.tomcat启动过程
第一步先执行listener,第二步执行servlet的init()方法
3.2.1.执行tomcat的监听器listener
spring实现了ServletContextListener接口,利用contextInitialized方法去执行监听器,初始化spring的根容器。
public class ContextLoaderListener extends ContextLoader implements ServletContextListener {
	/**
	 * Initialize the root web application context.
	 */
	@Override
	public void contextInitialized(ServletContextEvent event) {
		initWebApplicationContext(event.getServletContext());
	}
}
执行initWebApplicationContext(event.getServletContext())
执行spring核心类AbstractApplicationContext的refresh()方法
执行refresh()的ConfigurableListableBeanFactory beanFactory = obtainFreshBeanFactory();
执行AbstractRefreshableApplicationContext的refreshBeanFactory()方法
执行AnnotationConfigWebApplicationContext的loadBeanDefinitions()方法
执行AnnotatedBeanDefinitionReader reader = getAnnotatedBeanDefinitionReader(beanFactory) 添加钩子方法postprocessor后置处理器(后续invokeBeanFactoryPostProcessors(beanFactory)用于读取处理@Configuration,@Autowired(与注解容器类似的this()过程))。
后面就与注解的容器流程类似了。详情见Spring-IOC容器http://139.224.133.180:8090/archives/spring%E7%B3%BB%E5%88%97-ioc%E5%8E%9F%E7%90%86
注解容器AnnotationConfigApplicationContext是在this()阶段注册6个钩子bean定义;
Web注解容器AnnotationConfigWebApplicationContext是在tomcat调用添加的监听器的方法后在核心方法refresh的obtainFreshBeanFactory()过程中注册的6个钩子bean定义。
他们都调用了注解工具类AnnotationConfigUtils的registerAnnotationConfigProcessors方法。
3.2.2.servlet的init()过程
首先看一下UML类图
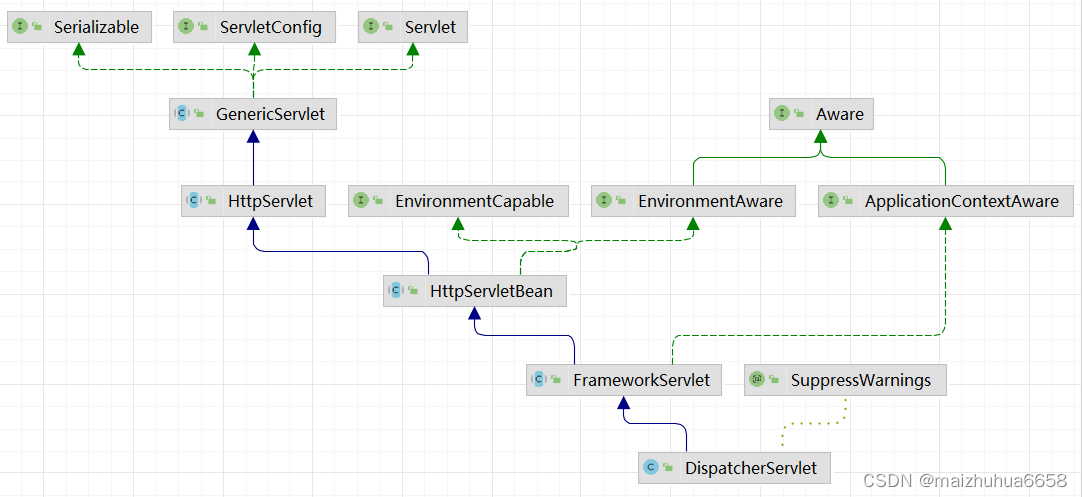
GenericServlet实现Servlet接口方法init(ServletConfig) ,所以入口就在这。
=>HttpServletBean重写了父类GenericServlet的抽象方法init()方法
=>FrameworkServlet重写父类的initServletBean()方法
- initWebApplicationContext()初始化web容器(注意当前容器的配置类是MvcConfig只需要扫描controller包相关的类)。执行onRefresh(wac),注册并实例化controller组件。
spring核心方法最后finishRefresh()会处理发布事件
FrameworkServlet有一个内部监听器实现了spring的监听器
有个疑问,为啥刷新父容器的时候不会发布该事件??
public abstract class FrameworkServlet extends HttpServletBean implements ApplicationContextAware {

	private class ContextRefreshListener implements ApplicationListener<ContextRefreshedEvent> {

		//容器刷新结束后会发布该事件
		@Override
		public void onApplicationEvent(ContextRefreshedEvent event) {
			FrameworkServlet.this.onApplicationEvent(event);
		}
	}
   }
之后就轮到DispatcherServlet上场了。容器刷新结束后调用事件会执行initStrategies方法,此方法会注册一些有用的mvc组件。比如initHandlerMappings(context)会创建好url与controller映射信息以及拦截器存放到handlerMappings成员变量中; initHandlerAdapters(context)会创建所有的handler适配器存放到handlerAdapters成员买的中。 代码如下:
class DispatcherServlet{
		private List<HandlerMapping> handlerMappings;
	   private List<HandlerAdapter> handlerAdapters;

   protected void initStrategies(ApplicationContext context) {
        //文件上传组件
		initMultipartResolver(context);
        //处理语言组件
		initLocaleResolver(context);
		initThemeResolver(context);
        //注册RequestMappingHandlerMapping
		initHandlerMappings(context);
		initHandlerAdapters(context);
		initHandlerExceptionResolvers(context);
		initRequestToViewNameTranslator(context);
        //视图解析组件
		initViewResolvers(context);
		initFlashMapManager(context);
	}
我们分析一下initHandlerMappings。该方法里调用BeanFactoryUtils.beansOfTypeIncludingAncestors(context, HandlerMapping.class)会去找到容器中的所有实例化的HandlerMapping的实现类。最终将5个HandlerMapping实现类赋值给变量this.handlerMappings。
这时候你可能会问,我们啥时候注册的?我们回顾一些文章开头的非xml配置MvcConfig有一个注解
@EnableWebMvc,该注解导入了DelegatingWebMvcConfiguration.class类,此类的父类WebMvcConfigurationSupport这个配置类定义了好多我们此刻需要的@Bean。
比如添加了其中一个映射处理器RequestmappingHandlerMapping的bean定义
@Bean
	public RequestMappingHandlerMapping requestMappingHandlerMapping() {
		RequestMappingHandlerMapping handlerMapping = createRequestMappingHandlerMapping();
        //该handlerMapping执行优先级最高
		handlerMapping.setOrder(0);
        //添加了2个默认拦截器+自定义的拦截器 。
		handlerMapping.setInterceptors(getInterceptors());
		handlerMapping.setContentNegotiationManager(mvcContentNegotiationManager());
		handlerMapping.setCorsConfigurations(getCorsConfigurations());

		PathMatchConfigurer configurer = getPathMatchConfigurer();
		if (configurer.isUseSuffixPatternMatch() != null) {
			handlerMapping.setUseSuffixPatternMatch(configurer.isUseSuffixPatternMatch());
		}
		if (configurer.isUseRegisteredSuffixPatternMatch() != null) {
			handlerMapping.setUseRegisteredSuffixPatternMatch(configurer.isUseRegisteredSuffixPatternMatch());
		}
		if (configurer.isUseTrailingSlashMatch() != null) {
			handlerMapping.setUseTrailingSlashMatch(configurer.isUseTrailingSlashMatch());
		}
		UrlPathHelper pathHelper = configurer.getUrlPathHelper();
		if (pathHelper != null) {
			handlerMapping.setUrlPathHelper(pathHelper);
		}
		PathMatcher pathMatcher = configurer.getPathMatcher();
		if (pathMatcher != null) {
			handlerMapping.setPathMatcher(pathMatcher);
		}

		return handlerMapping;
	}

//会执行WebMvcConfigurer类的addInterceptors(registry)方法
    protected final Object[] getInterceptors() {
		if (this.interceptors == null) {
			InterceptorRegistry registry = new InterceptorRegistry();
            //添加自定义的拦截器到register中
			addInterceptors(registry);
            //添加默认的拦截器
			registry.addInterceptor(new ConversionServiceExposingInterceptor(mvcConversionService()));
			registry.addInterceptor(new ResourceUrlProviderExposingInterceptor(mvcResourceUrlProvider()));
            //将自定义的拦截器封装成MappedInterceptor类型
			this.interceptors = registry.getInterceptors();
		}
		return this.interceptors.toArray();
	}
RequestMappingHandlerMapping是其中一个映射处理器。它重写了afterPropertiesSet()钩子方法。会在对象实例化初始化赋值后执行。
class RequestMappingHandlerMapping{
	public void afterPropertiesSet() {
		this.config = new RequestMappingInfo.BuilderConfiguration();
		this.config.setUrlPathHelper(getUrlPathHelper());
		this.config.setPathMatcher(getPathMatcher());
		this.config.setSuffixPatternMatch(this.useSuffixPatternMatch);
		this.config.setTrailingSlashMatch(this.useTrailingSlashMatch);
		this.config.setRegisteredSuffixPatternMatch(this.useRegisteredSuffixPatternMatch);
		this.config.setContentNegotiationManager(getContentNegotiationManager());
       //调用父类的后置方法,添加@Requestmapping注解的映射信息
		super.afterPropertiesSet();
	}
}
调用父类的关键方法如下,遍历容器中的所有bean,通过 isHandler(beanType) 会去寻找带有@Controller 与@RequestMapping注解的bean。detectHandlerMethods会去寻找这些类的handler methods并缓存起来。
protected void initHandlerMethods() {
//寻找容器中所有的bean
	String[] beanNames = (this.detectHandlerMethodsInAncestorContexts ?BeanFactoryUtils.beanNamesForTypeIncludingAncestors(getApplicationContext(), Object.class) :getApplicationContext().getBeanNamesForType(Object.class));

	for (String beanName : beanNames) {
		if (!beanName.startsWith(SCOPED_TARGET_NAME_PREFIX)) {
			Class<?> beanType = null;
			beanType = getApplicationContext().getType(beanName);

			if (beanType != null && isHandler(beanType)) {
                //将controller方法映射信息保存到mappingRegistry中
				detectHandlerMethods(beanName);
			}
		}
	}
	handlerMethodsInitialized(getHandlerMethods());
}
最终添加的handlerMapping如下图
![(img-cyKKaEff-1683613160742)(/upload/2023/04/image-1682674450990.png)]](https://img-blog.csdnimg.cn/5b003e7111104a31840a7b68c34c9663.png)
WebMvcConfigurationSupport配置类中handler适配器注册的@Bean有RequestMappingHandlerAdapter,该适配器用来反射执行handler。详细的介绍见第4节。
最终添加的3个handlerAdapters如下图
![[外链图片转存失败,源站可能有防盗链机制,建议将图片保存下来直接上传(img-v6bO9ClX-1683613160742)(/upload/2023/04/image-1682676672856.png)]](https://img-blog.csdnimg.cn/d2ca1f955e474356887dc3c9d2d3f2f2.png)
其余mvc组件同理,就略过了。
3.3.程序运行中 service()
发送请求调用方法链如下:
tomcat中HttpServlet#service(ServletRequest req, ServletResponse res)
=>spring mvc中FramworkServlet重写service(HttpServletRequest request, HttpServletResponse response);该方法调用processRequest(request, response),调用doService(request, response);
=>DispatcherServlet重写doService(HttpServletRequest request, HttpServletResponse response);调用doDispatch(request, response);
所以最重要的就是doDispatcher方法,下面一节详细分析。
4.spring mvc doDispatcher方法详解
HandlerMethod类
该类是Controller的Bean和请求方法Method的包装,调用方可以通过bean反射调用Method执行具体方法。以后该类称作handler
public class HandlerMethod {

	/** Logger that is available to subclasses */
	protected final Log logger = LogFactory.getLog(getClass());

	private final Object bean;

	private final BeanFactory beanFactory;

	private final Class<?> beanType;

	private final Method method;

	private final Method bridgedMethod;

	private final MethodParameter[] parameters;

	private final HandlerMethod resolvedFromHandlerMethod;
}
拦截器接口 HandlerInterceptor
spring mvc提供了拦截器接口,用于在执行Controller类的方法handler前后进行个性化处理,接口包含了以下3个关键钩子方法。
public interface HandlerInterceptor {

//在请求处理之前进行调用(Controller方法调用之前
	boolean preHandle(HttpServletRequest request, HttpServletResponse response, Object handler) throws Exception;

  //请求处理之后进行调用,但是在视图被渲染之前(Controller方法调用之后)
	void postHandle(HttpServletRequest request, HttpServletResponse response, Object handler, ModelAndView modelAndView)  throws Exception;

 //在整个请求结束之后被调用,也就是在DispatcherServlet 渲染了对应的视图之后执行(主要是用于进行资源清理工作)
	void afterCompletion(HttpServletRequest request, HttpServletResponse response, Object handler, Exception ex) throws Exception;
}
handler的拦截器链类 HandlerExecutionChain
通常系统中我们会有多个拦截器,我们希望在目标handler(目标方法,或者目标对象)前后依次执行拦截器,把它们串在一个数组中就称作拦截器链。这个概念我们已经不陌生了,在Spring-AOP的时候说过(比如方法执行前的@Before,@Around等)。
public class HandlerExecutionChain {
	//controller对应的方法,类型一般是HandlerMethod
    //HandlerMethod中包含了当前Controller的bean与方法与参数等信息
	private final Object handler;

    //我们需要执行的拦截器的数组
	private HandlerInterceptor[] interceptors;

	//我们需要执行的拦截器的集合,到时候转成数组
	private List<HandlerInterceptor> interceptorList;

    //拦截器执行到哪里的索引
	private int interceptorIndex = -1;

    //依次执行链中拦截器的前置方法
 	boolean applyPreHandle(HttpServletRequest request, HttpServletResponse response) throws Exception {
        //此处会将interceptorList集合转成interceptors数组,然后遍历数组循环执行各个拦截器中的applyPreHandle方法。
		HandlerInterceptor[] interceptors = getInterceptors();
		if (!ObjectUtils.isEmpty(interceptors)) {
			for (int i = 0; i < interceptors.length; i++) {
				HandlerInterceptor interceptor = interceptors[i];
				if (!interceptor.preHandle(request, response, this.handler)) {
					triggerAfterCompletion(request, response, null);
					return false;
				}
				this.interceptorIndex = i;
			}
		}
		return true;
	}

    //后置方法,生成视图前
    	void applyPostHandle(HttpServletRequest request, HttpServletResponse response, ModelAndView mv) throws Exception {
		HandlerInterceptor[] interceptors = getInterceptors();
		if (!ObjectUtils.isEmpty(interceptors)) {
			for (int i = interceptors.length - 1; i >= 0; i--) {
				HandlerInterceptor interceptor = interceptors[i];
				interceptor.postHandle(request, response, this.handler, mv);
			}
		}
	}

    // 执行最终完成方法
    	void triggerAfterCompletion(HttpServletRequest request, HttpServletResponse response, Exception ex)
			throws Exception {

		HandlerInterceptor[] interceptors = getInterceptors();
		if (!ObjectUtils.isEmpty(interceptors)) {
			for (int i = this.interceptorIndex; i >= 0; i--) {
				HandlerInterceptor interceptor = interceptors[i];
				try {
					interceptor.afterCompletion(request, response, this.handler, ex);
				}
				catch (Throwable ex2) {
					logger.error("HandlerInterceptor.afterCompletion threw exception", ex2);
				}
			}
		}
	}
前置方法按拦截器正序执行,后置方法倒序执行,最终方法也是倒序执行。
如果前置方法不通过,会执行该拦截器的最终方法。
映射注册器 MappingRegistry
用来缓存所有标注@RequestMapping方法的信息。可以通过字符串的request请求获取到对应的执行handler(上文中的拦截器链中的目标方法)。
class MappingRegistry {
		private final Map<T, MappingRegistration<T>> registry = new HashMap<T, MappingRegistration<T>>();
		//key: url信息封装类  value:方法封装类HandlerMethod(bean,反射要用的Method,参数信息)
		private final Map<T, HandlerMethod> mappingLookup = new LinkedHashMap<T, HandlerMethod>();
		//key: url字符串 value:url信息封装类(上一个变量key)
		private final MultiValueMap<String, T> urlLookup = new LinkedMultiValueMap<String, T>();

		private final Map<String, List<HandlerMethod>> nameLookup =
				new ConcurrentHashMap<String, List<HandlerMethod>>();

		private final Map<HandlerMethod, CorsConfiguration> corsLookup =
				new ConcurrentHashMap<HandlerMethod, CorsConfiguration>();

		private final ReentrantReadWriteLock readWriteLock = new ReentrantReadWriteLock();
}
映射处理器接口 HandlerMapping
该接口提供了将请求request映射成对应的处理器handler的方法,它返回的是一个包含handler的拦截器链
public interface HandlerMapping {
	HandlerExecutionChain getHandler(HttpServletRequest request) throws Exception;
}
看一下它的类图
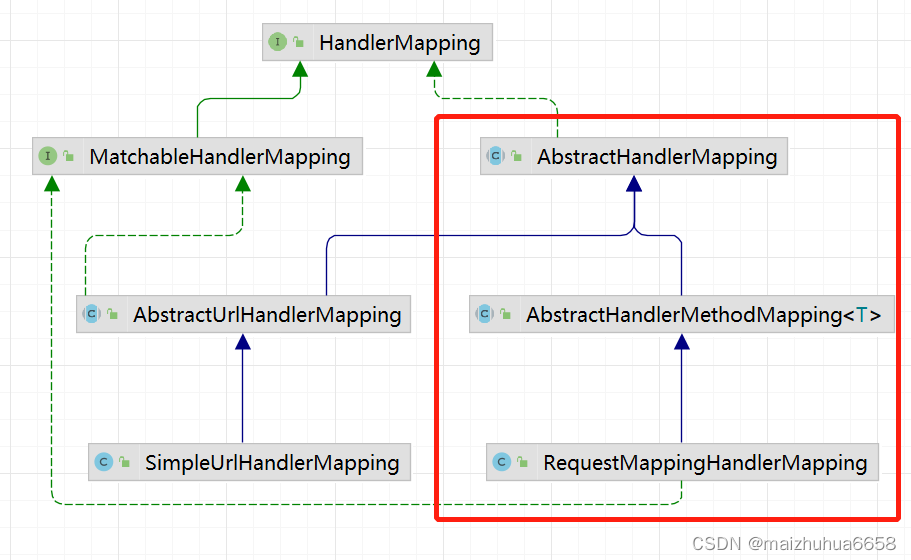
左边的族谱是处理xml中的匹配,右侧的族谱是用来处理方法注解@Requestmapping的。我们重点看右侧族谱,它有一个实现类 AbstractHandlerMapping,看一下是怎么处理请求映射的。
public class AbstractHandlerMapping{
//3.2.2节servlet init 过程添加的拦截器对象
private final List<HandlerInterceptor> adaptedInterceptors = new ArrayList<HandlerInterceptor>();

@Override
	public final HandlerExecutionChain getHandler(HttpServletRequest request) throws Exception {
        //获取请求对应的handler
		Object handler = getHandlerInternal(request);
        .....省略
        //根据handler与request构造拦截器链,将handler与当前类的成员变量adaptedInterceptors拦截器集合封装成链。如果拦截器有PathMatcher,需匹配正则表达式才会添加。
		HandlerExecutionChain executionChain = getHandlerExecutionChain(handler, request);
        //下面是处理跨域的请求构造拦截器链
		if (CorsUtils.isCorsRequest(request)) {
			CorsConfiguration globalConfig = this.corsConfigSource.getCorsConfiguration(request);
			CorsConfiguration handlerConfig = getCorsConfiguration(handler, request);
			CorsConfiguration config = (globalConfig != null ? globalConfig.combine(handlerConfig) : handlerConfig);
			executionChain = getCorsHandlerExecutionChain(request, executionChain, config);
		}
		return executionChain;
	}
 }
AbstractHandlerMapping的子类AbstractHandlerMethodMapping重写了getHandlerInternal方法
class AbstractHandlerMethodMapping{
      //映射注册器变量在dispatcherServlet init阶段缓存url与方法对应的信息
      MappingRegistry mappingRegistry = new MappingRegistry();

      protected HandlerMethod getHandlerInternal(HttpServletRequest request) throws Exception {
		//利用HttpServletRequest自身的getContextPath()与getURI()截取请求路径的字符串
		String lookupPath = getUrlPathHelper().getLookupPathForRequest(request);

		this.mappingRegistry.acquireReadLock();
		try {
            //根据mappingRegistry的urlLookup 查到url字符串对应的url封装类,然后通过mappingLookup根据url封装类查到最终的HandlerMethod方法封装类。
			HandlerMethod handlerMethod = lookupHandlerMethod(lookupPath, request);
			}
			return (handlerMethod != null ? handlerMethod.createWithResolvedBean() : null);
		}
		finally {
			this.mappingRegistry.releaseReadLock();
		}
	}
}
总结一下上面的内容。
1.DispatcherServlet 在初始化的过程中①将系统中所有的拦截器等信息封装成集合放到 HandlerMapping对象中。②将系统中@RequestMapping的方法(缓存到mappingRegister)放到自身的HandlerMapping对象中。
2.系统运行中发送一个请求request时,会通过HandlerMapping的mappingRegister取到对应的handler,然后将拦截器(正则表达式判断匹配才加)加到handler的拦截器链中。
HandlerAdapter接口
通过HandlerMapping从request中获取到了具体的handler,但是我们的handler有多种形式,比如上文中描述的Controller方法的handler,也有可能是静态资源url的handler,因此需要适配器模式来匹配不同场景的handler。
public interface HandlerAdapter {
	//判断当前处理器是否支持该handler
	boolean supports(Object handler);
    //当前处理器执行该handler的方法
    ModelAndView handle(HttpServletRequest request, HttpServletResponse response, Object handler) throws Exception;

    long getLastModified(HttpServletRequest request, Object handler);
    }
![[外链图片转存失败,源站可能有防盗链机制,建议将图片保存下来直接上传(img-Sc9NXxKM-1683613160743)(/upload/2023/04/image-1682587508254.png)]](https://img-blog.csdnimg.cn/e030a6377f8e42b7ab8ca85edfd79c0b.png)
- RequestMappingHandlerAdapter 最重要 ,处理@Controller注解
- HttpRequestHandlerAdapter 适配静态资源;
- SimpleControllerHandlerAdapter 适配自定义实现了Controller接口或Controller接口子类
比如controller方法handler的support方法如下
class RequestMappingHandlerAdapter{
	public final boolean supports(Object handler) {
        //我们上文提到的handler
		return (handler instanceof HandlerMethod && supportsInternal((HandlerMethod) handler));
	}
}
现在我们看一下doDispatcher方法的详细代码,如下:
try{
    try{
         // 检查 当前是否文件上传的请求,是的话就将request就转换为MultipartHttpServletRequest 类型的request
         processedRequest = checkMultipart(request);
         multipartRequestParsed = (processedRequest != request);

    // 根据HandlerMapping从request获取到当前拦截器链
	HandlerExecutionChain mappedHandler = getHandler(processedRequest);

    // 从注册的所有handler适配器中来找到support()当前handler的适配器
	HandlerAdapter ha = getHandlerAdapter(mappedHandler.getHandler());

	// 如果当前handler 支持 last-modified 头处理则进行缓存处理
	String method = request.getMethod();
	boolean isGet = "GET".equals(method);
	if (isGet || "HEAD".equals(method)) {
		long lastModified = ha.getLastModified(request, mappedHandler.getHandler());
	    //判断到目前为止请求中的时间是否有过修改,没有则直接return。实现缓存的功能
		if (new ServletWebRequest(request, response).checkNotModified(lastModified) && isGet) {
			return;
		}
	}
	//依次执行handler拦截器链中的所有的拦截器前置方法,如果不通过会执行拦截器的最终方法
	if (!mappedHandler.applyPreHandle(processedRequest, response)) {
		return;
	}

	//利用适配器来执行拦截器链中handler的方法,封装成ModelAndView对象返回(controller方法利用反射)
	mv = ha.handle(processedRequest, response, mappedHandler.getHandler());

	if (asyncManager.isConcurrentHandlingStarted()) {
		return;
	}

	applyDefaultViewName(processedRequest, mv);
    //执行所有拦截器的后置方法
	mappedHandler.applyPostHandle(processedRequest, response, mv);
    }catch(Exception ...){
       ......
    }
    //处理请求异常并解析上面代码获取的ModelAndView,根据解析出来的视图跳转页面
    //成功执行代码,该方法最终也会执行拦截器的最终方法
    processDispatchResult(processedRequest, response, mappedHandler, mv, dispatchException);
}catch(...){
//异常的情况执行拦截器的最终方法
//......
}finally{

mappedHandler.applyAfterConcurrentHandlingStarted(processedRequest, response);
}
5.总结
- tomcat启动前利用SPI技术去META-INF.services目录找到所有实现了ServletContainerInitializers接口的类,然后依次执行实现类的onStartup()方法。
- SpringServletContainerInitializer实现了ServletContainerInitializers,因此会调用onStartup()方法方法。注册tomcat的监听器ContextLoaderListener,以及注册tomcat的dispatcherServlet 。
- tomcat启动时执行监听器,创建并刷新bean容器。@EnableWebMvc会创建一些mvc组件的bean,其中包括我们自定义的拦截器。
- spring刷新后会执行监听器完成会触发事件dispatcherservlet的initStrategies方法,此方法会将上一步的mvc相关对象组装成组件封装到对象中。
- 容器启动后,发送request请求,会交给doDispatcher()方法处理。该方法,根据请求获取到对应的handler的拦截器链。先依次倒序执行拦截器的前置方法,然后通过适配器去执行该拦截器链得到modelandview对象,然后依次执行所有拦截器的后置方法,最后利用视图解析器将modelandview对象解析成视图,返回给response。最后不管成功失败,都依次倒序执行拦截器的最后方法。


 1487
1487


 被折叠的 条评论
为什么被折叠?
被折叠的 条评论
为什么被折叠?
 到【灌水乐园】发言


