


目标:简化及规范SectionList的使用。
实现:基于SectionList的封装。
适用的情况
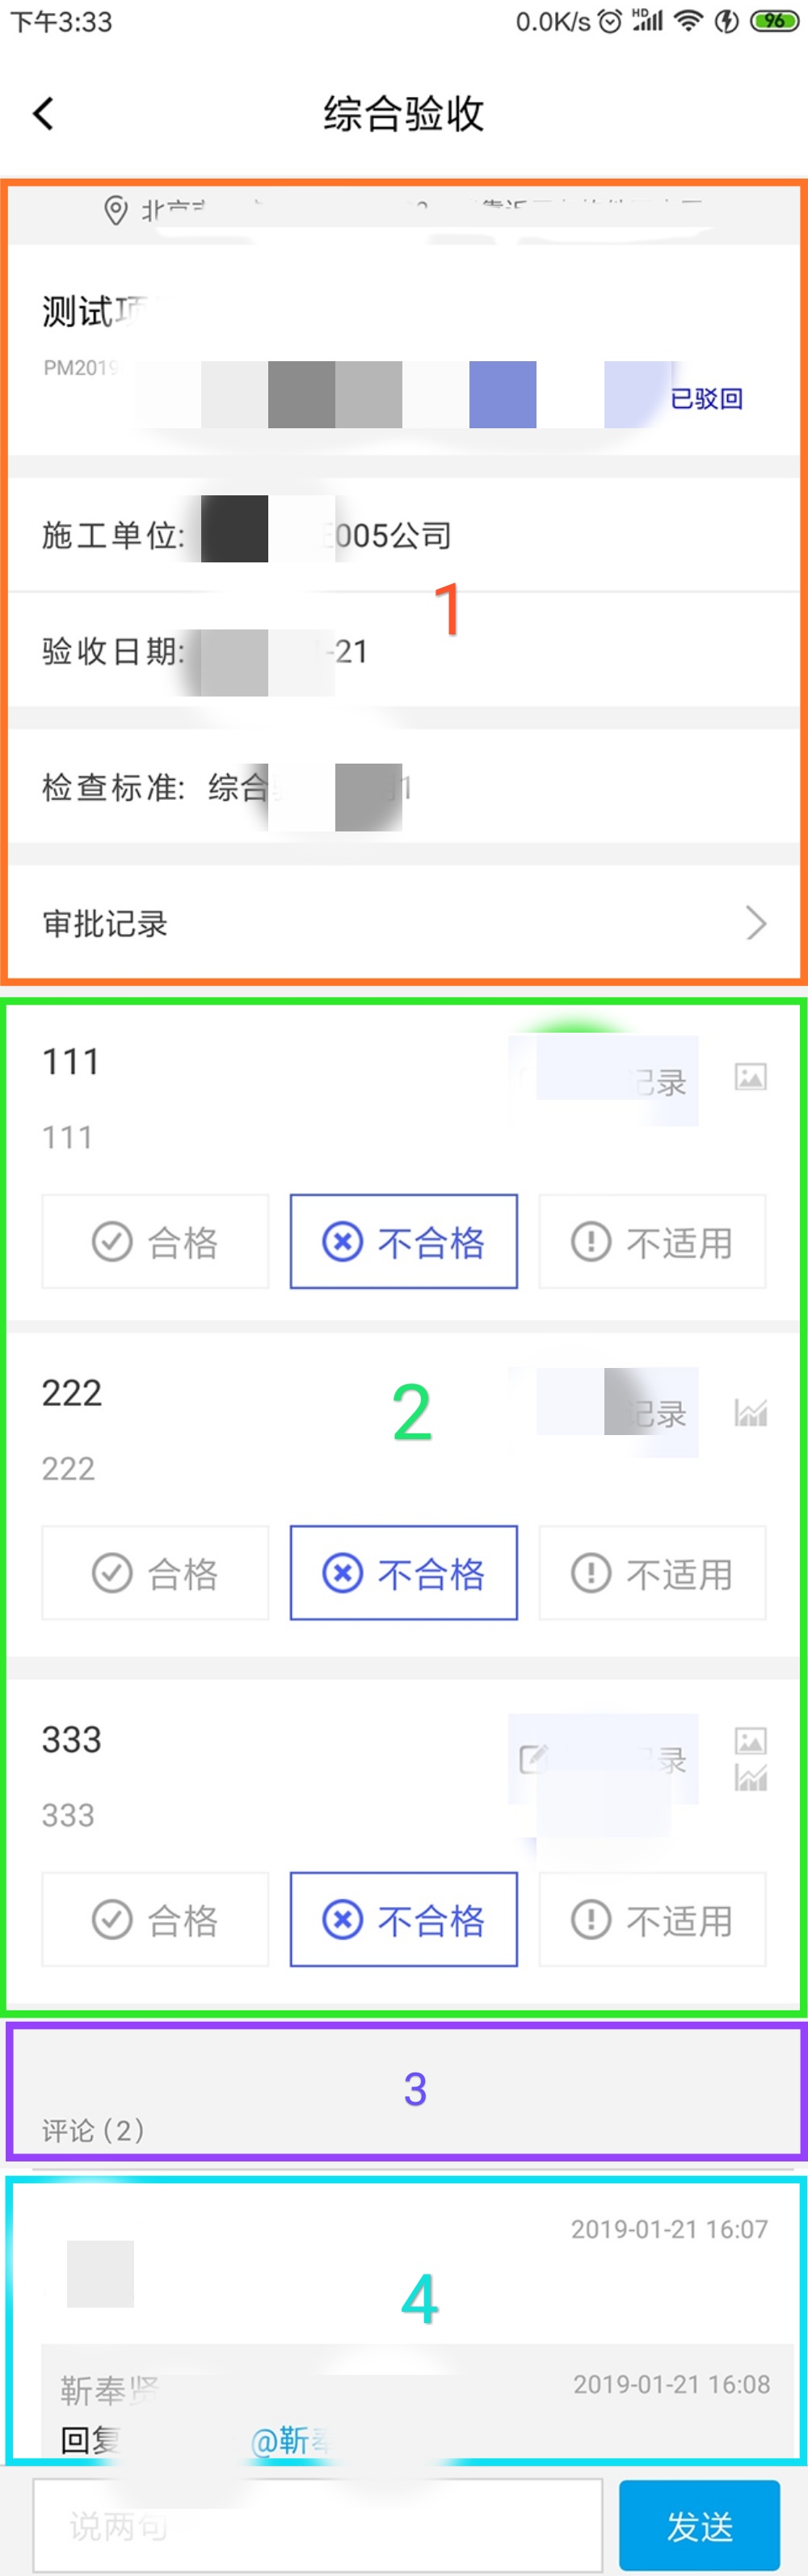
普通的线布局+列表/分类列表+普通线程布局+列表/分类列表。如下图:
封装后的BaseSectionList.js类,如下:
/**
 * @desc
 * @author MaRui
 */
import {
    View,
    StyleSheet,
    SectionList
} from 'react-native';
import React, {Component} from "react";
// [
//     {data: [], layoutType: 0, title: {}}
// ]
export default class BaseSectionList extends Component {
    constructor(props) {
        super(props);
        this.state = {
            dataList: []
        };
    }

    componentDidMount() {

        if (!this.props.data) {
            return
        }

        let newDataList = [];
        if (this.props.data && React.Children.toArray(this.props.children).length !== this.props.length) {
            this.setState({dataList: []});
            return;
        }
        for (let i = 0; i < this.props.data.length; i++) {
            if (this.props.data[i].length === 0) {
                newDataList.splice(newDataList.length, 0, {title: {}, data: [], layoutType: i});
                continue
            }
            for (let j = 0; j < this.props.data[i].length; j++) {
                let datumElement = this.props.data[i][j];
                if (datumElement) {
                    let title = this.props.data[j].title;
                    let data = this.props.data[j].content;
                    newDataList.splice(newDataList.length, 0, {title: title, data: data, layoutType: i});
                } else {
                    newDataList.splice(newDataList.length, 0, {title: {}, data: [], layoutType: i});
                }
            }
        }
        this.setState({dataList: newDataList});
    }

    componentWillReceiveProps(nextProps) {

        if (!this.props.data) {
            return
        }

        let isRefresh = false;
        if (this.props.data !== nextProps.data && this.props.data.length !== nextProps.data.length) {
            isRefresh = true;
        } else {
            for (let i = 0; i < this.props.data.length; i++) {
                if (this.props.data[i] !== nextProps.data[i]) {
                    isRefresh = true;
                    break;
                }
            }
        }

        if (isRefresh) {
            let newDataList = [];
            for (let i = 0; i < nextProps.data.length; i++) {
                if (nextProps.data[i].length === 1 && nextProps.data[i][0].baseSectionListType === 'baseSectionListContent') {
                    newDataList.splice(newDataList.length, 0, {title: {}, data: [], layoutType: i});
                    continue
                }
                for (let j = 0; j < nextProps.data[i].length; j++) {
                    let datumElement = nextProps.data[i][j];
                    if (datumElement) {
                        let title = datumElement.title;
                        let data = datumElement.content;
                        newDataList.splice(newDataList.length, 0, {title: title, data: data, layoutType: i});
                    } else {
                        newDataList.splice(newDataList.length, 0, {title: {}, data: [], layoutType: i});
                    }
                }
            }

            this.setState({dataList: newDataList}, () => {
                // alert('值:'+JSON.stringify(this.state.dataList)+'\n个数:'+this.state.dataList.length);
            });
        }
    }

    //分组创建的cell
    cellView = (data) => {
        if (data && this.props.children) {
            if (React.Children.toArray(this.props.children)[data.section.layoutType].props.renderCell) {
                return React.Children.toArray(this.props.children)[data.section.layoutType].props.renderCell(data)
            }

            // 建议数据少时使用
            if (React.Children.toArray(this.props.children)[data.section.layoutType].props.renderCellIsShow && !this.props.itemIsShow) {
                return React.Children.toArray(this.props.children)[data.section.layoutType].props.renderCellIsShow(data)
            }
        }
        return <View/>
    };

    //列表分组的header
    headerView = (data) => {
        if (data && this.props.children) {
            if (React.Children.toArray(this.props.children)[data.section.layoutType].props.renderHeader) {
                return React.Children.toArray(this.props.children)[data.section.layoutType].props.renderHeader(data)
            }

            // 建议数据少时使用
            if (React.Children.toArray(this.props.children)[data.section.layoutType].props.renderHeaderIsShow && !this.props.itemIsShow) {
                return React.Children.toArray(this.props.children)[data.section.layoutType].props.renderHeaderIsShow(data)
            }
        }
        return <View/>
    };

    extraUniqueKey = (item, index) => {
        return index + item;
    };

    render() {

        return (
            <View style={[{flex: 1}]}>
                <View style={styles.container}>
                    <SectionList
                        {...this.props}
                        sections={this.state.dataList}
                        renderItem={this.cellView}
                        keyExtractor={this.extraUniqueKey}
                        renderSectionHeader={this.headerView}
                        scrollEnabled={true}
                        stickySectionHeadersEnabled={false}
                    />
                </View>
            </View>
        );
    }
}

const styles = StyleSheet.create({
    container: {
        flex: 1
    },

});
主要实现了,不用给每一块的数据做标记就可以实现分类列表的显示、多类型布局的简便实现。之后补充封装代码的解析
BaseSectionList的使用,实现上图如下:
布局:
<BaseSectionList
         // 此处可以添加设置SectionList的任何属性,比如头部布局、底部布局、分割线等等
         style={{flex: 1}}
         data={this.props.data}
         ListHeaderComponent={this.headerRender}>

         <View
        	renderCell={this.renderListCell}/>

        <View
        	renderHeader={this.renderTitle}/>

         <View
            renderHeader={this.renderComment}
            renderCell={this.renderReply}/>

</BaseSectionList>
其中布局1为普通布局可以设置为ListHeaderComponent。此后,每一块布局都添加一个子view,234三块布局就添加三个标签“<View/>”。具体设置:比如布局2是列表则添加一个子view只设置renderCell,renderCell是list的item的布局。布局3是一个线性布局,可设置renderHeader即可。布局4是一个二级列表即分类列表,需要同时设置renderHeader和renderCell分别代表分类标题布局和分类列表item的布局。
数据结构:
let data = [];
data.splice(0, 0, [{title: {}, content: []}]);
data.splice(1, 0, [{baseSectionListType: 'baseSectionListContent'}]);
data.splice(2, 0, [{title: {'课程'}, content: ['语文', '数学', '英语']},
                   {title: {'班级'}, content: ['一班', '二班', '三班']},
                   {title: {'老师'}, content: ['张老师', '王老师', '李老师']}]);
传输的数据是一个数组。上边添加的三个布局,则数组的长度必须是3。每个元素也必须是数组,该例子的格式即是 [ [ ], [ ], [ ] ]。下面说每个元素的填充。分以下三种情况:
- 模块是列表,比如:布局2
元素是一个数组,长度是1。[{title: {}, content: []}]。title设置为空对象,content传数组即该块列表对应的数组。 - 模块是线性布局,比如:模块3
元素是一个数组,长度是1, 元素是{baseSectionListType: ‘baseSectionListContent’}。这个是固定不变的,实际只起到占位符的作用。该模块的数据自己管理。 - 模块是分类列表,比如:模块4
元素是一个数组,数组的长度是分类列表的类的个数,比如有3类[{title: {}, content: []}, {title: {}, content: []}, {title: {}, content: []}]。title是标题对应的数据,content传数组即该块列表对应的数组。


 1481
1481

 被折叠的 条评论
为什么被折叠?
被折叠的 条评论
为什么被折叠?
 到【灌水乐园】发言


