快速入门PyTorch
文章目录
什么是PyTorch
- 一个基于Python的机器学习框架
- 两个主要特点:
- 在GPUs上进行N维张量计算(如NumPy)
- 用于训练深度神经网络的自动微分
前置知识—tensors的基本使用
tensor
是pytorch的基本数据结构,他是一个高维矩阵,类似数组(arrays
)。
查看Tensors的维度
x.shape()
⚠️ PyTorch的dim(维度)等价于 NumPy中的axis(轴)
创建Tensors
直接从数据中获取(比如:list 或者 numpy.ndarray)
x = torch.tensor([[1, -1], [-1, 1]])
x = torch.from_numpy(np.array([[1, -1], [-1, 1]]))
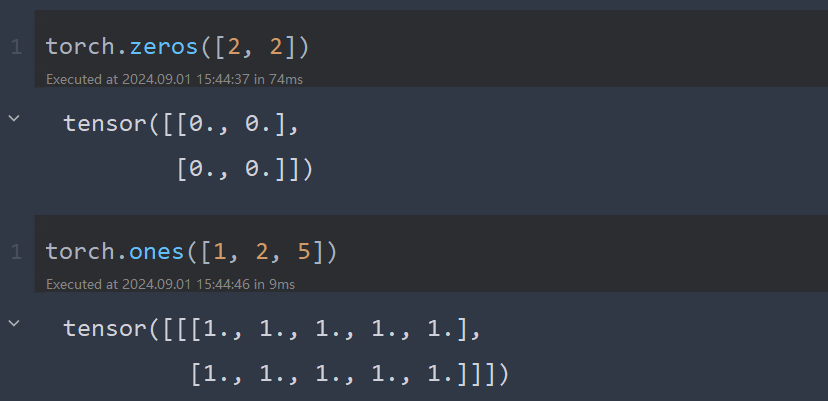
创建全是0或全是1的常数张量
x = torch.zeros([2, 2]) # [2, 2]指shape 第0维2列,第1维2列
x = torch.ones([1, 2, 5]) # [1, 2, 5]指shape 第0维1列,第1维2列,第2维5列
常用操作
支持常用的算术函数:
- 加法:
z = x + y
- 减法:
z = x - y
- 幂运算:
y = x.pow(2)
- 求和:
y = x.sum()
- 平均:
y = x.mean()
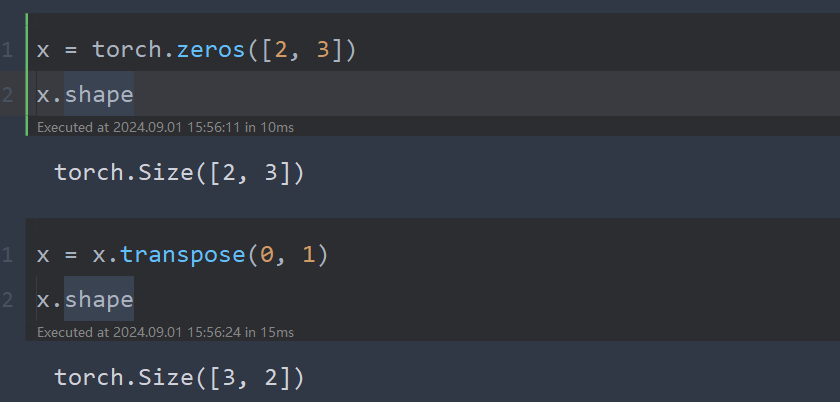
Transpose:将指定的两个维度转置:
x = torch.zeros([2, 3])
x.shape
x = x.transpose(0, 1)
x.shape
Squeeze:删除length = 1的指定维度
x = torch.zeros([1, 2, 3])
x.shape
x = x.squeeze(0) # dim = 0
x.shape
x = torch.zeros([2, 1, 3])
x.shape
x = x.squeeze(1) # dim = 1
x.shape
Unsqueeze:扩展一个维度
x = torch.zeros([2, 3])
x.shape
x = x.unsqueeze(1) # dim = 1
x.shape
x = torch.zeros([3, 2])
x.shape
x = x.unsqueeze(2) # dim = 2
x.shape
Cat:连接多个张量
x = torch.zeros([2, 1, 3])
y = torch.zeros([2, 3, 3])
z = torch.zeros([2, 2, 3])
w = torch.cat([x, y, z], dim=1) # 维度1上相加
w.shape
x = torch.zeros([1, 2, 3])
y = torch.zeros([2, 2, 3])
z = torch.zeros([3, 2, 3])
w = torch.cat([x, y, z], dim=0) # 维度0上相加
w.shape
数据类型
对模型和数据使用不同的数据类型会导致错误。
Data type | dtype | tensor |
---|---|---|
32-bit floating point | torch.float | torch.FloatTensor |
64-bit integer (signed) | torch.long | torch.LongTensor |
PyTorch和NumPy对比
类似的属性
PyTorch | NumPy |
---|---|
x.shape | x.shape |
x.dtype | x.dtype |
许多函数也有相同的名称
PyTorch | NumPy |
---|---|
x.reshape / x.view | x.reshape |
x.squeeze() | x.squeeze() |
x.unsqueeze(1) | np.expand_dims(x, 1) |
计算设备
张量和模块将默认使用CPU计算。
使用.to()
将张量移动到适当的设备。
CPU:
x = x.to('cpu')
GPU:
x = x.to('cuda')
检查您的计算机是否有NVIDIA GPU
torch.cuda.is_available()
多个GPUs: 指定 ‘cuda:0’, 'cuda:1 ', 'cuda:2 ', …
x = x.to('cuda:0')
为什么使用 GPUs?
- 以更多核心进行算术计算的并行计算
- What is a GPU and do you need one in Deep Learning? | by Jason Dsouza | Towards Data Science
梯度计算
x = torch.tensor([[1., 0.], [-1., 1.]], requires_grad=True) # ①
z = x.pow(2).sum() # ②
z.backward() # ③
x.grad # ④
神经网络的训练和测试
如何训练一个神经网络分为三步:定义神经、定义损失函数、定义优化算法。
一个神经网络完整的训练和测试过程包括:神经网络训练、神经网络验证、神经网络测试。神经网络训练和神经网络验证两部分不断迭代,训练好模型。使用训练好的网络进行测试。
下面具体介绍每个部分具体如何使用pytorch
编写代码。
第一步-数据加载
使用pytorch
的dataset
和dataloader
类处理和加载数据。
Dataset
:存储数据样本和需要值
Dataloader
:批量分组数据,支持多处理
"""使用示例"""
dataset = MyDataset(file)
dataloader = DataLoader(dataset, batch_size, shuffle=True) # 训练时设置为 True 测试时设置为 False
自定义数据加载,根据需要将数据从磁盘中获取,如:类别,图像,路径等信息。
from torch.utils.data import Dataset, DataLoader
class MyDataset(Dataset):
def __init__(self, file):
self.data = ... # 数据读取和处理
def __getitem__(self, index):
return self.data[index] # 每次返回一个样本
def __len__(self):
return len(self.data) # 返回数据集的大小
# 定义好的Dataset
dataset = MyDataset(file)
# 在DataLoader中加载数据
dataloader = DataLoader(dataset, batch_size=5, shuffle=False)
第二步-定义神经网络
线性层(全连接层)
Linear Layer (Fully-connected Layer)
import torch.nn as nn
nn.Linear(in_features, out_features)
左边输入维度为32,输出维度为64。Wx + b = y
查看全连接层的权重和偏置
layer = torch.nn.Linear(32, 64)
layer.weight.shape # W
layer.bias.shape # b
非线性激活函数
-
Sigmoid激活函数
nn.Sigmoid()
-
ReLU激活函数
nn.ReLU()
构建自己的神经网络
__init__()
:初始化模型和定义层
forward()
:计算神经网络的输出
import torch.nn as nn
class MyModel(nn.Module):
def __init__(self):
super(MyModel, self).__init__()
self.net = nn.Sequential(
nn.Linear(10, 32),
nn.Sigmoid(),
nn.Linear(32, 1)
)
def forward(self, x):
return self.net(x)
使用Sequential等价于下面代码,Sequential将各个层串联起来
import torch.nn as nn
class MyModel(nn.Module):
def __init__(self):
super(MyModel, self).__init__()
self.layer1 = nn.Linear(10, 32)
self.layer2 = nn.Sigmoid(),
self.layer3 = nn.Linear(32,1)
def forward(self, x):
out = self.layer1(x)
out = self.layer2(out)
out = self.layer3(out)
return out
第三步-定义损失函数
-
均方差损失函数(Mean Squared Error):常用于回归任务(regression)
criterion = nn.MSELoss() loss = criterion(model_output, expected_value)
-
交叉熵损失函数(Cross Entropy):常用于分类任务(classification)
criterion = nn.CrossEntropyLoss() loss = criterion(model_output, expected_value)
第四步-定义优化算法
基于梯度的优化算法,调整网络参数以减少误差。
例如,随机梯度下降(Stochastic Gradient Descent, SGD)
optimizer = torch.optim.SGD(model.parameters(), lr, momentum = 0)
对于每批数据:
- 调用
optimizer.zero_grad()
重置模型参数的梯度。 - 调用
loss.backward()
反向传播预测损失的梯度。 - 调用
optimizer.step()
来调整模型参数。
第五步-模型训练验证测试全过程
神经网络训练设置
dataset = MyDataset(file) # 通过MyDataset读取数据
tr_set = DataLoader(dataset, 16, shuffle=True) # 将数据放入Dataloader
model = MyModel().to(device) # 构建模型并迁移到设备(cpu/cuda)
criterion = nn.MSELoss() # 设置损失函数
optimizer = torch.optim.SGD(model.parameters(), 0.1) # 设置优化器
神经网络训练循环迭代
for epoch in range(n_epochs): # 遍历批次
model.train() # 设置模型为训练模式
for x, y in trian_loader: # 遍历训练集
optimizer.zero_grad() # 设置梯度为0
x, y = x.to(device), y.to(device) # 移动数据到设备(GPU、CPU)
pred = model(x) # 前向传播,计算输出
loss = criterion(pred, y) # 计算损失
loss.backward() # 反向传播,计算梯度
optimizer.step() # 使用优化器更新模型
神经网络验证循环迭代
model.eval() # 设置模型为验证模式
total_loss = 0
for x, y in valid_loader: # 遍历验证集
x, y = x.to(device), y.to(device) # 移动数据到设备(GPU、CPU)
with torch.no_grad(): # 禁用梯度计算
pred = model(x) # 前向传播,计算输出
loss = criterion(pred, y) # 计算损失
total_loss += loss.cpu().item() * len(x) # 累计损失
avg_loss = total_loss / len(valid_loader.dataset) # 计算平均损失
神经网络测试(预测)循环迭代
model.eval() # 设置模型为验证模式
preds = []
for x in test_loader: # 遍历测试集
x = x.to(device) # 移动数据到设备(GPU、CPU)
with torch.no_grad(): # 禁用梯度计算
pred = model(x) # 前向传播,计算输出
preds.append(pred.cpu()) # 记录预测结果
⚠️
model.eval(), torch.no_grad()
model.eval()
:更改一些模型层的行为,如dropout和batch normalization。
torch.no_grad()
:阻止计算被添加到梯度计算图中。通常用于防止对验证/测试数据的意外训练。
第六步-保存/加载训练好的模型
保存模型
torch.save(model.state_dict(), path)
加载模型
ckpt = torch.load(path)
model.load_state_dict(ckpt)
参考资料
PyTorch实用教程(第二版) (tingsongyu.github.io)
李宏毅《机器学习/深度学习》2021课程(国语版本,已授权)
PyTorch深度学习快速入门教程(绝对通俗易懂!)【小土堆】
跟李沐学AI的个人空间-【完结】动手学深度学习 PyTorch版)
ter/Warmup/Pytorch_Tutorial_1.pdf)
PyTorch实用教程(第二版) (tingsongyu.github.io)
李宏毅《机器学习/深度学习》2021课程(国语版本,已授权)