


React本身只关注于界面并不包含发送ajax请求的代码, 但是前端应用需要通过ajax请求与后台进行交互(json数据),所以 react应用中需要集成第三方
ajax库或自己封装。
集成的Ajax库,常用的ajax请求库:
- jQuery:比较重,不建议使用
- axios:轻量级,建议使用
axios请求的使用
axios的特点:
- 封装XmlHttpRequest对象的ajax
- promise风格
- 可以用在浏览器端和 node 服务器端
get请求:
axios.get('http://127.0.0.1:8000/axios-server',{
      // 参数:
      params:{
          id:100,
          vip:7
      },
      // 请求头
      headers:{
          name:'yang',
          age:20
      }
  }).then(value =>{
      // 响应体结果
      console.log(value)
  })
post请求:
axios.post('/axios-server',
            {// 请求体
                username:'admin',
                password:'admin'
            },{
            // 参数:
            params:{
                id:200,
                vip:9
            },
            // 请求头
            headers:{
                heigth:200,
                width:200
            }
        })
        }
axios的使用可以参照:https://blog.csdn.net/mantou_riji/article/details/124761150
eg:
客户端发送请求: App.js
import React, { Component } from 'react'
import axios from 'axios'
export default class App extends Component {
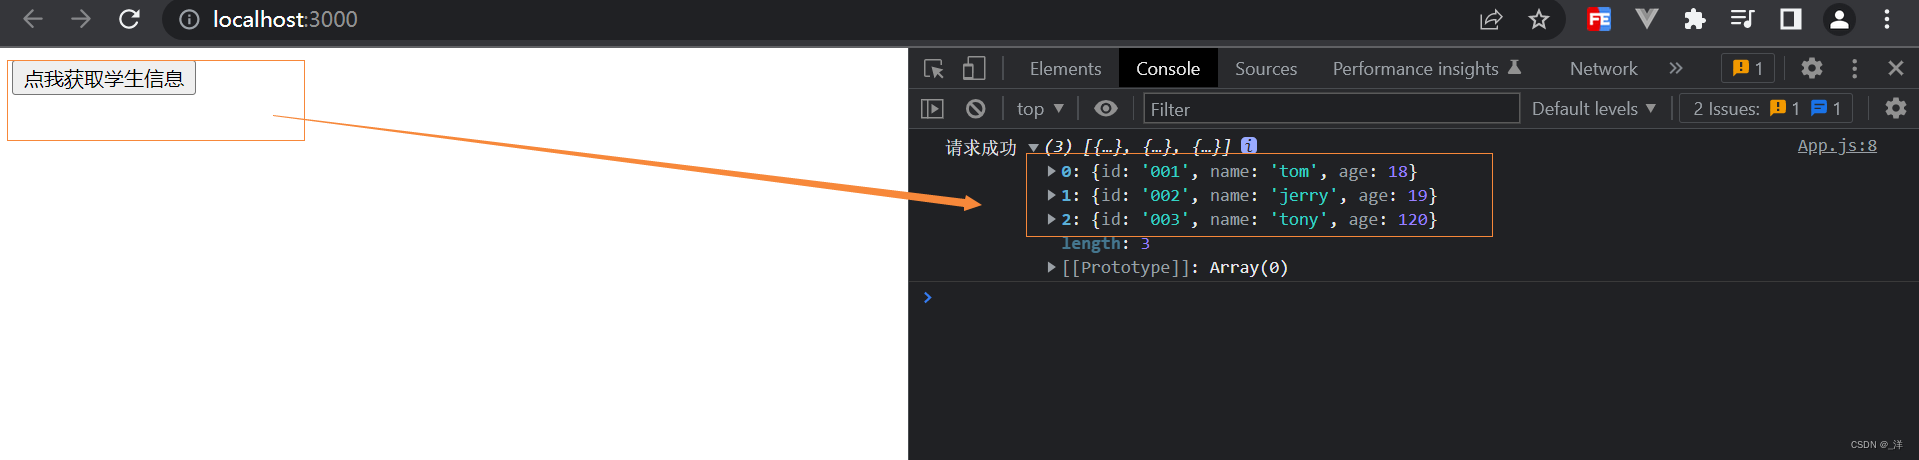
getStudentData = () => {
axios.get("http://localhost:5000/students").then(
response => {
console.log('请求成功', response.data);
},
error => {
console.log('请求失败', error);
}
)
}
render() {
return (
<div>
<button onClick = {this.getStudentData}>点我获取学生信息</button>
</div>
)
}
}
服务器端接受请求:server.js
const express = require('express')
const app = express()

app.use((request,response,next)=>{
	console.log('有人请求服务器1了');
	console.log('请求来自于',request.get('Host'));
	console.log('请求的地址',request.url);
	next()
})

app.get('/students',(request,response)=>{
	const students = [
		{id:'001',name:'tom',age:18},
		{id:'002',name:'jerry',age:19},
		{id:'003',name:'tony',age:120},
	]
	response.send(students)
})

app.listen(5000,(err)=>{
	if(!err) console.log('服务器1启动成功了,请求学生信息地址为:http://localhost:5000/students');
})
点击按钮获取学生信息的时候会出现跨域请求的问题,需要配置代理。
(跨域不是服务器不响应请求,是服务器响应了请求,但是浏览器不进行接收。)
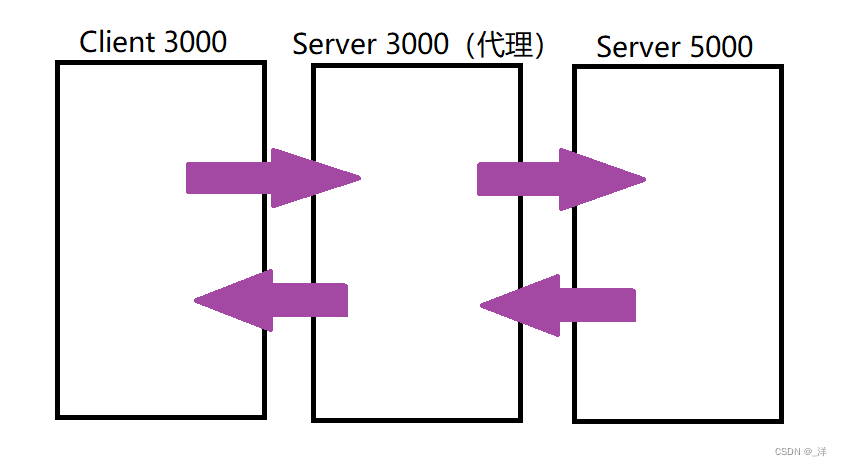
脚手架配置代理
跨域请求是因为不满足同源策略,(同源策略:https://blog.csdn.net/mantou_riji/article/details/124767753),可以通过jsonp、CORS等方法解决,也可以使用代理服务器解决。
配置代理的原理:配置一个与网页同源的服务器,网页向该服务器发送请求,该服务器再将请求发送给目标服务器,服务器之间发送请求不会有跨域问题。
配置方法一
在package.json中进行配置: 添加 "proxy":"代理转发目标服务器地址"
eg:
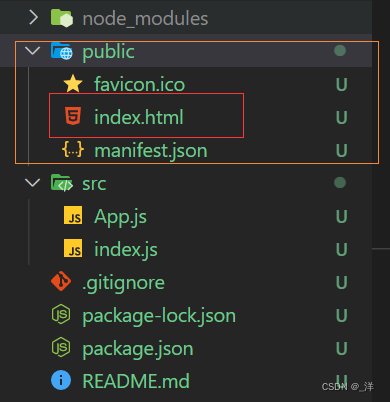
package.json
{
  "name": "react_app",
  "version": "0.1.0",
  "private": true,
  ...
  "proxy": "http://localhost:5000"
}
添加该配置之后,会自动为我们创建一个代理服务器发送请求,会将http://localhost:3000(客户端的地址)自动转换为http://localhost:5000。
修改App.js中的请求地址:
import React, { Component } from 'react'
import axios from 'axios'

export default class App extends Component {
  getStudentData = () => {
    axios.get("http://localhost:3000/students").then(
      response => {
        console.log('请求成功', response.data);
      },
      error => {
        console.log('请求失败', error);
      }
    )
  }
  render() {
    return (
      <div>
        <button onClick = {this.getStudentData}>点我获取学生信息</button>
      </div>
    )
  }
}
点击按钮就可以获取资源:
需要注意的是,不是将所有请求都直接转发给http://localhost:5000,获取请求之后会在当前服务器(http://localhost:3000)中查看是否有资源,如果有请求的资源则直接将资源返回,如果没有该资源则将请求转发给http://localhost:5000。
如: 如果发送 http://localhost:3000/index.html请求,就返回:
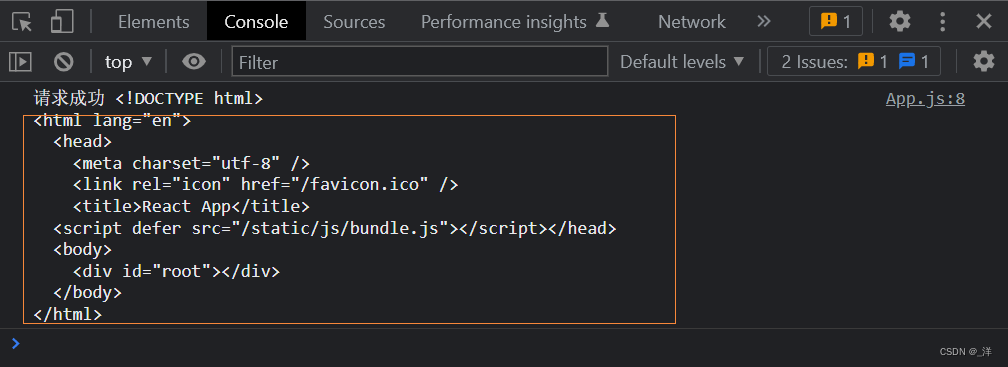
返回public/index.html静态资源。
问题:使用 proxy 这种配置方法只能配置代理到一个服务器。如果需要发送请求到两个服务器,就不能使用这种方法进行配置了。
配置方法二
新建src/setupProxy.js文件在里面配置(由于该文件是交给webpack进行处理的,而webpack又是用CommonJS写的,所以setupProxy.js也需要用CommonJS进行编写)。
setupProxy.js的格式如下:
eg:
// react脚手架已经下载
const proxy = require('http-proxy-middleware')

module.exports = function (app) {
    app.use(
        // 如果请求路径中以'/api1'为请求前缀,就走该代理
        proxy.createProxyMiddleware('/api1', {
            // 请求转发给谁
            target: 'http://localhost:5000',
            // 能控制服务器收到的请求中的host字段的值
            // 默认值是false,为false就是说告诉服务器实际请求是哪发出的;为true代表欺骗服务器请求是从服务器自己的源发出的,一般改成true
            changeOrigin: true,
            // 重写请求路径(服务器的响应地址中没有/api1)
            pathRewrite: {'^/api1':''}
        }),
        proxy.createProxyMiddleware('/api2', {
            target: 'http://localhost:5001',
            changeOrigin: true,
            pathRewrite: {'^/api2':''}
        }),
    )
}
App.js
import React, { Component } from 'react'
import axios from 'axios'

export default class App extends Component {
  getStudentData = () => {
    axios.get("http://localhost:3000/api1/students").then(
      response => {
        console.log('请求成功', response.data);
      },
      error => {
        console.log('请求失败', error);
      }
    )
  }
  getCarData = () => {
    axios.get("http://localhost:3000/api2/cars").then(
      response => {
        console.log('请求成功', response.data);
      },
      error => {
        console.log('请求失败', error);
      }
    )
  }
  render() {
    return (
      <div>
        <button onClick={this.getStudentData}>点我获取学生信息</button>
        <button onClick = {this.getCarData}>点我获取汽车信息</button>
      </div>
    )
  }
}
- 注意配置代理只是替换了一下源的内容,后面的请求路径保持不变,如果要修改可以借助
pathRewrite属性进行修改。 - 发送请求时,如果发送请求的源和程序本身的运行的源一致就可以将源省略
如:
假设程序是在http://localhost:3000/上运行,则
axios.get(`http://localhost:3000/api1/search/users?q=${keyWord}`)
可以简写成
axios.get(`api1/search/users?q=${keyWord}`)
请求发送
ajax
import React, { Component } from 'react'
import axios from 'axios'
export default class Search extends Component {
search = () => {
// 获取用户的输入
// 回调函数形式的ref直接存储在组件实例对象上
// const value = this.keyValueElement.value
// 解构赋值的连续写法 (代表从this身上取出keyValueElement,再从keyValueElement身上取出value,但是这种情况下keyValueElement是没有定义的)
// const {keyValueElement:{value}} = this
// 连续结构赋值并重命名 (将value重命名为keyWord)
const {keyValueElement:{value: keyWord}} = this
// 发送网络请求
// 发送请求前更新state的状态
this.props.updataAppState({isFirst:false, isLoading: true})
// github服务器使用cors解决跨域
// 发送请求时,如果发送请求的源和程序本身的运行的源一致就可以将源省略:
// axios.get(`http://localhost:3000/api1/search/users?q=${keyWord}`).then(
axios.get(`api1/search/users?q=${keyWord}`).then(
response => {
// 请求成功后更新state的状态
this.props.updataAppState({isLoading: false, users: response.data.items})
},
error => {
// 请求失败后更新state的状态
this.props.updataAppState({isLoading: false, err: error.message})
}
)
}
render() {
return (
<section className="jumbotron">
<h3 className="jumbotron-heading">Search Github Users</h3>
<div>
<input ref={currentNode => this.keyValueElement = currentNode} type="text" placeholder="enter the name you search"/>
<button onClick={this.search}>Search</button>
</div>
</section>
)
}
}
fetch
import React, { Component } from 'react'
// import axios from 'axios'
import PubSub from 'pubsub-js'
export default class Search extends Component {
search = async() => {
const {keyValueElement:{value: keyWord}} = this
PubSub.publish('updataListState', {isFirst:false,isLoading: false})
// -------------------------axios请求--------------------------------
// axios.get(`api1/search/users?q=${keyWord}`).then(
// response => {
// PubSub.publish('updataListState', {isLoading: false, users: response.data.items})
// },
// error => {
// PubSub.publish('updataListState', {isLoading: false, err: error.message})
// }
// )
// -------------------------fetch请求(未优化)-------------------------------
// fetch的返回结构是一个promise对象,.then的结果仍然是一个promise对象
// fetch(`api1/search/users?q=${keyWord}`).then(
// // 数据格式
// // 可以验证是否可以和服务器建立联系
// response => {
// console.log('联系服务器成功了');
// return response.json()
// },
// error => {
// console.log('联系服务器失败了', error);
// return new Promise()
// }
// ).then(
// // 真正的数据
// response => {
// console.log('获取数据成功了', response);
// },
// error => {
// console.log('获取数据失败了', error);
// }
// )
// -------------------------fetch请求(已优化)--------------------------
// fetch(`api1/search/users?q=${keyWord}`).then(
// response => {
// console.log('联系服务器成功了');
// return response.json()
// }
// ).then(
// response => {console.log('获取数据成功了', response);}
// ).catch((error) => {
// console.log('请求出错', error);
// })
// -------------------------fetch请求(再优化)--------------------------
try {
const response = await fetch(`api1/search/users?q=${keyWord}`)
const data = await response.json()
PubSub.publish('updataListState', {isLoading: false, users: data.items})
} catch(error){
PubSub.publish('updataListState', {isLoading: false, err: error.message})
}
}
render() {
return (
<section className="jumbotron">
<h3 className="jumbotron-heading">Search Github Users</h3>
<div>
<input ref={currentNode => this.keyValueElement = currentNode} type="text" placeholder="enter the name you search"/>
<button onClick={this.search}>Search</button>
</div>
</section>
)
}
}
补充:nanoid
nanoid可以生成唯一的标识,而且体积小。
使用:
import {nanoid} from 'nanoid'
const todoObj = {id:nanoid(), name:target.value, done:false}
defaultchecked 和 checked
注意defaultchecked 和 checked的区别,类似的还有: defaultValue 和 value
- defaultChecked 只在第一次渲染的时候起作用
- checked 的使用必须配合 onChange使用


 2929
2929


 被折叠的 条评论
为什么被折叠?
被折叠的 条评论
为什么被折叠?
 到【灌水乐园】发言


