


MyBatis-Plus的分页功能(快速上手)
分页功能:就是将后端得到的数据通过分页的形式展示给前端(页面)。
此处使用:
- 框架:SpringBoot2.6.6
- 模板引擎:thymeleaf(SpringBoot版本仲裁)
1. 编写前端页面pagin.html(主要是编写一个表格来进行分页)

示例代码:
<table border="1px" width="500px" height="200px" >
<thead>
<tr>
<th>id</th>
<th>用户名</th>
<th>age</th>
<th>email</th>
</tr>
</thead>
<tbody>
<tr >
<td>12</td>
<td>毛哥</td>
<td>18</td>
<td>1457643551@qq.com</td>
</tr>
<tr >
<td>12</td>
<td>毛哥</td>
<td>18</td>
<td>1457643551@qq.com</td>
</tr>
<tr >
<td>12</td>
<td>毛哥</td>
<td>18</td>
<td>1457643551@qq.com</td>
</tr>
</tbody>
</table>
<div width="500px" >当前第 1 页 总计 10 页 共 10 条记录
<span>首页</span>
<span>1</span>
<span>2</span>
<span>3</span>
<span>尾页</span>
</div>
2.使用Mybatis-Plus方式编写 dao层 和 service层
示例代码:
dao:(UserMapper.java)
@Mapper
	public interface UserMapper extends BaseMapper<User> {
	}
service:(UserService.java & UserServiceImpl.java)
-
UserService.java(接口)
public interface UserService extends IService<User> { } -
UserServiceImpl.java(实现类)
@Service
public class UserServiceImpl extends ServiceImpl<UserMapper, User> implements UserService {

}
3. Controller中获取数据库中的数据并转发到前端页面
示例代码:
controller:(UserController.java)
@GetMapping("/paging")
    public String pagin(@RequestParam(value = "pn",defaultValue = "1")Integer pn, Model model){
        Page<User> userPage = new Page<>(pn,2);
        Page<User> page = userService.page(userPage, null);
        model.addAttribute("page", page);
        return "pagin";
    }
这里要详细的解说一下:
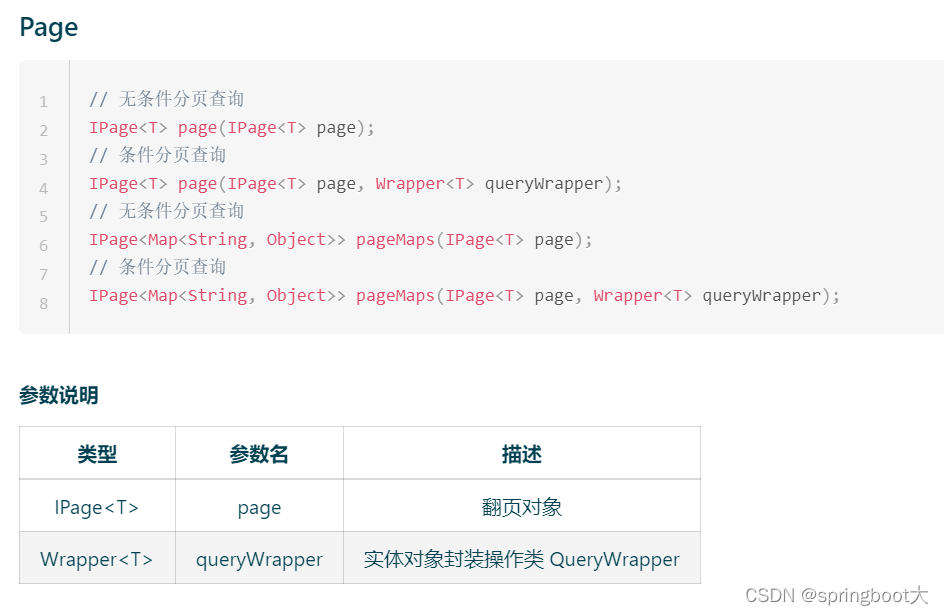
userService.page方法是分页查出数据,方法中有两个参数:
	- @param page(翻页对象),继承于IPape
		Page对象也有两个参数:
			- @param current 当前页
			- @param size 每页显示条数
	- @param queryWrapper (实体对象封装操作类):查询的条件封装对象

Page<User> page = userService.page(userPage, null) 得到了分页查询的结果
通过得到的结果的page对象,
- page.getPages():得到总页码
- page.getCurrent:获取当前页码
- page.getRecords:获取所有记录(也就是对象集,我们需要的数据列表)
- page.getTotal:得到数据的总数
…还有很多的方法,可以去Mybatis-Plus官网查看
所有最后只需要把数据放入model中,就能通过thymeleaf模板引擎去页面获取!!!
4.使用thymeleaf来进行页面渲染
示例代码:
<table border="1px" width="500px" height="200px" >
<thead>
<tr>
<th>id</th>
<th>用户名</th>
<th>age</th>
<th>email</th>
</tr>
</thead>
<tbody>
<tr th:each="user:${page.records}">
<td th:text="${user.id}"></td>
<td th:text="${user.name}">毛哥</td>
<td th:text="${user.age}">18</td>
<td th:text="${user.email}">1457643551@qq.com</td>
</tr>
</tbody>
</table>
<div width="500px" >当前第 [[${page.current}]] 页 总计 [[${page.pages}]] 页 共 [[${page.total}]] 条记录
<a th:href="@{/paging(pn=1)}">首页</a>
<span th:each="num:${#numbers.sequence(1,page.pages)}"><a th:href="@{/paging(pn=${num})}">[[${num}]] </a></span>
<a th:href="@{/paging(pn=${page.pages})}">尾页</a>
</div>
5.编写拦截器然后注入到SpringBoot容器中
写一个配置类,然后把MybatisPlusInterceptor通过@Bean注入到SpringBoot容器中:
/**
     * MybatisPlusInterceptor
     */
    @Bean
    public MybatisPlusInterceptor mybatisPlusInterceptor() {
        MybatisPlusInterceptor mybatisPlusInterceptor = new MybatisPlusInterceptor();
        //这是分页拦截器
        PaginationInnerInterceptor paginationInnerInterceptor = new PaginationInnerInterceptor();
//        设置请求页面大于最大页后操作,true调回到首页,false继续请求,默认false
        paginationInnerInterceptor.setOverflow(true);
//        设置最大单页限制数量,默认500条,-1不受限制
        paginationInnerInterceptor.setMaxLimit(500l);

        mybatisPlusInterceptor.addInnerInterceptor(paginationInnerInterceptor);
        return mybatisPlusInterceptor;
    }
6.展示最终结果
Mybatis-Plus分页功能展示


 2万+
2万+


 被折叠的 条评论
为什么被折叠?
被折叠的 条评论
为什么被折叠?
 到【灌水乐园】发言


