


//创建nginx 系统用户、用户组
groupadd -r -g 108 nginx
useradd -r -g 108 nginx
//安装常用的
yum -y install gcc gcc-c++ autoconf automake libtool make cmake
cd /usr/local/src/
//安装 nginx 需要的
yum -y install zlib zlib-devel openssl openssl-devel pcre-devel
//下载 最新稳定版的nginx
wget http://nginx.org/download/nginx-1.10.0.tar.gz
./configure \
--prefix=/usr/local/nginx \
--sbin-path=/usr/sbin/nginx \
--conf-path=/etc/nginx/nginx.conf \
--error-log-path=/var/log/nginx/error.log \
--http-log-path=/var/log/nginx/access.log \
--pid-path=/var/run/nginx/nginx.pid \
--lock-path=/var/lock/nginx.lock \
--user=nginx \
--group=nginx \
--with-http_stub_status_module \
--with-http_ssl_module \
--with-http_flv_module \
--with-http_gzip_static_module \
--http-client-body-temp-path=/var/tmp/nginx/client/ \
--http-proxy-temp-path=/var/tmp/nginx/proxy/ \
--http-fastcgi-temp-path=/var/tmp/nginx/fcgi/ \
--http-uwsgi-temp-path=/var/tmp/nginx/uwsgi \
--http-scgi-temp-path=/var/tmp/nginx/scgi \
--with-pcre
make && make install
/usr/sbin/nginx //启动
mkdir /var/tmp/nginx/client -p //再次启动
安装 php7
先安装一些常用的库
yum -y install libxslt-devel libjpeg libjpeg-devel libpng libpng-devel freetype freetype-devel libxml2 libxml2-devel gd gd-devel
yum -y install zlib zlib-devel glibc glibc-devel glib2 glib2-devel bzip2 bzip2-devel
yum -y install ncurses ncurses-devel curl curl-devel e2fsprogs e2fsprogs-devel
yum -y install krb5 krb5-devel libidn libidn-devel openssl openssl-devel //安装库
wget http://cn2.php.net/get/php-7.0.10.tar.gz/from/this/mirror
./configure --prefix=/usr/local/php \
--with-gd \
--enable-gd-native-ttf \
--enable-gd-jis-conv \
--enable-mysqlnd \
--with-curl \
--with-freetype-dir \
--with-gd \
--with-gettext \
--with-iconv-dir \
--with-kerberos \
--with-libdir=lib64 \
--with-libxml-dir \
--with-mysqli=mysqlnd \ ##mysql 可以后面安装
--with-pdo-mysql=mysqlnd \
--without-sqlite3 \ # 去掉sqlti3
--without-pdo-sqlite \ # 去掉pdo-sqlite
--with-openssl \
--with-pcre-regex \
--with-pear \
--with-png-dir \
--with-xmlrpc \
--with-xsl \
--with-zlib \
--enable-fpm \
--enable-bcmath \
--enable-libxml \
--enable-inline-optimization \
--enable-gd-native-ttf \
--enable-mbregex \
--enable-mbstring \
--enable-opcache \
--enable-pcntl \
--enable-shmop \
--enable-soap \
--enable-sockets \
--enable-sysvsem \
--enable-xml \
--enable-zip \
--disable-inline-optimization ##这个 一直编译 zend_execute.lo 错误, 看了 ./configure --help 里面写了 如果这个编译错误 就带上这个选项
make && make install
cp /usr/local/php/php-fpm.conf.default /usr/local/phpphp-fpm.conf
cp /usr/local/php/etc/php-fpm.d/www.conf.default /usr/local/php/etc/php-fpm.d/www.conf
cp /usr/local/src/php7**/php.ini-production /usr/local/php/lib/php.ini
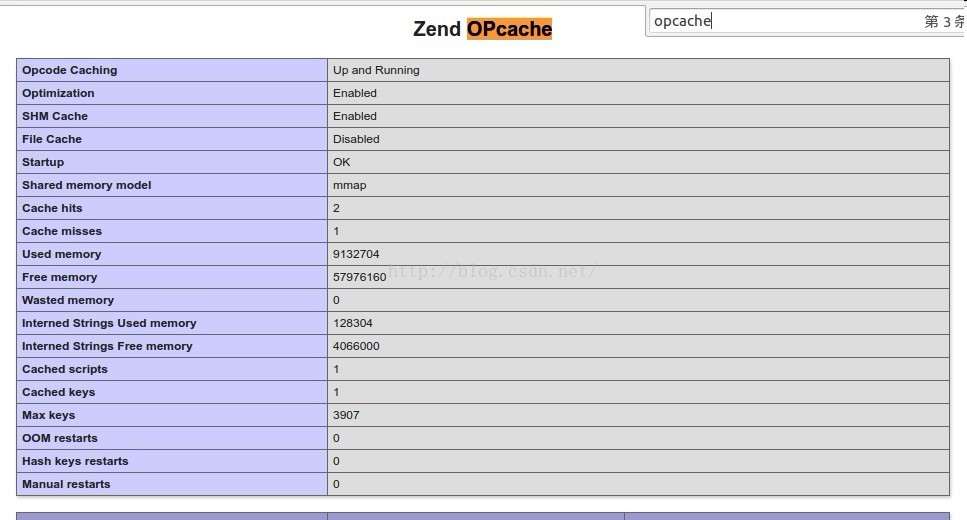
开启 opcache
在php.ini 中 加入一行,
zend_extension=opcache.so
并开启 opcache 选项

/usr/local/php/sbin/php-fpm //开启php
整合nginx 和php
vim /etc/nginx/nginx.conf
location ~ \.php$ {
root html;
fastcgi_pass 127.0.0.1:9000;
fastcgi_index index.php;
fastcgi_param SCRIPT_FILENAME $DOCUMENT_ROOT$fastcgi_script_name;
include fastcgi_params;
}
/usr/sbin/nginx -s reload
vim /usr/local/nginx/html/phpinfo.php
ip********/phpinfo.php //有表示整合成功
安装 mysql
我用的是 搜狐镜像,直接用它编译好的二进制包,
http://mirrors.sohu.com/mysql/MySQL-5.5/
cd /usr/local/src
wget http://mirrors.sohu.com/mysql/MySQL-5.5/mysql-5.5.50-linux2.6-x86_64.tar.gz
tar zxvf mysql-5.5.50-linux2.6-x86_64.tar.gz
mv mysql-5.5.50-linux2.6-x86_64 /usr/local/mysql
看着这个文档 一步一步来
http://dev.mysql.com/doc/refman/5.5/en/binary-installation.html
shell> useradd -r -g mysql -s /bin/false mysql
shell> cd /usr/local
shell> tar zxvf /path/to/mysql-VERSION-OS.tar.gz
shell> ln -s full-path-to-mysql-VERSION-OS mysql
shell> cd mysql
shell> chown -R mysql .
shell> chgrp -R mysql .
shell> scripts/mysql_install_db --user=mysql
shell> chown -R root .
shell> chown -R mysql data
# Next command is optional
shell> cp support-files/my-medium.cnf /etc/my.cnf
shell> bin/mysqld_safe --user=mysql &
# Next command is optional
shell> cp support-files/mysql.server /etc/init.d/mysql.server
/usr/local/mysql/bin/mysql
use mysql
select Host,User,Password from user\G
> delete from user where Host !='localhost';
> DELETE FROM user where User !='root';
>update user set Password=password('maozhongyu') where 1;
>flush privileges;


 357
357

 被折叠的 条评论
为什么被折叠?
被折叠的 条评论
为什么被折叠?
 到【灌水乐园】发言


