


最近很多朋友都在问我怎样从java客户端调用带安全验证的WCF服务。 当初我解决这个问题的时候查了很多文献和资料,虽说web service是号称跨平台的吧,可是真跨起来,有时也挺麻烦。现在我把它总结下来,希望能对大家有所帮助。
因为当时给公司(Paragallo Mobile AS)写解决方案的时候就是用的英文,所以还是英文的。同时我配了demo代码,相信大家可以看明白。如果有什么不明白的地方,可以给我留言。
Summary:
We use Message-Level Security authenticating with wsHttpBinding. And the user also needs a username/password. X.509 Certificate is used here.
This article talks about how to call WCF service from the java client with authentication. The server side use X.509 certificate to encrypt the Username and Password. The java client tool is Netbeans and Eclipse with SoapUI plug-in installed.
Contents
Invoke WCF service from Java Client with Authentication (X.509 Certificate)
1.1. Create a Certificate to Act as Your Root Certificate Authority
1.2. Install Your Root Certificate Authority Certificate on the Server and Client Machines
1.3. Create and Install Your Temporary Service Certificate
2.2. Create Customer Validator
3. Call the Service From Java Client
3.1 Create the Java client, the container is Glassfish
3.2 Create the Java Application client, the container is not Glassfish
3.3 Development the Java client code in Eclipse.
1.Prepare the Certificate:
We need to create a self-signed root certificate authority (CA) that will be placed in the Trusted Root Certification Authority store (受信任的根证书颁发机构). The certificate used by WCF is then created from the root self-signed certificate and installed in the LocalMachine store.
1.1. Create a Certificate to Act as Your Root Certificate Authority
Command: makecert -n "CN=RootCATest" -r -sv RootCATest.pvk RootCATest.cer
In this command:
-n – Specifies the subject name for the root CA. The convention is to prefix the subject name with "CN = " for "Common Name".
-r – Specifies that the certificate will be self-signed.
-sv – Specifies the file that contains the private key of the certificate.
RootCATest.cer – Specifies the name of the file containing the public key of the certificate.
In the Create Private Key Password dialog box, enter a password, confirm the password, and then click OK. Optionally, you can click None without entering the password, but this is not recommended for security reasons.
In the Enter Private Key Password dialog box, enter the password again and then click OK.
This is the password needed to access the private key file RootCATest.pvk in order to generate the file RootCATest.cer containing the public key.
1.2. Install Your Root Certificate Authority Certificate on the Server and Client Machines
In this step, you will install the certificate in the Trusted Root Certification Authorities (受信任的根证书颁发机构) location on both the server and client machines. All certificates that are signed with this certificate will be trusted by the client machine.
You can do this by run mmc command, then do it in Microsoft Management Console. Import the Certificate to Trusted Root Certification Authorities (受信任的根证书颁发机构).
1.3. Create and Install Your Temporary Service Certificate
Command: makecert -sk MyKeyName -iv RootCATest.pvk -n "CN=tempCert" -ic RootCATest.cer -sr localmachine -ss my -sky exchange -pe tempCert.cer
In the Enter Private Key Password dialog box, enter the password for the root CA privatekeyfile specified in STEP 1, and then click OK.
2.Create a Demo WCF Service
2.1. New a demo wcf service
2.2. Create Customer Validator
Class MyCustomValidator by inheriting UserNamePasswordValidator, but this should be created in a new class library project.
2.3. the Server config file
<system.serviceModel>
<bindings>
<wsHttpBinding>
<binding name="mySecureBinding">
<security mode="Message">
<message clientCredentialType="UserName"/>
</security>
</binding>
</wsHttpBinding>
</bindings>
<services>
<service behaviorConfiguration="ServerWcfService.Services.MySimpleServiceBehavior" name="ServerWcfService.Services.MySimpleService">
<endpoint address="" binding="wsHttpBinding" contract="ServerWcfService.ServiceContracts.IMySimpleService" bindingConfiguration="mySecureBinding">
<identity>
<dns value="MyServerCert"/>
</identity>
</endpoint>
<endpoint address="mex" binding="mexHttpBinding" contract="IMetadataExchange"/>
</service>
</services>
<behaviors>
<serviceBehaviors>
<behavior name="ServerWcfService.Services.MySimpleServiceBehavior">
<serviceMetadata httpGetEnabled="true"/>
<serviceDebug includeExceptionDetailInFaults="false"/>
<serviceCredentials>
<serviceCertificate findValue="MyServerCert" x509FindType="FindBySubjectName" storeLocation="LocalMachine" storeName="My"/>
<userNameAuthentication userNamePasswordValidationMode="Custom" customUserNamePasswordValidatorType="ServerWcfService.CustomValidators.MyCustomValidator,ServerWcfService"/>
</serviceCredentials>
</behavior>
</serviceBehaviors>
</behaviors>
</system.serviceModel>
The config file set the clientCredentialType in the <bindings> section and set the bindingConfiguration in <endpoint> section. We set serviceCredentials to do an authentication by Certificate and username authentication.
3. Call the Service From Java Client
You can use Web Services Interoperability Technologies (WSIT) do access the WCF Service from java client. And this was integrated in NetBeans V6.1.
3.1 Create the Java client, the container is Glassfish
Here the IDE is Netbeans, my version is 6.1.
1 New a Web project
2 add a new web service client.
3 import the server cert to the store “TrustStore”
This the command, you must install JDK if you want use it.
keytool -import -file MyServer.cer -keystore TrustStore -alias serverkey
the import file MyServer.cer is the server's X.509 certificate, serverkey is the alias of the certificate. And you will need to input a keystore password after you execute this command. Please remember your password. The keystore file will in the current forder where you do this command.
keytool -list -v -keystore TrustStore
using this command to see if the importing is successful.
Note: if you don't do this, it will throw an exception “WSS1511: An Error occurred while locating PEER Entity certificate in TrustStore.”.
4 Edit Web Service attributes
You can Edit it by right click the webservice
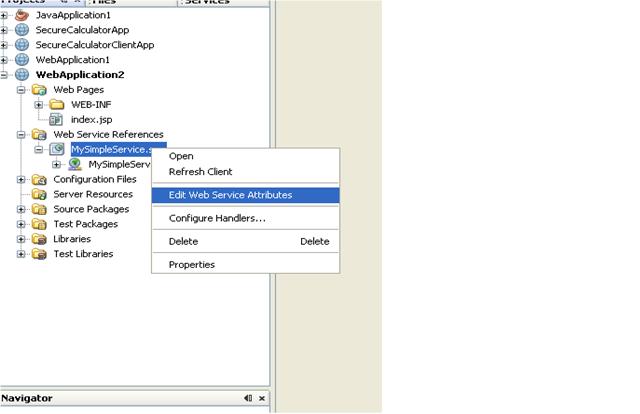
then you can edit the security attribute, please click the TrustStore button:
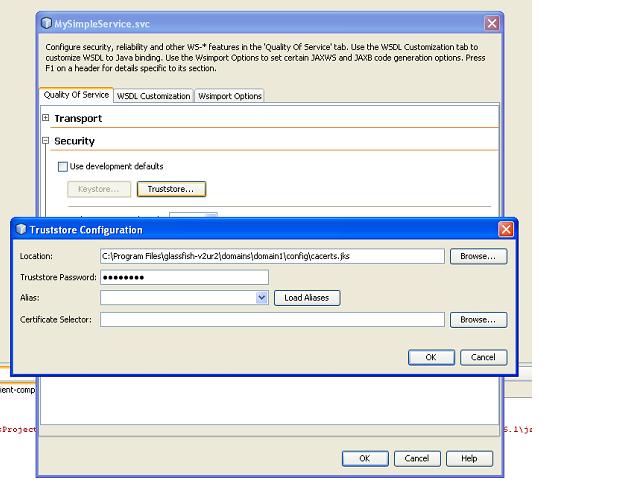
You can choose your truststore which you import the server Cert at step 3 by browse.please change the File of Type to all files.afte this input the password of the keystore. And the Cert's alias.

After this you will get two config file in folder “Source Packages” of Netbeans. The two files are MySimpleService.svc.xml and wsit-client.xml. Please edit the MySimpleService.svc.xml.
Example:
<wsp:Policy wsu:Id="WSHttpBinding_IMySimpleServicePolicy">
<wsp:ExactlyOne>
<wsp:All>
<sc:TrustStore wspp:visibility="private" peeralias="mykey" storepass="1302821986" type="JKS" location="C:/Documents and Settings/Marvion/TrustStore"/>
</wsp:All>
</wsp:ExactlyOne>
</wsp:Policy>
Note: the type is “JKS”.
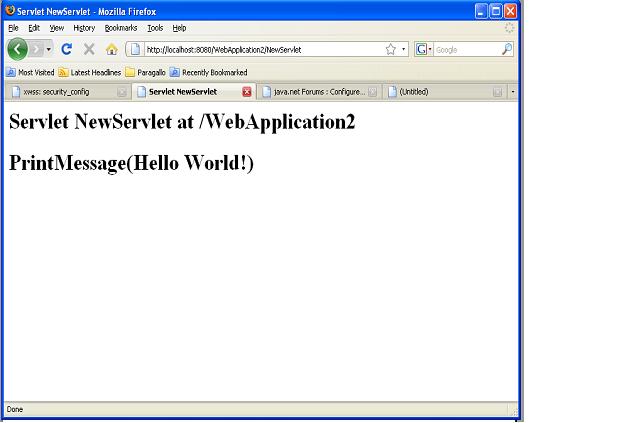
5. New a Test Servlet.
Add the following code to the servlet.
Note: the bold code is to put the username and password. Please write this before you call a method.
I test successfully.
3.2 Create the Java Application client, the container is not Glassfish
It's very same like above configuration. But if you are running on some other container then the only way for you is to supply your own CallbackHandler :
The config file:
<wsp:Policy wsu:Id="WSHttpBinding_IMySimpleServicePolicy">
<wsp:ExactlyOne>
<wsp:All>
<sc:CallbackHandlerConfiguration xmlns:sc="http://schemas.sun.com/2006/03/wss/client" >
<sc:CallbackHandler name="TrustStoreCallbackHandler" classname="javaapplication1.TrustStoreCallbackHandler" />
</sc:CallbackHandlerConfiguration>
</wsp:All>
</wsp:ExactlyOne>
</wsp:Policy>
The class-name is the full name of your own callbackhandler class.
Example:
Note: you need download metro-1_3.jar from https://metro.dev.java.net/1.3/ . After install that add the webservices-rt.jar to the project library reference.
3.3 Development the Java client code in Eclipse.
Well, there is no eclipse plug-in for can do it directly. So what I do is develop is in Netbeans first, then I move the code and configuration files to Eclipse. It needs to change some source folder directory here. see my sample code.
4. Download Demos
4.1 The Service side code. http://download.csdn.net/source/1135380
4.2 Web application code http://download.csdn.net/source/1135375
4.3 Java application code http://download.csdn.net/source/1135382
4.4 Eclipse client code http://download.csdn.net/source/1135383
4.5 The needed jar file (webservices-rt.jar) it will generate by netbeans when you add new webservice client.
Reference
01 http://msdn2.microsoft.com/en-us/library/ms733813.aspx
02 http://forums.java.net/jive/thread.jspa?messageID=293406
03 http://forums.java.net/jive/message.jspa?messageID=277883
04 http://forums.java.net/jive/thread.jspa?messageID=262600񀇈
05 https://xwss.dev.java.net/articles/security_config.html
06 https://wsit.dev.java.net/issues/show_bug.cgi?id=844


 1848
1848

 被折叠的 条评论
为什么被折叠?
被折叠的 条评论
为什么被折叠?
 到【灌水乐园】发言


