


导航
环境:
redis:5.0.8
Springboot: 2.2.3.RELEASE
redis安装参见:CentOS7下安装Redis(单机版)
集群方式及配置
基础配置集群配置:
#后台运行(守护进程)
daemonize yes
#去除保护模式(允许远程访问)
protected-mode no
#去除绑定(远程访问)
#bind 127.0.0.1
# 设置密码
requirepass redispwd
本次配置基于同一机器不通端口做集群,当redis位于不同机器时,部分配置可以省去(以下配置过程中会说明/【单机非必须】:当前机器仅运行一个redis实例)
Cluster分区集群
Cluster分区集群表现形式为数据均匀分布在其中一个分区节点上(预设虚拟槽的范围为0到16383,每个节点间共享数据槽范围)。
特别注意:cluster分区集群要求至少三个节点
修改节点1配置 6379
拷贝一份配置文件命名为redis-cluster6379.conf(来源安装目录:redis-5.0.8/redis.conf)
修改配置
# db写入磁盘目录位置(文件夹路径如果不存在,需要手动创建):【单机非必须】
dir ./cluster6379
#日志目录,默认运行命令时的目录【单机非必须】
logfile "./cluster6379/cluster6379.log"
#pid写入位置,默认/var/run/redis_6379.pid【单机非必须】
pidfile "/var/run/redis_6379.pid"
# 开启集群
cluster-enabled yes
修改节点2配置 6380
拷贝redis-cluster6379.conf 命名为redis-cluster6380.conf
# redis端口【单机非必须】
port 6380
 # db写入磁盘目录位置(文件夹路径如果不存在,需要手动创建):【单机非必须】
dir ./cluster6380
#日志目录,默认运行命令时的目录【单机非必须】
logfile "./cluster6380/cluster6380.log"
#pid写入位置,默认/var/run/redis_6379.pid【单机非必须】
pidfile /var/run/redis_6380.pid
修改节点3配置 6381
拷贝redis-cluster6379.conf 命名为redis-cluster6381.conf
# redis端口【单机非必须】
port 6381
 # db写入磁盘目录位置(文件夹路径如果不存在,需要手动创建):【单机非必须】
dir ./cluster6381
#日志目录,默认运行命令时的目录【单机非必须】
logfile "./cluster6381/cluster6381.log"
#pid写入位置,默认/var/run/redis_6379.pid【单机非必须】
pidfile /var/run/redis_6381.pid
启动节点1(6379)、节点2(6380)、节点3(6381)
./bin/redis-server redis-cluster6379.conf
./bin/redis-server redis-cluster6380.conf
./bin/redis-server redis-cluster6381.conf

查看6379状态及cluster 节点

查看6380状态及cluster 节点

对比发现,这是两个不同的集群(槽点分布没有显示,如果不理解继续向下看即可)。
配置集群关系
这里需要注意的是,redis5.0.8已经不支持redis-trib.rb配置集群了
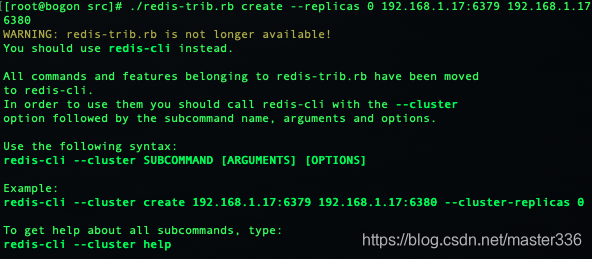
使用redis-cli配置集群
测试一下少于三个的集群会发生什么?
./bin/redis-cli --cluster create 192.168.1.17:6379 192.168.1.17:6380 --cluster-replicas 0 -a redispwd
注: -a参数后面跟的是密码,如果没有密码可以不设置此参数
执行结果:
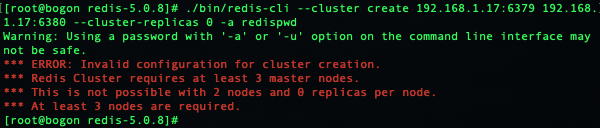
尴尬不!!!
配置集群
./bin/redis-cli --cluster create 192.168.1.17:6379 192.168.1.17:6380 192.168.1.17:6381 --cluster-replicas 0 -a redispwd
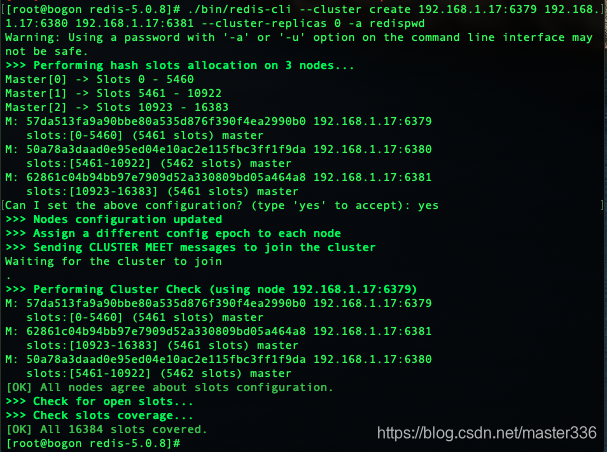
注意,中间有个询问,输入yes即可
分别查看三个基点的节点信息


可以看到槽点分布情况如下(对比未配置集群时的状态-无槽点信息):
| 节点 | 槽点范围 |
|---|---|
| 6379 | 0-5460 |
| 6380 | 5461-10922 |
| 6381 | 10923-16381 |
数据写入及读取
分别在6397、6380、6381节点上set一个相同的key


可以看到key [testkey]只能在节点6379上插入,其他节点上插入会提示错误并告诉可供插入的节点信息。
使用redis-cli新增节点
修改节点4配置 6382
拷贝redis-cluster6379.conf 命名为redis-cluster6382.conf
#redis端口【单机非必须】
port 6382
 # db写入磁盘目录位置(文件夹路径如果不存在,需要手动创建):【单机非必须】
dir ./cluster6382
#日志目录,默认运行命令时的目录【单机非必须】
logfile "./cluster6382/cluster6382.log"
#pid写入位置,默认/var/run/redis_6379.pid【单机非必须】
pidfile /var/run/redis_6382.pid
启动节点4【6382】
./bin/redis-server redis-cluster6382.conf
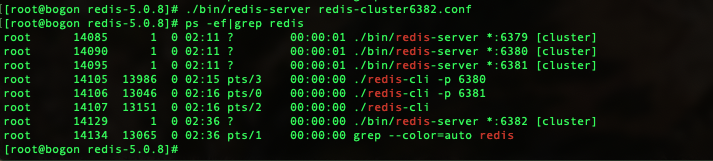
此时6382是个独立的节点

 添加节点4【6382】到集群
#-a 后面跟的是密码,如果没有密码则不需要-a参数
#add-node 后面的参数形式 new_host:new_port existing_host:existing_port
./bin/redis-cli --cluster add-node 192.168.1.17:6382 192.168.1.17:6380 -a redispwd
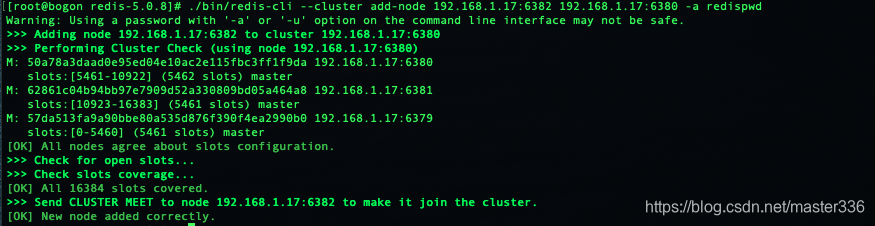
给节点4【6382】分配槽点
查看节点信息:
 节点添加成功后未分配槽点
./bin/redis-cli --cluster reshard 192.168.1.17:6379 -a redispwd
执行过程中有询问
#准备挪出来多少个槽点
How many slots do you want to move (from 1 to 16384)? 800
#哪个节点准备接受新分配的槽点
What is the receiving node ID? 18936b87abadcb66135e243fa3fe49e88e8bbdc7
#准备从哪些节点上挪出这800(向上看这个数的来源)个槽点
Please enter all the source node IDs.
	# 所有节点
  Type 'all' to use all the nodes as source nodes for the hash slots.
  #指定节点
  Type 'done' once you entered all the source nodes IDs.
Source node #1: all
#是否执行reshare
Do you want to proceed with the proposed reshard plan (yes/no)? yes
 查看节点信息:
 节点扩容完成
使用redis-cli删除节点
删除节点需要经过以下两步骤
1. 转移槽点
这一步跟添加节点后的槽点一样,大致过程为,挪出来所需要的节点数 -> 选择接收数据的节点 -> 选择挪出的节点
#挪出多少槽点(5195),把6380节点挪出来,节点数在该询问上面,不需要你计算
How many slots do you want to move (from 1 to 16384)? 5195
#哪个节点接收(18936b87abadcb66135e243fa3fe49e88e8bbdc7)6382节点接收
What is the receiving node ID? 18936b87abadcb66135e243fa3fe49e88e8bbdc7
#从哪挪
Please enter all the source node IDs.
 Type 'all' to use all the nodes as source nodes for the hash slots.
 Type 'done' once you entered all the source nodes IDs.
 #6380上挪,如果需要删除多个节点,继续回车填写下一个就行,填写完毕最后一个节点键入‘done’即可完成
Source node #1: 50a78a3daad0e95ed04e10ac2e115fbc3ff1f9da
Source node #2: done
 查看节点信息:

不再有槽点分配
2. 删除节点
./bin/redis-cli --cluster del-node 192.168.1.17:6380 50a78a3daad0e95ed04e10ac2e115fbc3ff1f9da -a redispwd

 节点已删除
节点已删除
需要注意的是,当节点上分配的有槽点时是不允许删除的

Cluster分区集群在Springboot中的配置
1. pom引入
 <!-- springboot整合redis -->
  <dependency>
      <groupId>org.springframework.boot</groupId>
      <artifactId>spring-boot-starter-data-redis</artifactId>
  </dependency>
2.yml配置(properties配置文件类型自行转换)
spring:
  redis:
  # 集群(分片)模式
    cluster:
      max-redirects: 3
      #节点
      nodes:
        - 192.168.1.17:6379
        - 192.168.1.17:6381
        - 192.168.1.17:6382
    # Redis服务器连接密码(默认为空)
    password: redispwd
    #jedis连接池信息仅供参考
    jedis:
      pool:
        #连接池最大连接数(使用负值表示没有限制)
        max-active: 8
        # 连接池最大阻塞等待时间(使用负值表示没有限制)
        max-wait: -1
        # 连接池中的最大空闲连接
        pool.max-idle: 8
        # 连接池中的最小空闲连接
        pool.min-idle: 0
3.封装RedisTemplate MyRedisConfig.java
import com.fasterxml.jackson.annotation.JsonAutoDetect;
import com.fasterxml.jackson.annotation.PropertyAccessor;
import com.fasterxml.jackson.databind.ObjectMapper;
import org.springframework.boot.autoconfigure.data.redis.RedisProperties;
import org.springframework.cache.annotation.EnableCaching;
import org.springframework.context.annotation.Bean;
import org.springframework.context.annotation.Configuration;
import org.springframework.data.redis.connection.RedisClusterConfiguration;
import org.springframework.data.redis.connection.RedisConnectionFactory;
import org.springframework.data.redis.core.RedisTemplate;
import org.springframework.data.redis.core.StringRedisTemplate;
import org.springframework.data.redis.core.ValueOperations;
import org.springframework.data.redis.serializer.Jackson2JsonRedisSerializer;
import org.springframework.data.redis.serializer.StringRedisSerializer;

import java.util.HashSet;

@Configuration
@EnableCaching
public class MyRedisConfig {

    @Bean
    public RedisClusterConfiguration redisClusterConfiguration(RedisProperties redisProperties){
        RedisClusterConfiguration redisClusterConfiguration = new RedisClusterConfiguration(new HashSet<>(redisProperties.getCluster().getNodes()));
        redisClusterConfiguration.setPassword(redisProperties.getPassword().toCharArray());
        return redisClusterConfiguration;
    }
    @Bean
    public RedisTemplate<Object, Object> redisTemplate(RedisConnectionFactory redisConnectionFactory) {
        RedisTemplate<Object, Object> redisTemplate = new RedisTemplate<>();
        redisTemplate.setConnectionFactory(redisConnectionFactory);
        // 使用Jackson2JsonRedisSerialize 替换默认的jdkSerializeable序列化
        Jackson2JsonRedisSerializer jackson2JsonRedisSerializer = new Jackson2JsonRedisSerializer(Object.class);
        ObjectMapper objectMapper = new ObjectMapper();
        objectMapper.setVisibility(PropertyAccessor.ALL, JsonAutoDetect.Visibility.ANY);
        objectMapper.enableDefaultTyping(ObjectMapper.DefaultTyping.NON_FINAL);
        jackson2JsonRedisSerializer.setObjectMapper(objectMapper);
        // 设置value的序列化规则和 key的序列化规则
        redisTemplate.setKeySerializer(new StringRedisSerializer());
        redisTemplate.setValueSerializer(jackson2JsonRedisSerializer);
        redisTemplate.afterPropertiesSet();
        return redisTemplate;
    }
    /**
     * 对redis字符串类型数据操作
     *
     * @param stringRedisTemplate
     * @return
     */
    @Bean({"valueoperations"})
    public ValueOperations<String, String> valueOperations(StringRedisTemplate stringRedisTemplate) {
        return stringRedisTemplate.opsForValue();
    }
}
4.测试Controller SysController.java
import com.platform.test.common.exception.BusinessException;
import com.platform.test.service.SysService;
import com.platform.test.vo.BaseRespVo;
import org.slf4j.Logger;
import org.slf4j.LoggerFactory;
import org.springframework.beans.factory.annotation.Autowired;
import org.springframework.beans.factory.annotation.Qualifier;
import org.springframework.data.redis.connection.RedisClusterConfiguration;
import org.springframework.data.redis.core.RedisTemplate;
import org.springframework.data.redis.core.ValueOperations;
import org.springframework.web.bind.annotation.RequestMapping;
import org.springframework.web.bind.annotation.RestController;

import javax.servlet.http.HttpSession;
import java.text.SimpleDateFormat;
import java.util.Date;
import java.util.HashMap;
import java.util.concurrent.TimeUnit;

@RestController
@RequestMapping("/sys")
public class SysController {
    static final Logger logger = LoggerFactory.getLogger(SysController.class);
    @Autowired
    @Qualifier("valueoperations")
    ValueOperations<String, String> valueOperations;
    @Autowired
    RedisClusterConfiguration redisClusterConfiguration;
    @Autowired
    RedisTemplate<Object,Object> redisTemplate;
    @Autowired
    SysService sysService;
    final static String REDIS_TEST_KEY_VALUE = "__REDIS_TEST_KEY_VALUE";

    @RequestMapping("/health")
    public BaseRespVo health(HttpSession session) throws BusinessException {
        SimpleDateFormat sf = new SimpleDateFormat("yyyy-MM-dd hh:mm:ss");
        HashMap<String, Object> data = new HashMap<>();
        data.put("time-server",sf.format(new Date()));
        data.put("status-redis",checkRedis());
        return new BaseRespVo(data);
    }

    private boolean checkRedis() {
        long time = System.currentTimeMillis();
        if(valueOperations == null){
            return false;
        }
        try {
            valueOperations.set(REDIS_TEST_KEY_VALUE+time,REDIS_TEST_KEY_VALUE,30000, TimeUnit.MILLISECONDS);
            logger.info("写入redis key: "+ REDIS_TEST_KEY_VALUE+time +" value:"+REDIS_TEST_KEY_VALUE);
            Thread.sleep(100);
            String value = valueOperations.get(REDIS_TEST_KEY_VALUE+time);
            if (value!=null && REDIS_TEST_KEY_VALUE.equals(value)) {
                logger.info("读取redis key: "+ REDIS_TEST_KEY_VALUE+time +" value:"+value);
                return true;
            }
        }catch (Exception e){
            logger.error("redis test exception!",e);
        }
        return false;
    }
}
执行结果:


 2347
2347


 被折叠的 条评论
为什么被折叠?
被折叠的 条评论
为什么被折叠?
 到【灌水乐园】发言


