


HelloWorld!直接开始!
1、建立一个 plug-in 工程,File > New > Project,选择 Plug-in development > Plug-in Project
2、在建立工程的第一个向导,填入工程的名称:osgi.test.helloworld,使用缺省的工程路径。注意目标平台的选择,由于我们的项目是一个通用的 OSGi bundle,所以选择 equinox 。

3、在下一个向导界面中,填入需要的一些插件信息(注意 Eclipse 中的插件概念基本类似于 OSGi 中的 bundle 的概念),关于 activator 的部分,如果不是一个 fragment bundle 则需要填入,除非您的 bundle 自己实现框架的事件监听,这个似乎也没有必要。因此,建议使用缺省的设置。
Activator:这是 bundle 启动时首先调用的程序入口,相当于 Java 模块中的 main 函数。不同的是,main 需要通过命令行调用,而 OSGi 的 Activator 是被动的接受 OSGi 框架的调用,收到消息后才开始启动。
最佳实践:不要在 Activator 中写太多的启动代码,否则会影响 bundle 启动速度,相关的服务启动可以放到服务的监听器中。
4、最后一步,不使用任何的模板,所以勾掉缺省的选项,点击完成。

5、完成,基本的插件视图如图 5,Eclipse 会在工程名下建立相同路径的 Java Package,其中包含了 Activator 类,插件的配置信息也都放在 MANIFEST.MF 文件中,将来我们相当多的工作都是在其中完成。
6、编辑 Activator.java,输入 hello world 语句,代码如下:
package osgi.test.helloworld;
import org.osgi.framework.BundleActivator;
import org.osgi.framework.BundleContext;
public class Activator implements BundleActivator {
private static BundleContext context;
static BundleContext getContext() {
return context;
}
/*
* (non-Javadoc)
* @see org.osgi.framework.BundleActivator#start(org.osgi.framework.BundleContext)
*/
public void start(BundleContext bundleContext) throws Exception {
System.out.println("hello world");
}
/*
* (non-Javadoc)
* @see org.osgi.framework.BundleActivator#stop(org.osgi.framework.BundleContext)
*/
public void stop(BundleContext bundleContext) throws Exception {
Activator.context = null;
}
}
我们可以看到每个 Activator 实际都是实现了 BundleActivator 接口,此接口使 Activator 能够接受框架的调用。在框架启动后,启动每个 bundle 的时候都会调用每个 bundle 的 Activator 。
注意:bundle 的 Activator 必须含有无参数构造函数,这样框架才能使用 Class.newInstance() 方式反射构造 bundle 的 Activator 实例。
这里我们在 start 方法中填入了我们希望输出的 hello world 字符串。那么,怎么才能启动这个 bundle 呢?
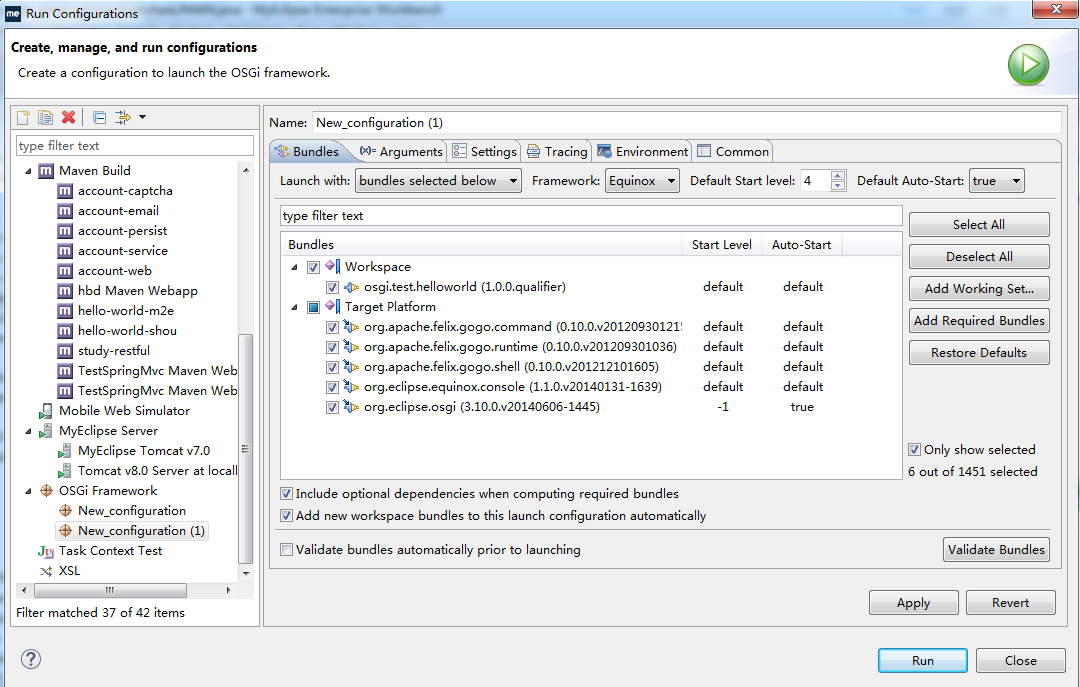
7、执行:选择 Run > Run Configurations,进入运行菜单,在 OSGi framework 中右键点击选择 new 一个新的 OSGi 运行环境,如图:
在右边的运行环境对话框中,输入运行环境的名字、start level 和依赖的插件,由于我们目前不需要其它的第三方插件,因此只需要勾上系统的 org.eclipse.osgi 插件,如果不选择此插件,hello world 将无法运行。如图 7,只有当您点击了 validate bundles 按钮 ,并且提示无问题之后,才表明您的运行环境基本 OK 了。
依赖插件的选择:
OK,那么就点击 Run 吧。


 1379
1379

 被折叠的 条评论
为什么被折叠?
被折叠的 条评论
为什么被折叠?
 到【灌水乐园】发言


