


翻阅 XDA 和海外 MIUI 论坛许久,国内 MIUI 论坛也看了个遍,没找到可靠的解决办法,于是自己瞎 J8 折腾,还真弄出来了
其实我后来才发现,CRC32 和 MD5 的生成全靠解压后得到的两个 .py 文件(与 .bat 同目录)
如果是 Windows 10 系统的用户并开启了内置 Linux 系统,可以切换到 Linux 命令行
然后安装 Python 后,直接去怼那两个 .py 文件,会自动生成【更可靠】
以下内容,使用 MIUI 9 的线刷包操作,MIUI 10 及以上会存在授权问题,仅能通过特定帐号授权才可刷入。
所以先用 MIUI 9 9008 修复后开机(必须开机),测试各个传感器正常后再通过系统升级或 Recovery 卡刷 MIUI 10/11 即可。
强调!【特别特别特别】需要注意:如果没有 MIUI 9 线刷包的手机,【请勿】效仿我下方的操作乱 erase 分区!9008 刷写需要员工授权!没授权无法刷入救砖!
小米 Note 3 推荐使用橙狐 Recovery,下载地址:OrangeFox-Unofficial-new-jason.zip | by EypCnn for Mi Note 3【非官方】
data 分区通过 Recovery 格式化后刷入 Magisk 可以防止数据分区加锁问题。
如果分区大小出现异常,使用 9008 刷写完毕后进官方 Recovery 重置一下数据即可(出厂设置、清理全部数据)。
先说一下,我在看 XDA 论坛时,RedMi Note 3(红米 Note 3)板块有网友提到 fastboot erase psersist 和 fastboot flash persist persist.img 的修复方法。
还有进入 EDL 模式,然后修改 .bat 刷机批处理文件再通过 MiFlash 实现刷入 persist.img 文件。
为什么要刷入这个文件?因为这就是导致传感器失效的原因,而线刷包默认是不会刷入这个文件的
当然我们会想到,拿到这个文件,同样的直接 fastboot flash persist persist.img 不就行了吗?
如果有这么简单,也不会这么费劲儿啦!因为命令会返回错误:FAILED (remote: Partition is write protected)
分区有写保护?那肯定是不行的了…
然后 MiFlash 的这个目录 MiFlash\Source\ThirdParty\Google\Android
我们从这个位置打开命令窗口,输入 fastboot 并回车:

可以看到 reboot 可以传入两个参数,一个是 bootloader(即 fastboot 模式),另一个是 emergency(紧急模式)
其实这个就是 EDL 模式了,我们尝试 fastboot reboot emergency,hh,进系统了(如果可以正常开机的话)
如果不能进系统应该是会滚到 recovery 或 fastboot,甚至卡在启动图标那儿!
难道说这个模式在 小米 Note 3 不存在?红米才有?
实际上小米 Note 3 也是有的,只不过进入的方法太 TM 曲折了!
我们来做准备工作:
用到的文件、程序:
- MiFlash:通用刷机工具点击下载
- 同上网址,找到你需要强刷包,国内稳定、开发版和国际版均可,我是用的国际版(广告少)
- 大脑和一双手【这可不是程序或文件!】
正式动工!
-
解压
tgz,也就是强刷包,如果解压出来是一个tar,就再解压一次tar,得到一个类似jason_global_images_V9.1.4.0.NCHMIEI_20171110.0000.00_7.1_global的文件夹(我以我的国际版为例) -
进入这个文件夹,用非记事本的文本编辑器打开
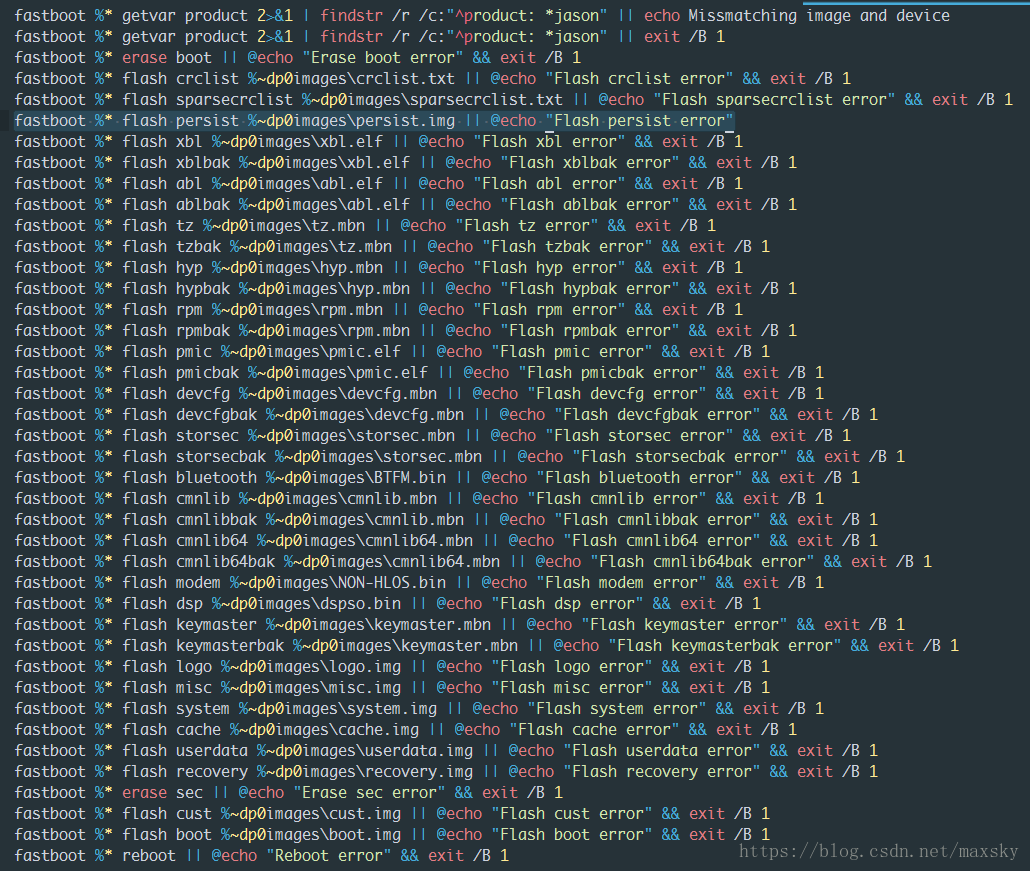
flash_all.bat,如图:新增图中那一行:(位置可以随意,但是最好放在顶部两个 getvar 之下)
::注意,我最后并没有加上 && exit /B 1,为了防止出错终止 fastboot %* flash persist %~dp0images\persist.img || @echo "Flash persist error" -
第一个文件修改完成后,接着第二个,进入
images文件夹,同样的方式打开partition.xml:搜索
persist找到所在行,倒数第二个属性filename后的引号内加入persist.img,如图: -
第三个文件,同目录
rawprogram0.xml:同样搜索
persist,找到所在行,filename后的引号内加入persist.img,如图: -
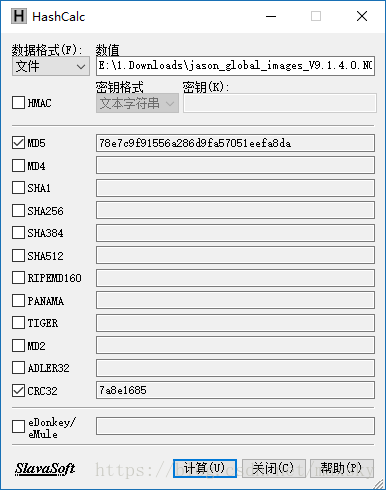
第四个文件,需要一个小工具
HashCalc,百度下一个吧下载好以后打开,数据格式选文件,然后将
persist.img文件拖到数值里面去,下方勾上 CRC32 点计算:将得到的 CRC32 值复制,编辑器打开
crclist.txt,在中间任意位置插入一行,写上# 根据自己的值填入,值前面一定加上 0x。如果你是 12345678,就是 0x12345678 persist 0x7a8e1685 -
至此,文件的准备就已经完成了。不要以为现在用
MiFlash就能成功修复,那是不可能的! -
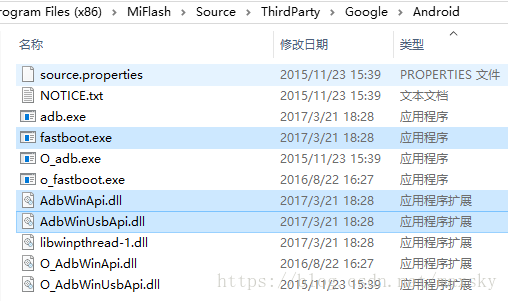
【圈起来划重点】,手机进入
fastboot模式,复制MiFlash\Source\ThirdParty\Google\Android里的
这三个文件到images目录
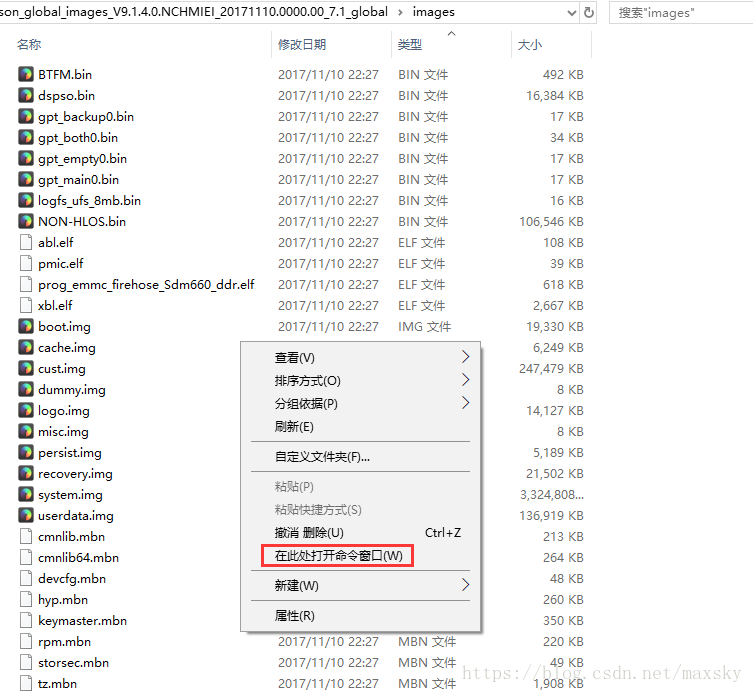
然后按住
Shift,鼠标右键,选择在此处打开命令窗口(Win 10 用户有可能是 Powershell,点他就是)
接下来要操作的事儿可能存在风险,如出现任何问题与本文作者无关…该送修还是送修,该换机就换机
因为…我说了我是瞎 J8 折腾的!这一步如果成功,会进入 EDL 模式
我们先来看一段命令,是我进入 EDL 模式前的操作:
# 这儿开始我在尝试操作分区表 E:\1.Downloads\jason_images_V9.2.2.0.NCHCNEK_20180123.0000.00_7.1_cn\images>fastboot flash partition gpt_backup0.bin target reported max download size of 536870912 bytes sending 'partition' (16 KB)... OKAY [ 0.284s] writing 'partition'... FAILED (remote: Error Updating partition Table ) finished. total time: 0.289s E:\1.Downloads\jason_images_V9.2.2.0.NCHCNEK_20180123.0000.00_7.1_cn\images>fastboot flash partition gpt_both0.bin target reported max download size of 536870912 bytes sending 'partition' (33 KB)... OKAY [ 0.300s] writing 'partition'... OKAY [ 0.062s] finished. total time: 0.365s E:\1.Downloads\jason_images_V9.2.2.0.NCHCNEK_20180123.0000.00_7.1_cn\images>fastboot flash partition gpt_empty0.bin target reported max download size of 536870912 bytes sending 'partition' (17 KB)... OKAY [ 0.054s] writing 'partition'... FAILED (remote: Error Updating partition Table ) finished. total time: 0.059s # 因为 gpt_both0.bin 这个刷入成功,所以我又尝试了一下刷 persist,当然是失败告终 E:\1.Downloads\jason_images_V9.2.2.0.NCHCNEK_20180123.0000.00_7.1_cn\images>fastboot flash persist persist.img target reported max download size of 536870912 bytes sending 'persist' (5188 KB)... OKAY [ 0.113s] writing 'persist'... FAILED (remote: Partition is write protected) finished. total time: 0.117s E:\1.Downloads\jason_images_V9.2.2.0.NCHCNEK_20180123.0000.00_7.1_cn\images>fastboot flash partition gpt_main0.bin target reported max download size of 536870912 bytes sending 'partition' (17 KB)... OKAY [ 0.003s] writing 'partition'... FAILED (remote: Error Updating partition Table ) finished. total time: 0.009s E:\1.Downloads\jason_images_V9.2.2.0.NCHCNEK_20180123.0000.00_7.1_cn\images>fastboot flash partition gpt_main0.bin target reported max download size of 536870912 bytes sending 'partition' (17 KB)... OKAY [ 0.002s] writing 'partition'... FAILED (remote: Error Updating partition Table ) finished. total time: 0.006s # 尝试擦除 persist 分区,失败 E:\1.Downloads\jason_images_V9.2.2.0.NCHCNEK_20180123.0000.00_7.1_cn\images>fastboot erase persist erasing 'persist'... FAILED (remote: Partition is write protected) finished. total time: 0.004s E:\1.Downloads\jason_images_V9.2.2.0.NCHCNEK_20180123.0000.00_7.1_cn\images>fastboot erase persist erasing 'persist'... FAILED (remote: Partition is write protected) finished. total time: 0.002s # 擦除 rpm 分区,成功 E:\1.Downloads\jason_images_V9.2.2.0.NCHCNEK_20180123.0000.00_7.1_cn\images>fastboot erase rpm erasing 'rpm'... OKAY [ 0.010s] finished. total time: 0.011s # 乱试命令中... E:\1.Downloads\jason_images_V9.2.2.0.NCHCNEK_20180123.0000.00_7.1_cn\images>fastboot erase all erasing 'all'... FAILED (remote: Check device console.) finished. total time: 0.003s # 乱试命令中... E:\1.Downloads\jason_images_V9.2.2.0.NCHCNEK_20180123.0000.00_7.1_cn\images>fastboot erase * erasing '*'... FAILED (remote: Check device console.) finished. total time: 0.004s # 擦除用户数据,成功 E:\1.Downloads\jason_images_V9.2.2.0.NCHCNEK_20180123.0000.00_7.1_cn\images>fastboot erase userdata ******** Did you mean to fastboot format this ext4 partition? erasing 'userdata'... OKAY [ 0.522s] finished. total time: 0.523s # 擦除 cust 分区,成功 E:\1.Downloads\jason_images_V9.2.2.0.NCHCNEK_20180123.0000.00_7.1_cn\images>fastboot erase cust erasing 'cust'... OKAY [ 0.019s] finished. total time: 0.021s # 擦除 dummy,失败 E:\1.Downloads\jason_images_V9.2.2.0.NCHCNEK_20180123.0000.00_7.1_cn\images>fastboot erase dummy erasing 'dummy'... FAILED (remote: Check device console.) finished. total time: 0.004s # 擦除 misc,成功 E:\1.Downloads\jason_images_V9.2.2.0.NCHCNEK_20180123.0000.00_7.1_cn\images>fastboot erase misc erasing 'misc'... OKAY [ 0.005s] finished. total time: 0.005s # 这儿是一个中转点,我先用了格式化命令,命令是错的可以不用试,下方几个都如此 E:\1.Downloads\jason_images_V9.2.2.0.NCHCNEK_20180123.0000.00_7.1_cn\images>fastboot format / FAILED (remote: GetVar Variable Not found) E:\1.Downloads\jason_images_V9.2.2.0.NCHCNEK_20180123.0000.00_7.1_cn\images>fastboot format * FAILED (remote: GetVar Variable Not found) E:\1.Downloads\jason_images_V9.2.2.0.NCHCNEK_20180123.0000.00_7.1_cn\images>fastboot format persist FAILED (remote: GetVar Variable Not found) E:\1.Downloads\jason_images_V9.2.2.0.NCHCNEK_20180123.0000.00_7.1_cn\images>fastboot format misc FAILED (remote: GetVar Variable Not found) # 至此,我尝试格式化 system 分区,因为之前是成功的,但是现在失败,错误返回提示已经乱码 E:\1.Downloads\jason_images_V9.2.2.0.NCHCNEK_20180123.0000.00_7.1_cn\images>fastboot format system CreateProcess failed: 绯荤粺鎵句笉鍒版寚瀹氱殑鏂囦欢銆?(2) error: Cannot generate image for system # misc 依旧不行 E:\1.Downloads\jason_images_V9.2.2.0.NCHCNEK_20180123.0000.00_7.1_cn\images>fastboot format misc FAILED (remote: GetVar Variable Not found) # 用户数据分区也是如此 E:\1.Downloads\jason_images_V9.2.2.0.NCHCNEK_20180123.0000.00_7.1_cn\images>fastboot format userdata CreateProcess failed: 绯荤粺鎵句笉鍒版寚瀹氱殑鏂囦欢銆?(2) error: Cannot generate image for userdata # 这儿我放弃了,准备重启进入 bootloader 再试,此时已经成功进入 EDL 模式! E:\1.Downloads\jason_images_V9.2.2.0.NCHCNEK_20180123.0000.00_7.1_cn\images>fastboot reboot bootloader rebooting into bootloader... OKAY [ 0.002s] finished. total time: 0.004s因为没有做进一步测试,我猜测只需清除了rpm、cust和misc分区,即可进入 EDL 模式
已具体测试,在清除rpm分区后重启手机,即可进入 EDL
(Powershell 如果不能直接执行fastboot,fastboot 命令需改成./fastboot.exe)fastboot erase rpm理论来说这几句命令执行后再fastboot reboot bootloader会和我一样成功进入 EDL 模式 -
尾声,在输入重启命令后,能听到手机和电脑的 USB 连接音,屏幕一直黑着,那么恭喜,你成功了99%
剩下的 1% 就非常简单了,我们先
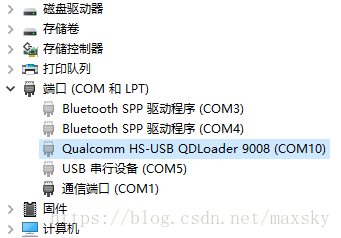
Win+R打开运行窗口,输入devmgmt.msc并回车,进入设备管理器如果没有感叹号提示你未知设备,或者其他什么的,那么如图应该是和我一样有一个高通的端口连接:
【图中为未连接状态,已连接的时候不是半透明的】如果有感叹号需要安装驱动怎么办?打开
MiFlash,点左上角的Driver,然后点击安装即可!当然我的端口是 COM10,每个人不一样,不用在意这些细节,只要这货是连接成功的!
撸开
MiFlash,选择你的线刷包解压文件夹,下方一定记得选全部删除,默认会选中全部删除并lock(千万别选错啦)点一下加载设备,开始刷机吧!
-
不放心?我们看看日志
在
MiFlash的安装目录有一个 Log 文件夹,进入,看到有一个COM开头的txt文件,打开瞧一瞧,只要和下方类似,耐心等待完成就好。
【注意完成后手机不会自动重启,在 MiFlash 的成功提示后自己拔线然后长按开机键等待开机(需要两次,第一次会进入fastboot)】[1:19:06 COM10]:MiFlash 2017.12.12.0 [1:19:06 COM10]:flash in thread name:COM10,id:16 [1:19:06 COM10]:sw in images [1:19:06 COM10]:flash in thread name:COM10,id:16 [1:19:06 COM10]:[COM10]:start flash. [1:19:06 COM10]:received hello packet [1:19:06 COM10]:download programmer E:\1.Downloads\jason_global_images_V9.1.4.0.NCHMIEI_20171110.0000.00_7.1_global\images\prog_emmc_firehose_Sdm660_ddr.elf [1:19:07 COM10]:sahara read 64b data:imgID 13,offset 0,length 64 [1:19:07 COM10]:sahara read 64b data:imgID 13,offset 64,length 728 [1:19:07 COM10]:sahara read 64b data:imgID 13,offset 4096,length 4096 [1:19:07 COM10]:sahara read 64b data:imgID 13,offset 8192,length 2760 [1:19:07 COM10]:sahara read 64b data:imgID 13,offset 12288,length 4096 [1:19:07 COM10]:sahara read 64b data:imgID 13,offset 16384,length 4096 [1:19:07 COM10]:sahara read 64b data:imgID 13,offset 20480,length 4096 [1:19:07 COM10]:sahara read 64b data:imgID 13,offset 24576,length 4096 [1:19:07 COM10]:sahara read 64b data:imgID 13,offset 28672,length 4096 [1:19:07 COM10]:sahara read 64b data:imgID 13,offset 32768,length 4096 [1:19:07 COM10]:sahara read 64b data:imgID 13,offset 36864,length 4096 [1:19:07 COM10]:sahara read 64b data:imgID 13,offset 40960,length 4096 [1:19:07 COM10]:sahara read 64b data:imgID 13,offset 45056,length 4096 [1:19:07 COM10]:sahara read 64b data:imgID 13,offset 49152,length 4096 [1:19:07 COM10]:sahara read 64b data:imgID 13,offset 53248,length 4096 [1:19:07 COM10]:sahara read 64b data:imgID 13,offset 57344,length 4096 [1:19:07 COM10]:sahara read 64b data:imgID 13,offset 61440,length 4096 [1:19:07 COM10]:sahara read 64b data:imgID 13,offset 65536,length 4096 [1:19:07 COM10]:sahara read 64b data:imgID 13,offset 69632,length 4096 [1:19:07 COM10]:sahara read 64b data:imgID 13,offset 73728,length 4096 [1:19:07 COM10]:sahara read 64b data:imgID 13,offset 77824,length 4096 [1:19:07 COM10]:sahara read 64b data:imgID 13,offset 81920,length 4096 [1:19:07 COM10]:sahara read 64b data:imgID 13,offset 86016,length 4096 [1:19:07 COM10]:sahara read 64b data:imgID 13,offset 90112,length 4096 [1:19:08 COM10]:sahara read 64b data:imgID 13,offset 94208,length 4096 [1:19:08 COM10]:sahara read 64b data:imgID 13,offset 98304,length 4096 -
开机,过完设置向导,打开相机发现不卡了,拨号面板
*#*#6484#*#*,测试发现传感器都可以用了!


 2508
2508


 被折叠的 条评论
为什么被折叠?
被折叠的 条评论
为什么被折叠?
 到【灌水乐园】发言


