


1.建立maven项目。
2导入springboot的autoconfigure插件及springboot-parent。
<?xml version="1.0" encoding="UTF-8"?>
<project xmlns="http://maven.apache.org/POM/4.0.0"
         xmlns:xsi="http://www.w3.org/2001/XMLSchema-instance"
         xsi:schemaLocation="http://maven.apache.org/POM/4.0.0 http://maven.apache.org/xsd/maven-4.0.0.xsd">
    <modelVersion>4.0.0</modelVersion>

    <groupId>com.byhoo</groupId>
    <artifactId>token-redis-springboot-starter</artifactId>
    <version>1.0-SNAPSHOT</version>
    <!-- spring parent-->
    <parent>
        <groupId>org.springframework.boot</groupId>
        <artifactId>spring-boot-starter-parent</artifactId>
        <version>2.0.0.RELEASE</version>
    </parent>
    <dependencies>

        <!-- https://mvnrepository.com/artifact/org.springframework.boot/spring-boot-autoconfigure -->
        <dependency>
            <groupId>org.springframework.boot</groupId>
            <artifactId>spring-boot-autoconfigure</artifactId>
            <version>2.2.1.RELEASE</version>
        </dependency>
        <!-- 能够让我们配置properties属性时有一定的提示-->
        <dependency>
            <groupId>org.springframework.boot</groupId>
            <artifactId>spring-boot-configuration-processor</artifactId>
            <optional>true</optional>
        </dependency>
    </dependencies>
</project>
3.编写TokenProperties文件用来读取配置文件信息
package com.bayhoo.utils;

import org.springframework.boot.context.properties.ConfigurationProperties;

/**
 * Created by lenovo on 2019/12/3.
 */

@ConfigurationProperties(prefix = "bayhoo")
public class TokenProperties {
    private String tokenRedisHost;
    private String tokenRedisPwd;

    /*
     配置文件中 配置文件中key没有打写,都是小写
        tokenRedisHost = token-redis-host
     */
    public void setTokenRedisHost(String tokenRedisHost) {
        this.tokenRedisHost = tokenRedisHost;
    }

    public void setTokenRedisPwd(String tokenRedisPwd) {
        this.tokenRedisPwd = tokenRedisPwd;
    }

    public String getTokenRedisHost() {
        return tokenRedisHost;
    }

    public String getTokenRedisPwd() {
        return tokenRedisPwd;
    }
}
@ConfigurationProperties 配置属性 prefix参数为属性前缀昵称
4.创建服务层用来测试TokenService
package com.bayhoo.service;

        import com.bayhoo.utils.TokenProperties;
        import org.springframework.beans.factory.annotation.Autowired;

/**
 * Created by lenovo on 2019/12/3.
 */

public class TokenService {
    @Autowired
    private TokenProperties tokenProperties;
    public String getToken(){
        return tokenProperties.getTokenRedisHost()+","+tokenProperties.getTokenRedisPwd();
    }

}
5.创建自动配置类TokenAutoConfiguration
package com.bayhoo.config;

import com.bayhoo.service.TokenService;
import com.bayhoo.utils.TokenProperties;
import org.springframework.boot.context.properties.EnableConfigurationProperties;
import org.springframework.context.annotation.Bean;
import org.springframework.context.annotation.Configuration;

/**
 * Created by lenovo on 2019/12/3.
 */
@Configuration
@EnableConfigurationProperties(TokenProperties.class)
public class TokenAutoConfiguration {

    @Bean
    public TokenService tokenService(){
        return new TokenService();
    }
}
@Configuration:表明此类是一个配置类,将变为一个bean被spring进行管理。@EnableConfigurationProperties:启用属性配置,将读取HelloServiceProperties里面的属性。@bean:作用之一就是能够管理第三方jar包内的类到容器中
6.在resources文件夹下面新建一个META-INF文件,并在下面创建spring.factories文件,将配置类(TokenAutoConfiguration)注入到IOC容器中。
org.springframework.boot.autoconfigure.EnableAutoConfiguration=com.bayhoo.config.TokenAutoConfiguration到现在我们的token-redis-springboot-starter 就编写完成啦,由于我们的springboot-starter插件是自定义的,所以正确命名应该为xxx-spring-boot-starter 然后在执行 mvn clean install 将我们的springboot-starter打入maven库。
7.新建一个项目,在pom包中引入我们的token-redis-springboot-starter
<dependency>
           <groupId>com.byhoo</groupId>
           <artifactId>token-redis-springboot-starter</artifactId>
           <version>1.0-SNAPSHOT</version>
</dependency>
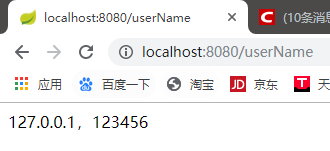
8.在application.yml添加我们自己的属性
bayhoo:
  token-redis-pwd: 123456
  token-redis-host: 127.0.0.1
9.在启动类上编写接口
package com.bayhoo;

import ch.qos.logback.core.net.SyslogOutputStream;
import com.bayhoo.service.TokenService;
import org.springframework.beans.factory.annotation.Autowired;
import org.springframework.boot.SpringApplication;
import org.springframework.boot.autoconfigure.SpringBootApplication;
import org.springframework.web.bind.annotation.RequestAttribute;
import org.springframework.web.bind.annotation.RequestMapping;
import org.springframework.web.bind.annotation.RestController;

/**
 * Created by lenovo on 2019/12/5.
 */
@SpringBootApplication
@RestController
public class SpringbootApplication {

    @Autowired
    private TokenService tokenService;

    @RequestMapping("/userName")
    public String userName(){

        return tokenService.getToken();
    }

    public static void main(String[] args) {
        SpringApplication.run(SpringbootApplication.class);
    }

}
启动springboot项目就可以啦


 2万+
2万+


 被折叠的 条评论
为什么被折叠?
被折叠的 条评论
为什么被折叠?
 到【灌水乐园】发言


