Overview
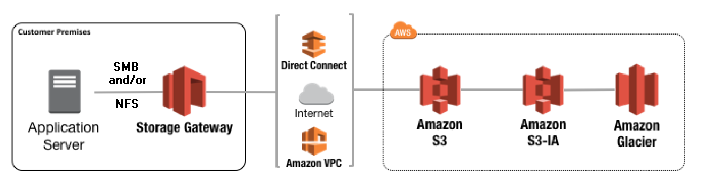
- AWS Storage Gateway connects an on-premises software appliance with cloud-based storage to provide seamless integration with data security features between your on-premises IT environment and the AWS storage infrastructure.
- AWS Storage Gateway offers file-based file gateways (Amazon S3 File and Amazon FSx File), volume-based (Cached and Stored), and tape-based storage solutions
Required prerequisites
- Configure Microsoft Active Directory (AD).
- Ensure that there is sufficient network bandwidth between the gateway and AWS. A minimum of 100 Mbps is required to successfully download, activate, and update the gateway.
- Configure your private networking, VPN, or AWS Direct Connect between your Amazon Virtual Private Cloud (Amazon VPC) and the on-premises environment where you are deploying your gateway, You must also have on-premises access to FSx for Windows File Server.
- Make sure your gateway can resolve the name of your Active Directory Domain Controller. You can use DHCP in your Active Directory domain to handle resolution, or specify a DNS server manually from the Network Configuration settings menu in the gateway local console.
- Hardware requirements for on-premises VMs
- Four virtual processors assigned to the VM
- 16 GiB of reserved RAM for file gateways
- 80 GiB of disk space for installation of VM image and system data
- Storage requirements
-
In addition to 80 GiB of disk space for the VM, you also need additional disks for your gateway.
Gateway type Cache (minimum) Cache (maximum) File gateway 150 GiB 64 TiB
-
Network and firewall requirements
- Your gateway requires access to the internet, local networks, Domain Name Service (DNS) servers, firewalls, routers, and so on.
Amazon S3 File Gateway
- Amazon S3 File Gateway supports a file interface into Amazon Simple Storage Service (Amazon S3) and combines a service and a virtual software appliance.
- By using this combination, you can store and retrieve objects in Amazon S3 using industry-standard file protocols such as Network File System (NFS) and Server Message Block (SMB).
- The software appliance, or gateway, is deployed into your on-premises environment as a virtual machine (VM) running on VMware ESXi, Microsoft Hyper-V, or Linux Kernel-based Virtual Machine (KVM) hypervisor.
- The gateway provides access to objects in S3 as files or file share mount points.
- How to use a file gateway:
- downloading a VM image for the file gateway.
- You then activate the file gateway from the AWS Management Console or through the Storage Gateway API. You can also create a file gateway using an Amazon EC2 image.
- After the file gateway is activated, you create and configure your file share and associate that share with your Amazon Simple Storage Service (Amazon S3) bucket.
- Doing this makes the share accessible by clients using either the Network File System (NFS) or Server Message Block (SMB) protocol.
- Files written to a file share become objects in Amazon S3, with the path as the key.
- There is a one-to-one mapping between files and objects, and the gateway asynchronously updates the objects in Amazon S3 as you change the files.
- Existing objects in the Amazon S3 bucket appear as files in the file system, and the key becomes the path
- Objects are encrypted with Amazon S3–server-side encryption keys (SSE-S3). All data transfer is done through HTTPS.
- The service optimizes data transfer between the gateway and AWS using multipart parallel uploads or byte-range downloads, to better use the available bandwidth.
- Local cache is maintained to provide low latency access to the recently accessed data and reduce data egress charges.
- File gateway converts files to S3 objects when uploading files to Amazon S3.
- Common file operations change file metadata, which results in the deletion of the current S3 object and the creation of a new S3 object.
Creating a file gateway
- creating a gateway
- Choosing a gateway type
- Choosing a host platform and downloading the VM
- Choosing a service endpoint
- Connecting to the gateway: To connect to your gateway, first get the IP address or activation key of your gateway VM.
- Activating the gateway
- Configuring local disks
- Configuring Amazon CloudWatch logging
Managing your file gateway
- After your file gateway is activated and running, you can add additional file shares and grant access to Amazon S3 buckets. Buckets that you can grant access to include buckets in a different Amazon Web Services account than your file share.
- When you create a file share, your file gateway requires access to upload files into your Amazon S3 bucket. To grant this access, your file gateway assumes an AWS Identity and Access Management (IAM) role that is associated with an IAM policy that grants this access.In addition, your S3 bucket must have an access policy that allows the IAM role to access the S3 bucket.
Amazon FSx File Gateway
- Amazon FSx File Gateway (FSx File) is a new file gateway type that provides low latency, and efficient access to in-cloud Amazon FSx for Windows File Server file shares from your on-premises facility.
Benefits of using Amazon FSx File Gateway
- Helps eliminate on-premises file servers and consolidates all their data in AWS to take advantage of the scale and economics of cloud storage.
- Provides options that you can use for all your file workloads, including those that require on-premises access to cloud data.
- Applications that need to stay on premises can now experience the same low latency and high performance that they have in AWS, without taxing your networks or impacting the latencies experienced by your most demanding applications.
How Amazon FSx File Gateway works
- download and deploy the FSx File VMware virtual appliance or an AWS Storage Gateway Hardware Appliance into your on-premises environment.
- activate the FSx File from the Storage Gateway console or through the Storage Gateway API. You can also create an FSx File using an Amazon Elastic Compute Cloud (Amazon EC2) image.
- use the Storage Gateway console to join it to your Microsoft Active Directory domain.
- use the Storage Gateway console to attach the gateway to an existing FSx for Windows File Server.
- FSx for Windows File Server makes all the shares on the server available as shares on your Amazon FSx File Gateway.
- FSx File maps local file shares and their contents to file shares stored remotely in FSx for Windows File Server.
- There is a 1:1 correspondence between the remote and locally visible files and their shares.
Tape Gateway
- Tape Gateway – A tape gateway provides cloud-backed virtual tape storage.
- The tape gateway is deployed into your on-premises environment as a VM running on VMware ESXi, KVM, or Microsoft Hyper-V hypervisor.
- You can run AWS Storage Gateway either on-premises as a VM appliance, as a hardware appliance, or in AWS as an Amazon EC2 instance.
- AWS Storage Gateway supports write once, read many (WORM) and tape retention lock on virtual tapes.
- Virtual tape – A virtual tape is like a physical tape cartridge. However, virtual tape data is stored in the Amazon Web Services Cloud.
- Each gateway can contain up to 1,500 tapes or up to 1 PiB of total tape data at a time.
- Virtual tape library (VTL) – A VTL is like a physical tape library available on-premises with robotic arms and tape drives. Your VTL includes the collection of stored virtual tapes. Each tape gateway comes with one VTL.
- Archive – Archive is analogous to an offsite tape holding facility. You can archive tapes from your gateway's VTL to the archive. If needed, you can retrieve tapes from the archive back to your gateway's VTL.
Creating a tape gateway
- creating a gateway
- Creating a Custom Tape Pool
- Choosing a Tape Pool Type
- Glacier Pool—archives the tape in GLACIER.
- Deep Archive Pool—archives the tape in DEEP_ARCHIVE.
- Using Tape Retention Lock
- Choosing a Tape Pool Type
- Creating Tapes
Managing your tape gateway
- You can add tapes in your tape gateway when you need them.
- The tape gateway automatically creates new virtual tapes to maintain the minimum number of available tapes that you configure.
- You can archive your tapes to Amazon S3 Glacier or DEEP_ARCHIVE.
- When your backup software ejects a tape, it is automatically archived in the pool that you chose when you created the tape.
- Move your tapes from GLACIER to DEEP_ARCHIVE for long-term data retention and digital preservation at a very low cost.
- To access data stored on an archived virtual tape, you must first retrieve the tape that you want to your tape gateway
- If you have multiple tape gateways in an AWS Region, you can retrieve a tape to only one gateway.
- You disable a tape gateway if the tape gateway has failed and you want to recover the tapes from the failed gateway to another gateway.
- You can only disable a gateway on the Storage Gateway console if the gateway is no longer connected to AWS
Volume Gateway
- Volume Gateway – A volume gateway provides cloud-backed storage volumes that you can mount as Internet Small Computer System Interface (iSCSI) devices from your on-premises application servers.
- The volume gateway is deployed into your on-premises environment as a VM running on VMware ESXi, KVM, or Microsoft Hyper-V hypervisor.
- Cached volumes – You store your data in Amazon Simple Storage Service (Amazon S3) and retain a copy of frequently accessed data subsets locally.
- Cached volumes can range from 1 GiB to 32 TiB in size and must be rounded to the nearest GiB.
- Each gateway configured for cached volumes can support up to 32 volumes for a total maximum storage volume of 1,024 TiB (1 PiB)
- You can take incremental backups, called snapshots, of your storage volumes in Amazon S3. These point-in-time snapshots are also stored in Amazon S3 as Amazon EBS snapshots.
- All gateway data and snapshot data for cached volumes is stored in Amazon S3 and encrypted at rest using server-side encryption (SSE)
- After you install the Storage Gateway software appliance—the VM—on a host in your data center and activate it, you use the AWS Management Console to provision storage volumes backed by Amazon S3.
- You then mount these storage volumes to your on-premises application servers as iSCSI devices.
- You also allocate disks on-premises for the VM. These on-premises disks serve the following purposes:
- Disks for use by the gateway as cache storage – As your applications write data to the storage volumes in AWS, the gateway first stores the data on the on-premises disks used for cache storage. Then the gateway uploads the data to Amazon S3.
- Disks for use by the gateway as the upload buffer – To prepare for upload to Amazon S3, your gateway also stores incoming data in a staging area, referred to as an upload buffer.
- Stored volumes – If you need low-latency access to your entire dataset, first configure your on-premises gateway to store all your data locally. Then asynchronously back up point-in-time snapshots of this data to Amazon S3.
- Stored volumes can range from 1 GiB to 16 TiB in size and must be rounded to the nearest GiB. Each gateway configured for stored volumes can support up to 32 volumes and a total volume storage of 512 TiB (0.5 PiB).
- After you install the AWS Storage Gateway software appliance—the VM—on a host in your data center and activated it, you can create gateway storage volumes.
- You then map them to on-premises direct-attached storage (DAS) or storage area network (SAN) disks.
- You can then mount these storage volumes to your on-premises application servers as iSCSI devices.
Creating a volume gateway
- creating a gateway
- Creating a volume
- Using your volume
Managing Your Volume Gateway
- Resizing a volume is not supported. To change the size of a volume, create a snapshot of the volume, and then create a new cached volume from the snapshot.
- As your application needs grow, you can add more volumes to your gateway.
- You can create a new volume from any existing cached volume in the same AWS Region.
- After you delete a volume, you can't get it back.
- As your data and performance needs grow, you might want to move your volumes to a different volume gateway. To do so, you can detach and attach a volume by using the Storage Gateway console or API.
AWS Storage Gateway Hardware Appliance
- The AWS Storage Gateway Hardware Appliance is a physical hardware appliance with the Storage Gateway software preinstalled on a validated server configuration.
- The hardware appliance is a high-performance 1U server that you can deploy in your data center, or on-premises inside your corporate firewall
- The AWS Storage Gateway Hardware Appliance can be ordered directly from the AWS Storage Gateway console.
Activating a gateway in a virtual private cloud
- Using the Amazon VPC service, you can create a private connection between your on-premises software appliance and cloud-based storage infrastructure. You can then use the software appliance to transfer data to AWS storage without your gateway communicating with AWS storage services over the public internet.
- To use a gateway with a Storage Gateway VPC endpoint in your VPC, do the following:
- Use the VPC console to create a VPC endpoint for Storage Gateway and get the VPC endpoint ID.
- If you are activating a file gateway, create a VPC endpoint for Amazon S3.
- If you are activating a file gateway, set up a HTTP proxy and configure it in the file gateway VM local console.
- Use the VPC endpoint ID to activate the gateway.
Moving your data to a new gateway
- You can move data between gateways as your data and performance needs grow, or if you receive an AWS notification to migrate your gateway.
Replacing a file gateway with a new file gateway
- Stop any applications that are writing to the existing file gateway.
- Save the configuration information about your existing file gateway and file shares.
- Stop the existing file gateway.
- Create a new file gateway and mount the file shares.
- Confirm that the new file gateway is working correctly.
- Delete the old gateway.
Moving stored volumes to a new stored volume gateway
- Stop any applications that are writing to the old stored volume gateway.
- Create a snapshot of your volume, and then wait for the snapshot to complete
- Stop the old stored volume gateway
- Detach the storage disks associated with your stored volumes from the gateway VM. This excludes the root disk of the VM.
- Activate a new stored volume gateway with a new hypervisor VM image
- Attach the physical storage disks that you detached from the old stored volume gateway VM in step 5.
- To preserve existing data on the disk, use the following steps to create stored volumes
- (Optional) In the Configure CHAP authentication wizard that appears, enter the Initiator name, Initiator secret, and Target secret, and then choose Save.
- Start the application that writes to your stored volume.
- When you have confirmed that your new stored volume gateway is working correctly, you can delete the old stored volume gateway.
- Delete the old gateway VM.
Moving cached volumes to a new cached volume gateway virtual machine
- Stop any applications that are writing to the old cached volume gateway.
- Unmount or disconnect iSCSI volumes from any clients that are using them.
- Create a snapshot of your volume, and then wait for the snapshot to complete
- Stop the old cached volume gateway
- Detach all disks, including the root disk, cache disks, and upload buffer disks, from the old gateway VM.
- Create a new storage gateway hypervisor VM instance, but don't activate it as a gateway.
- Your new storage gateway hypervisor VM instance should use the same network configuration as the old VM.
- Start the new VM.
- Attach the disks that you detached from the old cached volume gateway VM in step 5, to the new cached volume gateway. Attach them in the same order to the new gateway VM as they are on the old gateway VM.
- Initiate the gateway migration process by connecting to the new VM with a URL that uses the following format: http://
your-VM-IP-address
/migrate?gatewayId=your-gateway-ID
- Detach the old gateway's root disk, whose volume ID you noted in step 5.
- Start the gateway.
- Your volumes should now be available to your applications at the new gateway VM's IP address.
- Confirm that your volumes are available, and delete the old gateway VM.
Moving virtual tapes to a new tape gateway
- Use your backup application to back up all your data onto a virtual tape. Wait for the backup to finish successfully.
- Use your backup application to eject your tape.
- Using your backup application, verify that there are no active backup jobs going to the existing tape gateway before you stop it.
- Stop the existing tape gateway
- Create a new tape gateway.
- Create new tapes
- Use your backup application to start a backup job, and back up your data to the new tape.
- If your tape is archived and you need to restore data from it, retrieve it to the new tape gateway. The tape will be in read-only mode.
- Delete the old tape gateway
Maintaining Your Gateway
- File gateways require at least one disk to use as a cache.
- Volume gateways:
- Stored gateways require at least one disk to use as an upload buffer.
- Cached gateways require at least two disks. One to use as a cache, and one to use as an upload buffer.
- Tape gateways require at least two disks. One to use as a cache, and one to use as an upload buffer.
- We strongly recommend that you allocate at least 150 GiB of upload buffer.You can configure up to 2 TiB of upload buffer capacity for each gateway.
- Generally speaking, you size the cache storage at 1.1 times the upload buffer size
- You can limit (or throttle) the upload throughput from the gateway to AWS or the download throughput from your AWS to your gatewy.
Reference
What is AWS Storage Gateway? - AWS Storage Gateway