


从05年以来一直使用struts+spring+Hibernate进行开发,但是对Serveice层的测试从来也没有认真地使用过junit,今天周末在家试了一下,其实挺简单的。
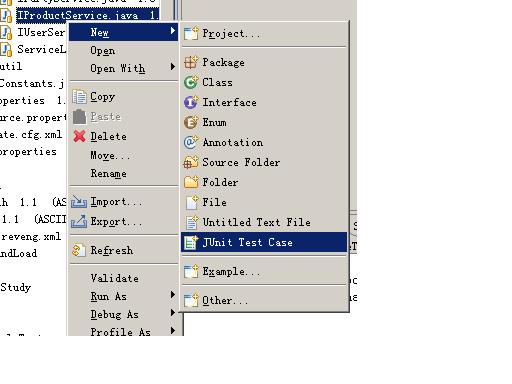
项目的源代码放在src中,再建立一个名为test的Source folder,专么放测试类,直接在要测试的Service上面右单击 ,如下图:
新建一个JUnit Test Case 文件,如下图: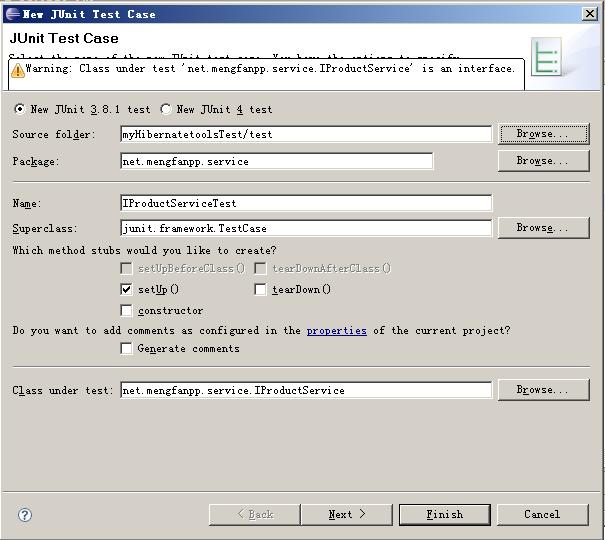
Source floder 改到test文件夹,选中setUp()。
编写测试代码:
 package
net.mengfanpp.service;
import
org.springframework.context.ApplicationContext;
import
org.springframework.context.support.FileSystemXmlApplicationContext;
import
junit.framework.TestCase;
import
net.mengfanpp.domain.Product;
package
net.mengfanpp.service;
import
org.springframework.context.ApplicationContext;
import
org.springframework.context.support.FileSystemXmlApplicationContext;
import
junit.framework.TestCase;
import
net.mengfanpp.domain.Product;
 public
class
IProductServiceTest
extends
TestCase
...
{
public
class
IProductServiceTest
extends
TestCase
...
{ //WebContent/WEB-INF/spring/ 是我的spring配置文件存放目录 ApplicationContext ctx = new FileSystemXmlApplicationContext( "WebContent/WEB-INF/spring/*.xml"); IProductService productService = (IProductService) ctx .getBean("productService");
 /**//* * (non-Javadoc) * * @see junit.framework.TestCase#setUp()
 */ protected void setUp() throws Exception ...{ super.setUp(); } /** *//** * Test method for * {@link net.mengfanpp.service.IProductService#getProductByID(int)}. */ public void testGetProductByID() ...{ // fail("Not yet implemented"); System.out.println("testing..."); Product product = productService.getProductByID(1); System.out.println(product.toString()); }
 }
}
然后,在该文件上右键单击“Run As ——〉Junit Test”查看测试结果!


 713
713

 被折叠的 条评论
为什么被折叠?
被折叠的 条评论
为什么被折叠?
 到【灌水乐园】发言


