


 本文深入探讨了Android系统的Dalvik虚拟机(VM)的工作原理,包括VM架构、JNI交互机制、类加载过程、方法解析、代码验证及优化、垃圾回收机制、同步方法实现等关键环节。此外,还介绍了类加载器的机制及其在Android中的应用。
这是n年前的笔记。当时网上还没有什么关于Dalvik的文章,只找到一篇如何单跑dalvik的说明文档,如获至宝。为满足自己的一时兴趣,在没有Java的基础上,自己决定单啃Dalvik代码。但不得不先读了java语言规范,java虚拟机规范等,否则寸步难行。
此笔记写得比较乱,应该已无多大参考价值,只为纪念当年那段苦闷但还有激情的岁月。
Android - Dalvik分析
VM介于平台和JAVA之间,是平台和JAVA沟通的通道。平台利用VM将JAVA解析为一个个对象,以对象为单位管理、操作JAVA。平台也可以通过reflect机制得到java的属性;java可以通过native机制调用平台API。
1、JavaVM & JNIEnv
对于Android,每个进程只能拥有一个JavaVM,而可拥有多个JNIEnv。JavaVM提供一系列Invocation interface,用于创建/删除VM;而JNIEnv提供一系列的native functions,并使得native code 可以访问java的 class、method、field等。即全局变量gDvm的作用域为进程。
对于有些VM,JNIEnv是thread-local storge,所以线程之间无法共享JNIEnv,常用JavaVM->GetEnv得到thread’s JNIEnv。
在C或C++中,JavaVM和JNIEnv的定义是不一样的,如下:
#if defined(__cplusplus)
typedef _JNIEnv JNIEnv;
typedef _JavaVM JavaVM;
#else
typedef const struct JNINativeInterface* JNIEnv;
typedef const struct JNIInvokeInterface* JavaVM;
#endif
但是第一个成员都是一样的,即:
struct _JNIEnv {
     const struct JNINativeInterface* functions;
。。。。。。。。。。。。。。。。}
struct _JavaVM {
const struct JNIInvokeInterface* functions;
。。。。。。。。。。。。}
但是在dalvik 内部,使用的其实是JNIEnvExt和JavaVMExt:
typedef struct JNIEnvExt {
    const struct JNINativeInterface* funcTable;     /* must be first */
    const struct JNINativeInterface* baseFuncTable;
    /* pointer to the VM we are a part of */
    struct JavaVMExt* vm;
    u4      envThreadId;
    Thread* self;
    /* if nonzero, we are in a "critical" JNI call */
    int     critical;
    /* keep a copy of this here for speed */
    bool    forceDataCopy;
    struct JNIEnvExt* prev;
    struct JNIEnvExt* next;
} JNIEnvExt;

typedef struct JavaVMExt {
    const struct JNIInvokeInterface* funcTable;     /* must be first */
    const struct JNIInvokeInterface* baseFuncTable;
    /* if multiple VMs are desired, add doubly-linked list stuff here */
    /* per-VM feature flags */
    bool    useChecked;
    bool    warnError;
    bool    forceDataCopy;
    /* head of list of JNIEnvs associated with this VM */
    JNIEnvExt*      envList;
    pthread_mutex_t envListLock;
} JavaVMExt;
新创建的JavaVM挂在以gDvm.vmList为头的队列中,由于当前每个进程只有一个VM,所以此队列只有一个成员。JavaVM中的所有JNIEnv以 JavaVMExt.envList为表头串成一双向链表,而JNIEnvExt.vm指向当前JNIEnv所在的VM。从JNIEnvExt的member也可以看出,JNIEnvExt是以线程为作用域的。
对于JavaVMExt.funcTable ,根据参数useChecked,决定使用gInvokeInterface还是gCheckInvokeInterface函数表;对于JNIEnvExt.funcTable,同样有gNativeInterface和gCheckNativeInterface之分。Check和非check之分就在于是否检查得更严格。
2、JNI_CreateJavaVM
平台调用此函数创建VM;利用createStringArray为Java的main创建入参;从输入参数中得到需要执行的class名,得到此class的main:([Ljava/lang/String;)V,并利用CallStaticVoidMethod执行之。
3、JNI_CreateJavaVM ->dvmStartup
调用流程如下:
setCommandLineDefaults
对gDvm中的一些成员赋值,包括heapSizeStart/heapSizeMax/stackSize/jdwpAllowed/classVerifyMode/dexOptMode/executionMode。
对于bootclassPathStr,根据环境变量BOOTCLASSPATH得到其值;对于classPathStr,根据环境变量CLASSPATH得到其值,或者根据传入参数-classpath/-cp得到其值。的此两变量必须存在,否则运行会出错。int dvmProcessOptions(int argc, const char* const argv[],bool ignoreUnrecognized)
处理传入的参数,包括-version/”-help/-classpath/-cp等。dvmCheckAsmConstants
Dalvik共定义了256个操作码,每个操作码的解析占64个字节。code起始于dvmAsmInstructionStart,结束于dvmAsmInstructionEnd。所以应该有如下等式:
(dvmAsmInstructionEnd-dvmAsmInstructionStart)==256*64
具体可见interpC-armXXX.c、interpAsm-armXXX.c 以及mterp.c 。dvmThreadStartup
在当前线程(即main thread)中为 gDvm.pthreadKeySelf分配TLS。
同时创建一个类型为 struct Thread新的线程,并将其挂到以gDvm.threadList为头的线程链表中,此线程并不是真正的pthread线程,而是指VM线程。所创线程的栈空间,或者用malloc分配,或者mmap映射。栈底预留STACK_OVERFLOW_RESERVE(768)个字节做保护,以防止栈溢出。
对此线程做初始化: 并将此新线程的status置为THREAD_RUNNING;对threadId/handle/systemTid赋初值;将此新线程赋值给gDvm.pthreadKeySelf,此即为man VM thread;创建线程的jniLocalRefTable(表项最大可扩展至512)和internalLocalRefTable(表项初始值32,最大可扩展至4096)。对于refTable的功能,详见如下两文档。里面描述了dalvik的全局对象引用和局部对象引用的概念。
Android JNI编程提高篇之一
Android JNI编程提高篇之二
另创建gDvm.threadIdMap,即此进程中线程ID的位图;创建并初始化一个新的monitor,将此monitor插入到gDvm.monitorList的表头处,且将此monitor赋值给gDvm.threadSleepMon。dvmVerificationStartup
对gDvm.instrWidth/gDvm.instrFormat/gDvm.instrFlags赋值,分别代表256个操作码对应的宽度/格式/标志dvmClassStartup
(1)确保gDvm.bootClassPathStr是有效的路径;
(2)创建长度为256的gDvm.loadedClasses hash表,用于缓存已经load的class;
(3)创建大小为5Mb的gDvm.pBootLoaderAlloc私有分配器,后续可以利用dvmLinearAlloc向此空间中申请空间。可用dvmLinearReadWrite/dvmLinearReadOnly等对所分配的空间标志不同的属性。
(4)gDvm.classSerialNumber赋值为0x50000000,至于不赋值为0,是为了可以在binary dump时可以看到此值;
(5)创建gDvm.unlinkedJavaLangClass,其descriptor为 “!unlinkedClass”,用于作为unlinkClass的表头;
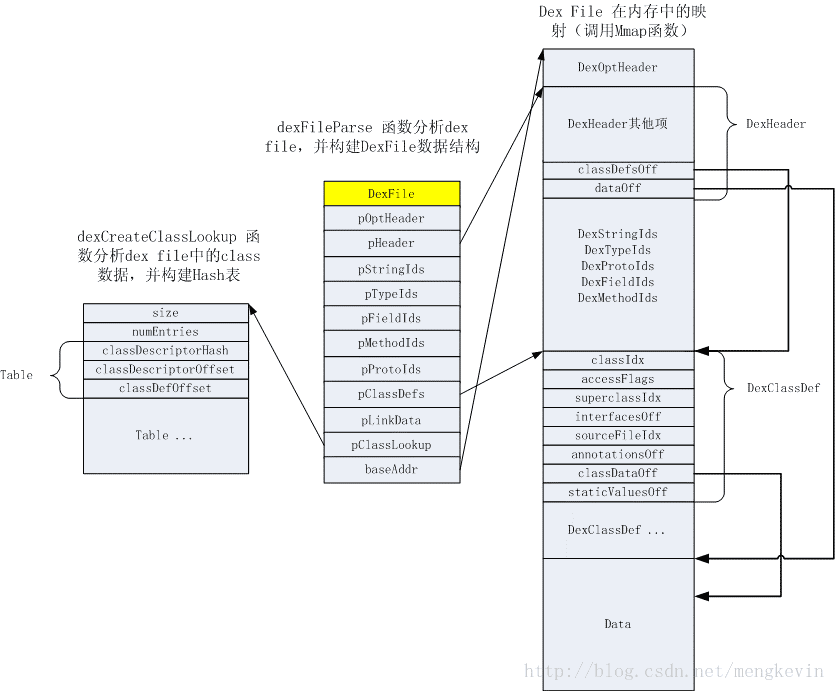
(6)processClassPath: 将gDvm.bootClassPathStr对应路径中的Jar、Dex等格式的文件信息以ClassPathEntry方式保存到gDvm.bootClassPath所指的数组中。即将路径中文件信息以结构JarFile或DexFile来表示。其中最重要的函数为dvmJarFileOpen,此API打开JarFile文件并解析此文件,具体流程如下:dexZipOpenArchive
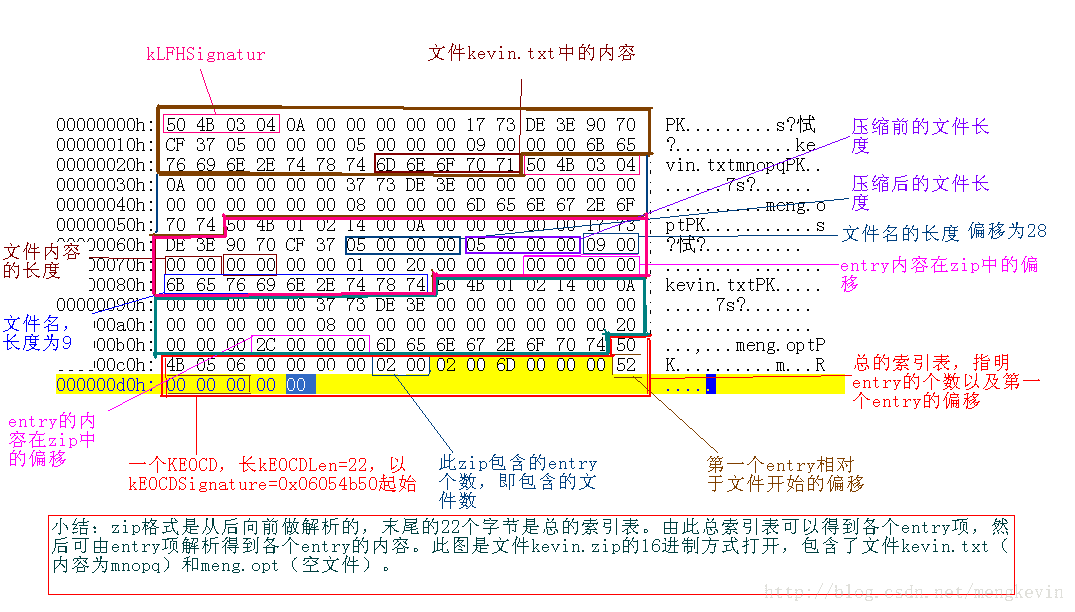
此打开Jar文件,并将此文件以只读方式mmap,再依次读取并判断此文件是否是合法的Zip文件。如是,则提取出mNumEntries (代表了Zip压缩包中包含了几个文件),并依此创建ZipHashEntry类型的hash 表,用于保存Zip文件所包含的文件信息(entry中文件名的偏移、文件名长度、hash值)。Hash value是以文件名计算出来的。此函数执行完后,Jar文件信息保存于结构ZipArchive中。 ZIP文件格式的一个简单说明如上图。查找有无和Jar文件同名但后缀名为odex的文件。比如bootpath中有/home/kevin/android/out/debug/host/linux-x86/pr/sim/system/core.jar, 则尝试打开文件
/home/kevin/android/out/debug/host/linux-x86/pr/sim/system/core.odex。
如存在,则说明有经过优化后的替代文件。先检测此文件的文件头是否为”dey\n”“036\0”,然后读取此文件的dependencies并确保所依赖的文件都已经在gDvm.bootClassPath中。
如此 odex文件不存在,则确认Jar压缩包中有无classes.dex文件。如有classes.dex,先计算出此dex的cache-file name。此文件名为$ANDROID_DATA/dalvik-cache/home@kevin@android@out@debug@host@linux-x86@pr@sim@system@core.jar@classes.dex ,如果环境变量ANDROID_DATA为空,则默认为 “/data” 。
然后尝试打开此文件,如不存在,则创建之,并写入一DexOptHeader。然后利用dexZipExtractEntryToFile将Zip中的classes.dex解压并写到cache file中,由于之前已经有个DexOptHeader,调用dvmOptimizeDexFile去Optimize此cache file。当只是简单优化(只做Byte reordering / structure aligning/class verification/bytecode optimization)则直接在此线程中调用dvmContinueOptimization执行,否则利用fork创建一新进程,利用/bin/dexopt对dex文件做优化,优化过程中会load所有dex中的class。关于优化的话题,后期再说。- dvmDexFileOpenFromFd
打开并解析此cache file。依次得到此文件的DexFile、DvmDex。 最后将得到的ZipArchive、cache file name、DvmDex填充到JarFile中。
小结:执行完dvmClassStartup后,已经完成了对bootpath中Jar文件的解析,并将之以JarFile结构体的方式存于 gDvm.bootClassPath中
dvmThreadObjStartup
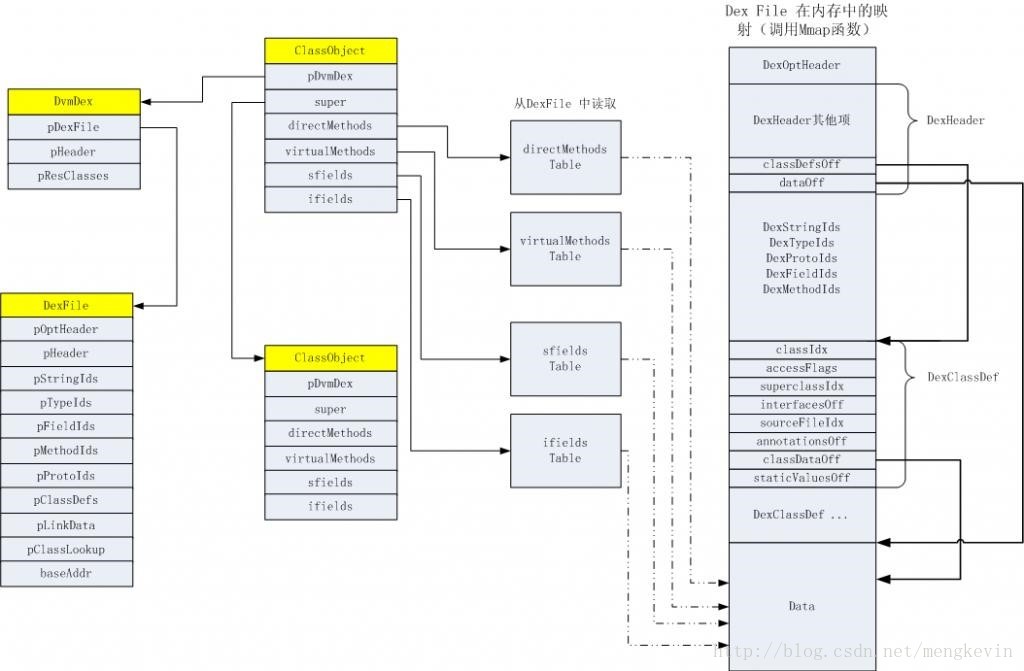
利用findClassNoInit,查找并load运行所必需的class,包括”Ljava/lang/Thread;”/ “Ljava/lang/VMThread;”/ “Ljava/lang/ThreadGroup;”。先从gDvm.loadedClasses此hash表中查找此些class有无已被loaded。如无,则searchBootPathForClass在gDvm.bootClassPath中查找有无dex文件包含此class,如有,则调用loadClassFromDex从对应的dex中load此class,并用dvmAddClassToHash将ClassObject保存于hash表gDvm.loadedClasses中。然后dvmLinkClass去resolve此class。此部分后续再详解。
从上述已load的class中得到所需要的field和method。
dvmJniStartup
- dvmReflectStartup
利用dvmFindSystemClassNoInit查找并load如下必须的class
"Ljava/lang/InternalError;",
"Ljava/lang/StackOverflowError;",
"Ljava/lang/UnsatisfiedLinkError;",
"Ljava/lang/NoClassDefFoundError;",
利用dvmFindClassNoInit查找并load如下class,并确保class的ifieldCount只能为1。
"Ljava/lang/Boolean;",
"Ljava/lang/Character;",
"Ljava/lang/Float;",
"Ljava/lang/Double;",
"Ljava/lang/Byte;",
"Ljava/lang/Short;",
"Ljava/lang/Integer;",
"Ljava/lang/Long;",
dvmPrepMainForJni
从gDvm.threadList取得链表头所指线程,此应该是ThreadID为1新创建的线程。利用createFakeEntryFrame在此线程的top处创建一fake栈帧,此栈帧的method指向”Ldalvik/system/NativeStart;”的 “([Ljava/lang/String;)V” “main”函数,此main为NativeMethod。 Add a stack frame that makes it look like the native code in the main thread was originally invoked from interpreted code. This gives us a place to hang JNI local references. The VM spec says (v2 5.2) that the VM begins by executing “main” in a class, so in a way this brings us closer to the spec. 并将当前的JNIEnv和此线程绑定。
class NativeStart: Dummy class used during JNI initialization. The JNI functions want to be able to create objects, and the VM needs to discard the references when the function returns. That gets a little weird when we’re calling JNI functions from the C main(), and there’s no Java stack frame to hitch the references onto. Rather than having some special-case code, we create this simple little class and pretend that it called the C main(). This also comes in handy when a native thread attaches itself with the JNI AttachCurrentThread call. If they attach the thread and start creating objects, we need a fake frame to store stuff in.栈帧的结构如下:
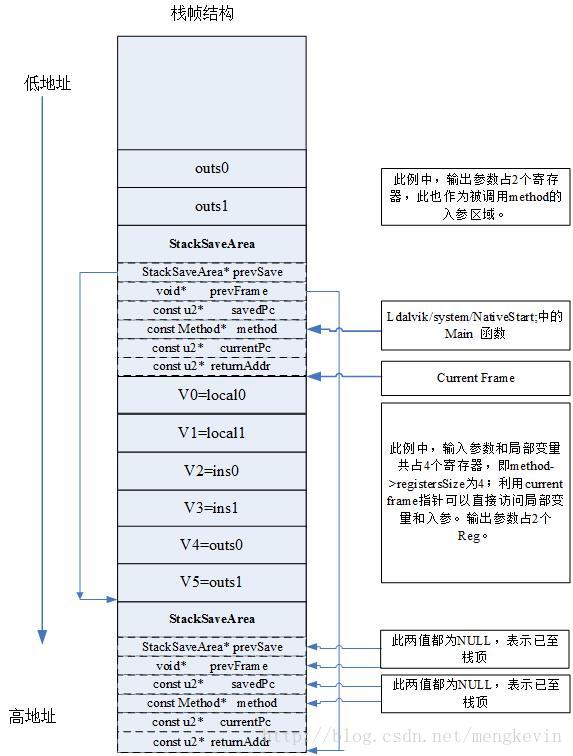
其中Method为NULL,表示此帧为break Frame.在interpAsm-armv4T.s 的函数common_returnFromMethod: 当函数返回时,会检查上一帧是否为break frame,如是,则认为有异常发生。
注:对于JNI栈帧,没有outsXX,只有VM调用interpreted method时才会保留此空间。对于JNI,其返回值是保存于jni reference Table中的,即saveBlock->xtra.localRefCookie指向jni reference Table中的空闲位置。
registerSystemNatives (jniRegisterSystemMethods)用于注册nativemethod
利用PushLocalFrame向VM线程栈中压一个StackSaveArea,其method指向当前method,最后PopLocalFrame此栈帧,此是为了保证在退出jniRegisterSystemMethods时此函数中所有的局部引用能够都被释放。
利用dvmRegisterJNIMethod/ dvmUseJNIBridge将可被class调用的native function注册,使得class 中的method可以访问此些native function。
JNINativeMethod中的
Name:指向class中的method名
Signature:指向此method的descriptor
fnPtr:指向native function例:static JNINativeMethod gMethods[] = {
/* name, signature, funcPtr */
{ “createNewFileImpl”, “([B)Z”, (void*) java_io_File_createNewFileImpl },
“createNewFileImpl”是指文件File.java中的Class java/io/File中的private native boolean createNewFileImpl(byte[] filePath); 而java_io_File_createNewFileImpl则实现在Java_io_File.cpp中。Method “createNewFileImpl”必须带有ACC_NATIVE属性。
经过dvmUseJNIBridge之后,method的nativeFunc和insns分别指向“中间函数”和native function;没有经过register处理的native method,默认的nativeFunc为dvmResolveNativeMethod。当class method调用到native method,则去调用nativeFunc,此利用dvmPlatformInvoke间接的去调用insns。可参见interpAsm-armv4t.asm中的 LinvokeNative。而如果native function 需要调用class method,则利用dvmCallMethod等函数。
在《andriod JNI入门二》中所提的“标准JNI不能通过标准函数名找到C++实现的Helloworld共享库中的函数,但是C实现的helloworld共享没有这个问题”,是因为经过显示的RegisterNatives时,是直接提供了native function名;而没有经过此Register动作的,其默认nativeFunc为dvmResolveNativeMethod。 而dvmResolveNativeMethod执行过程中,dvmLookupInternalNativeMethod先在internal-native method数组gDvmNativeMethodSet中查找此native method,如找到,则可直接以C方式调用;如未找到,则调用lookupSharedLibMethod在currently-loaded shared libraries 中查找。对于本例,由于是在JAVA中显示的load了helloword共享库,所以会走到此步。对于Runtime.nativeLoad,调用dvmLoadNativeCode加载本地native library,并调用JNI_OnLoad 。
对于dvmLookupInternalNativeMethod,会直接将native method 替换为真正的函数;而lookupSharedLibMethod和RegisterNatives,则需要经过“中间函数”去调用执行。
注:”中间函数”会兼顾特定平台的编译方式等等。如dvmPlatformInvoke。
注:对于System.loadLibrary(“libName”)中的libName,会根据不同的平台做不同的转换。对于linux,”lib%s.so”;对于windows, “lib%s.dll”。
注:lookupSharedLibMethod在查找匹配method时,需要根据native method命名规则将method name做转换,比如对于java中printJNI,需要将其转换为 Java_com_simon_HelloWorld_printJNI后再去lib中查找。如果未找到,则在转换后的name后在加上method的参数原形字符串。参见函数createJniNameString、mangleString、createMangledSignature。
注:由于cpp对函数名会mangle,在cpp中实现native method时需要以extern “C”做声名,以保证dlsym在对应的CPP模块中找到此函数。
注:对于native的参数形式,一般为
JNIEXPORT void JNICALL Java_HelloWorld_print(JNIEnv *, jobject,。。。);
而数组gDvmNativeMethodSet中的native函数的参数形式是:
void JNICALL Java_HelloWorld_print(const u4* args,JValue* pResult);
这是由不同的调用方式决定的。因为java在调用native时入参数r0,r1,r2,r3分别对应于“中间函数”dvmCallJNIMethod_XXX的参数形式:
dvmCallJNIMethod_general(const u4* args, JValue* pResult,const Method* method, Thread* self)
而JNIEXPORT void JNICALL Java_HelloWorld_print(JNIEnv *, jobject,。。。);的参数形式是由“中间函数”调用方式决定的。
dvmPrepMainThread
(1)调用 gDvm.classJavaLangThread中的
:(Ljava/lang/ThreadGroup;Ljava/lang/String;IZ)V
(2)调用 gDvm.classJavaLangVMThread中的
:(Ljava/lang/Thread;)V
(3)对线程thread=gDvm.threadList做进一步初始化:
vmThreadObj = (gDvm.classJavaLangVMThread的一个instance)
threadObj = (gDvm.classJavaLangThread 的一个instance)
vmThreadObj-〉vmData= thread;
threadObj-〉vmThread = vmThreadObj;
threadObj-〉contextClassLoader = dvmGetSystemClassLoader();
thread->threadObj = threadObj;(4) threadObj-〉contextClassLoader = dvmGetSystemClassLoader();
此loader是用于在java的上下文中装载class所用。对gDvm.zygote不同类型做处理。关于zygote,后续再做说明。
4、 dvmInitClass
此函数的执行前提是对应class已经resolved、linked完成,即此时class的状态应该>=CLASS_RESOLVED。该函数会被class 、 class->super、class->super->super等一层层的递归调用,所以需要考虑到多线程重入的问题。
/* current state of the class, increasing as we progress */
typedef enum ClassStatus {
    CLASS_ERROR         = -1,
    CLASS_NOTREADY      = 0,
    CLASS_LOADED        = 1,
    CLASS_PREPARED      = 2,    /* part of linking */
    CLASS_RESOLVED      = 3,    /* part of linking */
    CLASS_VERIFYING     = 4,    /* in the process of being verified */
    CLASS_VERIFIED      = 5,    /* logically part of linking; done pre-init */
    CLASS_INITIALIZING  = 6,    /* class init in progress */
    CLASS_INITIALIZED   = 7,    /* ready to go */
} ClassStatus;
当class还未verified,则调用dvmVerifyClass做完verified工作,此时状态会变为CLASS_VERIFIED。由于有可能在执行class的时,有其他线程在init同一个class,所以此处检查class状态是否为CLASS_INITIALIZING,如是,且class的threadID不是当前线程ID,则等待其他线程执行完毕。当当前线程被唤醒后,如果状态仍为CLASS_INITIALIZING,则继续等待;否则此时class的状态一定为CLASS_INITIALIZED。
如果没有并发的行为发生,此时class的状态应仍为CLASS_VERIFIED。继续调用validateSuperDescriptors,
make sure that the methods declared here match up with our superclass and interfaces. We know that the UTF-8 descriptors match, but classes from different class loaders can have the same name。比较clazz->vtable[i]和clazz->super->vtable[i],确保表中的每个method当参数或返回值为class时,用当前clazz和clazz->super去resolve可得到同一个clazz;同样对于clazz->vtable[]中interface method。
此时可以准备执行class的,但先将状态为CLASS_INITIALIZING,且将class的initThread赋为当前线程的ID,然后We unlock the object so that other threads can politely sleep on our mutex with Object.wait(), instead of hanging or spinning trying to grab our mutex., 即会在unlock的条件下执行,从而有可能出现在执行时(即此时状态为CLASS_INITIALIZING)又有其他线程调用dvmInitClass解析此class的现象。
如果class-〉super还未CLASS_INITIALIZED,则调用dvmInitClass初始化class-〉super。此处就发生递归调用。
initSFields(class) :Initialize any static fields whose values are stored in the Dex file. This should include all of the simple “final static” fields, which are required to be initialized first. (vmspec 2 sec 2.17.5 item 8) More-complicated final static fields should be set at the beginning of ; all we can do is trust that the compiler did the right thing。
此时可以dvmFindDirectMethodByDescriptor(clazz, “”, “()V”) ,dvmCallMethod,调用class的void clinit() 函数去Execute any static initialization code。void clinit()是由编译器生成的。
Class状态变为CLASS_INITIALIZED,且调用dvmObjectNotifyAll去Notify anybody waiting on the object。
4.1 initSFields
Initialize any static fields whose values are stored in the DEX file. This must be done during class initialization。
Class->sfieldCount表示此class所包含的static fields个数。且如果clazz->pDvmDex == NULL,则表示will be NULL for VM-generated, e.g. arrays and primitive classes。any static fields should already be set up。
从class所在的dex文件中找到此class对应的DexClassDef,索引得到DexEncodedArray,此array就存放有static的初始值,其存储结构如下:
Uleb128 size;
Encoded_value {
JValue  value;
u1      type;
}  values[size];
Values[] 和sfields[] 是一一对应的。即将sfields[i].value=values[i].value 。
5、dvmLinkClass
Link (prepare and resolve). Verification is deferred until later. This converts symbolic references into pointers. It’s independent of the source file format. If “classesResolved” is false, we assume that superclassIdx and interfaces[] are holding class reference indices rather than pointers. The class references will be resolved during link. (This is done when loading from DEX to avoid having to create additional storage to pass the indices around)。
首先“Resolve” the class. At this point, clazz’s reference fields contain Dex file indices instead of direct object references. We need to translate those indices into real references, while making sure that the GC doesn’t sweep any of the referenced objects. The GC will avoid scanning this object as long as clazz->obj.clazz is gDvm.unlinkedJavaLangClass. Once clazz is ready, we’ll replace clazz->obj.clazz with gDvm.classJavaLangClass to let the GC know to look at it.
It’s important that we take care of java.lang.Class first. If we were to do this after looking up the superclass (below), Class wouldn’t be ready when java.lang.Object needed it. Note that we don’t set clazz->obj.clazz yet. 即当执行到dvmLinkClass时,如果发现java.lang.Class还未linked,则此时利用dvmFindSystemClassNoInit去加载java.lang.Class。
All classes have a direct superclass, except for java/lang/Object。所以其clazz->super为无效的classIndex,应该为kDexNoIndex。
If “classesResolved” is false,则利用dvmResolveClass去解析clazz->super,即将clazz->super原来的index赋值为ClassObject* 。如果clazz->super是final class或interface class,则报错(因为final class和interface class不能被继承)。其次dvmCheckClassAccess检查clazz有无权限去访问clazz->super,It’s allowed if “clazz->super” is public or is in the same package. (Only inner classes can be marked “private” or “protected”, so we don’t need to check for it here.)。对于是否in the same package,通过比较class->descriptor,即对于
Ljava/lang/Object;
Ljava/lang/Class;
此两个class都在Ljava/lang/下,则认为在同一个包中。
 *  Ljava/lang/Object; + Ljava/lang/Class;          --> true
 *  LFoo;              + LBar;                      --> true
 *  Ljava/lang/Object; + Ljava/io/File;             --> false
 *  Ljava/lang/Object; + Ljava/lang/reflect/Method; --> false
Inherit finalizability from the superclass. If this class also overrides finalize(), its CLASS_ISFINALIZABLE bit will already be set. See if this class descends from java.lang.Reference and set the class flags appropriately.
Resolve the interfaces implemented directly by this class. We stuffed the class index into the interface pointer slot.利用dvmResolveClass去解析clazz->interfaces[i],也需利用dvmCheckClassAccess检查class是否可以访问clazz->interfaces[i]。
The ClassObject is now in a GC-able state. We let the GC realize this by punching in the real class type, which is always java.lang.Class. After this line, clazz will be fair game for the GC. Every field that the GC will look at must now be valid:
 * - clazz->super
 * - class->classLoader
 * - clazz->sfields
 * - clazz->interfaces
如果是interface class,则没有vTable,可直接解析为method index,即clazz->virtualMethods[i].methodIndex = (u2) i 。此作为vtable[]的索引值。
如果不是interface class,则创建createVtable。Create the virtual method table. The top part of the table is a copy of the table from our superclass, with our local methods overriding theirs. The bottom part of the table has any new methods we defined. 对于clazz->virtualMethodCount,表示是clazz自定义的virtual method,不包含未override自super的virtual method,可能的最大个数为(clazz->virtualMethodCount + clazz->super->vtableCount),最后会将vTable调整为actualCount个数。对于clazz->virtualMethods[i].methodIndex, For concrete virtual methods, this is the offset of the method in “vtable”。
createIftable:接下来创建interfaceTable。The set of interfaces we support is the combination of the interfaces 。 we implement directly and those implemented by our superclass. Each interface can have one or more “superinterfaces”, which we must also support. For speed we flatten the tree out. We might be able to speed this up when there are lots of interfaces by merge-sorting the class pointers and binary-searching when removing duplicates. We could also drop the duplicate removal – it’s only there to reduce the memory footprint. Because of “Miranda methods”, this may reallocate clazz->virtualMethods.
If we’re an interface, we don’t need the vtable pointers, so we’re done. If this class doesn’t implement an interface that our superclass doesn’t have, then we again have nothing to do.
When we’re handling invokeinterface, we probably have an object whose type is an interface class rather than a concrete class. We need to convert the method reference into a vtable index. So, for every entry in “iftable”, we create a list of vtable indices. Because our vtable encompasses the superclass vtable, we can use the vtable indices from our superclass for all of the interfaces that weren’t directly implemented by us. Each entry in “iftable” has a pointer to the start of its set of vtable offsets. The iftable entries in the superclass point to storage allocated in the superclass, and the iftable entries added for this class point to storage allocated in this class. “iftable” is flat for fast access in a class and all of its subclasses, but “ifviPool” is only created for the topmost implementor.
For each method listed in the interface’s method list, find the matching method in our class’s method list. We want to favor the subclass over the superclass, which just requires walking back from the end of the vtable. (This only matters if the superclass defines a private method and this class redefines it – otherwise it would use the same vtable slot. In Dalvik those don’t end up in the virtual method table, so it shouldn’t matter which direction we go. We walk it backward anyway.) Suppose we have the following arrangement:
     *   public interface MyInterface
     *   public boolean inInterface();
     *   public abstract class MirandaAbstract implements MirandaInterface
     *   //public abstract boolean inInterface(); // not declared!
     *   public boolean inAbstract() { stuff }    // in vtable
     *   public class MirandClass extends MirandaAbstract
     *   public boolean inInterface() { stuff }
     *   public boolean inAbstract() { stuff }    // in vtable
The javac compiler happily compiles MirandaAbstract even though it doesn’t declare all methods from its interface. When we try to set up a vtable for MirandaAbstract, we find that we don’t have an slot for inInterface. To prevent this, we synthesize abstract method declarations in MirandaAbstract.
We have to expand vtable and update some things that point at it, so we accumulate the method list and do it all at once below.
For abstract methods in an interface class, clazz->virtualMethods[n].methodIndex this is the offset of the method in “iftable[n]->methodIndexArray”.,而iftable[n]->methodIndexArray[methodIndez]才是指向vTable的索引值。
InterfaceTable小结:
1) clazz-> iftableCount包括clazz->super-> iftableCount和clazz->interfaceCount* clazz->interfaces[i]->iftableCount。 此时才为clazz->iftable分配空间。
2) 将clazz->super->iftable复制至clazz->iftable中。占iftable的前clazz->super-> iftableCount项。
3) 然后依次将clazz->interfaces[i] .clazz和(clazz->interfaces[i] .clazz)-> iftable[j].clazz复制至clazz->iftable中。即将class的interface以及interface所包含的iftable完全继承。
4) 如果本class是interface class 或本class没有实现新的interface, 则此时的iftable已经可以处理完毕,则不需要调整vTable,可以返回。
5) 检查本class新实现的interface所定义的virtualMethod,如果没有新实现的virtualMethod,则不需要调整vTable,则也可以返回。
6) 需要处理由新interface新引入的virtualMethod。对于clazz->iftable[i].clazz-> virtualMethods,从clazz->vtable[j]中查找是否已经有此virtualMethod,如有,且method为public,则clazz->iftable[i].methodIndexArray[methIdx]赋值为此method在clazz->vtable[]中的索引值; 如果未找到,则临时分配一数组mirandaList用于保存virtualmethod。扩展clazz->vtable和clazz-> virtualMethods,以便能够容纳新的virtualmethod,在往clazz->vtable和clazz-> virtualMethods赋值时,将virtualmethod的accessFlags设置为ACC_MIRANDA,并释放临时分配的数组mirandaList。此新的virtualmethod都是interface中的abstract method.
insertMethodStubs: Provide “stub” implementations for methods without them. Currently we provide an implementation for all abstract methods that throws an AbstractMethodError exception. This allows us to avoid an explicit check for abstract methods in every virtual call. NOTE: for Miranda methods, the method declaration is a clone of what was found in the interface class. That copy may already have had the function pointer filled in, so don’t be surprised if it’s not NULL. NOTE: this sets the “native” flag, giving us an “abstract native” method, which is nonsensical. Need to make sure that this doesn’t escape the VM. We can either mask it out in reflection calls, or copy “native” into the high 16 bits of accessFlags and check that internally.
对于clazz-> virtualMethods中的ACC_ABSTRACT method,将其属性加上ACC_NATIVE,且其nativeFunc指向dvmAbstractMethodStub。
computeFieldOffsets:Assign instance fields to u4 slots. The top portion of the instance field area is occupied by the superclass fields, the bottom by the fields for this class.
计算clazz->ifields[i]的byteOffset,计算过程中,会做排序,将reference field排在ifeilds[]的前面。其后会计算非reference field的偏移值,此过程中需要考虑到32bit和64bit(long型和doubile型)数据类型的差别和4字节对齐的问题。根据最终所算出的偏移值,也可知道instance object占了多少字节。
6、dvmResolveClass
Find the class corresponding to “classIdx”, which maps to a class name string. It might be in the same DEX file as “referrer”, in a different DEX file, generated by a class loader, or generated by the VM (e.g. array classes). Because the DexTypeId is associated with the referring class’ DEX file, we may have to resolve the same class more than once if it’s referred to from classes in multiple DEX files. This is a necessary property for DEX files associated with different class loaders. We cache a copy of the lookup in the DexFile’s “resolved class” table, so future references to “classIdx” are faster. Note that “referrer” may be in the process of being linked. Traditional VMs might do access checks here, but in Dalvik the class “constant pool” is shared between all classes in the DEX file. We rely on the verifier to do the checks for us. Does not initialize the class. “fromUnverifiedConstant” should only be set if this call is the direct result of executing a “const-class” or “instance-of” instruction, which use class constants not resolved by the bytecode verifier.
此函数用来查找classID指定的class,如果class还未loadede,则load此class。如果class的属性为CLASS_ISPREVERIFIED,则class一定是和referrer在同一个Dex文件中,或是bootstrap Class。 先从指定的pDvmDex->pResClasses[]找查找,如未找到,如为PrimitiveClass,则创建一个;否则dvmFindClassNoInit去查找并load此class。最后将load的class保存于pDvmDex->pResClasses[classIdx]中。
7、dvmResolveMethod
先resolve此method所在的class,如果是interface class,则出错返回;
对于METHOD_DIRECT,从clazz->directMethods[i]查找对应的method;
对于METHOD_STATIC,也从clazz->directMethods[i]中查找对应的method,如果在当前clazz中找不到,则从clazz->super中找,一直循环至clazz->super为NULL。
对于METHOD_VIRTUAL,从clazz->virtualMethods[i]中查找,类似于METHOD_STATIC,如当前clazz中未找到,则向clazz->super进一步查找。
如果所resolved method是abstract method, 则其所在的class也一定是abstract calss。如果是static method, 则init其所在的class。
最后将resolve所得到的method保存于pDvmDex->pResMethods[methodIdx]。
8、dvmResolveInterfaceMethod
先resolve此method所在的class,此class一定是interface class。
先在当前class的clazz->virtualMethods[i]中查找;如未找到,则当前class的iftable中的clazz(resClass->iftable[j].clazz)的virtualMethods[i]中查找。
最后所resolved得到的method一定是abstract method。然后将method保存于pDvmDex->pResMethods[methodIdx]
9、dvmResolveInstField
在clazz->ifields[]中依据file name和filed signaturez查找field,如未找到,则从clazz->super中找,一直至clazz->super为NULL。
最后将所得filed保存于pDvmDex->pResFields[fieldIdx]。
10、dvmResolveStaticField
在当前class中的clazz->sfields[]中依据file name和filed signaturez查找field;如未找到,clazz->iftable[].clazz-> sfields[]中继续查找,只需要查找此表的前clazz->super->iftableCount个。
如未找到,则继续递归在clazz->super中查找,一直至clazz->super为NULL。
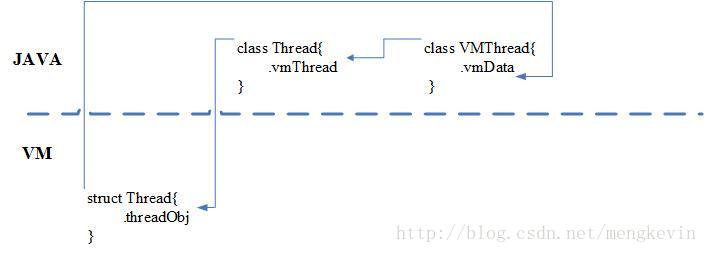
11、Dvm的线程结构
Dalvik的线程共涉及到4种结构:
VM中: Struct Thread,  pThread
Java中: class Thread,class VMThread
线程执行体是由pthread方式创建的,以Struct Thread来管理线程的相关信息;class VMThread是和Struct Thread对应的,即Java以VMThread为中介来访问访问或控制VM线程;而class Thread是Java的线程表现,是Java直接看到的线程呈现。关系如下图。
There are basically two main ways of having a {@code Thread} execute application code. One is providing a new class that extends {@code Thread} and overriding its {@link #run()} method. The other is providing a new {@code Thread} instance with a {@link Runnable} object during its creation.
In both cases, the {@link #start()} method must be called to actually execute the new {@code Thread}.即JAVA有两种办法创建线程,一是新定义一个以class Thread为父类的class,并重载函数run;或者创建Thread时指定Runnable,此也会更新函数run。
父线程调用start时才会真正去创建pthread线程,即才会走到VM创建thread流程,Class VMThread是由VM创建的,并赋值给class Thread;函数run是在子线程中由VM调用。所以.vmThread也用于判断thread是否已经被strated。
涉及到2个函数dvmCreateInterpThread和interpThreadStart,分别是由父线程和子线程调用的。由于子线程的结构struct Thread的初始化是在子线程中执行的,所以父线程和子线程有个同步关系。涉及到Thread->status、gDvm.threadListLock、gDvm.threadStartCond。

Thread以ThreadGroup的方式组织为树的形式。此树的inner node为ThreadGroup,而leaf node是Thread。The unique root of the tree is a {@code ThreadGroup} that is created at VM startup and has the name “system”。此root是在如下流程中创建的:
dvmPrepMainThread -->
dvmInitClass(gDvm.classJavaLangThreadGroup) -->
dvmCallMethod(. <init>.)
具体可见ThreadGroup.Java中的mSystem和mMain。
对于Thread.java对象threadObj,调用Thread(…) 将其挂接到threadGroup树中。调用gDvm.classJavaLangVMThread的init,用此threadObj构建一VMThread。
12、verifying and optimizing
后期在dvmInitClass时会用dvmVerifyClass去检测class。
有3种方式生成prepared dex或ODEX:
1) VM “just in time”: 即VM实时解析Dex文件并生成ODex,并将之写入到目录dalvik-cache。
2) system installer。 即在安装APP时,由installer生成ODex,并写入到目录dalvik-cache。
3) Build system。即在编译阶段就预先生成ODex,并将之放入dalvik-cache。对于此种方法,当其中一个class有变化时,需要重新编译相关联的class。
对于1) 和2),分为以下3步:
(1) 先生成dalvik-cache下的dex文件
(2) 从zip文件中抽取出classes.dex,在文件的开头预留 ODex header。
(3) 将此ODex文件映射至memory。也会调用dvmOptimizeDexFile优化此dex文件
对于3),则是由编译系统利用emulator模拟just in time方式,来优化Dex。此是考虑到不同的平台,工具无法做到最优。
相关的函数说明如下:
dvmVerifyClass
会调用verifyMethod: verify class的directMethods[]和virtualMethods[]。verifyMethod
如果insnsSize==0,则此method应该为native method或者abstract method。否则检测method code中的每个instruction的合法性。此合法性包括:dvmComputeCodeWidths
根据instruction的op计算每条指令应该占的长度,将其相加,将所得代码长度与insnsSize比较,两者应该一样。verifyInstructions
对于instruction中涉及到的index,比如filed index、string index,将值与method所在的Dex文件中的pDvmDex->pHeader->typeIdsSize/stringIdsSize等比较,确认有无越界。dvmVerifyCodeFlow
initRegisterTable
根据gDvm.generateRegisterMaps决定为哪类指令创建RegType*。共分为3类指令:kTrackRegsAll:所有的ins kTrackRegsGcPoints: Gc ins和branch ins kTrackRegsBranches: branch ins注:Gc ins包括:Branch , Switch, Throw,Return 此4类指令
Branch包括:Goto,IF_XXX。每个method的第一条指令,都已经被强制置位了branch 属性。
每条指令的RegType*占 (meth->registersSize + kExtraRegs(2) )个RegType 。此kExtraRegs(2)个空间规划给hold the return type briefly,最多可占2个。 即空间规划如下:Local Reg | input Reg | output RegsetTypesFromSignature
在method的第一条指令运行前,method的入参应该就绪。第一条指令的RegType*做如下分配:
(1) 先预留(meth->registersSize - meth->insSize)个寄存器作为local param.
(2) 对于非static method,需要默认添加一个入参this,代表此method所在的calzz。此this作为第一个入参。
(3) 根据method prototype,得到参数的个数以及类型,将类型依次填入;对于类型为classObject,则填入clazz。根据method prototype,的参数个数和类型,从而可以计算出参数所占的寄存器个数,将此个数与meth->insSize相比较,两者应该相等。 根据method prototype,检查method的返回类型字符串符是否合法。
doCodeVerification
Grind through the instructions.
The basic strategy is as outlined in v3 4.11.1.2: set the “changed” bit on the first instruction,
process it (setting additional “changed” bits), and repeat until there are no more.
v3 4.11.1.1
-> (N/A) operand stack is always the same size
-> operand stack [registers] contain the correct types of values
->local variables [registers] contain the correct types of values
-> methods are invoked with the appropriate arguments
-> fields are assigned using values of appropriate types
-> opcodes have the correct type values in operand registers
-> there is never an uninitialized class instance in a local variable in
code protected by an exception handler (operand stack is okay, because the operand stack is discarded when an exception is thrown) [can’t know what’s a local var w/o the debug info – should fall out of register typing]v3 4.11.1.2
-> execution cannot fall off the end of the code
(We also do many of the items described in the “static checks” sections, because it’s easier to do them here.)
We need an array of RegType values, one per register, for every instruction. In theory this could become quite large – up to several megabytes for a monster function. For self-preservation we reject anything that requires more than a certain amount of memory. (Typical “large” should be on the order of 4K code units * 8 registers.) This will likely have to be adjusted.
The spec forbids backward branches when there’s an uninitialized reference in a register. The idea is to prevent something like this:loop: move r1, r0 new-instance r0, MyClass ... if-eq rN, loop // once initialize r0This leaves us with two different instances, both allocated by the same instruction, but only one is initialized. The scheme outlined in v3 4.11.1.4 wouldn’t catch this, so they work around it by preventing backward branches. We achieve identical results without restricting code reordering by specifying that you can’t execute the new-instance instruction if a register contains an uninitialized instance created by that same instrutcion.
先对method的第一条ins设置为kInsnFlagChanged。然后针对标志为kInsnFlagChanged的指令,如为branch ins,则从RegType*中将寄存器的值copy至“workReg”寄存器中,然后做verifyInstruction检查:
在verifyInstruction中,检查当前指令currIns的合法性(参数,索引有无越界等等)。然后根据currIns的属性(Continue/Branch),得到下一条即将运行指令nextIns的地址,如果nextIns的RegType*不为NULL,则将currIns的执行结果(workReg寄存器值)跟新到nextIns的RegType*中。如果nextIns没有被标志为kInsnFlagChanged或kInsnFlagVisited,则将nextIns标志为kInsnFlagChanged;否则如果workReg和nextIns的RegType*值不一样,也会做同样的处理,即虽然nextIns可能已经执行过,但是还有再次需要执行的可能性。对于IF_XX等指令,其有continue和branch双重属性,会先处理continue再处理branch,所以执行的主要流程是顺序执行的。然后将currIns标志为kInsnFlagVisited,清除掉标志kInsnFlagChanged。如果method是不可写的,则检查method是否还有指令的状态不为kInsnFlagVisited,如有,则说明method中有dead code,There’s nothing “evil” about dead code(besides the wasted space), but it indicates a flaw somewhere down the line, possibly in the verifier.If we’ve rewritten “always throw” instructions into the stream, we are almost certainly going to have some dead code.
dvmOptimizeDexFile
如果只是简单的做opt,则用dvmContinueOptimization;否则fork一个进程,调用/bin/dexopt去优化Dex。- dvmContinueOptimization
- rewriteDex
(1) 如果硬件平台为big-endian,则需要交换字节序。比如对于4字节的长度,则需要做交换处理。
(2) 解析dex文件,得到DexFile;再根据DexFile,得到DvmDex。
(3) 创建DexClassLookup 表,将dex文件中的class依次填入此hash表中。从DexFile中可以索引到此表。
(4)利用dvmFindSystemClassNoInit去load此dex中的所有class。此处有个技巧:
dvmFindSystemClassNoInit会从bootpath中搜索相关的目录,所以在load前,将
gDvm.bootClassPathOptExtra = pDvmDex;load完之后,再
gDvm.bootClassPathOptExtra = NULL。利用此全局变量,可以搜索到我们的目标Dex文件。
(5) 调用dvmVerifyAllClasses去veryfy此Dex文件中的所有class。可参见dvmVerifyClass。 - writeDependencies
将gDvm.bootClassPath中的class相关信息添加到此Dex末尾处。 - writeAuxData
将DexClassLookup,IndexMapSet,RegisterMapBuilder依次添加到Dex末尾处。
- rewriteDex
- dvmContinueOptimization
最后将相关偏移量填写到DexOptHeader中。
13、VM调用native/interpreted method流程
调用callPrep做栈预处理,即在self thread的栈底为method创建stack。Native和interpreted两者的stack是不一样的,主要差别在于出参的存放位置。Interpreted是保存在stack中,而native是保存于jni local reference table中。
- 如果不是static method,则入参的第一个参数是this,当需要对应得clazz时,由this->clazz得到。
扫描 method->shorty[1]字符串,依次得到method的参数类型,然后据此依次从参数列表中得到参数值并压栈。需要确保入参所占的reg个数与method->insSize相等,否则抛出异常。 - 如果是native nethod,则调用method->nativeFunc;否则调用dvmInterpret。
- 最后调用dvmPopFrame将先前所压的栈做退栈。对于native method,同时做jni local reference table退栈。
dvmCallMethod/dvmCallMethodV/dvmCallMethodA/dvmInvokeMethod, 此4个函数的实现大同小异,主要差别在于参数的传入方式不同。
14、OP_INVOKE
14.1 OP_INVOKE_VIRTUAL: /* 0x6e */
即JAVA中调用java method时的流程描述。此ins的格式如下:
B|A|op CCCC G|F|E|D
[B=5] op {vD, vE, vF, vG, vA}, meth@CCCC
根据参数glue,可得到pDvmDex->pResMethods,然后以 CCCC为索引值,在pDvmDex->pResMethods中得到baseMethod,如为空,则dvmResolveMethod解析此method。从栈中得到第一个参数this(即vD所指),可得到thisPtr->clazz->vtable即此clazz的虚拟函数表,以baseMethod->methodIndex为索引值得到vtable[methodIndex]. 即thisPtr->clazz->vtable[pDvmDex->pResMethods[CCCC]->methodIndex]为将要执行的method。
根据B,将B个参数依次从当前FP copy至新的FP,newFp=old savearea – regsSize。然后依据(newsave - outsSize)> self->StackEnd 检查是否越栈。然后将相关信息填入newSaveArea,此时检查是否为native method,如是则转LinvokeNative。之后用新信息填入glue,开始取baseMethod的ins开始执行。
对于LinvokeNative ,调用前需要将Thread_jniLocal_topCookie保存于newFp->localRefCookie;在调用Method_nativeFunc返回后,需要用StackSaveArea_localRefCookie将Thread_jniLocal_topCookie局部引用退栈。
14.2 OP_INVOKE_XX
对于OP_INVOKE_SUPER、OP_INVOKE_DIRECT、OP_INVOKE_STATIC、OP_INVOKE_INTERFACE和 OP_INVOKE_VIRTUAL大同小异,主要差别在于怎么得到method。
OP_INVOKE_SUPER : method->clazz->super->->vtable[pDvmDex->pResMethods[CCCC]->methodIndex]
OP_INVOKE_DIRECT : pDvmDex->pResMethods[CCCC]
OP_INVOKE_STATIC : pDvmDex->pResMethods[CCCC] ,不做this指针检查。
OP_INVOKE_INTERFACE : 利用dvmFindInterfaceMethodInCache去找到methodToCall。
1) 需要满足 thisClass->iftable[i].clazz == pDvmDex->pResMethods[CCCC]->clazz,即同一个class。
2) vtableIndex = thisClass->iftable[i].methodIndexArray[pDvmDex->pResMethods[CCCC]->methodIndex]
3)methodToCall = thisClass->vtable[vtableIndex];
15、common_returnFromMethod
从当前saveArea得到savedPc,然后将此savedPc加3后得到rINST。此3是表示invoke ins的指令长度,即跳过invoke指令,指向invoke的下一条ins。
16、class instance对象的内存分布
1、Struct object的size
2、classRef  field(占32bit)
3、double/long  filed(占64bit)
4、其他(int,boolen,char…)  filed(占32bit)
当new一个class的instance时,会按照如上结构的size去分配一空间,然后用相应class的constructor去初始化此结构,其会递归调用clazz->super->()。每个instance是以struct Object开始的,也可见instance的ram只包含了field部分。其obj->clazz指向其对应的classObject。
17、synchonized method的VM实现
对于声明为synchronized的method,在编译时会在头和尾分别增加
: monitor-enter vXX   :对应于 dvmLockObject( self,object)
: monitor-exit vXX    :对应于 dvmUnlockObject( self, object)
此处的object一般指this。 对于Object ->lock,有THIN和FAT之分:
THIN: lock的32bit是按如下做了划分
Bit3–bit19 / bit18–bit3 / bit2–bit1 / bit0
Lock-count / (threadID) / hash state / THIN/FATFAT: 当本线程得到lock后,则创建monitor (所分配的地址值的末尾3bit一定需要为0),并将之赋给Object->lock。
至于有THIN和FAT之分,在于FAT将thin所做的工作由monitor来表示,对于每次lock/unlock的动作,不需要那么复杂;另一方面是由于同步需要体现在VM层面(Thread->status)和native(pthread_mutex_XXX)层面,通过monitor将两者统一起来。
18、GC实现
启动VM时,会调用dvmGcStartup做heap的初始化,对于非zygote进程,会继续调用dvmGcStartupAfterZygote做GC的初始化。
- dvmGcStartup:创建全局变量gDvm.gcHeap 、gHs、gHs->heaps[0] 。以后利用dvmAllocObject在此heap做object的空间分配。
- dvmGcStartupAfterZygote:创建入口为heapWorkerThreadStart的线程,用于在后台处理gc所收到的request。此会利用doHeapWork做实际的收集工作。
- doHeapWork:优先从队列gDvm.gcHeap->referenceOperations取所排列的object,如此对列为空,则从gDvm.gcHeap->pendingFinalizationRefs对列取object。如果需要WORKER_FINALIZE,则调用clazz object对应的method: finalize,即Class如果实现了method:void finalize() ,则在此时被执行;如果是WORKER_ENQUEUE,则调用java.lang.ref.Reference的method:enqueueInternal,即当object的reachability state有改变时,对此object的reference会被放入此队列。
- dvmCollectGarbageInternal:
java的GC机制的详细描述见《The.Java.Programming.Language,4th.Edition》的17.1/17.2/17.5章节。
Reference可分为如下4类:
strongly reachable 、softly reachable、weakly reachable、phantom reachable、unreachable。
Once an object becomes weakly reachable (or less), it can be finalized. If after finalization the object is unreachable, it can be reclaimed。
dvmCollectGarbageInternal的流程如下:
- 首先确保线程heapWorkerThreadStart没有被长时间的挂住,此通过判断线程是否处于callMethod “finalize”或“enqueueInternal” 状态以及callMethod的起始时间/当前时间来做评估。
调用dvmHeapMarkRootSet标注root object 为strongly reachability。包括:
1/ System classes defined by root classloader: 对gDvm.loadedClasses中的class做markClassObject (dvmMarkObjectNonNull)处理;
2/ Primitive classes: 对gDvm.primitiveClass[]中class做dvmMarkObject(dvmMarkObjectNonNull)处理;
3/ For each thread:
** Associated Thread/VMThread object:
对Thread->threadObj做dvmMarkObject(dvmMarkObjectNonNull)
**Exception currently being thrown, if present :
对 Thread->exception 做dvmMarkObject(dvmMarkObjectNonNull)
**Automatic VM local references (TrackedAlloc):
对Thread->internalLocalRefTable中的每个object做dvmMarkObjectNonNull
**JNI local references:
对Thread-> jniLocalRefTable中的每个object做dvmMarkObjectNonNull;对Thread-> jniMonitorRefTable中的每个object做dvmMarkObjectNonNull;
**Interpreted stack, from top to “curFrame”:
**Dalvik registers (args + local vars):
对Thread栈做回溯,对每个所调用到的method,根据method->registerMap,得到saveArea->xtra.currentPc即此thread currentPC所指instruction的对应的register bit value。然后从curret frame中取得v0,v1。。,的值,即method的local register和ins register,然后根据method->registersSize从register bit value取得相应的bit,如为1,则说明所对应的register指向alive object,做dvmMarkObjectNonNull处理;如无registerMap,则直接根据v0,v1。。,得值做判断,如指向object,则也做dvmMarkObjectNonNull处理。
**ThreadGroups (could track & start with these instead of working upward from Threads):
This assumes that the ThreadGroup class object is in the root set, which should always be true; it’s loaded by the built-in class loader, which is partof the root set.
**JNI global references
对gDvm.jniGlobalRefTable和gDvm.jniPinRefTable中的每个object做dvmMarkObjectNonNull处理。
**Interned string table
对 gDvm.internedStrings中的每个object做markStringObject处理。
**Special objects
**gDvm.outOfMemoryObj
对gDvm.outOfMemoryObj、gDvm.internalErrorObj、gDvm.noClassDefFoundErrorObj
做dvmMarkObjectNonNull处理;对gDvm.jniWeakGlobalRefQueue做dvmMarkObject处理。
**Objects allocated with ALLOC_NO_GC
对gDvm.gcHeap.nonCollectableRefs每个object做dvmMarkObjectNonNull处理。
**Objects pending finalization (but not yet finalized)
对gDvm.gcHeap. referenceOperations和gDvm.gcHeap. pendingFinalizationRefs
做dvmMarkObjectNonNull处理。
**Objects in debugger object registry
对gDvm.dbgRegistry 中的每个object做markRef处理。
Don’t need:
**Native stack (for in-progress stuff in the VM)
**The TrackedAlloc stuff watches all native VM references.注:dvmMarkObjectNonNull是利用了heap的bitmap去做查询以及set或clear相应bit。Heap bitmap的组织结构如下:
将heap空间的最小分配单位定义为HB_OBJECT_ALIGNMENT(8) bytes,即以8b为最小管理单元,所以object的地址一定是8字节对齐的。Bitmap为long int数组,假设sizeof(long int)为8byte,即为64bit,则bitmap[0].bit[0]表示heap的起始块block0,而bitmap[0].bit[1]表示block1, block1 = block0+8, 然后以此类推。这样heap范围内的地址都可以对应到bitmap中。
对于dvmIsValidObject,就是认为如果heap的bitmap对应位已经被set,则认为此是object。利用dvmHeapScanMarkedObjects将root object所引用的任何object迭带标记为strong reachability。由此形成以各个root object为root的多个树状结构。
搜索bitmap中已经set的bit,并得到对应的object,利用scanObject对此object相关的obj做mark。
scanObject:得到obj->clazz,将此clazz做markObjectNonNull:
(1) 如果clazz是object Array,即”[L*” or “[[*”,则scanObjectArray此obj,对于array中的object做markObject;
(2) 如果是DataObject,则对clazz->ifields中的ifieldRefCount个ref obj做markObject。一直循环至
clazz->super!=NULL。
(3) 如果clazz->accessFlags是CLASS_ISREFERENCE,说明是soft reference;利用isMarked确认
object->offJavaLangRefReference_referent是否已经被mark过,如没,且markAllReferents为真,则markObjectNonNull此object->offJavaLangRefReference_referent。
(4) 如果clazz->accessFlags 只为CLASS_ISREFERENCE,且
softReferenceCollectionState==SR_COLLECT_NONE,则不回收soft ref,markObjectNonNull此
object->offJavaLangRefReference_referent;如果为SR_COLLECT_ALL,则将此ref添加到
gcHeap->softReferences中。
(5) 对于CLASS_ISWEAKREFERENCE,将此obj添加到gcHeap->weakReferences对列中;对于CLASS_ISPHANTOMREFERENCE,将此obj添加到gcHeap->phantomReferences中。
(6) 如果obj->clazz==gDvm.classJavaLangClass,说明object是个clazz。对于所有已经linke完的class,其obj->clazz都是gDvm.classJavaLangClass,则scanClassObject此obj,包括clazz->super ,clazz->classloader,
Clazz->sfileds, clazz->interfaces 。对于class 的instance obj,其(instance obj)->clazz是其所对应的clazz。利用dvmHeapHandleReferences分别处理REF_SOFT, REF_WEAK, REF_PHANTOM。
dvmHeapSweepUnmarkedObjects:回收那些没有被mark的obj。调用sweepBitmapCallback去释放obj,如果是class obj,则释放clazz->vtable 、clazz->descriptorAlloc 、clazz->directMethods、clazz->virtualMethods、clazz-> initiatingLoaderList ->initiatingLoaders、clazz->interfaces、clazz->iftable、clazz->ifviPool、clazz->sfields、clazz->ifields。
最后调用dvmHeapFinishMarkStep清理现场,包括将gDvm.gcHeap->markContext中的bitmap写回至gHs-〉bitmap中;清理gDvm.gcHeap->markContext本身所占的数据。
dvmResumeAllThreads(SUSPEND_FOR_GC);
19、classloader
可参见《dynamic class loading in the java virtual machine.pdf》和《The.Java.Programming.Language,4th.Edition》的
第16章。
所有自定义的classloader都是extends自abstract class ClassLoader,需要override函数findClass。对于sub classloader,一定需要先将需求递交给parent,如果parent无法load此class,再由sub classloader处理。
Android自定义了class BootClassLoader,其在JVM中以clazz->classloader=NULL表示。对因于VMClassLoader。
Android另外还定义了SystemClassLoader,其是PathClassLoader的一个instance,它的parent是BootClassLoader.
其默认路径为”java.class.path” = gDvm.classPathStr。而gDvm.classPathStr或从环境变量CLASSPATH获得或是从参数-classpath或-cp获得,此路径是以“:”将各个dex/jar等文件分开。
对于一个extends的newloader,当newloader.loadclass时,先在gDvm.loadedClasses中以classScription和loader做为关键字查询(此时传入的loader是newloader的一个instance),如未查找到,则先调用newloader.parent.loadclass,
如果parent是bootloader,则传入的loader参数为NULL;如果不是bootloader,则也是parent的一个instance。如仍未找到,则调用newloader.findclass,此会真正从jar文件中load此class,并将clazz->classloader=newloader。
如果parent.loadclass已经成功的load了此class,则此时clazz->classloader=newloader.parent,则会将newloader添加到此clazz的initiatingLoaders对列中。一个简单的例子就是newloader去loader一个boot class。
注:
1)对于同一个classloader的两个instance,分别去加载同一个class时,如果此class不能被parent load成功而只能被本classloader去load,会认为是两个不同的classobject,这是因为clazz->classloader是不一样的(clazz->classloader保存的是class的instance,即new出来的Object,而不是Object->clazz) ;如果能被parent 成功的load,则认为是同一个classObject,此时这2个instance会出现在initiatingLoaders中。
2)java中loadclass时,如果parent找到对应的class,则直接返回,不对initiatingLoaders做处理;只有在JVM中利用dvmCallMethod调用newloader的load.class时,如果parent能找到class(此时clazz->classloader=parent),则将newloader加入initiatingLoaders。
3)对于classloader,是认为sub class的load行为是和super class的行为一致的。
20、dalvik注解
1、 class interface 不能作为super class,即不能被继承;没有virtual table,直接从clazz->virtualMethods[]索引method;
2、 Final class不能被继承;
3、 如果class不是interace,则需要将class所包含的interface中的virtual method添加到此class的vtable中;
4、 对于 dvmCallMethodV中的参数obj,指的是this指针,也即class的一个instance对象。
21、JIT
Dalvik Jit的介绍可见文档《android-jit-compiler-androids-dalvik-vm.pdf》。
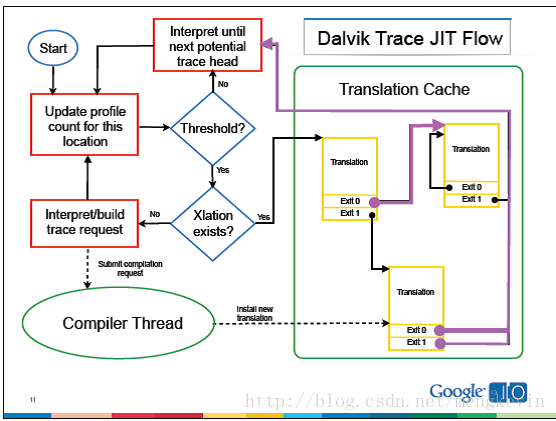
“Threshold”:对应于gDvmJit.threshold,对于armv7,其值是40;
Android中的初始化流程如下:
1、在dvmInitAfterZygote中,如果执行模式是kExecutionModeJit,则调用dvmCompilerStartup初始化jit。Android的jit是以每个进程为单位的。
2、dvmCompilerStartup:创建dvm thread,线程的入口是compilerThreadStart;
3、compilerThreadStart:负责接收jit请求并做真正的代码转换工作,此线程对应于上图的“compiler thread”。
在执行一些dalvik指令(比如
dvmMterpStdRun/L_OP_IF_LEZ/L_OP_IF_GTZ/L_OP_IF_GEZ/L_OP_IF_LTZ/L_OP_IF_NEZ/L_OP_IF_EQZ/L_OP_IF_LE/L_OP_IF_GT/L_OP_IF_GE/L_OP_IF_LT/L_OP_IF_NE/L_OP_IF_EQ/L_OP_SPARSE_SWITCH等时),会调用common_updateProfile更新相关pc点的threshold count,即上图的“update profile count for this location”。pJitProfTable数组的各项初值是gDvmJit.threshold,利用Dalvik PC rPC,根据公式:
Hash=( ((rPC) xor (rPC>>12))<<(32-11))>>(32-11)= ( ((rPC) xor (rPC<<12))<<21)>>21
算出hash值,依据hash值索引至pJitProfTable对应的项,将之减1。如果为0,则复位pJitProfTable对应的项,即重新赋值为jitThreshold。然后依次调用dvmJitGetTraceAddrThread/dvmJitCheckTraceRequest。
4、dvmJitGetTraceAddrThread:根据rPC在hash表gDvmJit.pJitEntryTable中搜索,确认有无对应于rPC的Translation,如有则直接跳至Translation对应的native Code。
5、 dvmJitCheckTraceRequest:置相关的标志位,以便后期的dvmCheckBefore能够监测到此jit请求,并提交给“compiler thread”。
6、dvmCheckBefore会调用dvmCompilerWorkEnqueue将jit请求发给“compiler thread”; “compiler thread”收到请求后,调用dvmCompilerDoWork做实际的翻译工作,然后调用dvmJitSetCodeAddr将“Translation”插入gDvmJit.pJitEntryTable。


 860
860

 被折叠的 条评论
为什么被折叠?
被折叠的 条评论
为什么被折叠?
 到【灌水乐园】发言


