


一、LNMP的介绍
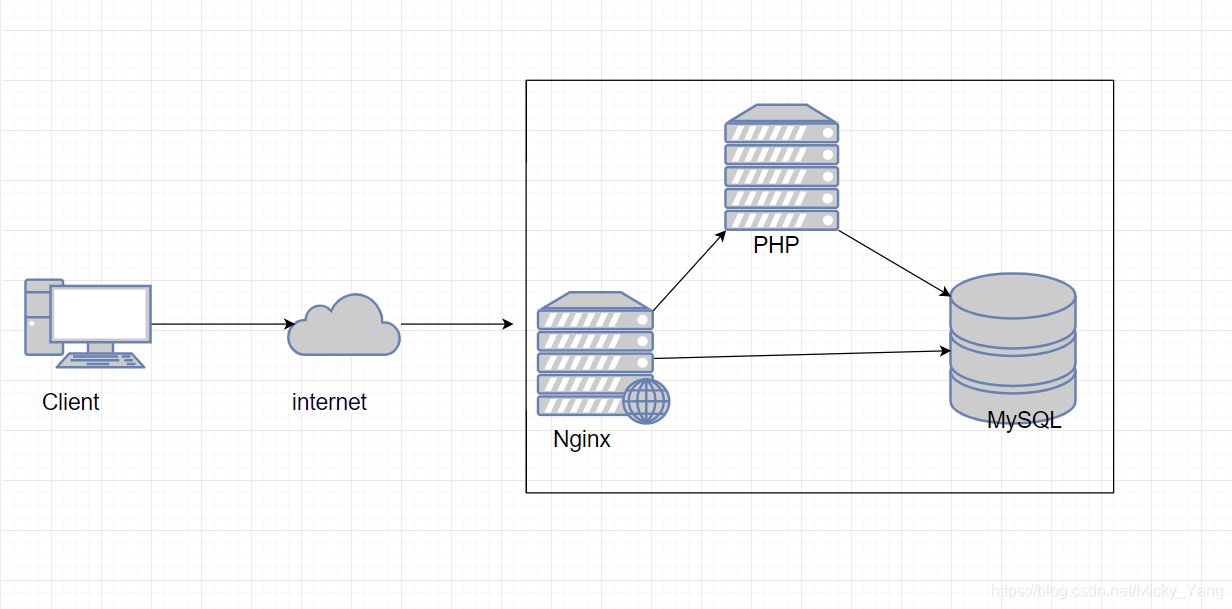
LNMP指的就是一组通常一起使用来运行动态网站或者服务器的自由软件名称的首字母的缩写而已,L指的就是Linux操作系统,N指的是Nginx这个静态Web服务器,同时Nginx也是一个高性能的反向代理服务器,P指的是PHP它是一种在服务器端执行的嵌入HTML文档的脚本语言。这四种软件都是免费开源的软件,组合搭建在一起就成为了一个免费、高效、扩展性强的网站服务系统。
二、基本流程和环境介绍
基本流程:准备编译环境
安装Nginx
安装MySQL
安装php-fpm
测试访问
软件版本:
Linux系统版本:CentOS 7.5.1804
Nginx版本:nginx-1.10.3.tar.gz
MySQL版本:mysql-5.6.41.tar.gz
PHP版本:php-5.6.33.tar.bz
三、开始编译安装
1)关闭防火墙、Selinux、配置epel和base的yum源
[root@lnmp ~]# systemctl stop firewalld
[root@lnmp ~]# setenforce 0
[root@lnmp ~]# cat /etc/yum.repos.d/CentOS-Base.repo | grep -v "^#"
[base]
name=CentOS-$releasever - Base - mirrors.aliyun.com
failovermethod=priority
baseurl=http://mirrors.aliyun.com/centos/7/os/$basearch/

[root@lnmp ~]# cat /etc/yum.repos.d/epel.repo | grep -v "^#"
[epel]
name=Extra Packages for Enterprise Linux 7 - $basearch
mirrorlist=https://mirrors.fedoraproject.org/metalink?repo=epel-7&arch=$basearch
enabled=1
gpgcheck=0
2)安装Nginx
[root@lnmp ~]# mkdir /application
[root@lnmp ~]# cd /application/
[root@lnmp ~]# wget http://nginx.org/download/nginx-1.10.2.tar.gz
[root@lnmp application]# groupadd  -r  nginx
[root@lnmp application]# useradd -g nginx nginx
[root@lnmp application]# yum groupinstall "Development tools"
......安装开发包组
[root@lnmp application]# tar -xf nginx-1.10.2.tar.gz
[root@lnmp application]# cd nginx-1.10.2/
[root@lnmp nginx-1.10.2]# ls
auto  CHANGES  CHANGES.ru  conf  configure  contrib  html  LICENSE  man  README  src
[root@lnmp nginx-1.10.2]#
[root@lnmp nginx-1.10.2]# ./configure --prefix=/usr/local/nginx-1.14.2  --user=nginx  --group=nginx --with-http_ssl_module --with-http_gunzip_module --with-http_gzip_static_module --with-http_auth_request_module --with-http_secure_link_module --with-http_stub_status_module --with-http_perl_module --with-pcre --with-perl_modules_path=/home/webserver/nginx3/perl

checking for PCRE library in /usr/pkg/ ... not found
checking for PCRE library in /opt/local/ ... not found

./configure: error: the HTTP rewrite module requires the PCRE library.
You can either disable the module by using --without-http_rewrite_module
option, or install the PCRE library into the system, or build the PCRE library
statically from the source with nginx by using --with-pcre=<path> opti
最低0.47元/天 解锁文章


 66
66


 被折叠的 条评论
为什么被折叠?
被折叠的 条评论
为什么被折叠?
 到【灌水乐园】发言


