


spring是十分优秀的开源框架,大量的java web项目受益于spring,控制反转和切面编程是spring的两大特点,上次我有实践简单的注入实例,也结合了注解去完成了注解的装配和bean注册,这次我们以更多的方法去解决xml的注入问题,相信掌握好了xml的注入,注解使用起来会更加得心应手。
首先我们来创建工程目录:
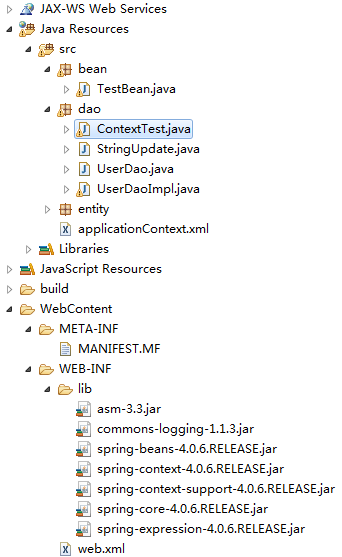
最开始我创建了一个包将applicationContext.xml放到该包下面,总是无法加载容器,后来放到了根包下面,问题得到了解决。
这次主要是注入的练习,web.xml里并没有配置什么。
首先我们来实践一个声明接口,注入实现类的练习:
声明一个接口:
public interface UserDao {
//定义一个save方法
    public void save();
}
实现类不仅实现了save方法,我还添加了一系列的成员变量,来完成注入练习:
package dao;

import java.util.ArrayList;
import java.util.HashSet;
import java.util.Map;

import entity.Person;

public class UserDaoImpl implements UserDao {
    private String name;
    //构造注入
//  UserDaoImpl(String name)
//  {
//      this.name = name;
//  }
    //依赖注入一个p1
    private Person p;
    public Person getP() {
        return p;
    }

    public void setP(Person p) {
        this.p = p;
    }
    //注入集合list
    private ArrayList list;
    public ArrayList getList() {
        return list;
    }

    public void setList(ArrayList list) {
        this.list = list;
    }

    public String getName() {
        return name;
    }

    public void setName(String name) {
        this.name = name;
    }
    //注入集合set
    private HashSet set;

    public HashSet getSet() {
        return set;
    }

    public void setSet(HashSet set) {
        this.set = set;
    }

    //注入集合map
    private Map map;

    public Map getMap() {
        return map;
    }

    public void setMap(Map map) {
        this.map = map;
    }

    //实现的方法
    @Override
    public void save() {
        // TODO Auto-generated method stub
        System.out.println("this is a UserDaoImpl");
    }

}
继续造轮子,不仅有集合的几种注入,我还新建了一个构造方法,注入四个不同类型的参数:
public class ContextTest {
    private String str;
    private Person person;
    private int id;
    private List list;
    public String getStr() {
        return str;
    }
    public List getList() {
        return list;
    }
    public void setList(List<Integer> list) {
        this.list = list;
    }
    public Person getPerson() {
        return person;
    }
    public int getId() {
        return id;
    }
    public void setId(int id) {
        this.id = id;
    }
    //三个构造参数,拿来构造注入使用,因此这个bean省略了setter
    ContextTest(String str,Person person,int id,List list)
    {
        this.str = str;
        this.person = person;
        this.id = id;
        this.list = list;
    }
}
几个实体类:
public class Parent {
    protected String parentName;
    protected int ParentAge;
    public String getParentName() {
        return parentName;
    }
    public void setParentName(String parentName) {
        this.parentName = parentName;
    }
    public int getParentAge() {
        return ParentAge;
    }
    public void setParentAge(int parentAge) {
        ParentAge = parentAge;
    }
}
public class Person {
    private String name;
    private int age;
    public String getName() {
        return name;
    }
    public void setName(String name) {
        this.name = name;
    }
    public int getAge() {
        return age;
    }
    public void setAge(int age) {
        this.age = age;
    }
}
public class Son extends Parent {
    private String sonName;
    private int sonAge;
    public String getSonName() {
        return sonName;
    }
    public void setSonName(String sonName) {
        this.sonName = sonName;
    }
    public int getSonAge() {
        return sonAge;
    }
    public void setSonAge(int sonAge) {
        this.sonAge = sonAge;
    }
}
spring容器配置applicationContext:
<beans xmlns="http://www.springframework.org/schema/beans"
    xmlns:context="http://www.springframework.org/schema/context"
    xmlns:xsi="http://www.w3.org/2001/XMLSchema-instance"
    xsi:schemaLocation="
        http://www.springframework.org/schema/beans
        http://www.springframework.org/schema/beans/spring-beans-3.0.xsd
        http://www.springframework.org/schema/context
        http://www.springframework.org/schema/context/spring-context-3.0.xsd">

    <!-- 构造注入 <bean id = "UserDaoImpl1" class = "dao.UserDaoImpl"> <constructor-arg
        value="constructor's method"></constructor-arg> </bean> -->

    <!-- -->
    <bean id="UserDaoImpl2" class="dao.UserDaoImpl" scope="singleton">
        <property name="name" value="Singleton's setter method" />
    </bean>

    <bean id="Person1" class="entity.Person">
        <property name="name" value="micro" />
        <property name="age" value="1"></property>
    </bean>

    <!-- UserDaoImpl里面依赖注入Person -->
    <bean id="UserDaoImpl4" class="dao.UserDaoImpl">
        <property name="name" value="personImpl" />
        <property name="p" ref="Person1"></property>
    </bean>

    <!-- 内部属性注入 -->
    <bean id="UserDaoImpl5" class="dao.UserDaoImpl">
        <property name="p">
            <bean id="temp" class="entity.Person">
                <property name="name" value="nestProperty" />
                <property name="age" value="22"></property>
            </bean>
        </property>
    </bean>

    <!-- 注入集合list -->
    <bean id="UserDaoImpl3" class="dao.UserDaoImpl">
        <property name="list">
            <list>
                <value>1</value>
                <value>2</value>
                <value>3</value>
            </list>
        </property>
    </bean>

    <!-- 注入集合set -->
    <bean id="UserDaoImpl6" class="dao.UserDaoImpl">
        <property name="set">
            <set>
                <value>1</value>
                <value>1</value>
                <value>2</value>
            </set>
        </property>
    </bean>

    <!-- 注入集合map -->
    <bean id="UserDaoImpl7" class="dao.UserDaoImpl">
        <property name="map">
            <map>
                <entry key="1" value="micro1" />
                <entry key="2" value="micro2" />
            </map>
        </property>
    </bean>

    <!-- 注册一个parent bean -->
    <bean id="parent1" class="entity.Parent">
        <property name="parentName" value="myParent" />
        <property name="parentAge" value="50" />
    </bean>
    <!-- 子类 ,拥有parentName与parentAge属性的注入值 -->
    <bean id="son1" class="entity.Son" parent="parent1">
        <property name="sonName" value="myName" />
        <property name="sonAge" value="22" />
    </bean>

    <!-- 四个构造参数的ContextText -->
    <bean id="context1" class="dao.ContextTest">
        <constructor-arg index="0" value="contextStr" />
        <constructor-arg index="1" ref="Person1" />
        <!-- 这里可以用index指定参数位置,从0开始,也可以用名字出指定构造参数的名字 -->
        <constructor-arg name="id" value="10" />
        <constructor-arg index="3" >
            <list>
                <value>3</value>
                <value>4</value>
                <value>5</value>
            </list>
        </constructor-arg>
    </bean>
</beans>
最后测试:
public static void main(String args[])
{
ApplicationContext context = new ClassPathXmlApplicationContext("applicationContext.xml");
// UserDaoImpl userDao = (UserDaoImpl)context.getBean("UserDaoImpl1");
// userDao.save();//调用实现类的方法,此处为动态绑定
// System.out.println(userDao.getName());
UserDaoImpl userDao = (UserDaoImpl)context.getBean("UserDaoImpl2");
System.out.println(userDao.getName());
Person p1 = (Person)context.getBean("Person1");
System.out.println("Person1'name "+p1.getName()+" Person1'age "+p1.getAge());
//测试UserDaoImpl里的Person依赖注入是否为person1
userDao = (UserDaoImpl)context.getBean("UserDaoImpl4");
System.out.println("UserDaoImpl4里的Person的名字为:"+userDao.getP().getName()+" 年龄为:"+userDao.getP().getAge());
//内部属性用bean注入
userDao = (UserDaoImpl)context.getBean("UserDaoImpl5");
System.out.println("UserdaoImpl5里的Person是采用内部bean去注入的,名字为:"+userDao.getP().getName()+" 年龄为:"+userDao.getP().getAge());
//注入集合list
userDao = (UserDaoImpl)context.getBean("UserDaoImpl3");
List list = userDao.getList();
for(Object o : list)
{
System.out.println(o.toString());
}
//注入集合set
userDao = (UserDaoImpl)context.getBean("UserDaoImpl6");
System.out.println("集合的大小为:"+userDao.getSet().size());
for(Object o : userDao.getSet())
{
System.out.println(o.toString());
}
//注入集合map
userDao = (UserDaoImpl)context.getBean("UserDaoImpl7");
System.out.println(userDao.getMap().toString());
//补充:HashMap的高效遍历方式
Iterator iterator = userDao.getMap().entrySet().iterator();
while(iterator.hasNext())
{
@SuppressWarnings("unchecked")
Map.Entry entry = (Map.Entry)iterator.next();
Object key = entry.getKey();
Object value = entry.getValue();
System.out.println("key = "+key+" value = "+value);
}
//创建两个bean,一个parent,一个son,son继承parent
Son son = (Son)context.getBean("son1");
System.out.println("son's parentName:"+son.getParentName()+" son's parentAge:"+son.getParentAge()+" son's sonName:"+son.getSonName()+" son's sonAge:"+son.getSonAge());
//测试多个构造方法的bean ContextTest
ContextTest c = (ContextTest)context.getBean("context1");
System.out.println("第一个构造参数str:"+c.getStr()+" 第二个构造参数person parentName,age依次为:"+c.getPerson().getName()+" "+c.getPerson().getAge()+" 第三构造参数id为:"+c.getId()+" 第四个构造参数list为"+c.getList());
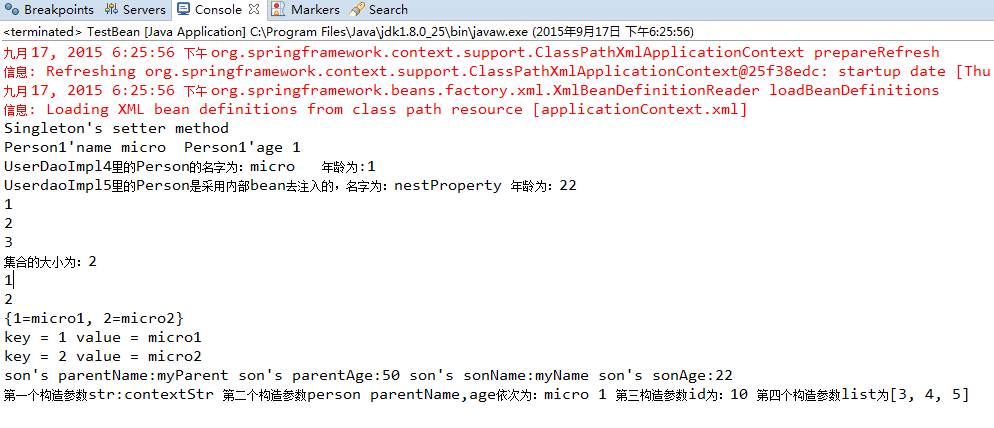
}运行结果:
接下来,按照最后一个测试类中的代码,进行分析:
ApplicationContext context = new ClassPathXmlApplicationContext("applicationContext.xml");这里是加载容器,应该放在根目录,否则会显示找不到容器。
ApplicationContext context = new ClassPathXmlApplicationContext("applicationContext.xml");
        UserDao userDao = (UserDao)context.getBean("UserDaoImpl1");
        userDao.save();//调用实现类的方法,此处为动态绑定
这里从容器获得名字为UserDaoImpl1的bean并且使用接口回调使用接口的save方法。但是我在实现类里添加很多方法并不能使用,只能使用接口中定义的方法。
容器当中UserDaoImpl1是这样定义的:
 <bean id = "UserDaoImpl1" class = "dao.UserDaoImpl"> <constructor-arg
        value="constructor's method"></constructor-arg> </bean>
这个实体类当中的构造方法为:
private String name;
    //构造注入
    UserDaoImpl(String name)
    {
        this.name = name;
    }
    //实现的方法
    @Override
    public void save() {
        // TODO Auto-generated method stub
        System.out.println("this is a UserDaoImpl and constructor to inject name : "+name);
    }
只有一个构造参数,所以直接写value就可以了,自动装配到该对象的name对象。
运行结果为:
this is a UserDaoImpl and constructor to inject name : constructor's method接下来我们继续:
    UserDaoImpl userDao = (UserDaoImpl)context.getBean("UserDaoImpl2");
        System.out.println(userDao.getName());
容器定义注入:
<bean id="UserDaoImpl2" class="dao.UserDaoImpl">
        <property name="name" value="ref's setter method" />
    </bean>
这个为setter注入,实体类里一定要有对应属性的setter方法,否则无法注入。
运行结果为:
ref's setter method我又创建一个实体类:
public class Person {
    private String name;
    private int age;
    public String getName() {
        return name;
    }
    public void setName(String name) {
        this.name = name;
    }
    public int getAge() {
        return age;
    }
    public void setAge(int age) {
        this.age = age;
    }
}
采用setter注入:
<bean id="Person1" class="entity.Person">
        <property name="name" value="micro" />
        <property name="age" value="1"></property>
    </bean>
测试:
Person p1 = (Person)context.getBean("Person1");
        System.out.println("Person1'name "+p1.getName()+"  Person1'age "+p1.getAge());
运行结果:
Person1'name micro Person1'age 1继续给UserDaoImpl里添加一个对象注入:
private Person p;
    public Person getP() {
        return p;
    }

    public void setP(Person p) {
        this.p = p;
    }
容器里注入,就注入刚才我们定义那个Person1:
<!-- UserDaoImpl里面依赖注入Person -->
    <bean id="UserDaoImpl4" class="dao.UserDaoImpl">
        <property name="name" value="personImpl" />
        <property name="p" ref="Person1"></property>
    </bean>
测试:
//测试UserDaoImpl里的Person依赖注入是否为person1
        userDao = (UserDaoImpl)context.getBean("UserDaoImpl4");
        System.out.println("UserDaoImpl4里的Person的名字为:"+userDao.getP().getName()+"   年龄为:"+userDao.getP().getAge());
运行结果:
UserDaoImpl4里的Person的名字为:micro 年龄为:1刚才是引用ref的方法去注入,起始还可以直接在property那里内部定义bean注入:
<!-- 内部属性注入 -->
    <bean id="UserDaoImpl5" class="dao.UserDaoImpl">
        <property name="p">
            <bean id="temp" class="entity.Person">
                <property name="name" value="nestProperty" />
                <property name="age" value="22"></property>
            </bean>
        </property>
    </bean>
注入的是个Person,别名叫temp,该对象的属性name为nestProperty,age为22
测试:
//内部属性用bean注入
        userDao = (UserDaoImpl)context.getBean("UserDaoImpl5");
        System.out.println("UserdaoImpl5里的Person是采用内部bean去注入的,名字为:"+userDao.getP().getName()+" 年龄为:"+userDao.getP().getAge());
运行结果:
UserdaoImpl5里的Person是采用内部bean去注入的,名字为:nestProperty 年龄为:22然后我定义了一个集合ArrayList,在容器里这样去注入:
<!-- 注入集合list -->
    <bean id="UserDaoImpl3" class="dao.UserDaoImpl">
        <property name="list">
            <list>
                <value>1</value>
                <value>2</value>
                <value>3</value>
            </list>
        </property>
    </bean>
value里顺序分别为list里顺序。
同样下面是set和map的注入:
    <!-- 注入集合set -->
    <bean id="UserDaoImpl6" class="dao.UserDaoImpl">
        <property name="set">
            <set>
                <value>1</value>
                <value>1</value>
                <value>2</value>
            </set>
        </property>
    </bean>

    <!-- 注入集合map -->
    <bean id="UserDaoImpl7" class="dao.UserDaoImpl">
        <property name="map">
            <map>
                <entry key="1" value="micro1" />
                <entry key="2" value="micro2" />
            </map>
        </property>
    </bean>
当获取到了map,我想打印结果,遇到了一个问题,怎样去遍历,总之,如下这样去遍历是比较好的方法:
//补充:HashMap的高效遍历方式
        Iterator iterator = userDao.getMap().entrySet().iterator();
        while(iterator.hasNext())
        {
            @SuppressWarnings("unchecked")
            Map.Entry entry = (Map.Entry)iterator.next();
            Object key = entry.getKey();
            Object value = entry.getValue();
            System.out.println("key = "+key+" value = "+value);
        }
当然也可以在println()里直接打印map。直接打印的结果是:
{1=micro1, 2=micro2}还可以在表明父类,使用注入的子类的时候,可以使用父类的成员变量。:
<!-- 注册一个parent bean -->
    <bean id="parent1" class="entity.Parent">
        <property name="parentName" value="myParent" />
        <property name="parentAge" value="50" />
    </bean>
    <!-- 子类 ,拥有parentName与parentAge属性的注入值 -->
    <bean id="son1" class="entity.Son" parent="parent1">
        <property name="sonName" value="myName" />
        <property name="sonAge" value="22" />
    </bean>
测试:
//创建两个bean,一个parent,一个son,son继承parent
        Son son = (Son)context.getBean("son1");
        System.out.println("son's parentName:"+son.getParentName()+" son's parentAge:"+son.getParentAge()+" son's sonName:"+son.getSonName()+" son's sonAge:"+son.getSonAge());
运行结果:
son's parentName:myParent son's parentAge:50 son's sonName:myName son's sonAge:22最后我们测试一个构造方法,四个参数:
public class ContextTest {
    private String str;
    private Person person;
    private int id;
    private List list;
    public String getStr() {
        return str;
    }
    public List getList() {
        return list;
    }
    public void setList(List<Integer> list) {
        this.list = list;
    }
    public Person getPerson() {
        return person;
    }
    public int getId() {
        return id;
    }
    public void setId(int id) {
        this.id = id;
    }
    //三个构造参数,拿来构造注入使用,因此这个bean省略了setter
    ContextTest(String str,Person person,int id,List list)
    {
        this.str = str;
        this.person = person;
        this.id = id;
        this.list = list;
    }
}
容器中的定义:
<!-- 四个构造参数的ContextText -->
    <bean id="context1" class="dao.ContextTest">
        <constructor-arg index="0" value="contextStr" />
        <constructor-arg index="1" ref="Person1" />
        <!-- 这里可以用index指定参数位置,从0开始,也可以用名字出指定构造参数的名字 -->
        <constructor-arg name="id" value="10" />
        <constructor-arg index="3" >
            <list>
                <value>3</value>
                <value>4</value>
                <value>5</value>
            </list>
        </constructor-arg>
    </bean>
//测试多个构造方法的bean ContextTest
ContextTest c = (ContextTest)context.getBean("context1");
System.out.println("第一个构造参数str:"+c.getStr()+" 第二个构造参数person parentName,age依次为:"+c.getPerson().getName()+" "+c.getPerson().getAge()+" 第三构造参数id为:"+c.getId()+" 第四个构造参数list为"+c.getList());运行结果:
第一个构造参数str:contextStr 第二个构造参数person parentName,age依次为:micro 1 第三构造参数id为:10 第四个构造参数list为[3, 4, 5]


 1869
1869


 被折叠的 条评论
为什么被折叠?
被折叠的 条评论
为什么被折叠?
 到【灌水乐园】发言


