


1 FFmpeg从入门到精通-FFmpeg简介
2 FFmpeg从入门到精通-FFmpeg工具使用基础
3 FFmpeg从入门到精通-FFmpeg转封装
4 FFmpeg从入门到精通-FFmpeg转码
5 FFmpeg从入门到精通-FFmpeg流媒体
6 FFmpeg从入门到精通-FFmpeg滤镜使用
7 FFmpeg从入门到精通-FFmpeg中Linux设备操作
8 FFmpeg从入门到精通-FFmpeg接口libavformat的使用
9 FFmpeg从入门到精通-FFmpeg接口libavcodec的使用
10 FFmpeg从入门到精通-FFmpeg接口libavfilter的使用
8.FFmpeg接口libavformat的使用
libavformat是FFmpeg中处理音频、视频以及字幕封装和解封装的通用框架,内置了很多处理多媒体文件的Muxer和Demuxer,它支持如AVInputFormat的输入容器和AVOutputFormat的输出容器,同时也支持基于网络的一些流媒体协议,如HTTP、RTSP、RTMP等。
8.1 音视频流封装
使用FFmpeg的API进行封装(Muxing)操作的主要步骤比较简单,流程如图所示。
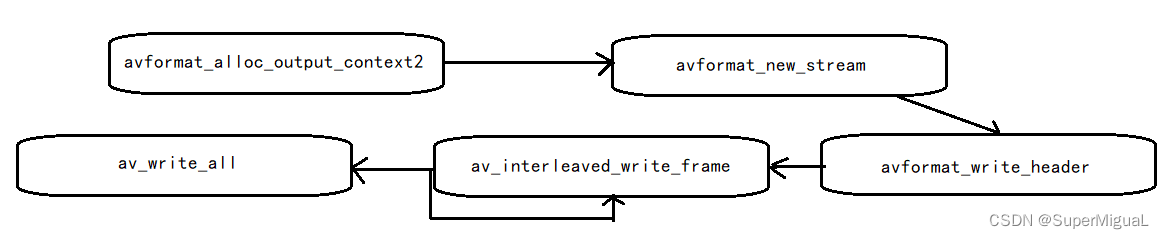
如图所示,几个重要的步骤已经罗列出来了,下面分别进行详细的讲解。
(1)API注册
在较新的版本已经弃用了。
#include <stdlib.h>
#include <stdio.h>
#include <string.h>
#include <math.h>
extern “C”
{
	#include <libavutil/channel_layout.h> //用户音频声道布局操作
	#include <libavutil/opt.h> //设置操作选项操作
	#include <libavutil/mathematics.h> //用于数学相关操作
	#include <libavutil/timestamp.h> //用于时间戳操作
	#include <libavformat/avformat.h> //用于封装与解封装操作
	#include <libswscale/swscale.h> //用于缩放、转换颜色格式操作
	#include <libswresample/swresample.h> //用于进行音频采样率操作
}
int main(int argc, char **argv)
{
	av_register_all(); //在较新的版本已经弃用
	return 0;
}
(2)申请AVFormatContext
在使用FFmpeg进行封装格式相关的操作时,首先创建输出格式上下文,需要使用AVFormatContext作为操作的上下文的操作线索:
	AVOutputFormat *fmt;
	AVFormatContext *oc;
	avformat_alloc_output_context2(&oc, NULL, "flv", filename);
	if (!oc) {
		printf(“cannot alloc flv format\n”);
	    return 1;
	}
	fmt = oc->oformat;
(3)申请AVStream
申请一个将要写入的AVStream流,AVStream流主要作为存放音频、视频、字幕数据流使用:
	AVStream *st;
	AVCodecContext *c;
	st = avformat_new_stream(oc, NULL);
	if (!st) {
		fprintf(stderr, "Could not allocate stream\n");
		exit(1);
	}
	st->id = oc->nb_streams-1;
至此,需要将Codec与AVStream进行对应,可以根据视频的编码参数对AVCodecContext的参数进行设置:
	c->codec_id       = codec_id
	c->bit_rate       = 400000;
	c->width     	  = 352;
	c->height    	  = 288;
	st->time_base     = (AVRational){ 1, 25 };
	c->time_base   	  = st->time_base;
	c->gop_size       = 12;
	c->pix_fmt        =  AV_PIX_FMT_YUV420P;
然后为了兼容新版本FFmpeg的AVCodecparameters结构,需要做一个参数copy操作:
	/* copy the stream parameters to the muxer */
	//将编码参数从编解码器上下文中复制到流的编码参数(AVCodecParameters)中
	ret = avcodec_parameters_from_context(st->codecpar, c);
	if (ret < 0) {
	    printf("Could not copy the stream parameters\n");
	    exit(1);
	}
至此,相关参数已经设置完毕,可以通过av_dump_format接口看到参数信息。
(4)增加目标容器头信息
在操作封装格式时,有些封装格式需要写入头部信息,所以在FFmpeg写封装数据时,需要先写封装格式的头部:
	ret = avformat_write_header(oc, &opt);
	if (ret < 0) {
	    printf("Error occurred when opening output file: %s\n",av_err2str(ret));
	    return 1;
	}
(5)写入帧数据
在FFmpeg操作数据包时,均采用写帧操作进行音视频数据包的写入,而每一帧在常规情况下均使用AVPacket结构进行音视频数据的存储,AVPacket结构中包含了PTS、DTS、Data等信息,数据在写入封装中时,会根据封装的特性写入对应的信息:
	AVFormatContext *ifmt_ctx = NULL;
	AVIOContext* read_in =avio_alloc_context(inbuffer, 32 * 1024 ,0,NULL,
	get_input_buffer,NULL,NULL);
	if(read_in==NULL)
	    goto end;
	ifmt_ctx->pb=read_in;
	ifmt_ctx->flags=AVFMT_FLAG_CUSTOM_IO;
	if ((ret = avformat_open_input(&ifmt_ctx, "h264", NULL, NULL)) < 0) {
	    av_log(NULL, AV_LOG_ERROR, "Cannot get h264 memory data\n");
	    return ret;
	}
	while(1) {
	    AVPacket pkt = { 0 };
	    av_init_packet(&pkt);
	    ret = av_read_frame(ifmt_ctx, &pkt);
	    ret = av_read_frame(ifmt_ctx, &pkt);
	    if (ret < 0)
	        break;
	    /* rescale output packet timestamp values from codec to stream timebase */
	    av_packet_rescale_ts(pkt, *time_base, st->time_base);
	    pkt->stream_index = st->index;
	    /* Write the compressed frame to the media file. */
	    return av_interleaved_write_frame(fmt_ctx, pkt);
	}
如上述这段代码所示,从内存中读取数据,需要将通过avio_alloc_context接口中获得的buffer与AVFormatConext建立关联,然后再像操作文件一样进行操作即可,接下来就可以从AVFormatContext中获得packet,然后将packet通过av_interleaved_write_frame写入到输出的封装格式中。
(6)写容器尾信息
在写入数据即将结束时,将会进行收尾工作,例如写入封装格式的结束标记等,例如FLV的sequence end标识等:
av_write_trailer(oc);
至此,通过FFmpeg将一段数据写入至封装容器中的实现原理已经讲解完毕,具体的代码demo,可以下载FFmpeg的源代码之后,从源代码的doc/examples/muxing.c中进行查看,也可以通过FFmpeg的官方网站demo进行查看:http://ffmpeg.org/doxygen/trunk/muxing_8c-example.html。
8.2 音视频文件解封装
音视频文件解封装为播放器、转码、转封装的常见操作,音视频文件解封装常见API操作步骤如图所示。
(1)API注册
int main(int argc, char * argv[])
{
    av_register_all();
    return 0;
}
(2)构建AVFormatContext
在注册过FFmpeg之后,可以声明输入的封装结构体为主线,然后通过输入文件或者输入流媒体流链接为封装结构的句柄:
	static AVFormatContext *fmt_ctx = NULL;
	/* open input file, and allocate format context */
	 open input file, and allocate format context */
	if (avformat_open_input(&fmt_ctx, input_filename, NULL, NULL) < 0) {
	    fprintf(stderr, "Could not open source file %s\n", src_filename);
	    exit(1);
	}
如上述代码所示,可通过avformat_open_input接口将input_filename句柄挂载至fmt_ctx结构里,之后FFmpeg即可对fmt_ctx进行操作。
(3)查找音视频流信息
在输入封装与AVFormatContext结构做好关联之后,即可通过avformat_find_stream_info从AVFormatContext中建立输入文件的对应的流信息:
/* retrieve stream information */
if (avformat_find_stream_info(fmt_ctx, NULL) < 0) {
    fprintf(stderr, "Could not find stream information\n");
    exit(1);
}
如上述代码所示,从fmt_ctx中可以获得音视频流信息。
(4)读取音视频流
获得音视频流之后,即可通过av_read_frame从fmt_ctx中读取音视频流数据包,将音视频流数据包读取出来存储至AVPackets中,然后就可以通过对AVPackets包进行判断,确定其为音频、视频、字幕数据,最后进行解码,或者进行数据存储:
/* initialize packet, set data to NULL, let the demuxer fill it */
av_init_packet(&pkt);
pkt.data = NULL;
pkt.size = 0;
/* read frames from the file */
while (av_read_frame(fmt_ctx, &pkt) >= 0) {
    AVPacket orig_pkt = pkt;
    do {
        ret = decode_packet(&got_frame, pkt);
        if (ret < 0)
            break;
        pkt.data += ret;
        pkt.size -= ret;
    } while (pkt.size > 0);
    av_packet_unref(&orig_pkt);
}
如上述代码所示,通过循环调用av_read_frame读取fmt_ctx中的数据至pkt中,然后解码pkt,如果读取fmt_ctx中的数据结束,则退出循环,开始执行结束操作。
(5)收尾
执行结束操作主要为关闭输入文件以及释放资源等:
avformat_close_input(&fmt_ctx);
至此,解封装操作已全部介绍完毕。具体的代码demo,可以下载FFmpeg的源代码,从源代码的doc/examples/demuxing_decoding.c中进行查看,也可以通过FFmpeg官方网站demo查看:http://ffmpeg.org/doxygen/trunk/demuxing_decoding_8c-example.html。
8.3 音视频文件转封装
音视频文件转封装操作是将一种格式转换为另一种格式的操作,例如从FLV格式转换为MP4格式,本节将根据前两节所描述的封装与解封装的过程,重点讲解如何进行转封装操作,下面看一下转封装所用到的接口,如图所示。
如图8-3所列的是转封装所用的主要接口,结合8.1节、8.2节介绍的封装与解封装操作,梳理转封装操作,主要步骤具体如下。
(1)API注册
首先在使用FFmpeg接口之前,需要进行FFmpeg使用接口的注册操作:
int main(int argc, char * argv[])
{
    av_register_all();
    return 0;
}
(2)构建输入AVFormatContext
注册之后,打开输入文件并与AVFormatContext建立关联:
AVFormatContext *ifmt_ctx = NULL;
if ((ret = avformat_open_input(&ifmt_ctx, in_filename, 0, 0)) < 0) {
    fprintf(stderr, "Could not open input file '%s'", in_filename);
    goto end;
}
(3)查找流信息
建立关联之后,与解封装操作类似,可以通过接口avformat_find_stream_info获得流信息:
if ((ret = avformat_find_stream_info(ifmt_ctx, 0)) < 0) {
    fprintf(stderr, "Failed to retrieve input stream information");
    goto end;
}
(4)构建输出AVFormatContext
输入文件打开完成之后,可以打开输出文件并与AVFormatContext建立关联:
AVFormatContext *ofmt_ctx = NULL;
avformat_alloc_output_context2(&ofmt_ctx, NULL, NULL, out_filename);
if (!ofmt_ctx) {
    fprintf(stderr, "Could not create output context\n");
    ret = AVERROR_UNKNOWN;
    goto end;
}
(5)申请AVStream
建立关联之后,需要申请输入的stream信息与输出的stream信息,输入stream信息可以从ifmt_ctx中获得,但是存储至ofmt_ctx中的stream信息需要申请独立内存空间:
AVStream *out_stream = avformat_new_stream(ofmt_ctx, in_stream->codec->codec);
if (!out_stream) {
    fprintf(stderr, "Failed allocating output stream\n");
    ret = AVERROR_UNKNOWN;
}
(6)stream信息的复制
输出的stream信息建立完成之后,需要从输入的stream中将信息复制到输出的stream中,由于本节重点介绍转封装,所以stream的信息不变,仅仅是改变了封装格式:
ret = avcodec_copy_context(out_stream->codec, in_stream->codec);
if (ret < 0) {
	fprintf(stderr, "Failed to copy context from input to output stream codec context\n");
}
在新版本的FFmpeg中,AVStream中的AVCodecContext被逐步弃用,转而使用AVCodecParameters,所以在新版本的FFmpeg中可以增加一个操作步骤:
ret = avcodec_parameters_from_context(out_stream->codecpar
, out_stream->codec );
if (ret < 0) {
    fprintf(stderr, "Could not copy the stream parameters\n");
}
(7)写文件头信息
输出文件打开之后,根据前面章节中介绍的封装方式,接下来可以进行写文件头的操作:
ret = avformat_write_header(ofmt_ctx, NULL);
if (ret < 0) {
    fprintf(stderr, "Error occurred when opening output file\n");
}
(8)数据包读取和写入
输入与输出均已经打开,并与对应的AVFormatContext建立了关联,接下来可以从输入格式中读取数据包,然后将数据包写入至输出文件中,当然,随着输入的封装格式与输出的封装格式的差别化,时间戳也需要进行对应的计算改变:
while (1) {
    AVStream *in_stream, *out_stream;
    ret = av_read_frame(ifmt_ctx, &pkt);
    if (ret < 0)
        break;
    in_stream  = ifmt_ctx->streams[pkt.stream_index];
      in_stream  = ifmt_ctx->streams[pkt.stream_index];
    out_stream = ofmt_ctx->streams[pkt.stream_index];
    /* copy packet */
    pkt.pts = av_rescale_q_rnd(pkt.pts, in_stream->time_base
, out_stream->time_base, AV_ROUND_NEAR_INF|AV_ROUND_PASS_MINMAX);
    pkt.dts = av_rescale_q_rnd(pkt.dts, in_stream->time_base
, out_stream->time_base, AV_ROUND_NEAR_INF|AV_ROUND_PASS_MINMAX);
pkt.duration = av_rescale_q(pkt.duration, in_stream->time_base, out_stream->time_base);
    pkt.pos = -1;
    ret = av_interleaved_write_frame(ofmt_ctx, &pkt);
    if (ret < 0) {
        fprintf(stderr, "Error muxing packet\n");
        break;
    }
    av_packet_unref(&pkt);
}
(9)写文件尾信息
解封装读取数据并将数据写入新的封装格式的操作已经完成,接下来即可进行写文件尾至输出格式的操作:
av_write_trailer(ofmt_ctx);
(10)收尾
输出格式写完之后即可关闭输入格式:
avformat_close_input(&ifmt_ctx);
至此,转封装操作结束。具体的代码demo,可以下载FFmpeg的源代码,从源代码的doc/examples/remuxing.c中进行查看,也可以通过FFmpeg官方网站demo查看:http://ffmpeg.org/doxygen/trunk/remuxing_8c-example.html。
8.4 视频截取
在日常处理视频文件时,常常会用到视频片段的截取功能,FFmpeg可以支持该功能,其处理方式与转封装类似,仅仅是多了一个视频的起始时间定位以及截取视频长度的接口调用av_seek_frame,下面举例说明截取视频的步骤,如图所示。
如图所示,从接口调用的步骤中可以看到其中加入了av_seek_frame的调用,可以参考av_seek_frame接口的注释然后再进行使用:
int av_seek_frame(AVFormatContext *s, int stream_index, int64_t timestamp, int flags);
根据av_seek_frame的接口说明可以看到,seek接口中总共包含4个参数,分别如下。
·AVFormatContext:句柄
·stream_index:流索引
·timestamp:时间戳
·flags seek:方法
而在传递flags参数时,可以设置多种seek策略,下面就来看一下flags对应的多种策略定义:
define AVSEEK_FLAG_BACKWARD    1
#define AVSEEK_FLAG_BYTE        2
#define AVSEEK_FLAG_ANY         4
#define AVSEEK_FLAG_FRAME       8
flags总共包含四种策略,分别为向前查找方法,根据字节位置进行查找,seek至非关键帧查找,根据帧位置查找。在播放器进度条拖动时常见的查找策略为AVSEEK_FLAG_BACKWARD方式查找。如果需要更精确的seek,则需要对应的封装格式支持,例如MP4格式,调用av_seek_frame截取视频可以根据8.3节的代码进行修改,在av_read_frame前调用av_seek_frame即可:
av_seek_frame(ifmt_ctx, ifmt_ctx->streams[pkt.stream_index], ts_start, AVSEEK_FLAG_BACKWARD);
while (1) {
    AVStream *in_stream, *out_stream;
    ret = av_read_frame(ifmt_ctx, &pkt);
    if (ret < 0)
        break;
    in_stream  = ifmt_ctx->streams[pkt.stream_index];
out_stream = ofmt_ctx->streams[pkt.stream_index];
if (av_compare_ts(pkt.pts, in_stream->time_base, 20, (AVRational){ 1, 1 }) >= 0)
        break;
    /* copy packet */
pkt.pts = av_rescale_q_rnd(pkt.pts, in_stream->time_base, out_stream->time_base, AV_ROUND_NEAR_INF|AV_ROUND_PASS_MINMAX);
pkt.dts = av_rescale_q_rnd(pkt.dts, in_stream->time_base, out_stream->time_base, AV_ROUND_NEAR_INF|AV_ROUND_PASS_MINMAX);
pkt.duration = av_rescale_q(pkt.duration, in_stream->time_base, out_stream->time_base);
    pkt.pos = -1;
    ret = av_interleaved_write_frame(ofmt_ctx, &pkt);
    if (ret < 0) {
        fprintf(stderr, "Error muxing packet\n");
        break;
    }
    av_packet_unref(&pkt);
}
从上述代码实现中可以看到,除了av_seek_frame之外,还多了一个av_compare_ts,而av_compare_ts可用来比较是否到达设置的截取长度,在本例中截取的时间长度为20秒。至此,视频截取功能已经介绍完毕。具体的代码demo可以下载FFmpeg的源代码,从源代码的doc/examples/remuxing.c中进行参考,也可以通过FFmpeg官方网站demo查看:http://ffmpeg.org/doxygen/trunk/remuxing_8c-example.html。
8.5 avio内存数据操作
在一些应用场景中需要从内存数据中读取H.264数据,然后将H.264数据封装为FLV格式或者MP4格式,使用FFmpeg的libavformat中的avio方法即可达到该目的,这样从内存中直接操作数据的方式常常被应用于操作已经编码的视频数据或音频数据,然后希望将数据通过FFmpeg直接封装到文件中。下面看一下封装内存数据的API调用步骤,如图8-5所示。
如图8-5所示,从内存中读取数据的操作主要是通过avio_alloc_context进行回调,回调接口在本节定义为read_packet,主要步骤已经在图8-5中给出,下面详细介绍一下主要步骤的操作方法。
(1)API注册
在使用FFmpeg之前,首先需要调用注册接口:
int main(int argc, char *[argv])
{
    av_register_all();
    return 0;
}
(2)读一个文件到内存
注册之后首先尝试将一个裸文件读取到内存中,FFmpeg提供了函数av_file_ma():
struct buffer_data {
    uint8_t *ptr;
    size_t size; ///< size left in the buffer
};
struct buffer_data bd = { 0 };
char *input_filename;
size_t buffer_size;
uint8_t *buffer = NULL;
ret = av_file_map(input_filename, &buffer, &buffer_size, 0, NULL);
if (ret < 0)
return ret;
bd.ptr  = buffer;
bd.size = buffer_size;
如上述代码所示,通过av_file_map可以将输入的文件input_filename中的数据映射到内存buffer中。
(3)申请AVFormatContext
内存映射完毕后,可以申请一个AVFormatContext,然后后面可以将avio操作的句柄挂在AVFormatContext中:
AVFormatContext *fmt_ctx = NULL;
if (!(fmt_ctx = avformat_alloc_context())) {
    ret = AVERROR(ENOMEM);
    return ret;
}
如上述代码所示,申请AVFormatContext,因为在FFmpeg框架中,针对AVFormat Context进行操作将会非常方便,所以可以将数据挂在AVFormatContext中,然后使用FFmpeg进行操作。
(4)申请AVIOContext
申请AVIOContext,同时将内存数据读取的回调接口注册给AVIOContext:
avio_ctx_buffer = av_malloc(avio_ctx_buffer_size);
if (!avio_ctx_buffer) {
    ret = AVERROR(ENOMEM);
    return ret;
}
avio_ctx = avio_alloc_context(avio_ctx_buffer, avio_ctx_buffer_size, 0, &bd, &read_packet, NULL, NULL);
if (!avio_ctx) {
    ret = AVERROR(ENOMEM);
    return ret;
}
fmt_ctx->pb = avio_ctx;
如上述代码所示,首先根据映射文件时映射的buffer的空间与大小申请一段内存,然后通过使用接口avio_alloc_context申请AVIOContext内存,申请的时候注册内存数据读取的回调接口read_packet,然后将申请的AVIOContext句柄挂载至之前申请的AVFormatContext中,接下来就可以对AVFormatContext进行操作了。
(5)打开AVFormatContext
基本操作已经完成,接下来与文件操作相同,使用avformat_open_input打开输入的AVFormatContext:
ret = avformat_open_input(&fmt_ctx, NULL, NULL, NULL);
if (ret < 0) {
        fprintf(stderr, "Could not open input\n");
        return ret;
}
使用auformat_open_input打开与常规的打开文件是有区别的,由于其是从内存读取数据,所以可直接通过read_packet读取数据,在调用avformat_open_input时不需要传递输入文件。
(6)查看音视频流信息
打开AVFormatContext之后,可以通过avformat_find_stream_info获得内存中的数据的信息:
ret = avformat_find_stream_info(fmt_ctx, NULL);
if (ret < 0) {
    fprintf(stderr, "Could not find stream information\n");
    return ret;
}
(7)读取帧
信息获取完毕之后,可以尝试通过av_read_frame来获得内存中的数据,尝试将关键帧打印出来:
while (av_read_frame(fmt_ctx, &pkt) >= 0) {
    if (pkt.flags & AV_PKT_FLAG_KEY) {
        fprintf(stderr, "pkt.flags = KEY\n");
    }
}
帧读取之后,就可以用于自己想要的操作了,如后期处理、转封装等操作。
至此,内存数据读取操作已介绍完毕,本节的参考代码可以从网络中获得:http://ffmpeg.org/doxygen/trunk/avio_reading_8c-example.html。
8.6 小结
本章通过使用API对文件进行了封装(Mux)和解封装(Demux),总结了使用API的具体流程,同时介绍了avio相关的知识点,avio在自定义数据源方面特别有用,熟悉它的原理和使用流程,往往有助于把事情化繁为简。


 1204
1204


 被折叠的 条评论
为什么被折叠?
被折叠的 条评论
为什么被折叠?
 到【灌水乐园】发言


