


nnUnet使用2d数据训练方法-DKFZ官方版
上一篇文章介绍了《保姆级教程:nnUnet在2维图像的训练和测试》,采用的是自己的2d数据集进行2d到3d的数据转换,内容包括nnUnet介绍、环境配置、数据配置、预处理、训练过程、确定最佳的U-Net配置、运行推断,算是带着大家在2d数据情况下把nnUnet训练和测试了一遍。
最近官方也更新了nnUnet在2d数据情况下的训练方法,链接为:https://github.com/MIC-DKFZ/nnUNet/blob/master/documentation/dataset_conversion.md,将2d的马萨诸塞州道路数据road_segmentation_ideal转换成3d的Task120_MassRoadsSeg数据。
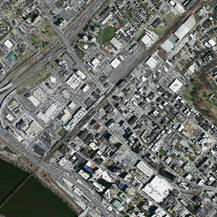
马萨诸塞州道路数据集是卫星标注图像,从航空图像中分割道路是一项具有挑战性的任务。来自附近树木的障碍物、相邻建筑物的阴影、道路纹理和颜色的变化、道路等级的不平衡(由于道路图像像素相对较少)是阻碍当前模型分割从图像一端延伸到另一端的尖锐道路边界的其他挑战。高质量的航空图像数据集有助于对现有方法进行比较,并在机器学习和计算机视觉领域引起人们对航空图像应用的兴趣。
输入图像如下:

标注图像如下:

一、官方说明
How to use 2D data with nnU-Net
nnU-Net was originally built for 3D images. It is also strongestwhen applied to 3D segmentation problems because a large proportion of itsdesign choices were built with 3D in mind. Also note that many 2D segmentationproblems, especially in the non-biomedical domain, may benefit from pretrainednetwork architectures which nnU-Net does not support. Still, there is certainlya need for an out of the box segmentation solution for 2D segmentationproblems. And also on 2D segmentation tasks nnU-Net cam perform extremely well!We have, for example, won a 2D task in the cell tracking challenge with nnU-Net(see our Nature Methods paper) and we have also successfully applied nnU-Net tohistopathological segmentation problems. Working with 2D data in nnU-Netrequires a small workaround in the creation of the dataset. Essentially, allimages must be converted to pseudo 3D images (so an image with shape (X, Y)needs to be converted to an image with shape (1, X, Y). The resulting imagemust be saved in nifti format. Hereby it is important to set the spacing of thefirst axis (the one with shape 1) to a value larger than the others. If you areworking with niftis anyways, then doing this should be easy for you. Thisexample here is intended for demonstrating how nnU-Net can be used with’regular’ 2D images. We selected the massachusetts road segmentation datasetfor this because it can be obtained easily, it comes with a good amount oftraining cases but is still not too large to be difficult to handle.
See here for anexample. This script contains a lot of comments and useful information. Alsohave a look here.
How to convert other image formats tonifti
Please have a look at the following tasks:
Task120: 2D png images
Task075 and Task076: 3D tiff
Task089 2D tiff
二、Task120数据集
这里Task120的链接为:
https://github.com/MIC-DKFZ/nnUNet/blob/master/nnunet/dataset_conversion/Task120_Massachusetts_RoadSegm.py
首先简单介绍一下代码的功能:
-
创建原始数据的文件夹Task120_MassRoadsSeg以及子文件夹imagesTr、imagesTs、labelsTs、labelsTr。
-
/road_segmentation_ideal路径内的有训练集training和测试集testing两个文件夹,数据集文件夹内有输入图像input和标签output两个文件夹,分别提取到每个数据的名称。
-
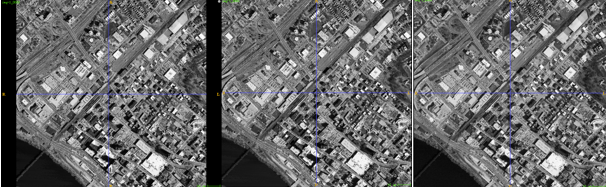
调用convert_2d_image_to_nifti函数,读取每个数据,将3通道的图像拆成3个模态的3个数据,设置每个像素点实际的长度与宽度Spacing,并保存成nii.gz的3维数据,这里的3维数据其实只有1层。
原始图像img-1.png如下:
生成的3个通道的3个模态数据img-1_0000.nii.gz、img-1_0001.nii.gz和img-1_0002.nii.gz如下,是用ITK-SNAP打开的,只展示沿z轴的一层图像。
三、代码详解
此部分代码文件为:
nnUNet/nnunet/dataset_conversion/Task120_Massachusetts_RoadSegm.py
1. 首先导入需要的包
import numpy as np
from batchgenerators.utilities.file_and_folder_operations import *
from nnunet.dataset_conversion.utils import generate_dataset_json
from nnunet.paths import nnUNet_raw_data, preprocessing_output_dir
from nnunet.utilities.file_conversions import convert_2d_image_to_nifti
2. 定义main函数并做介绍
if __name__ == '__main__':
    """
    nnU-Net was originally built for 3D images. It is also strongest when applied to 3D segmentation problems because a
    large proportion of its design choices were built with 3D in mind. Also note that many 2D segmentation problems,
    especially in the non-biomedical domain, may benefit from pretrained network architectures which nnU-Net does not
    support.
    Still, there is certainly a need for an out of the box segmentation solution for 2D segmentation problems. And
    also on 2D segmentation tasks nnU-Net cam perform extremely well! We have, for example, won a 2D task in the cell
    tracking challenge with nnU-Net (see our Nature Methods paper) and we have also successfully applied nnU-Net to
    histopathological segmentation problems.
    Working with 2D data in nnU-Net requires a small workaround in the creation of the dataset. Essentially, all images
    must be converted to pseudo 3D images (so an image with shape (X, Y) needs to be converted to an image with shape
    (1, X, Y). The resulting image must be saved in nifti format. Hereby it is important to set the spacing of the
    first axis (the one with shape 1) to a valu
最低0.47元/天 解锁文章


 6201
6201


 被折叠的 条评论
为什么被折叠?
被折叠的 条评论
为什么被折叠?
 到【灌水乐园】发言


