


要使得App可以通过浏览器链接打开,只需要在manifest里对相应Activity配置就可以了,具体配置如下:
<?xml version="1.0" encoding="utf-8"?>
<manifest xmlns:android="http://schemas.android.com/apk/res/android"
    package="com.example.mingjing.test">

    <application
        android:allowBackup="true"
        android:icon="@mipmap/ic_launcher"
        android:label="@string/app_name"
        android:supportsRtl="true"
        android:theme="@style/AppTheme">
        <activity
            android:name=".MainActivity"
            android:label="@string/app_name"
            android:theme="@style/AppTheme.NoActionBar">
            <intent-filter>
                <action android:name="android.intent.action.MAIN" />

                <category android:name="android.intent.category.LAUNCHER" />
            </intent-filter><!-- ATTENTION: This intent was auto-generated. Follow instructions at
  https://g.co/AppIndexing/AndroidStudio to publish your URLs. -->
            <intent-filter android:autoVerify="true">
                <action android:name="android.intent.action.VIEW" />

                <category android:name="android.intent.category.DEFAULT" />
                <category android:name="android.intent.category.BROWSABLE" />
                <!-- ATTENTION: This data URL was auto-generated. We recommend that you use the HTTP scheme.
                  TODO: Change the host or pathPrefix as necessary. -->
                <data
                    android:host="test.mingjing.example.com"
                    android:pathPrefix="/main"
                    android:scheme="mingjing" />
            </intent-filter>
        </activity>
    </application>

</manifest>
这段代码可以自己敲,不过Android Studio提供了自动生成这段代码的方式:
1.但把光标放在…之间的任意地方,在左边会有一个黄色的小灯泡,点击小灯泡->再点击Add URL,相应的代码就生成成功了,如下图所示:
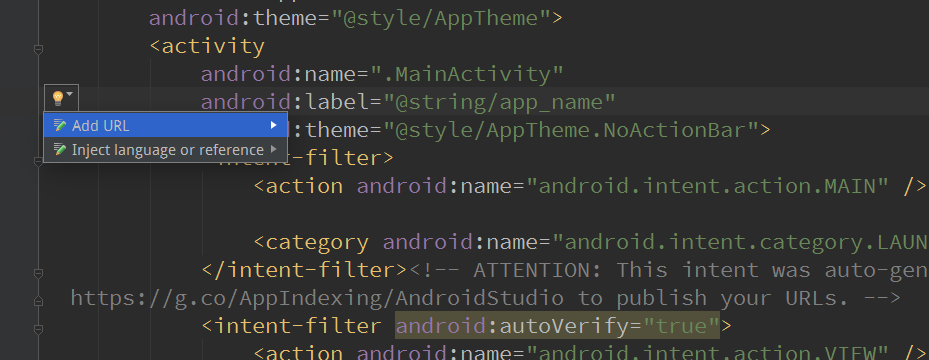
生成的代码如下所示:
<intent-filter>
                <action android:name="android.intent.action.VIEW" />

                <category android:name="android.intent.category.DEFAULT" />
                <category android:name="android.intent.category.BROWSABLE" />
                <!-- ATTENTION: This data URL was auto-generated. We recommend that you use the HTTP scheme.
                  TODO: Change the host or pathPrefix as necessary. -->
                <data
                    android:host="test.mingjing.example.com"
                    android:pathPrefix="/main"
                    android:scheme="http" />
            </intent-filter>
其中host默认时应用的程序名,pathPrefix默认是main,scheme默认时http,这几个值可以根据需要改成任意的字符串,注意pathPrefix要以/开头,只要能和浏览器链接各个部分对上就行了。
下面是测试启动这个页面的Activity代码:
package com.example.mingjing.web;

import android.support.v7.app.AppCompatActivity;
import android.os.Bundle;
import android.webkit.WebResourceRequest;
import android.webkit.WebView;
import android.webkit.WebViewClient;

public class MainActivity extends AppCompatActivity {

    @Override
    protected void onCreate(Bundle savedInstanceState) {
        super.onCreate(savedInstanceState);
        setContentView(R.layout.activity_main);
WebView webView = (WebView) findViewById(R.id.wv_test);
        webView.loadData("<body><a href=\"mingjing://test.mingjing.example.com/main\">click me!</a></body>","text/html","UTF-8");
    }
}
其中的链接”mingjing://test.mingjing.example.com/main\”,mingjing对应intent-filter里的scheme,test.mingjing.exmaple.com对应host,main对应pathPrefix,当然也可以在链接后面加上参数如:
mingjing://test.mingjing.example.com/main?id=1002&name=mingjing,这样就可以在被启动的Activity里的NewIntent(Intent intent)方法里拿到传过来的参数,具体如下:
被启动的Activity
activity_layout:
<?xml version="1.0" encoding="utf-8"?>
<LinearLayout xmlns:android="http://schemas.android.com/apk/res/android"
    android:orientation="vertical" android:layout_width="match_parent"
    android:layout_height="match_parent"
    android:gravity="center"
    android:background="@android:color/darker_gray">
    <TextView
        android:layout_width="wrap_content"
        android:layout_height="wrap_content"
        android:maxWidth="100dp"
        android:id="@+id/tv_content"
        android:textColor="@android:color/black"
        android:gravity="center" />
</LinearLayout>
Activity:
package com.example.mingjing.test;
import android.app.Activity;
import android.content.Intent;
import android.net.Uri;
import android.os.Bundle;
import android.widget.TextView;
/**
* Created by mingjing on 16-9-5.
*/
public class MainActivity extends Activity {
/**
* ATTENTION: This was auto-generated to implement the App Indexing API.
* See https://g.co/AppIndexing/AndroidStudio for more information.
*/
@Override
protected void onCreate(Bundle savedInstanceState) {
super.onCreate(savedInstanceState);
setContentView(R.layout.activity_main);
// ATTENTION: This was auto-generated to implement the App Indexing API.
// See https://g.co/AppIndexing/AndroidStudio for more information.
onNewIntent(getIntent());
}
@Override
protected void onNewIntent(Intent intent) {
super.onNewIntent(intent);
Uri data = intent.getData();
String s = intent.getDataString();
if (intent.getAction().equals(Intent.ACTION_VIEW)) {
String id = data.getQueryParameter("id");
String name = data.getQueryParameter("name");
TextView textView = (TextView) findViewById(R.id.tv_content);
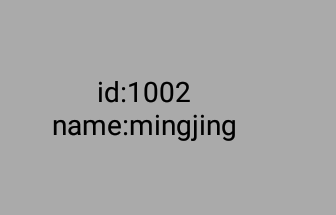
textView.setText("id:" + id + "\nname:" + name);
}
}
@Override
public void onStart() {
super.onStart();
// ATTENTION: This was auto-generated to implement the App Indexing API.
// See https://g.co/AppIndexing/AndroidStudio for more information.
}
@Override
public void onStop() {
super.onStop();
}
}
manifest:
<?xml version="1.0" encoding="utf-8"?>
<manifest xmlns:android="http://schemas.android.com/apk/res/android"
    package="com.example.mingjing.test">

    <application
        android:allowBackup="true"
        android:icon="@mipmap/ic_launcher"
        android:label="@string/app_name"
        android:supportsRtl="true"
        android:theme="@style/AppTheme">
        <activity
            android:name=".MainActivity"
            android:label="@string/app_name"
            android:theme="@style/AppTheme.NoActionBar">
            <intent-filter>
                <action android:name="android.intent.action.MAIN" />

                <category android:name="android.intent.category.LAUNCHER" />
            </intent-filter><!-- ATTENTION: This intent was auto-generated. Follow instructions at
  https://g.co/AppIndexing/AndroidStudio to publish your URLs. -->
            <intent-filter android:autoVerify="true">
                <action android:name="android.intent.action.VIEW" />

                <category android:name="android.intent.category.DEFAULT" />
                <category android:name="android.intent.category.BROWSABLE" />
                <!-- ATTENTION: This data URL was auto-generated. We recommend that you use the HTTP scheme.
                  TODO: Change the host or pathPrefix as necessary. -->
                <data
                    android:host="test.another"
                    android:pathPrefix="/main"
                    android:scheme="everystr" />
            </intent-filter>
        </activity>
    </application>

</manifest>
测试程序的代码:
package com.example.mingjing.web;

import android.support.v7.app.AppCompatActivity;
import android.os.Bundle;
import android.webkit.WebResourceRequest;
import android.webkit.WebView;
import android.webkit.WebViewClient;

public class MainActivity extends AppCompatActivity {

    @Override
    protected void onCreate(Bundle savedInstanceState) {
        super.onCreate(savedInstanceState);
        setContentView(R.layout.activity_main);
WebView webView = (WebView) findViewById(R.id.wv_test);
        webView.loadData("<body><a href=\"everystr://test.another/main?id=1002&name=mingjing\">click me!</a></body>","text/html","UTF-8");
    }
}
运行结果:
Google还提供了App Indexing API,具体参看Add URL and App Indexing Support


 4204
4204

 被折叠的 条评论
为什么被折叠?
被折叠的 条评论
为什么被折叠?
 到【灌水乐园】发言


