


本文整理自B站视频尚硅谷SpringCloud框架开发教程(SpringCloudAlibaba微服务分布式架构丨Spring Cloud)
Ribbon = 负载均衡 + restTemplate (@LoadBalanced)
Spring Cloud Ribbon是基于Netflix Ribbon实现的一套客户端负载均衡的工具。主要功能是提供客户端的软件负载均衡算法和服务调用
Ribbon本地负载均衡客户端VS Nginx服务端负载均衡区别
Nginx是服务器负载均衡,客户端所有请求都会交给nginx,然后由nginx实现转发请求。即负载均衡是由服务端实现的。
Ribbon本地负载均衡,在调用微服务接口时候,会在注册中心上获取注册信息服务列表之后缓存到JVM本地,从而在本地实现RPC远程服务调用技术。
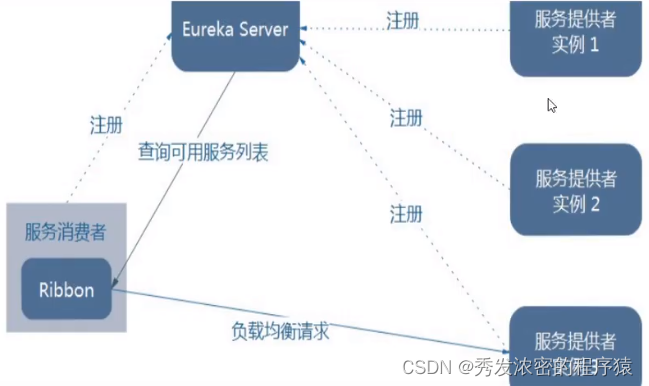
Ribbon在工作时分成两步:
第一步先选择EurekaServer ,它优先选择在同一个区域内负载较少的server。
第二步再根据用户指定的策略,在从server取到的服务注册列表中选择一个地址。
其中Ribbon提供了多种策略:比如轮询、随机和根据响应时间加权。
使用方式
spring-cloud-starter-netflix-eureka-client自带了spring-cloud-starter-ribbon引用。
RestTemplate的使用
getForObject() / getForEntity() - GET请求方法
getForObject():返回对象为响应体中数据转化成的对象,基本上可以理解为Json。
getForEntity():返回对象为ResponseEntity对象,包含了响应中的一些重要信息,比如响应头、响应状态码、响应体等。
postForObject() / postForEntity() - POST请求方法
@GetMapping("/consumer/payment/getForEntity/{id}")
public CommonResult<Payment> getPayment2(@PathVariable("id") Long id)
{
    ResponseEntity<CommonResult> entity = restTemplate.getForEntity(PAYMENT_URL+"/payment/get/"+id,CommonResult.class);
    if(entity.getStatusCode().is2xxSuccessful()){
        return entity.getBody();//getForObject()
    }else{
        return new CommonResult<>(444,"操作失败");
    }
}
Ribbon负载规则
lRule:根据特定算法中从服务列表中选取一个要访问的服务
RoundRobinRule 轮询 (默认)
RandomRule 随机
RetryRule 先按照RoundRobinRule的策略获取服务,如果获取服务失败则在指定时间内会进行重
WeightedResponseTimeRule 对RoundRobinRule的扩展,响应速度越快的实例选择权重越大,越容易被选择
BestAvailableRule 会先过滤掉由于多次访问故障而处于断路器跳闸状态的服务,然后选择一个并发量最小的服务
AvailabilityFilteringRule 先过滤掉故障实例,再选择并发较小的实例
ZoneAvoidanceRule 默认规则,复合判断server所在区域的性能和server的可用性选择服务器
Ribbon负载规则替换
官方文档明确给出了警告:
这个自定义配置类不能放在@ComponentScan所扫描的当前包下以及子包下,
否则我们自定义的这个配置类就会被所有的Ribbon客户端所共享,达不到特殊化定制的目的了。(也就是说不要将Ribbon配置类与主启动类同包)
1.新建规则类MySelfRule
import com.netflix.loadbalancer.IRule;
import com.netflix.loadbalancer.RandomRule;
import org.springframework.context.annotation.Bean;
import org.springframework.context.annotation.Configuration;
@Configuration
public class MySelfRule {
    @Bean
    public IRule myRule(){
        return new RandomRule();
    }
}
主启动类添加@RibbonClient
import com.lun.myrule.MySelfRule;
import org.springframework.boot.SpringApplication;
import org.springframework.boot.autoconfigure.SpringBootApplication;
import org.springframework.cloud.netflix.eureka.EnableEurekaClient;
import org.springframework.cloud.netflix.ribbon.RibbonClient;

@SpringBootApplication
@EnableEurekaClient
//添加到此处
@RibbonClient(name = "CLOUD-PAYMENT-SERVICE", configuration = MySelfRule.class)
public class OrderMain80
{
    public static void main( String[] args ){
        SpringApplication.run(OrderMain80.class, args);
    }
}
Ribbon默认负载轮询算法原理
默认负载轮训算法: rest接口第几次请求数 % 服务器集群总数量 = 实际调用服务器位置下标,每次服务重启动后rest接口计数从1开始。
List instances = discoveryClient.getInstances(“CLOUD-PAYMENT-SERVICE”);
如:
List [0] instances = 127.0.0.1:8002
List [1] instances = 127.0.0.1:8001
8001+ 8002组合成为集群,它们共计2台机器,集群总数为2,按照轮询算法原理:
当总请求数为1时:1%2=1对应下标位置为1,则获得服务地址为127.0.0.1:8001
当总请求数位2时:2%2=О对应下标位置为0,则获得服务地址为127.0.0.1:8002
当总请求数位3时:3%2=1对应下标位置为1,则获得服务地址为127.0.0.1:8001
当总请求数位4时:4%2=О对应下标位置为0,则获得服务地址为127.0.0.1:8002
如此类推…
Feign和OpenFeign
Feign旨在使编写Java Http客户端变得更容易。
前面在使用Ribbon+RestTemplate时,利用RestTemplate对http请求的封装处理,形成了一套模版化的调用方法。但是在实际开发中,由于对服务依赖的调用可能不止一处,往往一个接口会被多处调用,所以通常都会针对每个微服务自行封装一些客户端类来包装这些依赖服务的调用。所以,Feign在此基础上做了进一步封装,由他来帮助我们定义和实现依赖服务接口的定义。在Feign的实现下,我们只需创建一个接口并使用注解的方式来配置它(以前是Dao接口上面标注Mapper注解,现在是一个微服务接口上面标注一个Feign注解即可),即可完成对服务提供方的接口绑定,简化了使用Spring cloud Ribbon时,自动封装服务调用客户端的开发量。
Feign集成了Ribbon
利用Ribbon维护了Payment的服务列表信息,并且通过轮询实现了客户端的负载均衡。而与Ribbon不同的是,通过feign只需要定义服务绑定接口且以声明式的方法,优雅而简单的实现了服务调用。
Feign和OpenFeign两者区别
Feign是Spring Cloud组件中的一个轻量级RESTful的HTTP服务客户端Feign内置了Ribbon,用来做客户端负载均衡,去调用服务注册中心的服务。Feign的使用方式是:使用Feign的注解定义接口,调用这个接口,就可以调用服务注册中心的服务。
<dependency>
    <groupId>org.springframework.cloud</groupId>
    <artifactId>spring-cloud-starter-feign</artifactId>
</dependency>
OpenFeign是Spring Cloud在Feign的基础上支持了SpringMVC的注解,如@RequesMapping等等。OpenFeign的@Feignclient可以解析SpringMVc的@RequestMapping注解下的接口,并通过动态代理的方式产生实现类,实现类中做负载均衡并调用其他服务。
<dependency>
    <groupId>org.springframework.cloud</groupId>
    <artifactId>spring-cloud-starter-openfeign</artifactId>
</dependency>
测试实例
新建cloud-consumer-feign-order80
1.改pom.xml
<dependencies>
        <!--openfeign-->
        <dependency>
            <groupId>org.springframework.cloud</groupId>
            <artifactId>spring-cloud-starter-openfeign</artifactId>
        </dependency>
        <!--eureka client-->
        <dependency>
            <groupId>org.springframework.cloud</groupId>
            <artifactId>spring-cloud-starter-netflix-eureka-client</artifactId>
        </dependency>
        <!-- 引入自己定义的api通用包,可以使用Payment支付Entity -->
        <dependency>
            <groupId>com.lun.springcloud</groupId>
            <artifactId>cloud-api-commons</artifactId>
            <version>${project.version}</version>
        </dependency>
        <!--web-->
        <dependency>
            <groupId>org.springframework.boot</groupId>
            <artifactId>spring-boot-starter-web</artifactId>
        </dependency>
        <dependency>
            <groupId>org.springframework.boot</groupId>
            <artifactId>spring-boot-starter-actuator</artifactId>
        </dependency>
        <!--一般基础通用配置-->
        <dependency>
            <groupId>org.springframework.boot</groupId>
            <artifactId>spring-boot-devtools</artifactId>
            <scope>runtime</scope>
            <optional>true</optional>
        </dependency>
        <dependency>
            <groupId>org.projectlombok</groupId>
            <artifactId>lombok</artifactId>
            <optional>true</optional>
        </dependency>
        <dependency>
            <groupId>org.springframework.boot</groupId>
            <artifactId>spring-boot-starter-test</artifactId>
            <scope>test</scope>
        </dependency>
    </dependencies>
2.新建yml
server:
  port: 80

eureka:
  client:
    register-with-eureka: false
    service-url:
      defaultZone: http://eureka7001.com:7001/eureka/,http://eureka7002.com:7002/eureka/
3.主启动
import org.springframework.boot.SpringApplication;
import org.springframework.boot.autoconfigure.SpringBootApplication;
import org.springframework.cloud.openfeign.EnableFeignClients;

@SpringBootApplication
@EnableFeignClients
public class OrderFeignMain80 {
    public static void main(String[] args) {
        SpringApplication.run(OrderFeignMain80.class, args);
    }
}
4.controller
import com.lun.springcloud.entities.CommonResult;
import com.lun.springcloud.entities.Payment;
import com.lun.springcloud.service.PaymentFeignService;
import lombok.extern.slf4j.Slf4j;
import org.springframework.web.bind.annotation.GetMapping;
import org.springframework.web.bind.annotation.PathVariable;
import org.springframework.web.bind.annotation.RestController;
import javax.annotation.Resource;

@RestController
@Slf4j
public class OrderFeignController
{
    @Resource
    private PaymentFeignService paymentFeignService;

    @GetMapping(value = "/consumer/payment/get/{id}")
    public CommonResult<Payment> getPaymentById(@PathVariable("id") Long id)
    {
        return paymentFeignService.getPaymentById(id);
    }
}
5.service
业务逻辑接口+@FeignClient配置调用provider服务
新建PaymentFeignService接口并新增注解@FeignClient
import com.lun.springcloud.entities.CommonResult;
import com.lun.springcloud.entities.Payment;
import org.springframework.cloud.openfeign.FeignClient;
import org.springframework.stereotype.Component;
import org.springframework.web.bind.annotation.GetMapping;
import org.springframework.web.bind.annotation.PathVariable;


@Component
@FeignClient(value = "CLOUD-PAYMENT-SERVICE")
public interface PaymentFeignService
{
    @GetMapping(value = "/payment/get/{id}")
    public CommonResult<Payment> getPaymentById(@PathVariable("id") Long id);
}
6.测试
先启动2个eureka集群7001/7002
再启动2个微服务8001/8002
启动OpenFeign启动
http://localhost/consumer/payment/get/1
Feign自带负载均衡配置项
Gateway是在Spring生态系统之上构建的API网关服务,基于Spring 5,Spring Boot 2和Project Reactor等技术。
Gateway旨在提供一种简单而有效的方式来对API进行路由,以及提供一些强大的过滤器功能,例如:熔断、限流、重试等。
SpringCloud Gateway是Spring Cloud的一个全新项目,基于Spring 5.0+Spring Boot 2.0和Project Reactor等技术开发的网关,它旨在为微服务架构提供—种简单有效的统一的API路由管理方式。
SpringCloud Gateway作为Spring Cloud 生态系统中的网关,目标是替代Zuul,在Spring Cloud 2.0以上版本中,没有对新版本的Zul 2.0以上最新高性能版本进行集成,仍然还是使用的Zuul 1.x非Reactor模式的老版本。而为了提升网关的性能,SpringCloud Gateway是基于WebFlux框架实现的,而WebFlux框架底层则使用了高性能的Reactor模式通信框架Netty。
Spring Cloud Gateway的目标提供统一的路由方式且基于 Filter链的方式提供了网关基本的功能,例如:安全,监控/指标,和限流。
主要作用
方向代理
鉴权
流量控制
熔断
日志监控
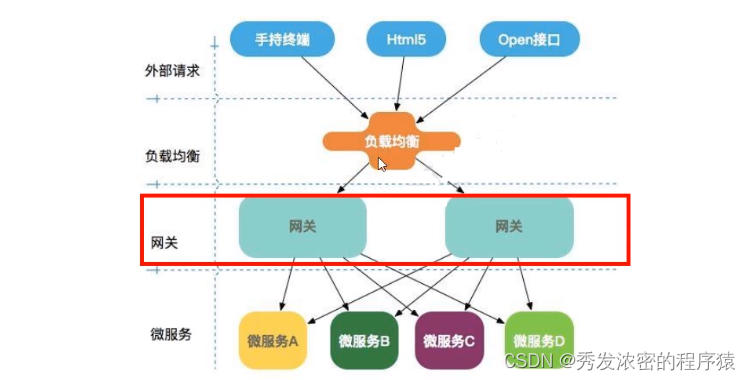
微服务架构中网关的位置
SpringCloud Gateway与Zuul的区别
在SpringCloud Finchley正式版之前,Spring Cloud推荐的网关是Netflix提供的Zuul。
Zuul 1.x,是一个基于阻塞I/O的API Gateway。
Zuul 1.x基于Servlet 2.5使用阻塞架构它不支持任何长连接(如WebSocket)Zuul的设计模式和Nginx较像,每次I/О操作都是从工作线程中选择一个执行,请求线程被阻塞到工作线程完成,但是差别是Nginx用C++实现,Zuul用Java实现,而JVM本身会有第-次加载较慢的情况,使得Zuul的性能相对较差。
Zuul 2.x理念更先进,想基于Netty非阻塞和支持长连接,但SpringCloud目前还没有整合。Zuul .x的性能较Zuul 1.x有较大提升。在性能方面,根据官方提供的基准测试,Spring Cloud Gateway的RPS(每秒请求数)是Zuul的1.6倍。
Spring Cloud Gateway建立在Spring Framework 5、Project Reactor和Spring Boot2之上,使用非阻塞API。
Spring Cloud Gateway还支持WebSocket,并且与Spring紧密集成拥有更好的开发体验
三大核心概念
- Route(路由) - 路由是构建网关的基本模块,它由ID,目标URI,一系列的断言和过滤器组成,如断言为true则匹配该路由;
- Predicate(断言) - 参考的是Java8的java.util.function.Predicate,开发人员可以匹配HTTP请求中的所有内容(例如请求头或请求参数),如果请求与断言相匹配则进行路由;
- Filter(过滤) - 指的是Spring框架中GatewayFilter的实例,使用过滤器,可以在请求被路由前或者之后对请求进行修改。
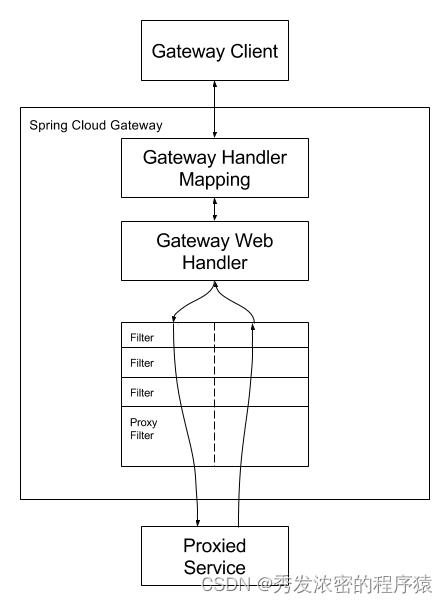
客户端向Spring Cloud Gateway发出请求。然后在Gateway Handler Mapping 中找到与请求相匹配的路由,将其发送到GatewayWeb Handler。
Handler再通过指定的过滤器链来将请求发送到我们实际的服务执行业务逻辑,然后返回。
过滤器之间用虚线分开是因为过滤器可能会在发送代理请求之前(“pre”)或之后(“post")执行业务逻辑。
Filter在“pre”类型的过滤器可以做参数校验、权限校验、流量监控、日志输出、协议转换等,在“post”类型的过滤器中可以做响应内容、响应头的修改,日志的输出,流量监控等有着非常重要的作用。
核心逻辑:路由转发 + 执行过滤器链。
Gateway9527搭建
1.新建Module - cloud-gateway-gateway9527
2.改pom
<dependencies>
        <!--gateway-->
        <dependency>
            <groupId>org.springframework.cloud</groupId>
            <artifactId>spring-cloud-starter-gateway</artifactId>
        </dependency>
        <!--eureka-client-->
        <dependency>
            <groupId>org.springframework.cloud</groupId>
            <artifactId>spring-cloud-starter-netflix-eureka-client</artifactId>
        </dependency>
        <!-- 引入自己定义的api通用包,可以使用Payment支付Entity -->
        <dependency>
            <groupId>com.lun.springcloud</groupId>
            <artifactId>cloud-api-commons</artifactId>
            <version>${project.version}</version>
        </dependency>
        <!--一般基础配置类-->
        <dependency>
            <groupId>org.springframework.boot</groupId>
            <artifactId>spring-boot-devtools</artifactId>
            <scope>runtime</scope>
            <optional>true</optional>
        </dependency>
        <dependency>
            <groupId>org.projectlombok</groupId>
            <artifactId>lombok</artifactId>
            <optional>true</optional>
        </dependency>
        <dependency>
            <groupId>org.springframework.boot</groupId>
            <artifactId>spring-boot-starter-test</artifactId>
            <scope>test</scope>
        </dependency>
    </dependencies>
3.新建application.yml
server:
  port: 9527

spring:
  application:
    name: cloud-gateway

eureka:
  instance:
    hostname: cloud-gateway-service
  client: #服务提供者provider注册进eureka服务列表内
    service-url:
      register-with-eureka: true
      fetch-registry: true
      defaultZone: http://eureka7001.com:7001/eureka
4.业务类
5.主启动
import org.springframework.boot.SpringApplication;
import org.springframework.boot.autoconfigure.SpringBootApplication;
import org.springframework.cloud.netflix.eureka.EnableEurekaClient;

@SpringBootApplication
@EnableEurekaClient
public class GateWayMain9527
{
    public static void main(String[] args) {
        SpringApplication.run(GateWayMain9527.class, args);
    }
}
6.9527网关如何做路由映射?
cloud-provider-payment8001看看controller的访问地址
我们目前不想暴露8001端口,希望在8001外面套一层9527
7.YML新增网关配置
server:
  port: 9527

spring:
  application:
    name: cloud-gateway
#############################新增网关配置###########################
  cloud:
    gateway:
      routes:
        - id: payment_routh #payment_route    #路由的ID,没有固定规则但要求唯一,建议配合服务名
          uri: http://localhost:8001          #匹配后提供服务的路由地址
          #uri: lb://cloud-payment-service #匹配后提供服务的路由地址
          predicates:
            - Path=/payment/get/**         # 断言,路径相匹配的进行路由

        - id: payment_routh2 #payment_route    #路由的ID,没有固定规则但要求唯一,建议配合服务名
          uri: http://localhost:8001          #匹配后提供服务的路由地址
          #uri: lb://cloud-payment-service #匹配后提供服务的路由地址
          predicates:
            - Path=/payment/lb/**         # 断言,路径相匹配的进行路由
####################################################################

eureka:
  instance:
    hostname: cloud-gateway-service
  client: #服务提供者provider注册进eureka服务列表内
    service-url:
      register-with-eureka: true
      fetch-registry: true
      defaultZone: http://eureka7001.com:7001/eureka
8.测试
启动7001
启动8001-cloud-provider-payment8001
启动9527网关
访问说明
添加网关前 - http://localhost:8001/payment/get/1
添加网关后 - http://localhost:9527/payment/get/1
两者访问成功,返回相同结果
GateWay配置动态路由
默认情况下Gateway会根据注册中心注册的服务列表,以注册中心上微服务名为路径创建动态路由进行转发,从而实现动态路由的功能(不写死一个地址)。
pom.xml
<!--eureka-client-->
<dependency>
    <groupId>org.springframework.cloud</groupId>
    <artifactId>spring-cloud-starter-netflix-eureka-client</artifactId>
</dependency>
application.xml
需要注意的是uri的协议为lb,表示启用Gateway的负载均衡功能。
lb://serviceName是spring cloud gateway在微服务中自动为我们创建的负载均衡uri。
server:
  port: 9527

spring:
  application:
    name: cloud-gateway
#############################新增网关配置###########################
  cloud:
    gateway:
      discovery:
        locator:
          enabled: true #开启从注册中心动态创建路由的功能,利用微服务名进行路由
      routes:
        - id: payment_routh #payment_route    #路由的ID,没有固定规则但要求唯一,建议配合服务名
          #uri: http://localhost:8001          #匹配后提供服务的路由地址
          uri: lb://cloud-payment-service #匹配后提供服务的路由地址
          predicates:
            - Path=/payment/get/**         # 断言,路径相匹配的进行路由

        - id: payment_routh2 #payment_route    #路由的ID,没有固定规则但要求唯一,建议配合服务名
          #uri: http://localhost:8001          #匹配后提供服务的路由地址
          uri: lb://cloud-payment-service #匹配后提供服务的路由地址
          predicates:
            - Path=/payment/lb/**         # 断言,路径相匹配的进行路由
####################################################################

eureka:
  instance:
    hostname: cloud-gateway-service
  client: #服务提供者provider注册进eureka服务列表内
    service-url:
      register-with-eureka: true
      fetch-registry: true
      defaultZone: http://eureka7001.com:7001/eureka
浏览器访问http://localhost:9527/payment/lb不停刷新页面,8001/8002两个端口切换
Stream(消息驱动)
常见MQ(消息中间件):
ActiveMQ
RabbitMQ
RocketMQ
Kafka
有没有一种新的技术诞生,让我们不再关注具体MQ的细节,我们只需要用一种适配绑定的方式,自动的给我们在各种MQ内切换。(类似于Hibernate)
Cloud Stream是什么?屏蔽底层消息中间件的差异,降低切换成本,统一消息的编程模型。
Stream是什么及Binder介绍
stream
Cloud Stream中文指导手册
什么是Spring Cloud Stream?
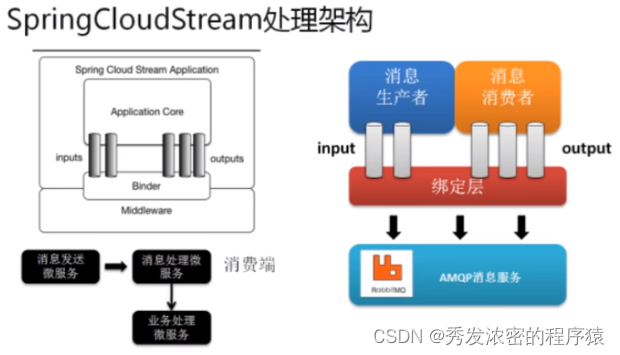
官方定义Spring Cloud Stream是一个构建消息驱动微服务的框架。
应用程序通过inputs或者 outputs 来与Spring Cloud Stream中binder对象交互。
通过我们配置来binding(绑定),而Spring Cloud Stream 的binder对象负责与消息中间件交互。所以,我们只需要搞清楚如何与Spring Cloud Stream交互就可以方便使用消息驱动的方式。
通过使用Spring Integration来连接消息代理中间件以实现消息事件驱动。
Spring Cloud Stream为一些供应商的消息中间件产品提供了个性化的自动化配置实现,引用了发布-订阅、消费组、分区的三个核心概念。
目前仅支持RabbitMQ、 Kafka。
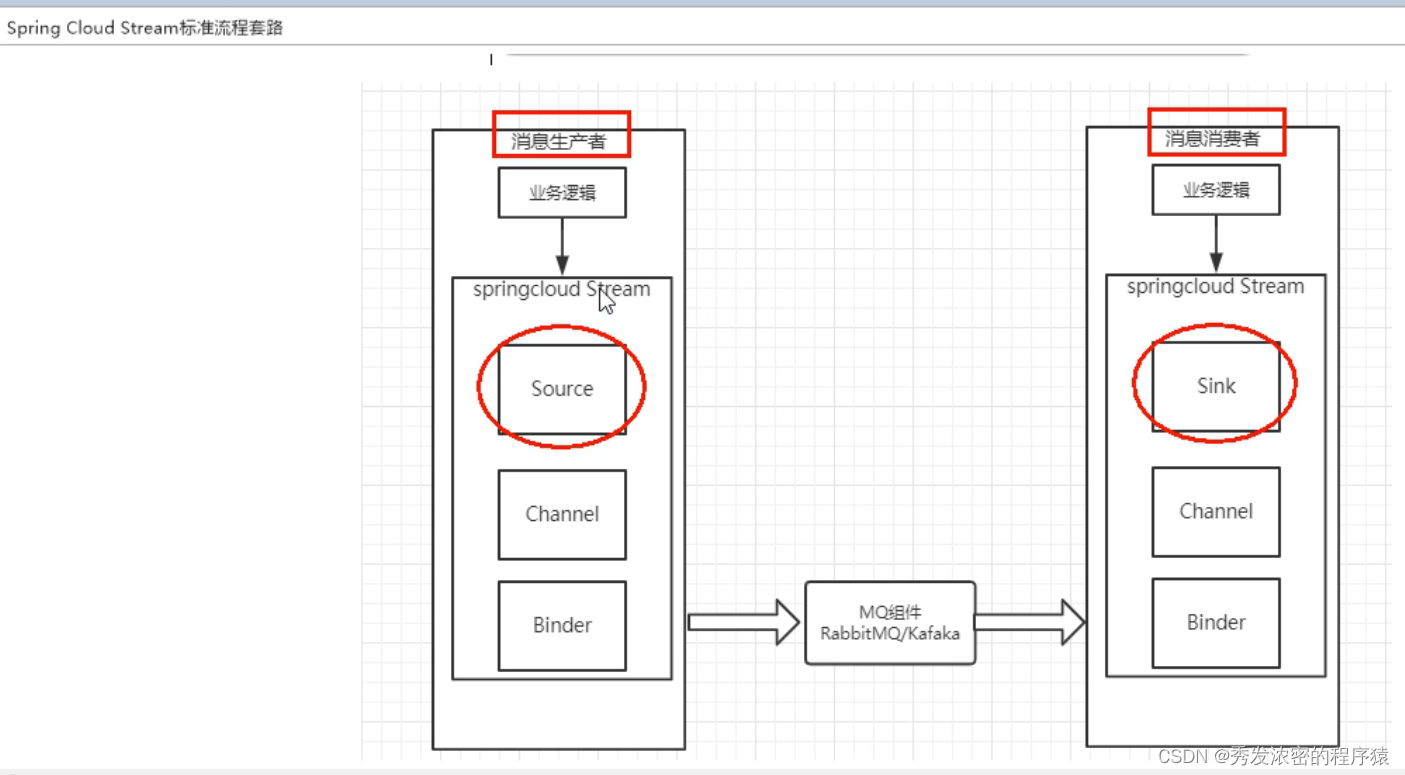
Stream的设计思想
标准MQ实现方式
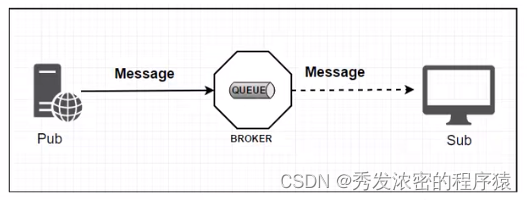
生产者/消费者之间靠消息媒介传递信息内容
消息必须走特定的通道 - 消息通道 Message Channel
消息通道里的消息如何被消费呢,谁负责收发处理 - 消息通道MessageChannel的子接口SubscribableChannel,由MessageHandler消息处理器所订阅。
为什么用Cloud Stream?
比方说我们用到了RabbitMQ和Kafka,由于这两个消息中间件的架构上的不同,像RabbitMQ有exchange,kafka有Topic和Partitions分区。

这些中间件的差异性导致我们实际项目开发给我们造成了一定的困扰,我们如果用了两个消息队列的其中一种,后面的业务需求,我想往另外一种消息队列进行迁移,这时候无疑就是一个灾难性的,一大堆东西都要重新推倒重新做,因为它跟我们的系统耦合了,这时候Spring Cloud Stream给我们提供了—种解耦合的方式。
Stream凭什么可以统一底层差异?
在没有绑定器这个概念的情况下,我们的SpringBoot应用要直接与消息中间件进行信息交互的时候,由于各消息中间件构建的初衷不同,它们的实现细节上会有较大的差异性通过定义绑定器作为中间层,完美地实现了应用程序与消息中间件细节之间的隔离。通过向应用程序暴露统一的Channel通道,使得应用程序不需要再考虑各种不同的消息中间件实现。
通过定义绑定器Binder作为中间层,实现了应用程序与消息中间件细节之间的隔离。
Binder:
INPUT对应于消费者
OUTPUT对应于生产者
Stream中的消息通信方式遵循了发布-订阅模式
Topic主题进行广播
在RabbitMQ就是Exchange
在Kakfa中就是Topic
(此图为重点)
编码API和注解
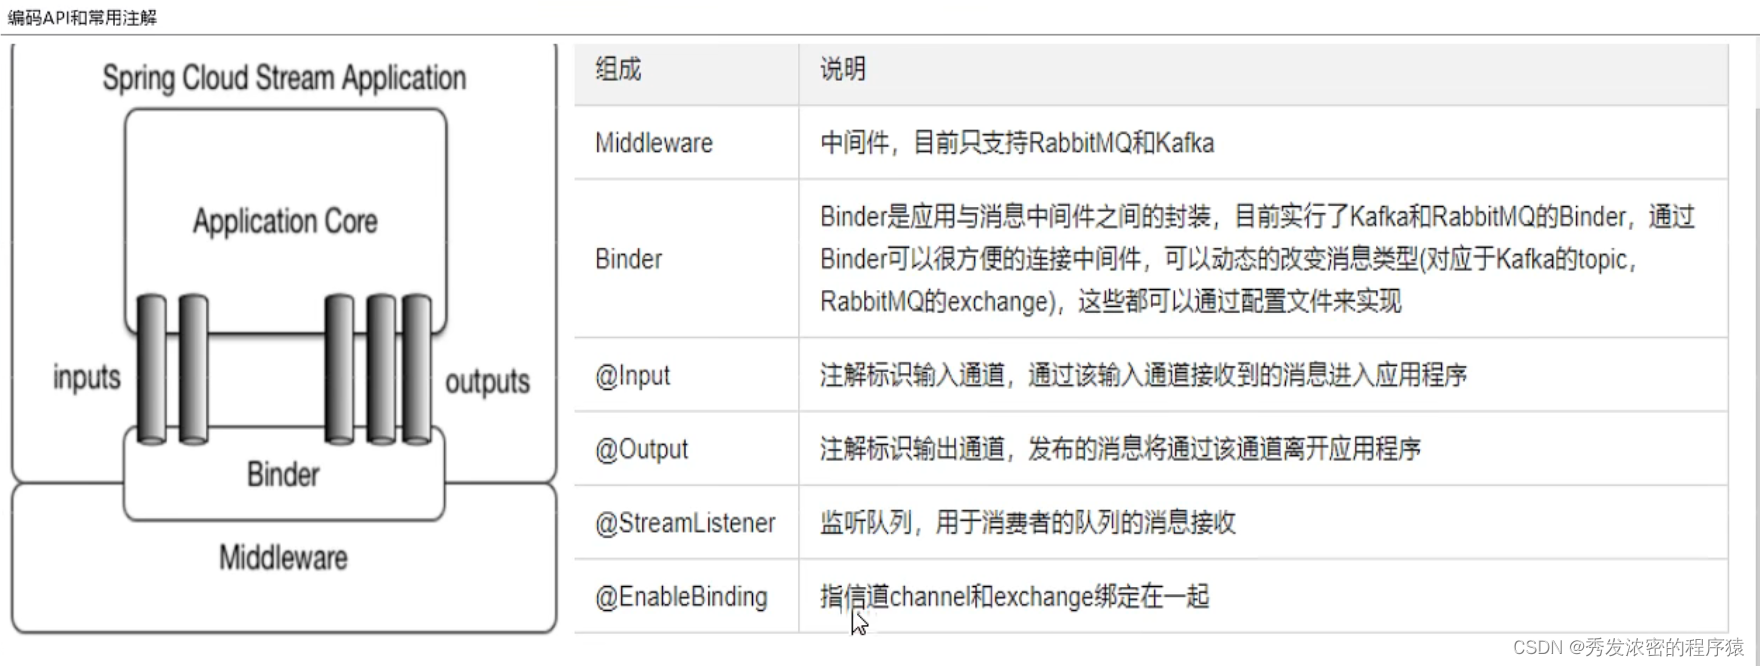
Stream中的消息通信方式遵循了发布-订阅模式
Topic主题进行广播
在RabbitMQ就是Exchange
在Kakfa中就是Topic
Stream消息驱动生产者(发送信息)
1.安装RabbitMQ
2.创建RabbitMQ项目
<1> 创建cloud-stream-rabbitmq-provider8801
<2>pom
 <dependencies>
        <dependency>
            <groupId>org.springframework.boot</groupId>
            <artifactId>spring-boot-starter-web</artifactId>
        </dependency>
        <dependency>
            <groupId>org.springframework.boot</groupId>
            <artifactId>spring-boot-starter-actuator</artifactId>
        </dependency>
        <dependency>
            <groupId>org.springframework.cloud</groupId>
            <artifactId>spring-cloud-starter-netflix-eureka-client</artifactId>
        </dependency>
        <dependency>
            <groupId>org.springframework.cloud</groupId>
            <artifactId>spring-cloud-starter-stream-rabbit</artifactId>
        </dependency>
        <!--基础配置-->
        <dependency>
            <groupId>org.springframework.boot</groupId>
            <artifactId>spring-boot-devtools</artifactId>
            <scope>runtime</scope>
            <optional>true</optional>
        </dependency>
        <dependency>
            <groupId>org.projectlombok</groupId>
            <artifactId>lombok</artifactId>
            <optional>true</optional>
        </dependency>
        <dependency>
            <groupId>org.springframework.boot</groupId>
            <artifactId>spring-boot-starter-test</artifactId>
            <scope>test</scope>
        </dependency>
    </dependencies>
<3>yml
server:
  port: 8801

spring:
  application:
    name: cloud-stream-provider
  cloud:
      stream:
        binders: # 在此处配置要绑定的rabbitmq的服务信息;
          defaultRabbit: # 表示定义的名称,用于于binding整合
            type: rabbit # 消息组件类型
            environment: # 设置rabbitmq的相关的环境配置
              spring:
                rabbitmq:
                  host: localhost
                  port: 5672
                  username: guest
                  password: guest
        bindings: # 服务的整合处理
          output: # 这个名字是一个通道的名称
            destination: studyExchange # 表示要使用的Exchange名称定义
            content-type: application/json # 设置消息类型,本次为json,文本则设置“text/plain”
            binder: defaultRabbit # 设置要绑定的消息服务的具体设置

eureka:
  client: # 客户端进行Eureka注册的配置
    service-url:
      defaultZone: http://localhost:7001/eureka
  instance:
    lease-renewal-interval-in-seconds: 2 # 设置心跳的时间间隔(默认是30秒)
    lease-expiration-duration-in-seconds: 5 # 如果现在超过了5秒的间隔(默认是90秒)
    instance-id: send-8801.com  # 在信息列表时显示主机名称
    prefer-ip-address: true     # 访问的路径变为IP地址
<4>启动类
import org.springframework.boot.SpringApplication;
import org.springframework.boot.autoconfigure.SpringBootApplication;

@SpringBootApplication
public class StreamMQMain8801 {
    public static void main(String[] args) {
        SpringApplication.run(StreamMQMain8801.class,args);
    }
}
<5>service
接口
public interface IMessageProvider {
    public String send();
}
实现类
import com.lun.springcloud.service.IMessageProvider;
import org.springframework.cloud.stream.annotation.EnableBinding;
import org.springframework.cloud.stream.messaging.Source;
import org.springframework.integration.support.MessageBuilder;
import org.springframework.messaging.MessageChannel;

import javax.annotation.Resource;
import java.util.UUID;


@EnableBinding(Source.class) //定义消息的推送管道
public class MessageProviderImpl implements IMessageProvider
{
    @Resource
    private MessageChannel output; // 消息发送管道

    @Override
    public String send()
    {
        String serial = UUID.randomUUID().toString();
        output.send(MessageBuilder.withPayload(serial).build());
        System.out.println("*****serial: "+serial);
        return null;
    }
}
<6>controller
import com.lun.springcloud.service.IMessageProvider;
import org.springframework.web.bind.annotation.GetMapping;
import org.springframework.web.bind.annotation.RestController;

import javax.annotation.Resource;

@RestController
public class SendMessageController
{
    @Resource
    private IMessageProvider messageProvider;

    @GetMapping(value = "/sendMessage")
    public String sendMessage() {
        return messageProvider.send();
    }

}
测试
启动 7001eureka
启动 RabpitMq(79_Bus之RabbitMQ环境配置)
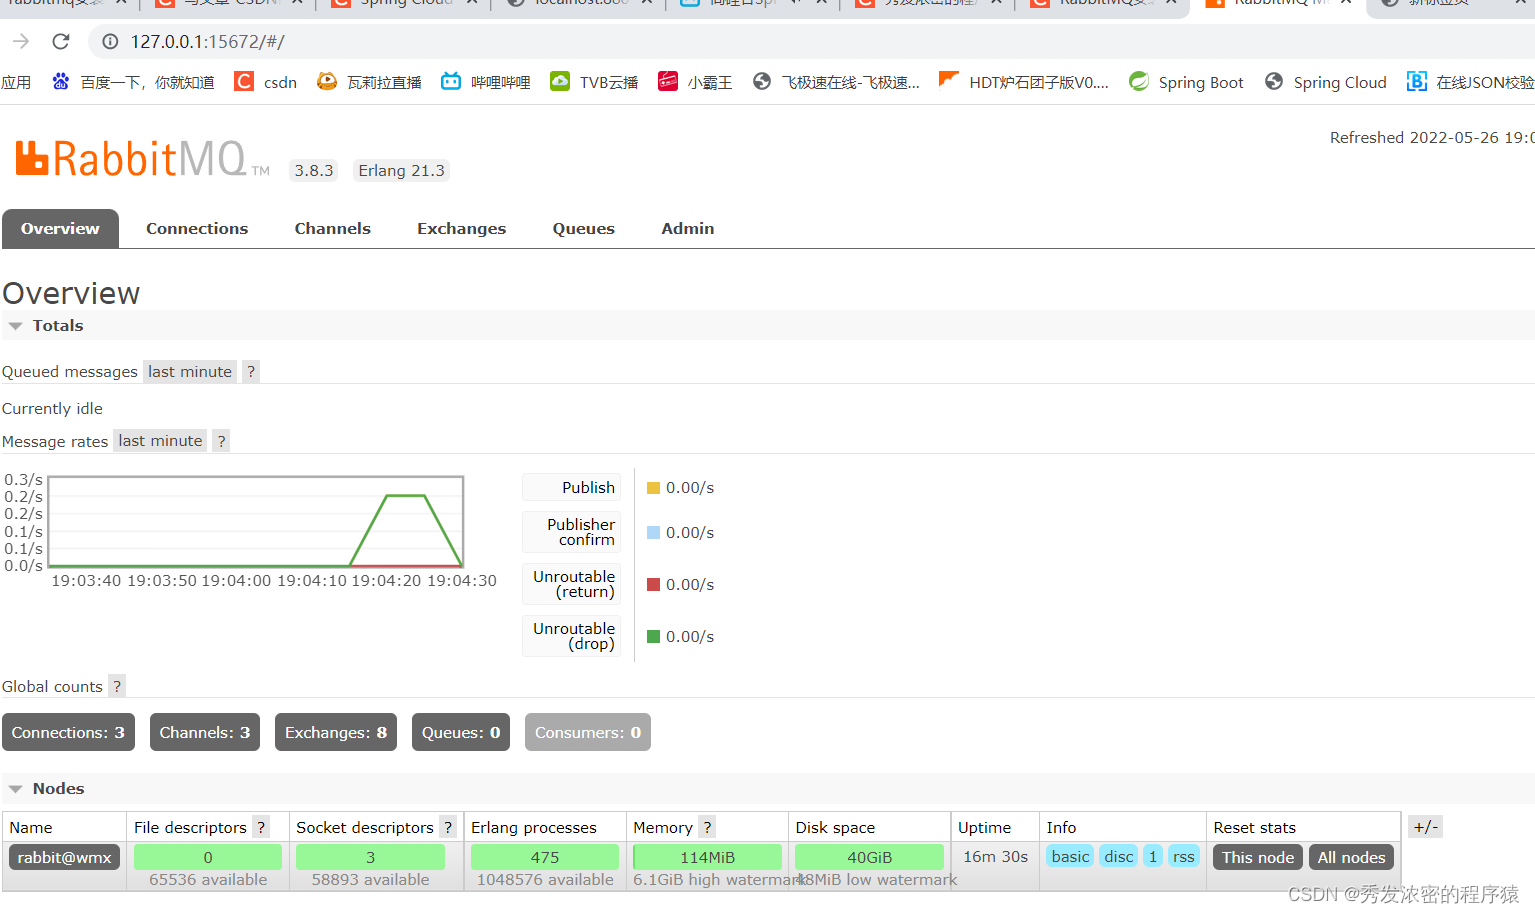
rabbitmq-plugins enable rabbitmq_management
http://localhost:15672/
启动 8801
访问 - http://localhost:8801/sendMessage
后台将打印serial: UUID字符串 RabbitMQ中折线图有显示
Stream消息驱动消费者(接受信息)
1.新建Module:cloud-stream-rabbitmq-consumer8802
2.改pom
 <dependencies>
        <dependency>
            <groupId>org.springframework.boot</groupId>
            <artifactId>spring-boot-starter-web</artifactId>
        </dependency>
        <dependency>
            <groupId>org.springframework.cloud</groupId>
            <artifactId>spring-cloud-starter-netflix-eureka-client</artifactId>
        </dependency>
        <dependency>
            <groupId>org.springframework.cloud</groupId>
            <artifactId>spring-cloud-starter-stream-rabbit</artifactId>
        </dependency>
        <dependency>
            <groupId>org.springframework.boot</groupId>
            <artifactId>spring-boot-starter-actuator</artifactId>
        </dependency>
        <!--基础配置-->
        <dependency>
            <groupId>org.springframework.boot</groupId>
            <artifactId>spring-boot-devtools</artifactId>
            <scope>runtime</scope>
            <optional>true</optional>
        </dependency>
        <dependency>
            <groupId>org.projectlombok</groupId>
            <artifactId>lombok</artifactId>
            <optional>true</optional>
        </dependency>
        <dependency>
            <groupId>org.springframework.boot</groupId>
            <artifactId>spring-boot-starter-test</artifactId>
            <scope>test</scope>
        </dependency>
    </dependencies>
3.新建appliction.yml
server:
  port: 8802

spring:
  application:
    name: cloud-stream-consumer
  cloud:
      stream:
        binders: # 在此处配置要绑定的rabbitmq的服务信息;
          defaultRabbit: # 表示定义的名称,用于于binding整合
            type: rabbit # 消息组件类型
            environment: # 设置rabbitmq的相关的环境配置
              spring:
                rabbitmq:
                  host: localhost
                  port: 5672
                  username: guest
                  password: guest
        bindings: # 服务的整合处理
          input: # 这个名字是一个通道的名称
            destination: studyExchange # 表示要使用的Exchange名称定义
            content-type: application/json # 设置消息类型,本次为对象json,如果是文本则设置“text/plain”
            binder: defaultRabbit # 设置要绑定的消息服务的具体设置

eureka:
  client: # 客户端进行Eureka注册的配置
    service-url:
      defaultZone: http://localhost:7001/eureka
  instance:
    lease-renewal-interval-in-seconds: 2 # 设置心跳的时间间隔(默认是30秒)
    lease-expiration-duration-in-seconds: 5 # 如果现在超过了5秒的间隔(默认是90秒)
    instance-id: receive-8802.com  # 在信息列表时显示主机名称
    prefer-ip-address: true     # 访问的路径变为IP地址
4.启动类
import org.springframework.boot.SpringApplication;
import org.springframework.boot.autoconfigure.SpringBootApplication;

@SpringBootApplication
public class StreamMQMain8802 {
    public static void main(String[] args) {
        SpringApplication.run(StreamMQMain8802.class,args);
    }
}
5.service
6.controller
import org.springframework.beans.factory.annotation.Value;
import org.springframework.cloud.stream.annotation.EnableBinding;
import org.springframework.cloud.stream.annotation.StreamListener;
import org.springframework.cloud.stream.messaging.Sink;
import org.springframework.messaging.Message;
import org.springframework.stereotype.Component;


@Component
@EnableBinding(Sink.class)
public class ReceiveMessageListenerController
{
    @Value("${server.port}")
    private String serverPort;


    @StreamListener(Sink.INPUT)
    public void input(Message<String> message)
    {
        System.out.println("消费者1号,----->接受到的消息: "+message.getPayload()+"\t  port: "+serverPort);
    }
}
测试
启动EurekaMain7001
启动StreamMQMain8801
启动StreamMQMain8802
8801发送8802接收消息


 3051
3051


 被折叠的 条评论
为什么被折叠?
被折叠的 条评论
为什么被折叠?
 到【灌水乐园】发言


