如何优雅的实现撤销和回退功能

如何优雅的实现撤销和回退功能

本篇要讲的是怎么样快速并且稳定以及优雅的实现redo undo功能的逻辑,相信大家都会想到命令模式的可以实现这个功能,但是如果你不想写那么多代码,偷个懒的话,那请往下瞧瞧!

好了各位老司机,快肥来,看栗子

栗子

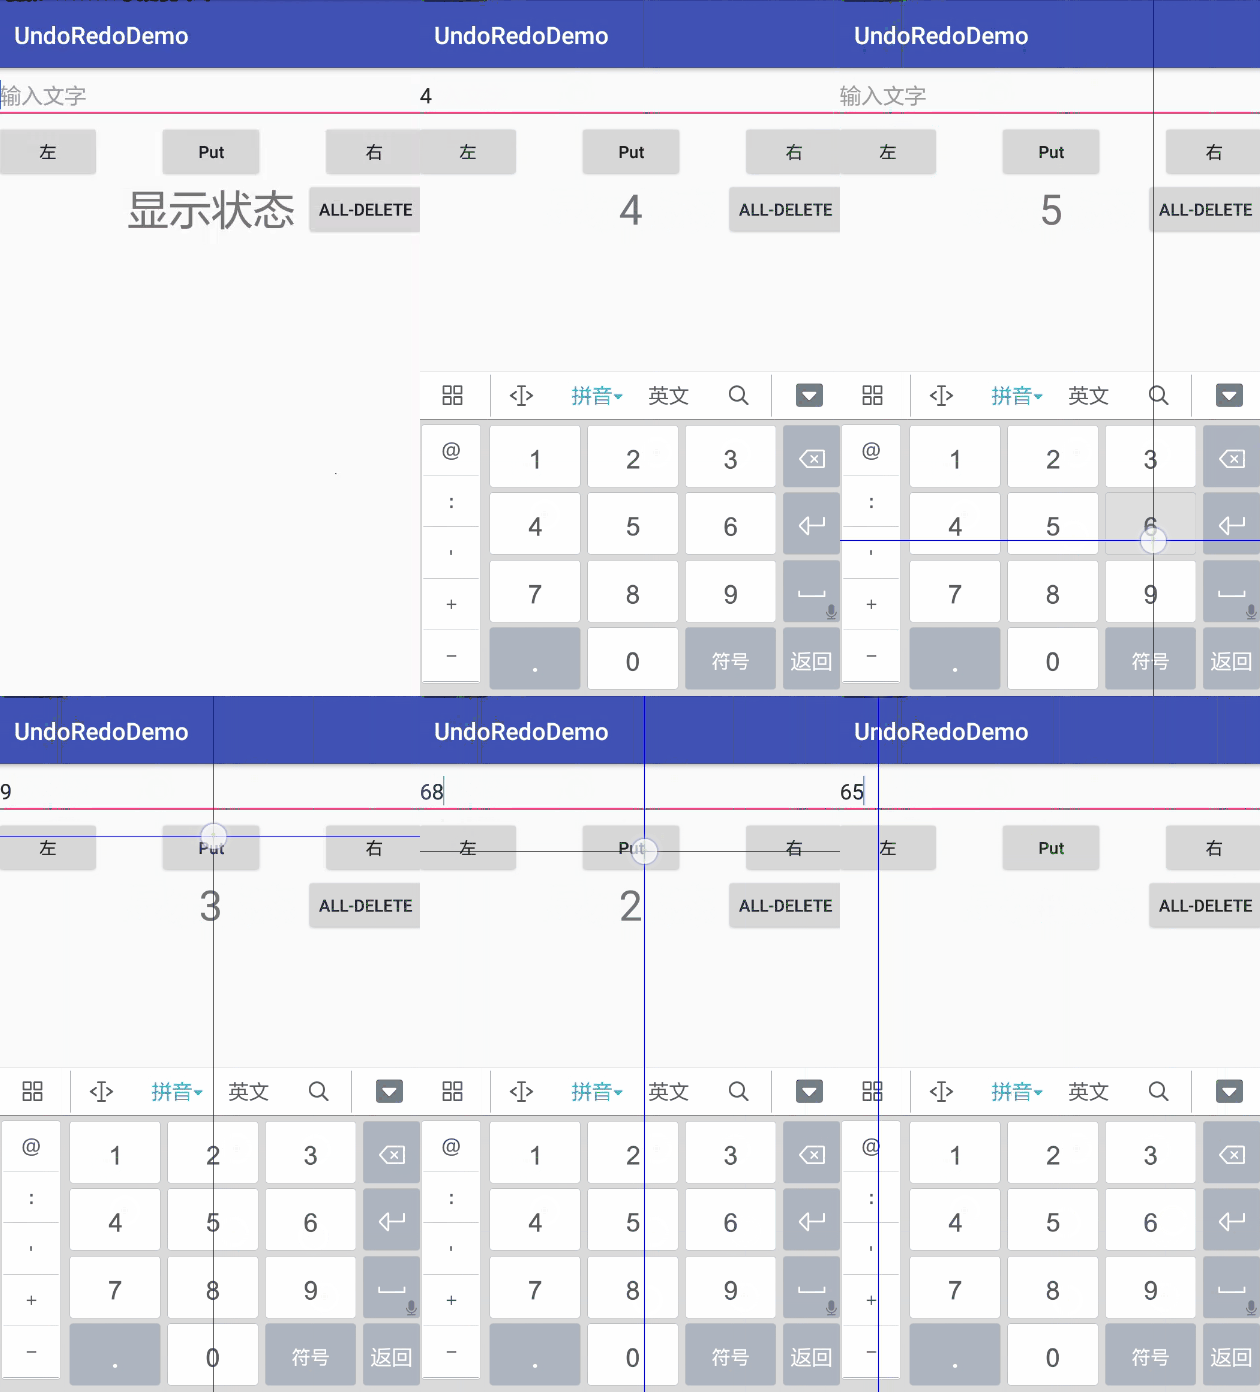
如下,需求是普通的插入数据,然后插入之后的数据可以做到undo(左移),redo(右移),全部删除的功能。其实如果你们应用里面要是有图片编辑的撤销和回退场景的话,那么这个图的功能表现你可能很熟悉。
1.gif

撤销删除环形管理类

撤销重做的功能用途很广泛,比如平时用到的Ctrl+Z和Ctrl+Y组合,比如图片编辑的左右撤销功能。这种逻辑有很多方法可以实现,比如控制一个指针,比如用命令模式包装控制命令、比如管理两个队列。下面我要做的是一种不需要维护数字指针的实现。

  • 1、可以左右撤销数据
  • 2、可以控制向左撤销的最大数量
  • 3、方便存任意的数据
  • 4、希望是一个可以统一使用的工具类
  • 5、支持并发操作

一、思路

分析需求,我们需要的是主要是3个功能,添加数据、往左得到左边的数据、往右得到右边的数据,正常情况下,如果不要数字指针,也就说明不会有数字的增和减,那么只能用链表来实现。为了节省内存,可以考虑使用环形链表实现。并且可以用一个当前的节点的全局变量来代替数字的指针。

  • 1、没有元素的情况
  • 2、2个元素的情况
  • 3、3个元素的情况
  • 4、5个元素的情况
  • 5、删除一个元素
  • 6、删除全部元素

二、目录

  • 1、定义各个节点
  • 2、往链表尾部插入节点
  • 3、判断左右边界
  • 4、拿到向左向右的数据
  • 5、删除节点之后的数据
  • 6、将当前的头部节点前移
  • 7、遍历链表得到所有节点的数量
  • 8、封装put函数
  • 9、封装undo redo函数
  • 10、删除链表所有数据
改造
  • 1、当前显示的节点添加volatile关键字
  • 2、改造put方法
  • 3、改造undo、redo方法
  • 4、改造范型的数据结构
  • 5、将范型周期删除的回调填入各个方法
  • 6、给各个方法加上同步关键字synchronized
  • 7、范型需要传入的数据结构

三、代码实现

针对上面的思路,代码实现如下

1、定义各个节点
 	// 头结点
    private Node<T> mHead;
    // 尾结点
    private Node<T> mTail;
    // 当前的显示的节点
    private Node<T> mCurrentNode;
2、往链表尾部插入节点
 	/**
     * 在链表表尾插入一个结点
     *
     * @param data
     */
    private void insertInTail(T data) {
        Node<T> newNode = new Node<>(data);
        // 保存为当前的节点
        this.mCurrentNode = newNode;
        if (mTail == null) {
            // 为null,说明是尾节点
            mHead = newNode;
            mTail = newNode;

            // 和头部相连接,形成环形双向链表
            mTail.mNext = mHead;
            mHead.mPrevious = mTail;
        } else {
            newNode.mPrevious = mTail;
            mTail.mNext = newNode;
            mTail = newNode;

            // 和头部相连接,形成环形双向链表
            mTail.mNext = mHead;
            mHead.mPrevious = mTail;
        }
    }

先把数据存入当前显示的节点,接着判断当前链表中有没有元素。如果没有那么当前的节点既是头部节点又是尾部节点,然后还要将他们头尾相连。如果不为空说明当前链表有数据,那么将新元素接到尾部节点上,并且新的节点变为尾部节点,并且与头部节点相连。

3、判断左右边界

    /**
     * 是否是左边界
     *
     * @return false代表是左边界
     */
    public boolean isLeftBound() {
        return mCurrentNode == mHead || mCurrentNode == null;
    }

右边界和左边界原理一样。这里只分析左边界,只需要判断当前的节点是否是头结点(链表有数据)或者是否为空(链表无数据时)。

4、拿到向左向右的数据
private T getPreNode() {
        if (mHead == null) {
            return null;
        }
        if (isLeftBound()) {
            // 如果是左边界
            return mHead.mData;
        }
        mCurrentNode = mCurrentNode.mPrevious;
        return mCurrentNode.mData;
    }

向右的原理一样。这里只分析向左,想判断头部书否为空,如果为空,说明链表无数据,直接返回空。接着判断是否是左边界,如果是左边界,那么返回头部的数据。如果不是上面2种情况那么返回前一个节点的数据。

  • 到这里已经实现需求的1、3、4了,还差控制数量的实现,下面的方法是为了控制数量而实现的。
5、删除节点之后的数据

假设现在添加了5个数据,然后撤销了2步(当前节点停在第3个元素),如果这个时候需要往链表里添加数据,那么需要将第4、第5个数据删掉。所以就有了deleteAfterNode()方法

/**
     * 删除链表指定结点之后的元素,具体做法是当前的Node直接连接头节点
     *
     * @param node
     * @return
     */
    private void deleteAfterNode(Node<T> node) {
        if (node == null) {
            return;
        }
        
        Node<T> cur = node.mNext;
        while (cur != mHead) {
            Node<T> dest = cur;
            cur = cur.mNext;

            dest.mNext = null;
            dest.mPrevious = null;
        }
        
        mTail = node;

        mTail.mNext = mHead;
        mHead.mPrevious = mTail;
    }

先判断是否是空链表。如果不是则从当前节点的下一节点开始清空节点元素,并且最后把当前的节点变为尾节点并且,直接连接头节点。

6、将当前的头部节点前移

假设当前链表中节点数量到了峰值(比如5个),那么再往里面添加一个数据,就变成了6个,为了稳定在5个,那么要把前面的头部给删掉。

 	/**
     * 当前的指针头部前移
     */
    private void replaceCurrentHead() {
        Node<T> node = mHead;
        mHead = mHead.mNext;

        node.mNext = null;
        node.mPrevious = null;

        mTail.mNext = mHead;
        mHead.mPrevious = mTail;
    }
7、遍历链表得到所有节点的数量
 	/**
     * 返回计算后的链表长度
     *
     * @return
     */
    private int size() {
        if (mTail == null) {
            // 如果尾部没有值,那么size为0
            return 0;
        }
        // 尾部有值的情况
        int size = 1;
        // 如果尾部有值,那么开始遍历每一个项
        Node cur = mTail;
        while (cur != mTail.mNext) {
            size++;
            cur = cur.mPrevious;
        }
        return size;
    }
8、封装put函数
	public void put(T data) {
        deleteAfterNode(mCurrentNode);
        if (size() >= mCount) {
            insertInTail(data);
            // 当前的头部前移
            replaceCurrentHead();
            return;
        }
        // 执行插入
        insertInTail(data);
    }

每次添加数据,先清除当前节点后面的数据,如果当前链表的节点数量大于峰值,那么将头部前移。

9、封装undo redo函数
	/**
     * 向左撤销
     *
     * @return
     */
    public T undo() {
        return getPreNode();
    }

    /**
     * 向后恢复
     *
     * @return
     */
    public T redo() {
        return getNextNode();
    }
10、删除链表所有数据
	/**
     * 删除链表所有数据
     */
    public void removeAll() {
        if (mHead == null) {
            return;
        }
        Node cur = mHead;
        while (cur != mHead.mPrevious) {
            Node dest = cur;
            cur = cur.mNext;

            dest.mNext = null;
            dest.mPrevious = null;
        }
        mHead = null;
        mTail = null;
        mCurrentNode = null;
    }

四、改造成同步链表

1、当前显示的节点添加volatile关键字
    // 当前的显示的节点
    private volatile Node<T> mCurrentNode;
2、改造put方法
    public void put(T data) {
        synchronized (UndoRedoLinkedList.this) {
            deleteAfterNode(mCurrentNode);
            if (size() >= mCount) {
                insertInTail(data);
                // 当前的头部前移
                replaceCurrentHead();
                return;
            }
            // 执行插入
            insertInTail(data);
        }
    }
3、改造undo、redo方法
    /**
     * 向左撤销
     *
     * @return
     */
    public synchronized T undo() {
        return getPreNode();
    }

    /**
     * 向后恢复
     *
     * @return
     */
    public synchronized T redo() {
        return getNextNode();
    }
4、改造范型的数据结构

为了能完全的将数据类型,比如bitmap完全清除出内存,有时候需要在将Bitmap置空之前调用recycle方法,

A、定义接口
    public interface Entry {
        void onDestroy();
    }
B、改造范型
public class UndoRedoLinkedList<T extends UndoRedoLinkedList.Entry> {
C、数据结构添加volatile关键字
private static class Node<T> {
        // 业务的数据
        private T mData;
        private volatile Node<T> mPrevious;
        private volatile Node<T> mNext;

        Node(T data) {
            mData = data;
        }
    }
5、将范型周期删除的回调填入各个方法。

比如

/**
     * 删除链表所有数据
     */
    public synchronized void removeAll() {
        if (mHead == null) {
            return;
        }
        Node<T> cur = mHead;
        while (cur != mHead.mPrevious) {
            Node<T> dest = cur;
            cur = cur.mNext;

            dest.mData.onDestroy();
            dest.mNext = null;
            dest.mPrevious = null;
        }
        mHead = null;
        mTail = null;
        mCurrentNode = null;
    }
6、给各个方法加上同步关键字synchronized
7、范型需要传入的数据结构
  public class UndoRedoBean implements UndoRedoLinkedList.Entry {

    private String mData = null;
    private int mIndex = 1;

    public void setData(String data) {
        mData = data;
    }

    public String getData() {
        return mData;
    }

    public int getIndex() {
        return mIndex;
    }

    @Override
    public void onDestroy() {
        mIndex = 0;
    }
}

例子:UndoRedoDemo


更多

Command模式实现撤销重做(Undo/Redo)

设计模式 - 命令模式(command pattern) 撤销(undo) 详解

数据结构之链表及其Java实现

  • 1
    点赞
  • 10
    收藏
    觉得还不错? 一键收藏
  • 0
    评论
实现Qt的QTableView支持撤销回退功能,需要按以下步骤进行操作: 1. 创建一个记录表格数据的类,并在其中添加用于撤销和重做的操作。 ```c++ class TableModel : public QAbstractTableModel { public: TableModel(QObject *parent = nullptr); int rowCount(const QModelIndex &parent = QModelIndex()) const override; int columnCount(const QModelIndex &parent = QModelIndex()) const override; QVariant data(const QModelIndex &index, int role = Qt::DisplayRole) const override; bool setData(const QModelIndex &index, const QVariant &value, int role = Qt::EditRole) override; Qt::ItemFlags flags(const QModelIndex &index) const override; bool insertRows(int position, int rows, const QModelIndex &parent = QModelIndex()) override; bool removeRows(int position, int rows, const QModelIndex &parent = QModelIndex()) override; // 撤销重做相关操作 void undo(); void redo(); bool canUndo() const; bool canRedo() const; private: QVector<QVector<QVariant>> m_data; QVector<QVector<QVariant>> m_undoStack; QVector<QVector<QVariant>> m_redoStack; }; ``` 2. 在构造函数中初始化记录数据的变量,并将其与视图绑定。 ```c++ TableModel::TableModel(QObject *parent) : QAbstractTableModel(parent) { m_data.resize(10, QVector<QVariant>(10)); for (int row = 0; row < 10; ++row) { for (int col = 0; col < 10; ++col) { m_data[row][col] = QString("(%1,%2)").arg(row).arg(col); } } } ``` 3. 实现数据模型的基本功能,包括获取行数、列数、单元格数据、单元格编辑等。 ```c++ int TableModel::rowCount(const QModelIndex &parent) const { if (parent.isValid()) return 0; return m_data.size(); } int TableModel::columnCount(const QModelIndex &parent) const { if (parent.isValid()) return 0; return m_data[0].size(); } QVariant TableModel::data(const QModelIndex &index, int role) const { if (!index.isValid()) return QVariant(); if (role == Qt::DisplayRole || role == Qt::EditRole) { return m_data[index.row()][index.column()]; } return QVariant(); } bool TableModel::setData(const QModelIndex &index, const QVariant &value, int role) { if (index.isValid() && role == Qt::EditRole) { m_undoStack.push_back(m_data); m_redoStack.clear(); m_data[index.row()][index.column()] = value; emit dataChanged(index, index, {role}); return true; } return false; } Qt::ItemFlags TableModel::flags(const QModelIndex &index) const { if (!index.isValid()) return Qt::NoItemFlags; return QAbstractTableModel::flags(index) | Qt::ItemIsEditable; } bool TableModel::insertRows(int position, int rows, const QModelIndex &parent) { m_undoStack.push_back(m_data); m_redoStack.clear(); beginInsertRows(parent, position, position + rows - 1); for (int row = 0; row < rows; ++row) { m_data.insert(position, QVector<QVariant>(m_data[0].size())); } endInsertRows(); return true; } bool TableModel::removeRows(int position, int rows, const QModelIndex &parent) { m_undoStack.push_back(m_data); m_redoStack.clear(); beginRemoveRows(parent, position, position + rows - 1); m_data.erase(m_data.begin() + position, m_data.begin() + position + rows); endRemoveRows(); return true; } ``` 4. 实现撤销和重做操作。在撤销时,将当前数据保存到重做栈中,并从撤销栈中取出上一次的数据,更新视图显示。在重做时,将当前数据保存到撤销栈中,并从重做栈中取出下一次的数据,更新视图显示。 ```c++ void TableModel::undo() { if (canUndo()) { m_redoStack.push_back(m_data); m_data = m_undoStack.back(); m_undoStack.pop_back(); emit dataChanged(index(0, 0), index(m_data.size() - 1, m_data[0].size() - 1), {}); } } void TableModel::redo() { if (canRedo()) { m_undoStack.push_back(m_data); m_data = m_redoStack.back(); m_redoStack.pop_back(); emit dataChanged(index(0, 0), index(m_data.size() - 1, m_data[0].size() - 1), {}); } } bool TableModel::canUndo() const { return !m_undoStack.empty(); } bool TableModel::canRedo() const { return !m_redoStack.empty(); } ``` 5. 在主窗口中创建QTableView,并将其与数据模型绑定。同时,创建撤销和重做的按钮,并在点击时调用数据模型的撤销和重做操作。 ```c++ MainWindow::MainWindow(QWidget *parent) : QMainWindow(parent) { QTableView *tableView = new QTableView(this); TableModel *model = new TableModel(this); tableView->setModel(model); setCentralWidget(tableView); QAction *undoAction = new QAction(tr("&Undo"), this); undoAction->setShortcuts(QKeySequence::Undo); connect(undoAction, &QAction::triggered, model, &TableModel::undo); QAction *redoAction = new QAction(tr("&Redo"), this); redoAction->setShortcuts(QKeySequence::Redo); connect(redoAction, &QAction::triggered, model, &TableModel::redo); QToolBar *toolBar = addToolBar(tr("Edit")); toolBar->addAction(undoAction); toolBar->addAction(redoAction); } ``` 这样,就可以在Qt的QTableView中实现撤销和重做的功能了。

“相关推荐”对你有帮助么?

  • 非常没帮助
  • 没帮助
  • 一般
  • 有帮助
  • 非常有帮助
提交
评论
添加红包

请填写红包祝福语或标题

红包个数最小为10个

红包金额最低5元

当前余额3.43前往充值 >
需支付:10.00
成就一亿技术人!
领取后你会自动成为博主和红包主的粉丝 规则
hope_wisdom
发出的红包
实付
使用余额支付
点击重新获取
扫码支付
钱包余额 0

抵扣说明:

1.余额是钱包充值的虚拟货币,按照1:1的比例进行支付金额的抵扣。
2.余额无法直接购买下载,可以购买VIP、付费专栏及课程。

余额充值