


原文地址:http://blog.csdn.net/xiaominghimi/archive/2010/12/27/6100602.aspx
各位童鞋请你们注意:surfaceview中确实有 onDraw这个方法,但是surfaceview不会自己去调用!!!
而我代码中的ondraw 也好 draw 也好,都是我自己定义的一个方法。。。放在线程中不断调用的,一定要注意!!
上一篇我们已经可以在同一界面中既显示我们的surfaceview和button、textview等组件,那么基本算是成功了,但是身为游戏开发人员,如果不是想故意要这种类似电影形式的展现方式(我们的surfaceview在中间 - -.很想播放电影似的。。),是绝对不允许游戏的分量只是占了中间那么一部分,肯定需要全屏显示,别的组件只是一个配角的角色。那么下面先上一张截图看下为什么修改与调整。
(图1)
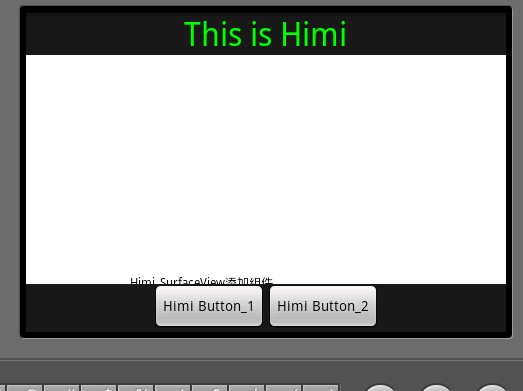
看到我们画出来的字体了吧,很悲剧被覆盖了!只要有button就会有一块长条,即使我们修改button中布局的颜色也只是把长条的颜色变成白色,当然好看是好看了,但是仍旧遮挡我们的字体!这可不是我们想要的结果。我们想要的效果应该是下图这样的:
(图2)

娃哈哈,这效果就对啦,我们的view占满全屏,而组件本身才会对我们的view中的内容有遮挡,不会多出一些无用的长条遮挡....
当时虽然想的方法就是布局xml的问题,我一开始想在我们xml中定义的surfaceview中直接添加按钮,但是view不能添加view!所以没办法,就想到是否是布局的问题。经过多次尝试才终于成功做到。
view plaincopy to clipboardprint?
·········10········20········30········40········50········60········70········80········90········100·······110·······120·······130·······140·······150
<?xml version="1.0" encoding="utf-8"?>
<LinearLayout xmlns:android="http://schemas.android.com/apk/res/android"
android:orientation="vertical"
android:layout_width="fill_parent"
android:layout_height="fill_parent"
>
<RelativeLayout
android:layout_width="fill_parent"
android:layout_height="wrap_content"
android:layout_weight="1" >
<com.himi.MySurfaceView android:id="@+id/view3d"
android:layout_width="fill_parent"
android:layout_height="fill_parent"/>
<Button
android:layout_width="wrap_content"
android:layout_height="wrap_content"
android:layout_alignParentBottom="true"
android:text="Himi Button_1"
android:id="@+id/button1"/>
<Button android:layout_width="wrap_content"
android:layout_height="wrap_content"
android:layout_alignParentBottom="true"
android:layout_toRightOf="@id/button1"
android:text="Himi Button_2"
android:id="@+id/button2"/>
<TextView
android:id="@+id/textview"
android:layout_width="fill_parent"
android:layout_height="fill_parent"
android:text="This is Himi"
android:textSize="32sp"
android:textColor="#00FF00"
android:gravity="center_horizontal"/>
</RelativeLayout>
</LinearLayout>
xml 修改的不大,主要将之前的线性布局改成了相对布局。虽然改动不大,但是也真的费了不少时间去调整、这样一来大家就可以在自己的游戏Surfaceview中随意添加组件啦,娃哈哈~~~
源码在上一篇已经给出下载地址,这里也只是对xml的修改大家需要可以去下载上一篇的源码,将xml调整即可
本文来自CSDN博客,转载请标明出处:http://blog.csdn.net/xiaominghimi/archive/2010/12/27/6100602.aspx


 109
109

 被折叠的 条评论
为什么被折叠?
被折叠的 条评论
为什么被折叠?
 到【灌水乐园】发言


