


一,什么是依赖注入?(DI)
那么我们先来了解一下什么是IOC,所谓的ioc就是控制反转,即把创建对象的交给spring容器管理。那么什么是ioc呢?就是在创建对象时,本对象又引入了其他类的对象或者对本对象的属性进行赋值等操作。那么,springioc和DI是什么关系呢?DI依赖Springioc,也就是说springioc是DI 的前提。
二 ,在java中如何实现对属性的赋值呢?
了解到sping 的依赖注入实际上就是对类的属性的操作,那么我们来看一下java中对属性操作方式有哪些?
(1)通过类的构造方法
(2)通过set方法
(3)通过接口实现对属性的操作
那么下面我们一一看看他们是怎样实现的。
(1)通过类的构造方法
A。创建一个实体类,内部有一个属性为name
package com.test.java;

public class Demo1 {
	private String name;
	public Demo1(String name) {
		this.name = name;
	}
	public void sys() {
		System.out.println("Demo1......"+name);
	}
}
B.编写测试代码块
package com.test.java;

import org.junit.Test;

public class TestDemo1 {

	/**
	 * 通过构造方法对属性赋值
	 */
	@Test
	public void testDemo1() {
		//创建Demo1对象 ,对demo1的属性name赋值为tom
		Demo1 demo1 = new Demo1("tom");
		demo1.sys();
	}
}
(2)通过set方法
A,编写实体类
package com.test.java;

public class Demo2 {
	private String name;
	public void setName(String name) {
		this.name = name;
	}
	public void sys() {
		System.out.println("demo2......."+name);
	}
}
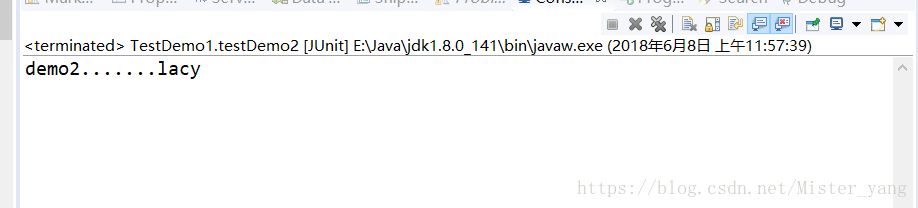
B.编写一个测试类
/**
	 * 通过set对属性赋值
	 */
	@Test
	public void testDemo2() {
		//创建Demo对象
		Demo2 demo2 = new Demo2();
		//通过set方式对属性name赋值
		demo2.setName("lacy");
		demo2.sys();
	}
(3)通过接口实现对属性的操作
A,辨析接口信息
package com.test.java;

public interface IDemo3 {
	public void add(String name);
}
package com.test.java;

public class Demo3  implements IDemo3{
	private String name;

	@Override
	public void add(String name) {
		// TODO Auto-generated method stub
		this.name = name;
	}
	public void sys() {
		System.out.println("demo3....."+name);
	}

}
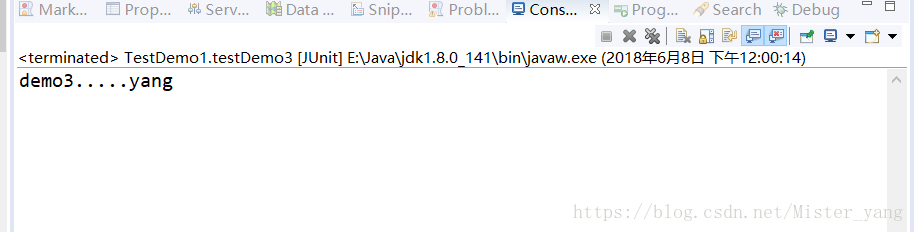
C.辨析测试信息
/**
	 * 通过接口对属性赋值
	 */
	@Test
	public void testDemo3() {
		IDemo3 demo3 = new Demo3();
		demo3.add("yang");
		((Demo3)demo3).sys();
	}
三。springioc注入的方式
JAVA的方式有三种方式给属性赋值,而spring只有前两种
即:(1)构造方法
(2)set注入
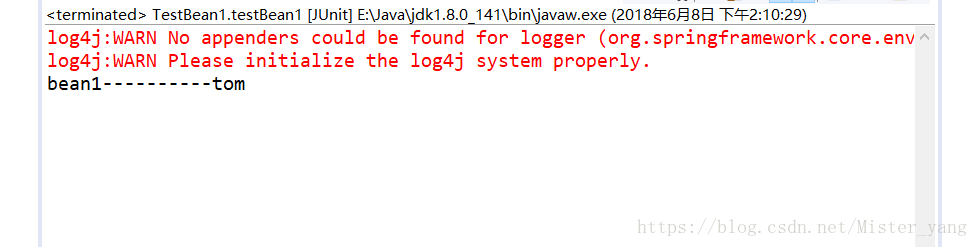
(1)方式一,构造方法
A。创建实体类
package com.test.ioc;

public class Bean1 {
	private String name;
	public Bean1(String name) {
		// TODO Auto-generated constructor stub
		this.name = name;
	}
	public void sys() {
		System.out.println("bean1----------"+name);
	}
}
B。在bean.xml中配置
<?xml version="1.0" encoding="UTF-8"?>
<beans xmlns="http://www.springframework.org/schema/beans"
    xmlns:xsi="http://www.w3.org/2001/XMLSchema-instance"
    xmlns:mvc="http://www.springframework.org/schema/mvc"
    xmlns:context="http://www.springframework.org/schema/context"
    xmlns:aop="http://www.springframework.org/schema/aop"
    xmlns:tx="http://www.springframework.org/schema/tx"
    xsi:schemaLocation="
        http://www.springframework.org/schema/beans http://www.springframework.org/schema/beans/spring-beans.xsd
        http://www.springframework.org/schema/mvc
        http://www.springframework.org/schema/mvc/spring-mvc.xsd
        http://www.springframework.org/schema/context http://www.springframework.org/schema/context/spring-context.xsd
        http://www.springframework.org/schema/aop http://www.springframework.org/schema/aop/spring-aop.xsd
        http://www.springframework.org/schema/tx http://www.springframework.org/schema/tx/spring-tx.xsd">
	<!-- spring通过构造方法 注入 -->
	<bean id="bean1" class="com.test.ioc.Bean1">
		<constructor-arg name="name" value="tom"></constructor-arg>
	</bean>
</beans> @Test
public void testBean1() {
@SuppressWarnings("resource")
ApplicationContext applicationContext = new ClassPathXmlApplicationContext("bean.xml");
Bean1 bean1 = (Bean1) applicationContext.getBean("bean1");
bean1.sys();
}
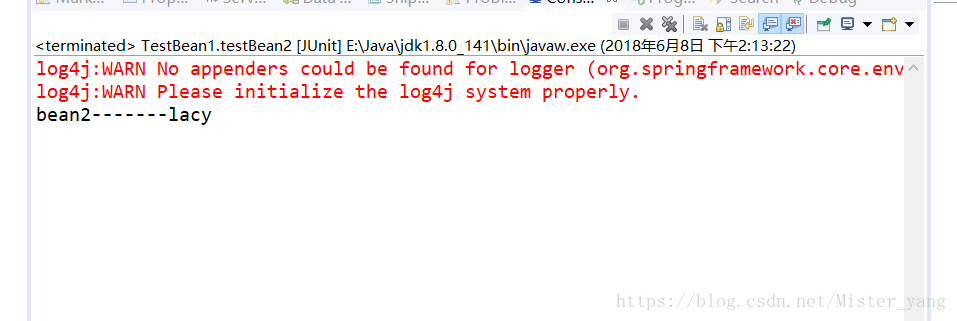
方式二;通过set注入
A。编写实体类
package com.test.ioc;

public class Bean2 {

	private String name;


	public void setName(String name) {
		this.name = name;
@Test
public void testBean2() {
ApplicationContext applicationContext = new ClassPathXmlApplicationContext("bean.xml");
Bean2 bean2 = (Bean2) applicationContext.getBean("bean2");
bean2.sys();
}B.配置xml文件
<!-- spring通过set注入 -->
<bean id = "bean2" class = "com.test.ioc.Bean2">
<property name="name" value="lacy"></property>
</bean>C.编写测试代码
@Test
	public void testBean2() {
		ApplicationContext applicationContext = new ClassPathXmlApplicationContext("bean.xml");
		Bean2 bean2 = (Bean2) applicationContext.getBean("bean2");
		bean2.sys();
	}
四,springioc通过set的方式注入实体类的对象
在实际开发过程中,我们往往是通过set注入的方式来减少两个类之间的耦合度,使改变时不会对其他的类产生太大影响。
例如:javaweb的三大层框架的service层和dao层。service层需要使用dao层的对象来持久化数据。那么我们现在来模拟一下听过set方式注入。
A。userdao层通过输出模拟请求
package com.test.ioc;
public class UserDao {
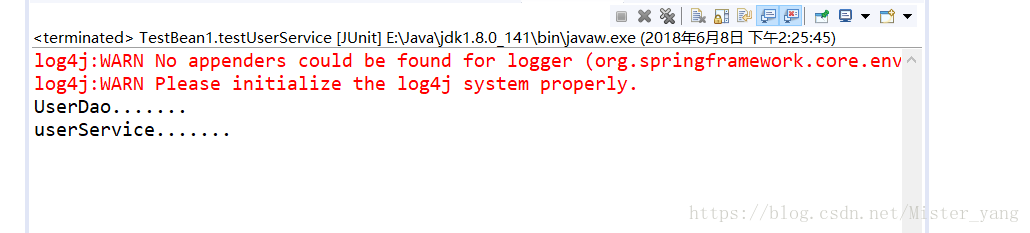
public void sys() {
System.out.println("UserDao.......");
}
}
B。userservice调用userdao
package com.test.ioc;

public class UserService {

	private UserDao userDao;

	public void setUserDao(UserDao userDao) {
		this.userDao = userDao;
	}
	public void sys() {
		userDao.sys();
	}
}
C。编写配置文件
<!-- 通过set注入对象 -->
	<bean id="userDao" class="com.test.ioc.UserDao"></bean>

	<bean id = "userService" class="com.test.ioc.UserService">
		<property name="userDao" ref="userDao"></property>
	</bean>
D。编写测试类
	@Test
	public void testUserService() {
		ApplicationContext applicationContext = new ClassPathXmlApplicationContext("bean.xml");
		UserService userService = (UserService) applicationContext.getBean("userService");
		userService.sys();
	}
五。使用set注入注入其他的类型的属性
1.数组
2.集合
3.map
4.properties
A。编写实体类
package com.test.ioc;
import java.util.List;
import java.util.Map;
import java.util.Properties;
public class Property {
private String arrs[];
private List<String> list;
private Map<String, String> map;
private Properties properties;
public void setArrs(String[] arrs) {
this.arrs = arrs;
}
public void setList(List<String> list) {
this.list = list;
}
public void setMap(Map<String, String> map) {
this.map = map;
}
public void setProperties(Properties properties) {
this.properties = properties;
}
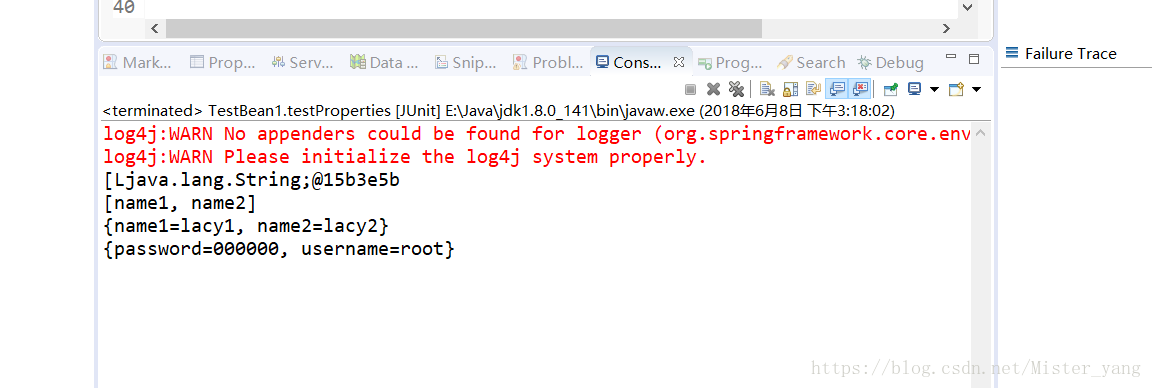
public void sys() {
System.out.println(arrs);
System.out.println(list.toString());
System.out.println(map);
System.out.println(properties);
}
}B。配置xml文件
<!-- 通过set注入注入到特殊属性 -->
	<bean id = "property" class = "com.test.ioc.Property">
		<property name="arrs">
			<list>
				<value>tom1</value>
				<value>tom2</value>
			</list>
		</property>
		<property name="list">
			<list>
				<value>name1</value>
				<value>name2</value>
			</list>
		</property>

		<property name="properties">
			<props>
				<prop key="username">root</prop>
				<prop key="password">000000</prop>
			</props>
		</property>
		<property name="map">
			<map>
				<entry key="name1" value="lacy1"></entry>
				<entry key="name2" value="lacy2"></entry>
			</map>
		</property>
	</bean>
C。编写测试类
@Test
	public void testProperties() {
		ApplicationContext applicationContext = new ClassPathXmlApplicationContext("bean.xml");
	    Property property = (Property) applicationContext.getBean("property");
	    property.sys();
	}


 70
70


 被折叠的 条评论
为什么被折叠?
被折叠的 条评论
为什么被折叠?
 到【灌水乐园】发言


