


大纲
1.Seata XA分布式事务案例及AT与XA的区别
2.Seata XA分布式事务案例的各模块运行流程
3.Seata使用Spring Boot自动装配简化复杂配置
4.全局事务注解扫描组件的自动装配
5.全局事务注解扫描器的核心变量与初始化
6.全局事务注解扫描器创建AOP代理
7.全局事务降级检查开启与提交事务的源码
8.Seata Server故障时全局事务拦截器的降级处理
9.基于HTTP请求头的全局事务传播的源码
10.XA数据源代理的初始化与XA连接代理的获取
11.XA分支事务注册与原始XA连接启动的源码
12.XA分布式事务两阶段提交流程的源码
1.Seata XA分布式事务案例及AT与XA的区别
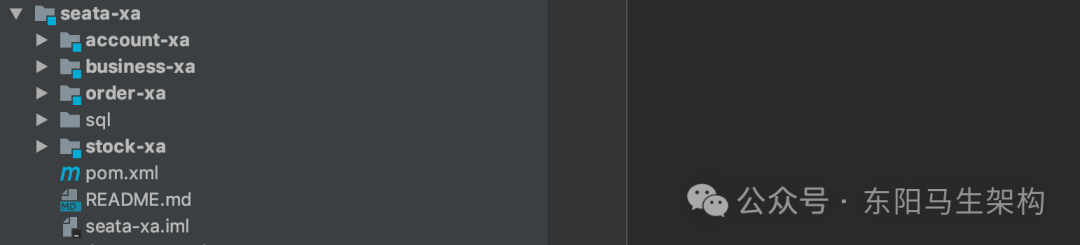
(1)seata-samples项目的seata-xa模块简介
(2)启动Seata XA分布式事务案例的步骤
(3)Seata XA模式与AT模式对比
(1)seata-samples项目的seata-xa模块简介
seata-samples项目下的seata-xa模块,便基于Seata XA模式,实现了分布式事务的提交和回滚。
该seata-xa模块是一个Spring Boot项目:
一.使用了Feign来实现远程调用
二.使用了Spring JDBC来实现访问MySQL数据库
三.使用了Seata XA来实现分布式事务
(2)启动Seata XA分布式事务案例的步骤
一.执行案例所需的SQL语句:sql/all_in_one.sql
DROP TABLE IF EXISTS `stock_tbl`;
CREATE TABLE `stock_tbl` (
    `id`             int(11) NOT NULL AUTO_INCREMENT,
    `commodity_code` varchar(255) DEFAULT NULL,
    `count`          int(11) DEFAULT 0,
    PRIMARY KEY (`id`),
    UNIQUE KEY (`commodity_code`)
) ENGINE=InnoDB DEFAULT CHARSET=utf8;

DROP TABLE IF EXISTS `order_tbl`;
CREATE TABLE `order_tbl` (
    `id`             int(11) NOT NULL AUTO_INCREMENT,
    `user_id`        varchar(255) DEFAULT NULL,
    `commodity_code` varchar(255) DEFAULT NULL,
    `count`          int(11) DEFAULT 0,
    `money`          int(11) DEFAULT 0,
    PRIMARY KEY (`id`)
) ENGINE=InnoDB DEFAULT CHARSET=utf8;

DROP TABLE IF EXISTS `account_tbl`;
CREATE TABLE `account_tbl` (
    `id`      int(11) NOT NULL AUTO_INCREMENT,
    `user_id` varchar(255) DEFAULT NULL,
    `money`   int(11) DEFAULT 0,
    PRIMARY KEY (`id`)
) ENGINE=InnoDB DEFAULT CHARSET=utf8;
二.下载Seata Sever压缩包
访问:https://github.com/seata/seata/releases三.解压Seata Sever的压缩包并启动Seata Server
$ unzip seata-server-xxx.zip
$ cd distribution
$ sh ./bin/seata-server.sh 8091 file
四.依次启动AccountXA、OrderXA、StockXA、BusinessXA服务
五.测试
# 具体调用参数请结合BusinessController的代码
$ curl http://127.0.0.1:8084/purchase
六.说明
数据初始化逻辑参考BusinessService.initData()方法。基于初始化数据和默认的调用逻辑,purchase将被成功调用3次。每次账户余额扣减3000,由最初的10000减少到1000。第4次调用,因为账户余额不足,purchase调用将失败。最后相应的库存、订单、账户都会回滚。
(3)Seata XA模式与AT模式对比
只要切换数据源代理类型,上述案例即可在XA模式和AT模式之间进行切换。
一.XA模式使用的数据源代理类型是DataSourceProxyXA
public class DataSourceProxy {
    @Bean("dataSourceProxy")
    public DataSource dataSource(DruidDataSource druidDataSource) {
        //DataSourceProxyXA for XA mode
        return new DataSourceProxyXA(druidDataSource);
    }
}
二.AT模式使用的数据源代理类型是DataSourceProxy
public class DataSourceProxy {
    @Bean("dataSourceProxy")
    public DataSource dataSource(DruidDataSource druidDataSource) {
        return new DataSourceProxy(druidDataSource);
    }
}
AT模式需要在数据库中建立undo_log表
XA模式不需要在数据库中建立undo_log表
CREATE TABLE `undo_log` (
    `id` bigint(20) NOT NULL AUTO_INCREMENT,
    `branch_id` bigint(20) NOT NULL,
    `xid` varchar(100) NOT NULL,
    `context` varchar(128) NOT NULL,
    `rollback_info` longblob NOT NULL,
    `log_status` int(11) NOT NULL,
    `log_created` datetime NOT NULL,
    `log_modified` datetime NOT NULL,
    PRIMARY KEY (`id`),
    UNIQUE KEY `ux_undo_log` (`xid`,`branch_id`)
) ENGINE=InnoDB AUTO_INCREMENT=1 DEFAULT CHARSET=utf8;
2.Seata XA分布式事务案例的各模块运行流程
(1)account-xa模块实现的账户服务的运行流程
(2)order-xa模块实现的订单服务的运行流程
(3)stock-xa模块实现的库存服务的运行流程
(4)business-xa模块实现的全局事务入口服务的运行流程
(1)account-xa模块实现的账户服务的运行流程
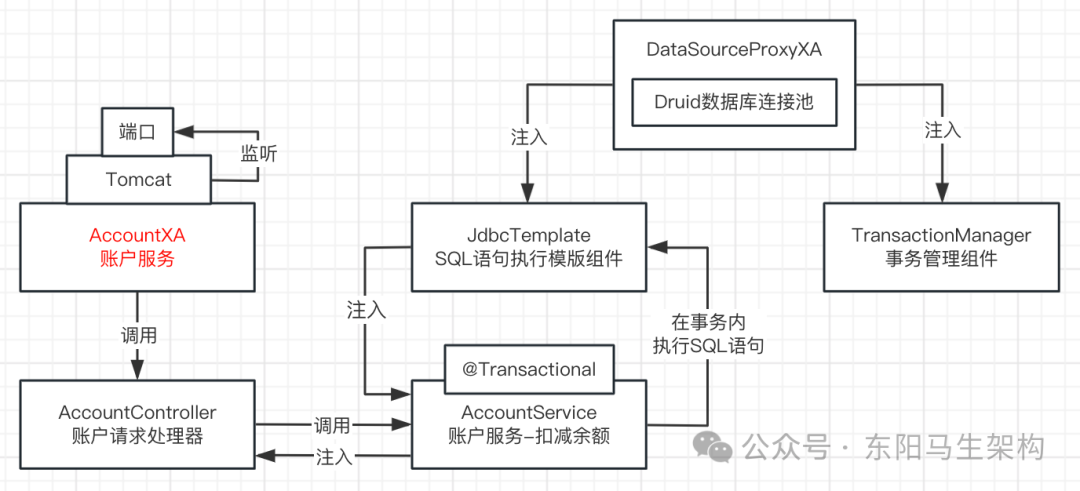
如下是account-xa模块的核心代码:
@EnableTransactionManagement
@SpringBootApplication
public class AccountXAApplication {
    public static void main(String[] args) {
        //监听8083端口
        SpringApplication.run(AccountXAApplication.class, args);
    }
}

@Configuration
public class AccountXADataSourceConfiguration {
    @Bean
    @ConfigurationProperties(prefix = "spring.datasource")
    public DruidDataSource druidDataSource() {
        return new DruidDataSource();
    }

    @Bean("dataSourceProxy")
    public DataSource dataSource(DruidDataSource druidDataSource) {
        //DataSourceProxyXA for XA mode
        return new DataSourceProxyXA(druidDataSource);
    }

    @Bean("jdbcTemplate")
    public JdbcTemplate jdbcTemplate(DataSource dataSourceProxy) {
        return new JdbcTemplate(dataSourceProxy);
    }

    @Bean
    public PlatformTransactionManager txManager(DataSource dataSourceProxy) {
        return new DataSourceTransactionManager(dataSourceProxy);
    }
}

@RestController
public class AccountController {
    @Autowired
    private AccountService accountService;

    @RequestMapping(value = "/reduce", method = RequestMethod.GET, produces = "application/json")
    public String reduce(String userId, int money) {
        try {
            accountService.reduce(userId, money);
        } catch (Exception exx) {
            exx.printStackTrace();
            return FAIL;
        }
        return SUCCESS;
    }
}

@Service
public class AccountService {
    public static final String SUCCESS = "SUCCESS";
    public static final String FAIL = "FAIL";
    private static final Logger LOGGER = LoggerFactory.getLogger(AccountService.class);

    @Autowired
    private JdbcTemplate jdbcTemplate;

    @Transactional
    public void reduce(String userId, int money) {
        String xid = RootContext.getXID();
        LOGGER.info("reduce account balance in transaction: " + xid);
        jdbcTemplate.update("update account_tbl set money = money - ? where user_id = ?", new Object[]{money, userId});
        int balance = jdbcTemplate.queryForObject("select money from account_tbl where user_id = ?", new Object[]{userId}, Integer.class);
        LOGGER.info("balance after transaction: " + balance);
        if (balance < 0) {
            throw new RuntimeException("Not Enough Money ...");
        }
    }
}
(2)order-xa模块实现的订单服务的运行流程
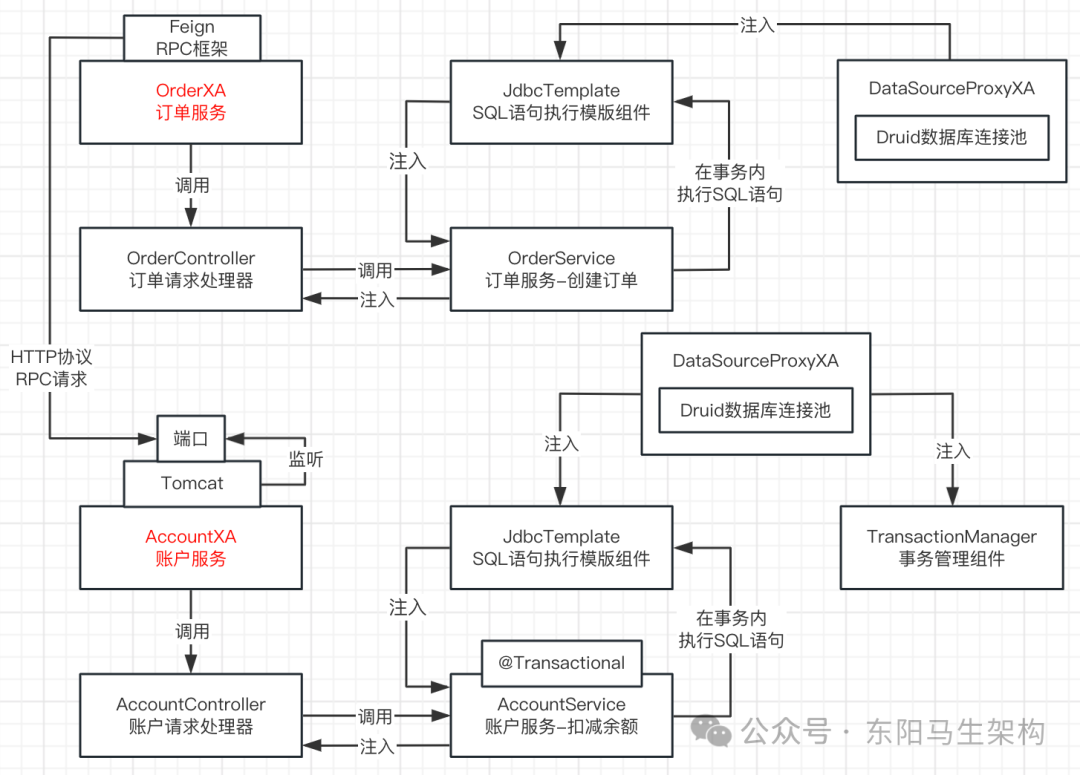
如下是order-xa模块的核心代码:
@SpringBootApplication
@EnableFeignClients
public class OrderXAApplication {
    public static void main(String[] args) {
        //监听8082端口
        SpringApplication.run(OrderXAApplication.class, args);
    }
}

@Configuration
public class OrderXADataSourceConfiguration {
    @Bean
    @ConfigurationProperties(prefix = "spring.datasource")
    public DruidDataSource druidDataSource() {
        return new DruidDataSource();
    }

    @Bean("dataSourceProxy")
    public DataSource dataSource(DruidDataSource druidDataSource) {
        //DataSourceProxyXA for XA mode
        return new DataSourceProxyXA(druidDataSource);
    }

    @Bean("jdbcTemplate")
    public JdbcTemplate jdbcTemplate(DataSource dataSourceProxy) {
        return new JdbcTemplate(dataSourceProxy);
    }
}

@RestController
public class OrderController {
    @Autowired
    private OrderService orderService;

    @RequestMapping(value = "/create", method = RequestMethod.GET, produces = "application/json")
    public String create(String userId, String commodityCode, int orderCount) {
        try {
            orderService.create(userId, commodityCode, orderCount);
        } catch (Exception exx) {
            exx.printStackTrace();
            return FAIL;
        }
        return SUCCESS;
    }
}

@Service
public class OrderService {
    public static final String SUCCESS = "SUCCESS";
    public static final String FAIL = "FAIL";
    private static final Logger LOGGER = LoggerFactory.getLogger(OrderService.class);

    @Autowired
    private AccountFeignClient accountFeignClient;

    @Autowired
    private JdbcTemplate jdbcTemplate;

    public void create(String userId, String commodityCode, Integer count) {
        String xid = RootContext.getXID();
        LOGGER.info("create order in transaction: " + xid);
        //定单总价 = 订购数量(count) * 商品单价(100)
        int orderMoney = count * 100;
        //生成订单
        jdbcTemplate.update("insert order_tbl(user_id,commodity_code,count,money) values(?,?,?,?)", new Object[]{userId, commodityCode, count, orderMoney});
        //调用账户余额扣减
        String result = accountFeignClient.reduce(userId, orderMoney);
        if (!SUCCESS.equals(result)) {
            throw new RuntimeException("Failed to call Account Service. ");
        }
    }
}

@FeignClient(name = "account-xa", url = "127.0.0.1:8083")
public interface AccountFeignClient {
    @GetMapping("/reduce")
    String reduce(@RequestParam("userId") String userId, @RequestParam("money") int money);
}
(3)stock-xa模块实现的库存服务的运行流程
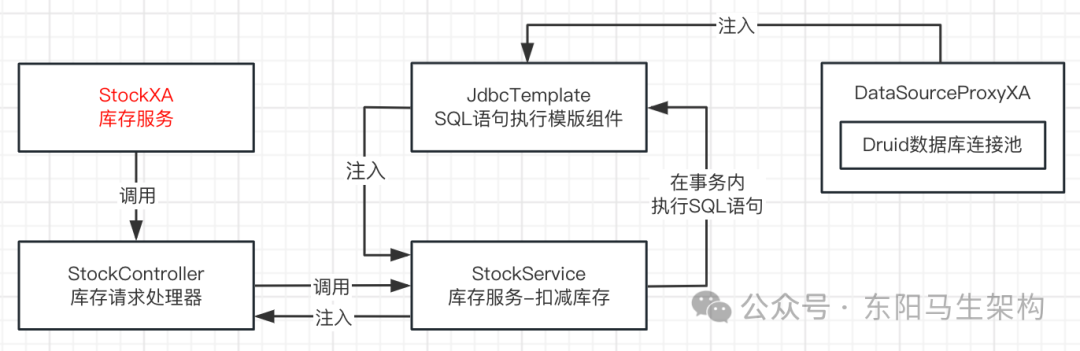
如下是stock-xa模块的核心代码:
@SpringBootApplication
public class StockXAApplication {
    public static void main(String[] args) {
        //监听8081端口
        SpringApplication.run(StockXAApplication.class, args);
    }
}

@Configuration
public class StockXADataSourceConfiguration {
    @Bean
    @ConfigurationProperties(prefix = "spring.datasource")
    public DruidDataSource druidDataSource() {
        return new DruidDataSource();
    }

    @Bean("dataSourceProxy")
    public DataSource dataSource(DruidDataSource druidDataSource) {
        //DataSourceProxyXA for XA mode
        return new DataSourceProxyXA(druidDataSource);
    }

    @Bean("jdbcTemplate")
    public JdbcTemplate jdbcTemplate(DataSource dataSourceProxy) {
        return new JdbcTemplate(dataSourceProxy);
    }
}

@RestController
public class StockController {
    @Autowired
    private StockService stockService;

    @RequestMapping(value = "/deduct", method = RequestMethod.GET, produces = "application/json")
    public String deduct(String commodityCode, int count) {
        try {
            stockService.deduct(commodityCode, count);
        } catch (Exception exx) {
            exx.printStackTrace();
            return FAIL;
        }
        return SUCCESS;
    }
}

@Service
public class StockService {
    public static final String SUCCESS = "SUCCESS";
    public static final String FAIL = "FAIL";
    private static final Logger LOGGER = LoggerFactory.getLogger(StockService.class);

    @Autowired
    private JdbcTemplate jdbcTemplate;

    public void deduct(String commodityCode, int count) {
        String xid = RootContext.getXID();
        LOGGER.info("deduct stock balance in transaction: " + xid);
        jdbcTemplate.update("update stock_tbl set count = count - ? where commodity_code = ?", new Object[]{count, commodityCode});
    }
}
(4)business-xa模块实现的全局事务入口服务的运行流程
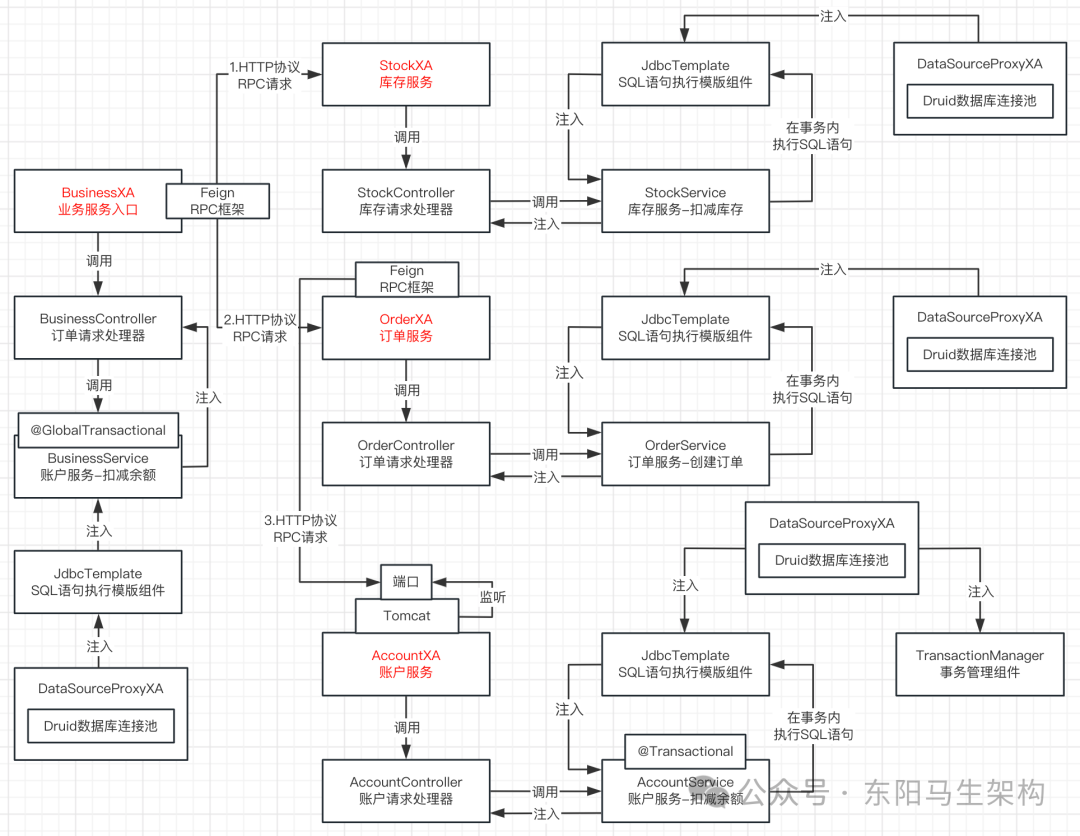
如下是business-xa模块的核心代码:
@SpringBootApplication
@EnableFeignClients
public class BusinessXAApplication {
    public static void main(String[] args) {
        //监听8084端口
        SpringApplication.run(BusinessXAApplication.class, args);
    }
}

@Configuration
public class BusinessXADataSourceConfiguration {
    @Bean
    @ConfigurationProperties(prefix = "spring.datasource")
    public DruidDataSource dataSource() {
        return new DruidDataSource();
    }

    @Bean("jdbcTemplate")
    public JdbcTemplate jdbcTemplate(DataSource dataSource) {
        return new JdbcTemplate(dataSource);
    }
}

@RestController
public class BusinessController {
    @Autowired
    private BusinessService businessService;

    @RequestMapping(value = "/purchase", method = RequestMethod.GET, produces = "application/json")
    public String purchase(Boolean rollback, Integer count) {
        int orderCount = 30;
        if (count != null) {
            orderCount = count;
        }
        try {
            businessService.purchase(TestDatas.USER_ID, TestDatas.COMMODITY_CODE, orderCount, rollback == null ? false : rollback.booleanValue());
        } catch (Exception exx) {
            return "Purchase Failed:" + exx.getMessage();
        }
        return SUCCESS;
    }
}

@Service
public class BusinessService {
    public static final String SUCCESS = "SUCCESS";
    public static final String FAIL = "FAIL";
    private static final Logger LOGGER = LoggerFactory.getLogger(BusinessService.class);

    @Autowired
    private StockFeignClient stockFeignClient;

    @Autowired
    private OrderFeignClient orderFeignClient;

    @Autowired
    private JdbcTemplate jdbcTemplate;

    @GlobalTransactional
    public void purchase(String userId, String commodityCode, int orderCount, boolean rollback) {
        String xid = RootContext.getXID();
        LOGGER.info("New Transaction Begins: " + xid);

        String result = stockFeignClient.deduct(commodityCode, orderCount);
        if (!SUCCESS.equals(result)) {
            throw new RuntimeException("库存服务调用失败,事务回滚!");
        }

        result = orderFeignClient.create(userId, commodityCode, orderCount);
        if (!SUCCESS.equals(result)) {
            throw new RuntimeException("订单服务调用失败,事务回滚!");
        }
        if (rollback) {
            throw new RuntimeException("Force rollback ... ");
        }
    }
    ...
}

@FeignClient(name = "stock-xa", url = "127.0.0.1:8081")
public interface StockFeignClient {
    @GetMapping("/deduct")
    String deduct(@RequestParam("commodityCode") String commodityCode, @RequestParam("count") int count);
}

@FeignClient(name = "order-xa", url = "127.0.0.1:8082")
public interface OrderFeignClient {
    @GetMapping("/create")
    String create(@RequestParam("userId") String userId, @RequestParam("commodityCode") String commodityCode, @RequestParam("orderCount") int orderCount);
}
3.Seata使用Spring Boot自动装配简化复杂配置
(1)seata-spring-boot-starter简介
(2)自动装配GlobalTransactionScanner的Bean
(1)seata-spring-boot-starter简介
seata-v1.5.0源码下的seata-spring-boot-starter模块,便使用了Spring Boot自动装配来简化seata-all的复杂配置。与dubbo-spring-boot-starter是Spring Boot整合Dubbo所需的依赖一样,seata-spring-boot-starter也是Spring Boot整合Seata所需的依赖。
seata-samples-1.5.0项目中的seata-spring-boot-starter-samples模块,整合了SpringBoot + Dubbo + Mybatis + Nacos +Seata来实现Dubbo的分布式事务管理。其中使用Nacos作为Dubbo和Seata的注册中心和配置中心,使用MySQL数据库和MyBatis来操作数据。
注意:seata-spring-boot-starter默认会开启数据源自动代理,用户若再手动配置DataSourceProxy将会导致异常。
(2)自动装配GlobalTransactionScanner的Bean
seata-samples-1.5.0项目的seata-xa模块与seata-samples-dubbo模块不同,后者是通过xml配置文件来装配GlobalTransactionScanner这个Bean的。
<?xml version="1.0" encoding="UTF-8"?>
<beans xmlns="http://www.springframework.org/schema/beans"
       xmlns:xsi="http://www.w3.org/2001/XMLSchema-instance"
       xmlns:dubbo="http://dubbo.apache.org/schema/dubbo"
       xsi:schemaLocation="http://www.springframework.org/schema/beans http://www.springframework.org/schema/beans/spring-beans.xsd http://dubbo.apache.org/schema/dubbo http://dubbo.apache.org/schema/dubbo/dubbo.xsd">
    ...
    <!-- 全局事务注解扫描组件 -->
    <bean class="io.seata.spring.annotation.GlobalTransactionScanner">
        <constructor-arg value="dubbo-demo-account-service"/>
        <constructor-arg value="my_test_tx_group"/>
    </bean>
</beans>
前者是通过seata-spring-boot-starter的SeataAutoConfiguration类,来实现自动装配GlobalTransactionScanner这个Bean的。
@ConditionalOnProperty(prefix = SEATA_PREFIX, name = "enabled", havingValue = "true", matchIfMissing = true)
public class SeataAutoConfiguration {
    private static final Logger LOGGER = LoggerFactory.getLogger(SeataAutoConfiguration.class);

    @Bean(BEAN_NAME_FAILURE_HANDLER)
    @ConditionalOnMissingBean(FailureHandler.class)
    public FailureHandler failureHandler() {
        return new DefaultFailureHandlerImpl();
    }

    @Bean
    @DependsOn({BEAN_NAME_SPRING_APPLICATION_CONTEXT_PROVIDER, BEAN_NAME_FAILURE_HANDLER})
    @ConditionalOnMissingBean(GlobalTransactionScanner.class)
    public GlobalTransactionScanner globalTransactionScanner(SeataProperties seataProperties, FailureHandler failureHandler) {
        if (LOGGER.isInfoEnabled()) {
            LOGGER.info("Automatically configure Seata");
        }
        //返回一个@GlobalTransaction全局事务注解的扫描组件
        return new GlobalTransactionScanner(seataProperties.getApplicationId(), seataProperties.getTxServiceGroup(), failureHandler);
    }
}
4.全局事务注解扫描组件的自动装配
(1)Spring Boot的自动装配驱动Seata Spring Boot的自动装配
(2)SeataAutoConfiguration会自动装配GlobalTransactionScanner
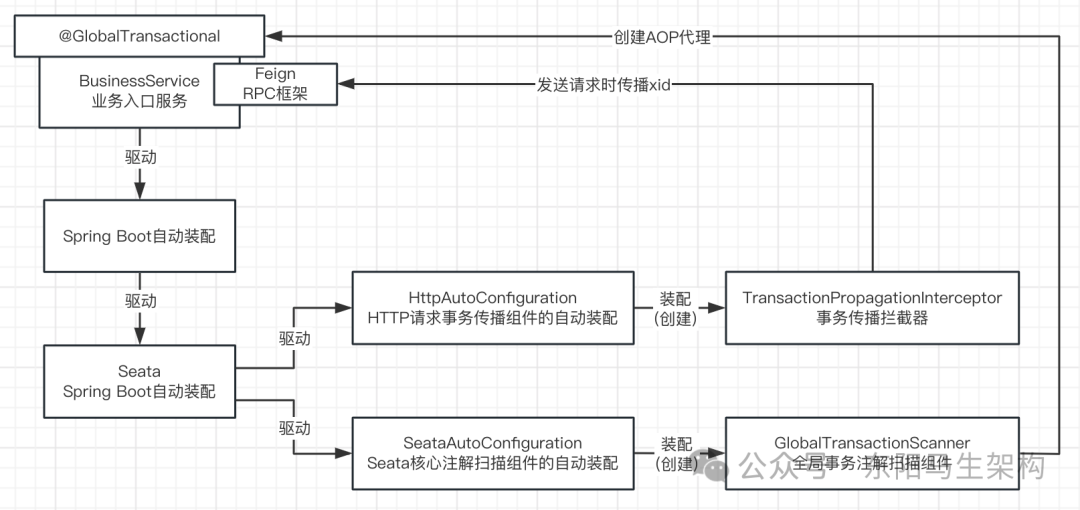
(1)Spring Boot的自动装配驱动Seata Spring Boot的自动装配
resources/META-INF/spring.factories的配置文件如下,所以Spring Boot会自动装配上述这4个类。
# Auto Configure
org.springframework.boot.autoconfigure.EnableAutoConfiguration=\
io.seata.spring.boot.autoconfigure.SeataPropertiesAutoConfiguration,\
io.seata.spring.boot.autoconfigure.SeataDataSourceAutoConfiguration,\
io.seata.spring.boot.autoconfigure.SeataAutoConfiguration,\
io.seata.spring.boot.autoconfigure.HttpAutoConfiguration
(2)SeataAutoConfiguration会自动装配GlobalTransactionScanner
全局事务注解扫描器GlobalTransactionScanner会扫描@GlobalTransactional全局事务注解。
@ConditionalOnProperty(prefix = SEATA_PREFIX, name = "enabled", havingValue = "true", matchIfMissing = true)
public class SeataAutoConfiguration {
    private static final Logger LOGGER = LoggerFactory.getLogger(SeataAutoConfiguration.class);

    @Bean(BEAN_NAME_FAILURE_HANDLER)
    @ConditionalOnMissingBean(FailureHandler.class)
    public FailureHandler failureHandler() {
        return new DefaultFailureHandlerImpl();
    }

    @Bean
    @DependsOn({BEAN_NAME_SPRING_APPLICATION_CONTEXT_PROVIDER, BEAN_NAME_FAILURE_HANDLER})
    @ConditionalOnMissingBean(GlobalTransactionScanner.class)
    public GlobalTransactionScanner globalTransactionScanner(SeataProperties seataProperties, FailureHandler failureHandler) {
        if (LOGGER.isInfoEnabled()) {
            LOGGER.info("Automatically configure Seata");
        }
        //返回一个@GlobalTransaction全局事务注解的扫描组件
        return new GlobalTransactionScanner(seataProperties.getApplicationId(), seataProperties.getTxServiceGroup(), failureHandler);
    }
}
5.全局事务注解扫描器的核心变量与初始化
//The type Global transaction scanner.
//AbstractAutoProxyCreator,自动代理创建组件,继承了它以后,Spring容器里的Bean都会传递给wrapIfNecessary()
//从而让GlobalTransactionScanner.wrapIfNecessary()可以扫描每个Bean的每个方法
//判断是否添加了@GlobalTransactional注解,如果扫描到添加了就对这个Bean创建一个AOP代理
public class GlobalTransactionScanner extends AbstractAutoProxyCreator
    implements ConfigurationChangeListener, InitializingBean, ApplicationContextAware, DisposableBean {
    ...
    //方法拦截器
    private MethodInterceptor interceptor;
    //全局事务注解拦截器
    private MethodInterceptor globalTransactionalInterceptor;
    //应用ID
    private final String applicationId;
    //全局事务服务分组
    private final String txServiceGroup;
    //事务模式
    private final int mode;
    //与阿里云有关的,一个是访问key,一个是密钥key
    private String accessKey;
    private String secretKey;

    //是否禁用全局事务配置,默认是false
    private volatile boolean disableGlobalTransaction = ConfigurationFactory.getInstance().getBoolean(ConfigurationKeys.DISABLE_GLOBAL_TRANSACTION, DEFAULT_DISABLE_GLOBAL_TRANSACTION);
    //是否完成初始化
    private final AtomicBoolean initialized = new AtomicBoolean(false);

    //失败处理钩子
    private final FailureHandler failureHandlerHook;
    //Spring容器上下文
    private ApplicationContext applicationContext;

    //Instantiates a new Global transaction scanner.
    public GlobalTransactionScanner(String txServiceGroup) {
        this(txServiceGroup, txServiceGroup, DEFAULT_MODE);
    }

    //Instantiates a new Global transaction scanner.
    public GlobalTransactionScanner(String txServiceGroup, int mode) {
        this(txServiceGroup, txServiceGroup, mode);
    }

    //Instantiates a new Global transaction scanner.
    public GlobalTransactionScanner(String applicationId, String txServiceGroup) {
        this(applicationId, txServiceGroup, DEFAULT_MODE);
    }

    //Instantiates a new Global transaction scanner.
    public GlobalTransactionScanner(String applicationId, String txServiceGroup, int mode) {
        this(applicationId, txServiceGroup, mode, null);
    }

    //Instantiates a new Global transaction scanner.
    public GlobalTransactionScanner(String applicationId, String txServiceGroup, FailureHandler failureHandlerHook) {
        this(applicationId, txServiceGroup, DEFAULT_MODE, failureHandlerHook);
    }

    //Instantiates a new Global transaction scanner.
    public GlobalTransactionScanner(String applicationId, String txServiceGroup, int mode, FailureHandler failureHandlerHook) {
        setOrder(ORDER_NUM);
        setProxyTargetClass(true);
        this.applicationId = applicationId;
        this.txServiceGroup = txServiceGroup;
        this.mode = mode;
        this.failureHandlerHook = failureHandlerHook;
    }

    //Spring销毁时的回调接口
    @Override
    public void destroy() {
        ShutdownHook.getInstance().destroyAll();
    }

    //Spring初始化回调接口,负责这个扫描组件GlobalTransactionScanner的初始化
    @Override
    public void afterPropertiesSet() {
        if (disableGlobalTransaction) {
            if (LOGGER.isInfoEnabled()) {
                LOGGER.info("Global transaction is disabled.");
            }
            ConfigurationCache.addConfigListener(ConfigurationKeys.DISABLE_GLOBAL_TRANSACTION, (ConfigurationChangeListener)this);
            return;
        }
        if (initialized.compareAndSet(false, true)) {
            initClient();
        }
    }

    //初始化Seata的两个网络通信客户端:TM网络客户端、RM网络客户端
    private void initClient() {
        if (LOGGER.isInfoEnabled()) {
            LOGGER.info("Initializing Global Transaction Clients ... ");
        }
        if (StringUtils.isNullOrEmpty(applicationId) || StringUtils.isNullOrEmpty(txServiceGroup)) {
            throw new IllegalArgumentException(String.format("applicationId: %s, txServiceGroup: %s", applicationId, txServiceGroup));
        }
        //init TM
        TMClient.init(applicationId, txServiceGroup, accessKey, secretKey);
        if (LOGGER.isInfoEnabled()) {
            LOGGER.info("Transaction Manager Client is initialized. applicationId[{}] txServiceGroup[{}]", applicationId, txServiceGroup);
        }
        //init RM
        RMClient.init(applicationId, txServiceGroup);
        if (LOGGER.isInfoEnabled()) {
            LOGGER.info("Resource Manager is initialized. applicationId[{}] txServiceGroup[{}]", applicationId, txServiceGroup);
        }
        if (LOGGER.isInfoEnabled()) {
            LOGGER.info("Global Transaction Clients are initialized. ");
        }
        registerSpringShutdownHook();
    }
    ...
}


 被折叠的 条评论
为什么被折叠?
被折叠的 条评论
为什么被折叠?
 到【灌水乐园】发言


