


1.前期准备
1.1.节点准备
修改主机名、ip、iptables关闭;时间同步
关闭防火墙
service iptables stop
查看防火墙开机启动状态
chkconfig iptables –list
关闭防火墙的开机启动
chkconfig iptables off
1.2.软件准备
ganglia-3.7.1.tar.gz、ganglia-web-3.7.0.tar.gz 地址:http://ganglia.info/?page_id=66
confuse-2.7.tar.gz 地址:http://www.nongnu.org/confuse/
Python-2.7.10.tgz 地址:https://www.python.org/downloads/release/python-2710/
httpd-2.2.31.tar.gz 地址:http://httpd.apache.org/download
php-5.6.12.tar.gz 地址:http://php.net/downloads.php
2.集群规划
2.1
1主 2从
2.2.软件规划
Ganglia监控服务的主节点需要安装:ganglia、ganglia-web、php、apache
Ganglia被监控从节点需要安装:ganglia
2.3.安装路径
ganglia-core安装路径 /usr/local/ganglia
php安装路径 /usr/local/php
apache安装路径 /usr/local/apache2
ganglia-web安装路径 /opt/ganglia/ganglia-web
rrds数据路径 /opt/ganglia/rrds
3.安装框架
3.1.检查依赖[或者安装过程中发现缺少再安装]
rpm -q gcc glibc glibc-common rrdtool rrdtool-devel expat expat-devel pcre pcre-devel dejavu-lgc-sans-mono-fonts dejavu-sans-mono-fonts zlib-devel pcre pcre-devel apr apr-devel apr-util apr-util-devel
yum安装:
yum install -y gcc glibc glibc-common rrdtool rrdtool-devel expat expat-devel dejavu-lgc-sans-mono-fonts dejavu-sans-mono-fonts zlib-devel pcre pcre-devel apr apr-devel apr-util apr-util-devel perl libxml2 libxml2-devel
3.2.安装ganglia
将要安装的源文件传到一个节点的/opt/src下
cd /opt/src
3.2.1.confuse
//libconfuse 是一个用C实现配置文件解析器库
tar zvxf confuse-2.7.tar.gz
cd confuse-2.7
./configure CFLAGS=-fPIC –disable-nls
//-fPIC 作用于编译阶段,告诉编译器产生与位置无关代码(Position-Independent Code)则产生的代码中,没有绝对地址,全部使用相对地址,故而代码可以被加载器加载到内存的任意位置,都可以正确的执行。这正是共享库所要求的,共享库被加载时,在内存的位置不是固定的。
//–disable-nls:禁止对国际化支持
make && make install
3.2.2.python
// ganglia-gmond-modules-python
//很慢
python[默认的python.so路径/usr/lib64/]
cd /opt/src
tar -zvxf Python-2.7.10.tgz
cd /opt/src/Python-2.7.10
./configure –prefix=/usr/local –enable-shared
make && make install
//安装后libpython2.7.so在/usr/local/lib下
配置共享库
vi /etc/ld.so.conf
– 增加如下内容#python.so所在位置
/usr/local/lib
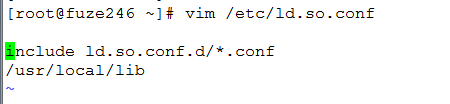
ldconfig
//ldconfig 命令的用途,主要是在默认搜寻目录(/lib和/usr/lib)以及动态库配置文件/etc/ld.so.conf内所列的目录下,搜索出可共享的动态链接库(格式如前介绍,lib*.so*),
检查是否生效
ldconfig -v |grep “libpython2.7.so”

3.2.3.ganglia
- 3.2.3.1.安装
cd /opt/src
tar zvxf ganglia-3.7.1.tar.gz
cd ganglia-3.7.1
./configure –prefix=/usr/local/ganglia –with-gmetad –enable-gexec –with-python=/usr/local
make && make install - 3.2.3.2.配置gmond(所有节点)
cd /opt/src/ganglia-3.7.1
//初始化gmond配置文件
./gmond/gmond -t > /usr/local/ganglia/etc/gmond.conf
vi /usr/local/ganglia/etc/gmond.conf – 修改如下内容
cluster {
name = "cloud-cluster"
owner = "nobody"
latlong = "unspecified"
url = "unspecified"
}

udp_send_channel {
#bind_hostname = yes # Highly recommended, soon to be default.
           # This option tells gmond to use a source address
           # that resolves to the machine's hostname.  Without
           # this, the metrics may appear to come from any
           # interface and the DNS names associated with
           # those IPs will be used to create the RRDs.
mcast_join = 239.2.11.71
port = 8649
ttl = 1
}
/* You can specify as many udp_recv_channels as you like as well. */
udp_recv_channel {
mcast_join = 239.2.11.71
port = 8649
bind = 239.2.11.71
retry_bind = true
# Size of the UDP buffer. If you are handling lots of metrics you really
# should bump it up to e.g. 10MB or even higher.
# buffer = 10485760
}
###################################添加python指标Begin
复制python module到ganglia部署目录
mkdir /usr/local/ganglia/lib64/ganglia/python_modules
cd /opt/src/ganglia-3.7.1
cp ./gmond/python_modules//.py /usr/local/ganglia/lib64/ganglia/python_modules
安装程序ganglia-3.7.1默认提供了一些python module的配置文件,只需要部署到 /usr/local/ganglia/etc/conf.d 目录下面即可生效
cp ./gmond/python_modules/conf.d/*.pyconf /usr/local/ganglia/etc/conf.d
###################################添加python指标End
//添加开机启动
cd /opt/src/ganglia-3.7.1
cp ./gmond/gmond.init /etc/init.d/gmond
cp /usr/local/ganglia/etc/gmond.conf /etc/ganglia/
vi /etc/init.d/gmond –修改如下内容
GMOND=/usr/local/ganglia/sbin/gmond
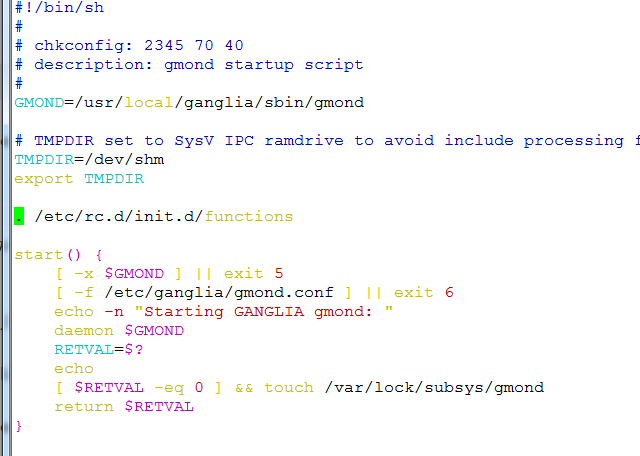
//添加开机启动
chkconfig –add gmond
开启服务:
service gmond start/restart
在gmond机器上测试
telnet localhost 8649
3.2.3.3.配置gmetad(主节点)
cd /opt/src/ganglia-3.7.1
vi /usr/local/ganglia/etc/gmetad.conf – 修改如下内容
##如果此文件没有 cp ./gmetad/gmetad.conf /usr/local/ganglia/etc/
--从第一台响应主机开始收集状态数据
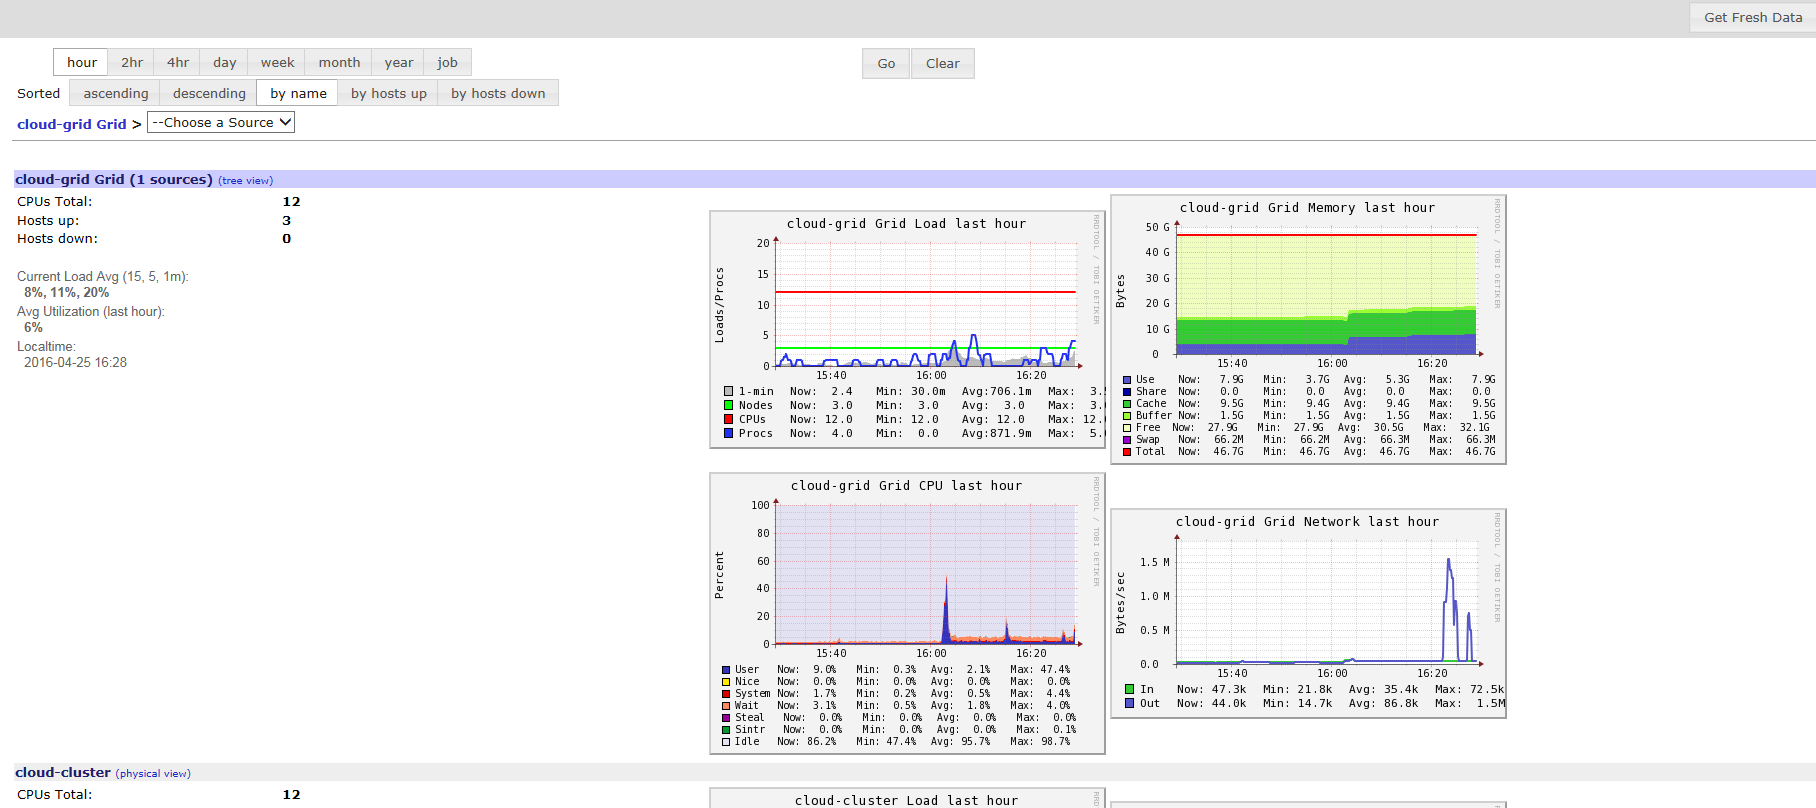
data_source “cloud-cluster” 10 fuze246 fuze247 fuze248
gridname “cloud-grid”
--gmetad侦听端口
xml_port 8651
--gmetad交互式侦听端口
interactive_port 8652
rrd_rootdir “/opt/ganglia/rrds”
case_sensitive_hostnames 0
创建和修改rrds数据目录所有者
mkdir -p /opt/ganglia/rrds
chown -R nobody:nobody /opt/ganglia/rrds
启动gmetad服务
service gmetad restart
设置开机启动
cd /opt/src/ganglia-3.7.1
cp ./gmetad/gmetad.init /etc/init.d/
cp /usr/local/ganglia/etc/gmetad.conf /etc/ganglia/
vi /etc/init.d/gmetad 修改如下内容
GMETAD=/usr/local/ganglia/sbin/gmetad
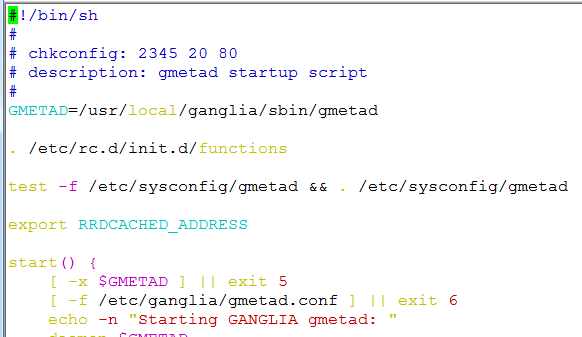
chkconfig –add gmetad
在gmetad机器上测试
telnet localhost 8651
3.2.3.4.安装ganglia-web (主节点)
3.2.3.4.1.安装apache
cd /opt/src
tar zvxf httpd-2.2.31.tar.gz
cd httpd-2.2.31
./configure –prefix=/usr/local/apache2
make && make install3.2.3.4.2.安装php(安装很慢)
#vi /usr/local/apache2/bin/apxs
#有的版本要将第一行改为perl位置即:#!/usr/bin/perl -w
cd /opt/src
tar zvxf php-5.6.12.tar.gz
cd php-5.6.12
./configure –prefix=/usr/local/php –with-apxs2=/usr/local/apache2/bin/apxs
make && make install3.2.3.4.3.ganglia-web
cd /opt/src
tar zvxf ganglia-web-3.7.0.tar.gz -C /opt/ganglia
mv /opt/ganglia/ganglia-web-3.7.0 /opt/ganglia/ganglia-web
cd /opt/ganglia/ganglia-web
cp conf_default.php conf.php
vi conf.php
$conf['gweb_confdir'] = "/opt/ganglia/ganglia-web";
# Where gmetad stores the rrd archives.
$conf['gmetad_root'] = "/opt/ganglia";
$conf['rrds'] = "${conf['gmetad_root']}/rrds";
vi header.php
<?php
session_start();
ini_set('date.timezone','PRC');      --修改时区为本地时区
# If you want to grab data from a different ganglia source specify it here.
# Although, it would be strange to alter the IP since the Round-Robin
# databases need to be local to be read.
$conf['ganglia_ip'] = "127.0.0.1";
$conf['ganglia_port'] = 8652;
配置临时目录:[dwoo是php的模版引擎]
cd /opt/ganglia/ganglia-web/dwoo
mkdir cache compiled
chmod 777 cache compiled
配置服务器设置
vi /usr/local/apache2/conf/httpd.conf
....
Listen 80
....

<IfModule dir_module>
DirectoryIndex index.html index.php
AddType application/x-httpd-php .php
</IfModule>
....

# 在文件最后增加如下内容
# ganglia
Alias /ganglia "/opt/ganglia/ganglia-web"
<Directory "/opt/ganglia/ganglia-web">
AuthType Basic
Options None
AllowOverride None
Order allow,deny
Allow from all
</Directory>
ServerName fuze246:80
启动httpd服务
/usr/local/apache2/bin/apachectl restart


 1728
1728

 被折叠的 条评论
为什么被折叠?
被折叠的 条评论
为什么被折叠?
 到【灌水乐园】发言


