


 本文详细介绍了Nginx的Web服务器优势,如IO多路复用、HTTP协议详解、Yum部署步骤、配置文件结构、编译参数选择、日志管理、访问控制和性能限制等内容,为Nginx的部署与运维提供了全面指南。
一、Nginx的优势
nginx是一个高性能的HTTP和反向代理服务器,也是一个SMTP(邮局)服务器。
Nginx的web优势:IO多路复用,时分多路复用,频分多路复用
高并发,IO多路复用,epoll,异步,非阻塞
IO多路复用理论方法
1.第一种方法:最传统的多线程并发模型(没进来一个新的I/O六会分配一个新的进程管理)
2.第二种方法:I/O多路复用(耽搁县城,通过记录跟踪每个I/O六的状态,来同时管理多个I/O流),发明他的原因是尽量多个提高服务器的吞吐能力,在同一个线程里面,通过拨开关的方式,来同时传输多个I/O流
IO多路复用技术类型
select
poll
epoll:特点:异步,非阻塞
二、HTTP协议详解
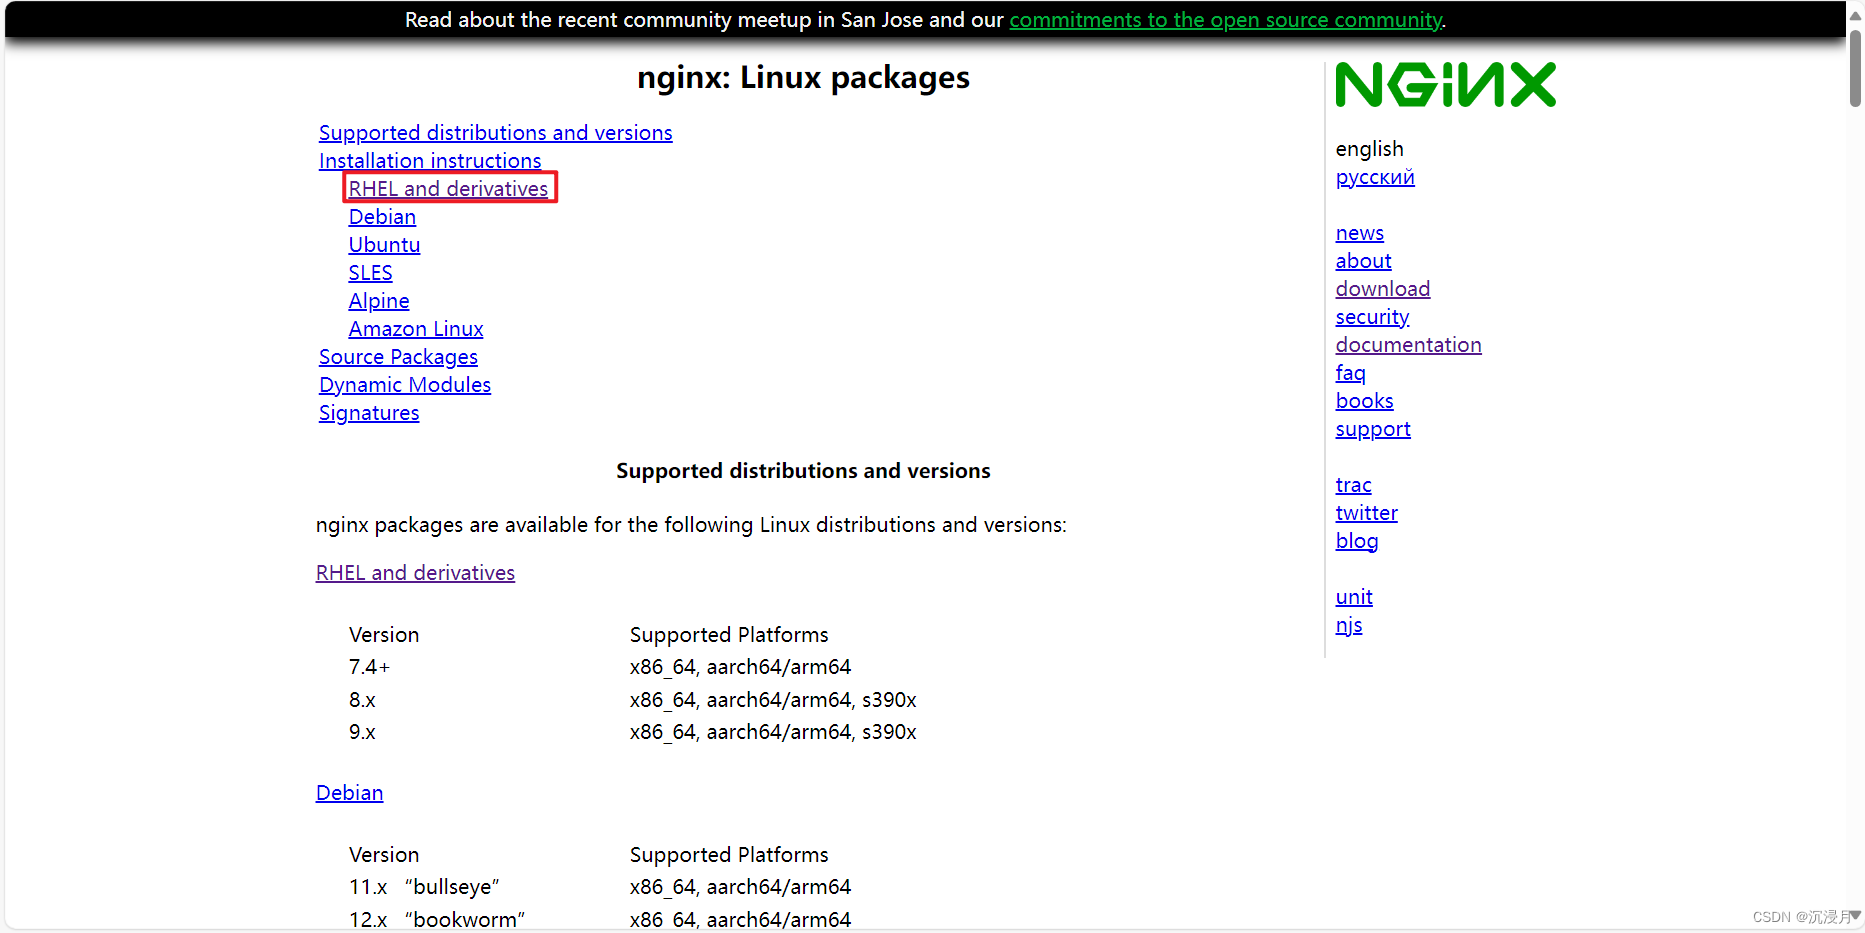
三、Nginx部署Yum
1.官网链接
http://www.nginx.org
2.nginx版本类型
- Mainline version:主线版,即开发版
- Stable version:最新稳定版,生产环境上建议使用的版本
- Legacy versions:遗留的老版本的稳定版
3.配置yum源
下载压缩包

安装nginx文档


4.装环境问题
getenforce
systemctl status firewalld
yum -y install nginx
systemctl start nginx
systemctl enable nginx
nginx -V
四、Nginx配置文件
rpm -ql nginx 查看所有文件
| /etc/logrotate.d/nginx | 日志轮转 |
| /etc/nginx | |
| /etc/nginx/conf.d | 子配置文件 |
| /etc/nginx/conf.d/default.conf | 默认网站配置文件 |
| /etc/nginx/fastcgi_params | 动态网站模块文件-python,php所需的相关变量 |
| /etc/nginx/mime.types | 文件关联程序(网站文件类型和相关处理程序) |
| /etc/nginx/modules | 模块文件夹,第三方模块 |
| /etc/nginx/nginx.conf | 主配置文件 |
| /etc/nginx/scgi_params | 动态网站模块文件-python,php所需的相关变量 |
| /etc/nginx/uwsgi_params | 动态网站模块文件-python,php所需的相关变量 |
| /usr/lib/systemd/system/nginx-debug.service | ngnix调试程序启动脚本 |
| /usr/lib/systemd/system/nginx.service | 服务脚本 |
| /usr/lib64/nginx | |
| /usr/lib64/nginx/modules | |
| /usr/libexec/initscripts/legacy-actions/nginx | |
| /usr/libexec/initscripts/legacy-actions/nginx/check-reload | |
| /usr/libexec/initscripts/legacy-actions/nginx/upgrade | |
| /usr/sbin/nginx | 主程序 |
| /usr/sbin/nginx-debug | |
| /usr/share/doc/nginx-1.24.0 | |
| /usr/share/doc/nginx-1.24.0/COPYRIGHT | |
| /usr/share/man/man8/nginx.8.gz | |
| /usr/share/nginx | |
| /usr/share/nginx/html | |
| /usr/share/nginx/html/50x.html | |
| /usr/share/nginx/html/index.html | |
| /var/cache/nginx | 缓存 |
| /var/log/nginx | 日志文件 |
五、Nginx编译参数
ngnix -V
nginx version: nginx/1.24.0
built by gcc 4.8.5 20150623 (Red Hat 4.8.5-44) (GCC)
built with OpenSSL 1.0.2k-fips 26 Jan 2017
TLS SNI support enabled
| configure arguments: | 配置参数 configure --help 查询帮助 |
| --prefix=/etc/nginx | 安装路径 |
| --sbin-path=/usr/sbin/nginx | 程序文件 |
| --modules-path=/usr/lib64/nginx/modules | 模块路径 |
| --conf-path=/etc/nginx/nginx.conf | 主配置文件 |
| --error-log-path=/var/log/nginx/error.log | 错误日志 |
| --http-log-path=/var/log/nginx/access.log | 访问日志 |
| --pid-path=/var/run/nginx.pid | 程序id |
| --lock-path=/var/run/nginx.lock | 所路径,防止重复启动nginx |
| --http-client-body-temp-path=/var/cache/nginx/client_temp | 缓存 |
| --http-proxy-temp-path=/var/cache/nginx/proxy_temp | 代理缓存 |
| --http-fastcgi-temp-path=/var/cache/nginx/fastcgi_temp | php缓存 |
| --http-uwsgi-temp-path=/var/cache/nginx/uwsgi_temp | python缓存 |
| --http-scgi-temp-path=/var/cache/nginx/scgi_temp | |
| --with-compat | 启动动态模块兼容 |
| --user=nginx | 用户 |
| --group=nginx | 组 |
| --with-file-aio | 使用nginx的aio特性会大大提高性能 |
| --with-threads | 多线程模块 |
| --with-http_addition_module | 响应之前或者之后追加文本内容,比如像在站点底部追加一个js广告或者新的css样式 |
| --with-http_auth_request_module | 认证模块 |
| --with-http_dav_module | 增加上传PUT,DELETE,MKCOL;创建集合,COPY,MOVE方法默认情况下为关闭 |
| --with-http_flv_module | nginx添加mp4,flv视频支持模块 |
| --with-http_gunzip_module | 压缩模块 |
| --with-http_gzip_static_module | |
| --with-http_mp4_module | 多媒体模块 |
| --with-http_random_index_module | |
| --with-http_realip_module | nginx获取真实ip模块 |
| --with-http_secure_link_module | nginx安全下载模块 |
| --with-http_slice_module | nginx中文文档 |
| --with-http_ssl_module | 安全模块 |
| --with-http_stub_status_module | 访问状态 |
| --with-http_sub_module | nginx替换网站响应内容 |
| --with-http_v2_module | |
| --with-mail | 邮件哭护短 |
| --with-mail_ssl_module | |
| --with-stream | 负载均衡 |
| --with-stream_realip_module | |
| --with-stream_ssl_module | |
| --with-stream_ssl_preread_module | |
| --with-cc-opt | cpu优化参数 |
| --param | |
| --with-ld-opt |
六、Nginx基本配置
1.观察主配置文件
1.1分类
1.CoreModule模块(进程数等)

全局/核心模块:配置影响nginx全局的指令,一般有运行nginx服务器的用户组,nginx进程pid存放位置,日志存放路径,配置文件引入,允许生成worker process数等
2.EventsModule 事件驱动模块(工作模式)
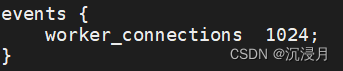
events块:配置影响nginx服务期货与用户的网络连接,有每个进程的最大连接数,选取哪种事件驱动模型处理连接请求,是否需同时接受多个网络连接,开启多个网络连接序列化等
nginx优化可以改变worker_process为cpu数量,和worker_connections最大连接数
3.HttpCoreModule http内核模块(文档程序类型,配置文件)
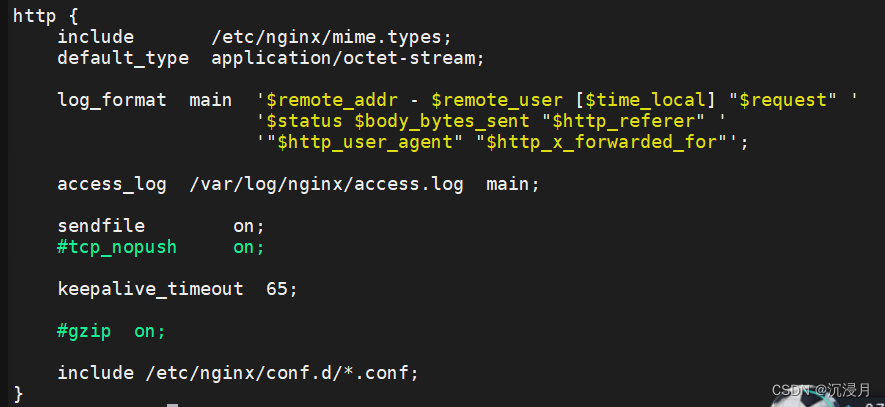
default_type application/octet-stream; 字节流处理方式
http模块:可以嵌套多个server,配置代理,缓存,日志定义等绝大多数功能和第三方模块的配置,如文件引入,mime-type定义,日子自定义,是否使用sendfile传输文件,连接超时时间,单连接请求数等
4.server块:配置虚拟主机的相关参数,一个http中可以有多个server
5.location:配置请求的路由,以及各种页面的处理情况
1.2vim /etc/nginx/nginx.conf
2.观察默认虚拟主机配置文件
vim /etc/nginx/conf.d/default.conf
server { 虚拟主机
listen 80; 监听端口
server_name localhost; 购买的域名(服务器的名字)#access_log /var/log/nginx/host.access.log main; 日志
location / { 位置
root /usr/share/nginx/html;
index index.html index.htm; 主页
}#error_page 404 /404.html;
# redirect server error pages to the static page /50x.html
#
error_page 500 502 503 504 /50x.html;
location = /50x.html { 错误页面
root /usr/share/nginx/html; 错误页面主页
}# proxy the PHP scripts to Apache listening on 127.0.0.1:80
#
#location ~ \.php$ {
# proxy_pass http://127.0.0.1;
#}# pass the PHP scripts to FastCGI server listening on 127.0.0.1:9000
#
#location ~ \.php$ {
# root html;
# fastcgi_pass 127.0.0.1:9000;
# fastcgi_index index.php;
# fastcgi_param SCRIPT_FILENAME /scripts$fastcgi_script_name;
# include fastcgi_params;
#}# deny access to .htaccess files, if Apache's document root
# concurs with nginx's one
#
#location ~ /\.ht {
# deny all;
#}
}
3.启动一个新的虚拟主机
3.1vim /etc/nginx/conf.d/xuleilinux.conf 在nginx上启动一个独立的网站
server {
listen 80;
server_name xuleilinux.com;location / {
root /xuleilinux;
index index.html;
}}
mkdir /xuleiLinux
echo meinanzi > /xuleilinux/index.html
3.2.重启服务
systemctl restart nginx
3.3.域名解析和访问
vim /etc/hosts
192.168.64.139 xuleilinux.com
elink xuleilinux.com 出现meinanzi成功 按q退出
七、Nginx日志Log
1.日志配置
1.1日志模块
官方文档
http://nginx.org/en
日志模块的名称:ngx_http_log_module
1.2相关指令
| log_format | 日志格式 |
| access_log | |
| error_log | |
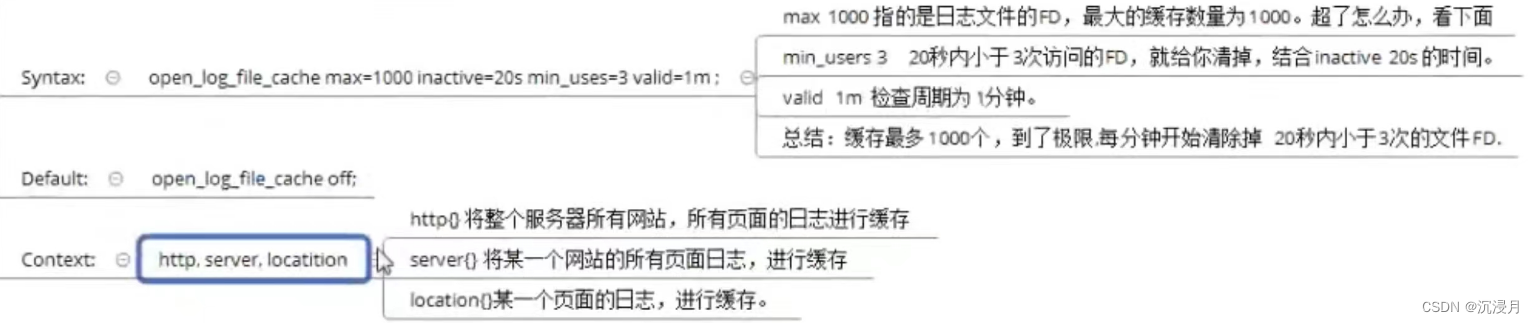
| open_log_file_cache |
1.3日志的格式和命令----log_format
1.3.1简介
Nginx又非常灵活的日志记录模式,每个级别的配置可以有各自独立的访问日志,日志格式通过log_format命令定义
1.3.2语法

1.3.3默认值
![]()
1.3.4环境
Context:http context
1.3.5定义设置位置
vim /etc/nginx/nginx.conf
日志部分配置


日志格式允许包含的变量
| $remote_addr | 远程地址,记录客户端ip地址 |
| $remote_user | 远程用户,记录客户端用户名称 |
| [$time_local] | 本地时间,服务器自身时间 |
| $request | 请求,记录请求的url和http协议 |
| $status | 状态,请求状态 |
| $body_bytes_sent | 发送给客户端的字节数,不包括响应头的大小 |
| $http_referer | 记录那个页面链接访问过来的(超链接) |
| $http_user_agent | 记录客户端浏览器相关信息 |
| $http_x_forwarded_for | 代理ip |
| old |
1.4访问日志和错误日志
access_log
error_log
个性化404
1.修改主配置文件
server {
listen 80;
server_name xuleilinux.com;
location / {
root /xuleilinux;
index index.html;
}error_page 404 /404.html;
location = /404.html {
root /xuleilinux;
}
}重启nginx systemctl restart nginx
2.创建错误反馈页面
vim /xuleilinux/404.html
3.访问
访问不存在的页面
![]()
4.查看404日志
1.5日志缓存
大量访问到来时,对于每一条日志记录,都将是先打开文件,在写入日志,然后关闭占用系统的io与业务无关,可以使用open_log_file_cache来设
2.日志轮转/切割
前言
Nginx安装,回默认启动日志轮转
rpm -ql nginx | grep log
/etc/logrotate.d/nginx
/var/log/nginx
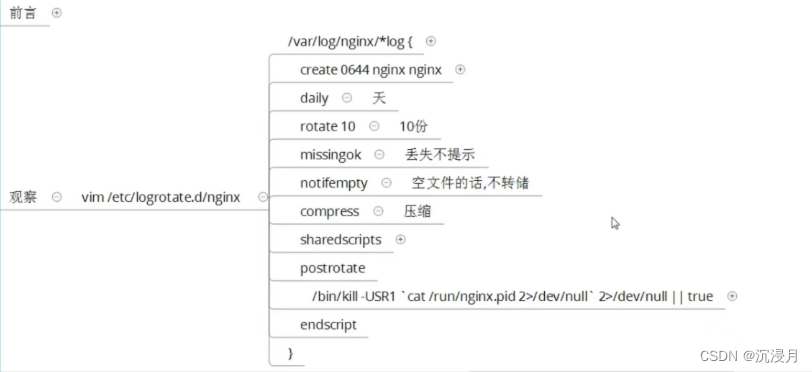

3.日志分析
八、Nginx WEB模块
1.连接状态
stub_status_module
1.1.目的:展示用户和nginx链接数量信息
1.2.查询模块是否安装
nginx -V 2>&1 | grep stub_status
1.3.启动状态模块
1.3.1访问默认站点的状态模块(注意:错误验证)
http://192.168.64.139/nginx_status 未启用(404)
1.3.2配置状态模块
vim /etc/nginx/conf.d/default.conf
server{
location /nginx_status{
stub_status;
allow all;
}
} 启用改模块
1.3.3重启服务再次访问
systemctl restart nginx
观察连接数和请求数

解释
- Active connections: 1 当前活动的连接数
- server accepts handled requests 服务器接收处理请求
- 2 2 3
- 2 总连接数
- 2 成功连接数.
- 3 总共处理的请求数
- Reading: 0 读取客户端Header的信息数 请求头
- Writing: 1 返回给客户端的Header的信息数 响应头
- Waiting: 0 等待的请求数 开启了keeoalive
关于链接的问题
1.什么是链接
OSI封装回顾

tcp封装结构

tcp三次握手

tcp四次挥手/四次断开

2.什么是请求
一次http协议
3.keepalived----------长连接设置
4.关闭长连接会如何
vim /etc/nginx/nginx.conf
keepalive_timeout 65; 长链接;把这个改短
5.再次刷新状态也观察
超过上面改的时间,连接数会增加
2.随机主页
目的:将主页设置成随机职业,是一种微调机制
启动随机主页
1.创建主页目录:mkdir /app
2.创建多个主页
touch /app/{blue.html,green.html,red.html,.yellow.html} .yellow.html是一个隐藏文件
在上述不同的页面,书写不同的内容
3.启动随机主页
vim /etc/nginx/conf.d/default.conf
server {
location / {
# root /usr/share/nginx/html;
# index index.html index.htm;
root /app;
random_index on;
}
}systemctl restart nginx 重启nginx,改完配置一定要重启nginx
刷新主页,观察变化
注意:要将/app的权限改为777,否则报403,还有防火墙和seliunx
3.替换模块------seb_module
目的:网页内容替换
如果我们在用模板生成网站时,因为某些原因造成代码不如意,但此时文件数量巨大,不方便重新生成,这个时候就可以用此模块来展示实现纠错,另一方面,也可以实现服务端文字过滤。
3.1启动替换1
server {
sub_filter nginx "yanchao"; #默认只换一次
location / {
root /usr/share/nginx/html;
index index.html index.html;
}
}}

sub_filter_once off; 全部替换
3.2启动替换2
4.文件读取
模块 ngx_http_core_module
原理介绍-------在nginx.conf
sendfile-----------文件拷贝时,不再经过用户,只经过内核,减少切切换和和拷贝次数
tcp_nopush----------当包累计到一定时再发送
tcp_nodelay---------
5.文件压缩
启动改模块,是文件传输前进行压缩,提高传输效率
模块 ngx_http_gzip_module
在 /etc/nginx/nginx.conf
http {
    gzip on;
    gzip_types text/plain text/css application/json application/javascript text/xml application/xml application/xml+rss text/javascript;
    gzip_vary on;
    gzip_min_length 1000;
    gzip_comp_level 5;
    gzip_http_version 1.1;
    gzip_proxied any;
}
6.页面缓存
模块 ngx_http_headers_module
location / {
expires 12h;
root /usr/share/nginx/html;
index index.html index.html;
}
服务器优化:启动缓存时间,加速浏览,缺点是时效性降低
7.防盗链
模块
启动防盗链
1.搭建一个a.com的网站
同六.3创建一个新的虚机主机
2.搭建一个b.com的网站
同六.3创建一个新的虚机主机
3.访问两个网络页面,均能正常显示图片
4.注意a.com的网络日志
加入access_log可将与主日志分离
[root@xuleilinux /]# vim  /etc/nginx/conf.d/a.com.conf
server{

        access_log  /var/log/nginx/a.com.access.log  main;


        listen 80;
        server_name a.com;
        location / {
                root /a.com;
                index index.html;
        }
}
5.注意b.com的网络日志
同上
再刷新b页面时,a也会增加日志,这是因为b。com盗用的ade图片
6.启动a.com的防盗链功能
server{

        access_log  /var/log/nginx/a.com.access.log  main;


        listen 80;
        server_name a.com;
        location / {
                root /a.com;
                index index.html;

                valid_referers none blocked *.a.com;
                if ($invalid_referer){
                        return 403;
                }
        }
}
重启服务
7.再次访问b.com网站,盗链失效
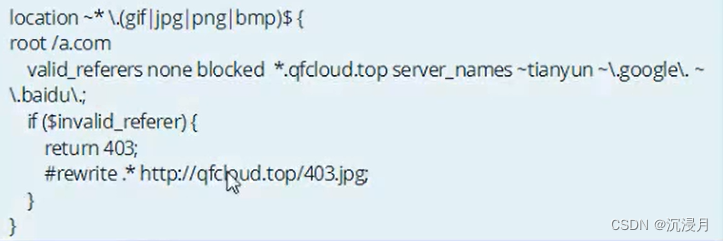
8.如果希望某些网站能够使用资源
server{

        access_log  /var/log/nginx/a.com.access.log  main;


        listen 80;
        server_name a.com;
        location / {
                root /a.com;
                index index.html;

                valid_referers none blocked *.a.com server_name ~\.google\. ~.baidu\. b.com  192.168.64.139.* a.com;
                 if ($invalid_referer){
                        return 403;
                }
        }
}
9.再次盗链,合法盗链成功
生产上用的
九、Nginx访问限制
1.ngx_http_limit_req_module
启动请求频率限制
0.在不限制的情况下进行访问
yum install -y httpd-tools 下载一款压力测试工具
ab -n 100 -c http://a.com/
1.启动限制
vim /etc/nginx/nginx.conf
定义-----写在nginx.conf的http里
limit_req_zone $binary_remote_addr zone=req_zone:10m rate=1r/s;
限制请求 二进制地址 限制策略名称 占用10m空间 允许每秒1次请求
引用------写在server的location里
limit_req zone=req_zone;
引用限制策略名称
2.ngx_http_limit_conn_module
通过ip地址,限制连接(tcp)
启动连接频率限制

十、访问控制
1.基于主机(ip)
模块 ngx_http_access_module
allow 允许某些主机
deny 拒绝某些主机
启动控制
1.1限制主机访问
vim /etc/nginx/conf.d/default.conf
server{
allow 192.168.64.123;
allow 192.168.64.124;
deny all;
}
1.2测试
服务器无法访问
2.基于用户(username&password)
模块 ngx_http_auth_basic_module
方法一:
auth_basic_string | off;
方法二:
auth_basic_user_file file;
启用控制
1.建立认证文件
yum install -y httpd-tools
htpasswd -cm /etc/nginx/conf.d/passwd user1 会话密码
htpasswd -cm /etc/nginx/conf.d/passwd user2
cat /etc/nginx/conf.d/passwd 观察口令文件是否生成,已生成
2.启动认证
vim /etc/nginx/conf.d/default
server{
auth_basic "nginx access test";
auth_basic_user_file /etc/nginx/conf.d/passwd;
}
3.重启并验证


 3303
3303


 被折叠的 条评论
为什么被折叠?
被折叠的 条评论
为什么被折叠?
 到【灌水乐园】发言


