


文章目录
Shiro安全框架
一、 入门概述
1.1、Shiro是什么
Apache Shiro 是一款功能强大的且易于使用的Java的安全框架。Shiro可以完成:认证、加密、会话管理、与web集集成等。借助SHiro可以帮助我们快速轻松的保护任何应用程序。
shiro官网:Apache Shiro | Simple. Java. Security.

1.2、为什么使用Shiro
与Shiro的特性密不可分:
- 易于使用
- 全面
- 灵活
- 强力支持Web
- 兼容性强
- 社区支持
1.3、Shiro与Spring Security的区别
-
SpringSecurity基于Spring开发,项目若使用Spring 可以与SpringSecurity作权限更加方便,而Shiro需要与Spring进行整合
-
Spring Security功能更加丰富
-
Spring Security社区资源更加丰富
看到这里,是不是有些人就认为Spring Security功能更发面都比Shiro好,为什么不学习SpringSecurity。有一句话:
存在即合理。下面看看Shiro的特点
-
Shiro的配置和使用比较简单,SpringSecurity使用比较复杂
-
Shiro的依赖性低,不需要任何的容器与框架,可以独立运行
-
Shiro不仅仅可以使用在Web端,可以使用在任何的场景。
1.4、基本功能
了解Shiro的功能,我们可以去官网下载一张Shiro的功能结构图来进行补充学习:
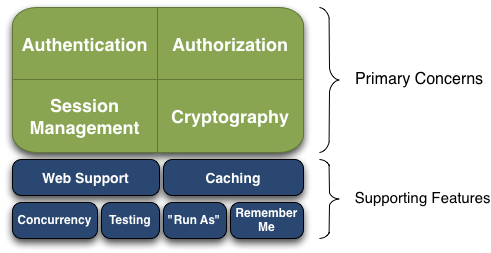
1.4.1、主要功能
- 认证登录(Authentication)
- 授权验证(Authorization)
- 会话管理(Session Management)
- 密码加密(Cryptography)
1.4.2 、次要功能
- Web支持(web support)
- 缓存(caching)
- 多线程并发验证(Concurrency)
- 测试(Testing)
- 另外身份登录(Run as)
- 记住我(Remember me)
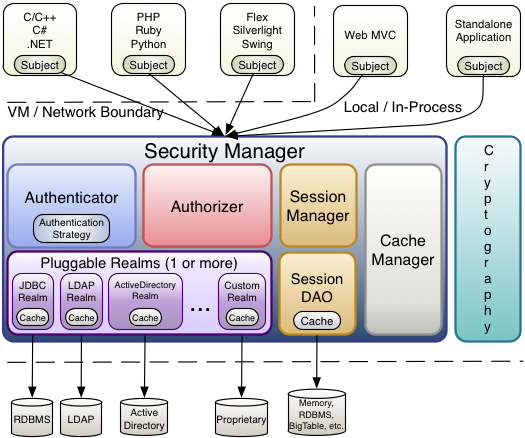
1.5、架构原理
从外部来看Shiro,即从应用程序的角度来观察使用Shiro完成工作

应用程序—>(登录)---->subject(对象)进行身份校验---->安全管理器(SecurityManager)---->Reaim(用户登陆的用户信息)
从内部的架构来看Shiro
二、基本使用
2.1、环境准备
1、Shiro不依赖容器,可以直接利用Maven使用
2、添加依赖
<!-- Shiro依赖 -->
  <dependencies>
  	<dependency>
  		<groupId>org.apache.shiro</groupId>
  		<artifactId>shiro-core</artifactId>
  		<version>1.9.0</version>
  	</dependency>

  	<dependency>
  		<groupId>commons-logging</groupId>
  		<artifactId>commons-logging</artifactId>
  		<version>1.2</version>
  	</dependency>
  </dependencies>
3、创建Maven工程
结构如下:

2.2、配置ini文件
在创建好的工程的Resources目录下,创建一个shiro.ini文件

[users]
zhangsan=z3
lisi=l4
2.3、登录认证
2.3.1、登录认证概念
(1)身份认证:一般需要提供身份ID等一些表示用户登陆这信息身份的标识,如提供email、用户名\密码来认证
(2)在Shiro中、用户需要提供principals(身份)和credentials(证明)给shiro。从而应用能验证用户身份。
2.3.2、登录认证的流程
- 收集用户二点身份/凭证,及如用户名/密码
- 调用Subject.login进行登录,如果失败则将得到的相应的AuthenticationException异常,根据异常提示用户登录错误信息,否则登陆成功。
- 创建自定义的Realm类,继承org.apache.shiro.realm.AuthenticationRealm类,实现doGetAuthenticationInfo()方法

2.3.3、登录认证示例
创建测试类,获取认证对象,进行登录认证,如下:
public class ShiroRun {
	@SuppressWarnings("deprecation")
	public static void main(String[] args) {
		// 1、获取Shiro初始化 通过ini文件获取用户信息
		@SuppressWarnings("deprecation")
		IniSecurityManagerFactory factory = new IniSecurityManagerFactory("classpath:shiro.ini");
		try {
			// 通过工厂创建SecurityManager
			SecurityManager securityManager = factory.getInstance();
			SecurityUtils.setSecurityManager(securityManager);
			// 2、获取Subject对象
			Subject subject = SecurityUtils.getSubject();
			// 3、获取外部参数 通过页面获取的用户名和密码 创建token对象
			AuthenticationToken token = new UsernamePasswordToken("zhangsan", "z31");
			// 4、完成登录
			subject.login(token);
			System.out.println("登陆成功...");
		} catch (UnknownAccountException e) {
			// TODO: handle exception
			System.out.println("用户名不存在...");
		} catch (IncorrectCredentialsException e) {
			// TODO: handle exception
			System.out.println("密码错误...");
		} catch (AuthenticationException e) {
			System.out.println("登陆失败...");
		}
	}
}
登陆成功:

密码错误:

账户错误:

2.4、角色、授权
2.4.1、授权
授权:也叫做访问控制,即在应用中控制谁访问哪些资源授权中需要了解的概念:主体(Subject)、资源(Resources)、权限(Permission)、角色(Role)
- **主体:**访问应用的用户,用户经授权才可访问指定资源
- **资源:**在应用中用户可以访问的URL,比如JSP页面,查看/编辑某些权限
- **权限:**表示在应用中用户能不能访问某个资源(有没有权利去访问某一个资源)
Shiro支持粗粒度的授权(用户模块的所有权限的授权)、也支持细粒度的授权(某个模块下的某个功能,比如查询)
2.4.1.1、授权方式
- 编程式授权:通过IF-ELSE授权
if(subject.hasRole("admin")){
    // 有admin的权限
}else if(subject.hasRole("commons")){
	// 普通用户的权限
}else{
    // 没有权限
}
- 注解式:通过执行的Java方法上加上注解完成,没有泉下今年的将抛出异常
@RequriesRole("admin")
public void queryALL(){
    // 具体的业务逻辑
}
- JSP/GSP标签,在JSP/GSP页面通过相应的标签完成
<shiro:hasRole name="admin">
    <input type="button" class="queryAll" name="queryAll" value="查询所有"/>
</shiro:hasRole>
2.4.1.2、授权流程
- 首先调用
Subject.isPermitted*/hasRole*接口,其余委托SecurityManager。而SecurityManager接着会委托给Authorizer。 - Authorizer是真正的授权者,如果调用isPermitted(“user:view”),其首先会通过PermissionResolver把字符串转化成相应的Permission示例。
- 再授权之前,其会调用相应的Realm获取Subject相应的角色/权限用于匹配传入的角色/权限
- Authorizer会判断Realm的角色/权限是否与传过来的匹配,如果有多个Realm,则会委托给ModularRealmAuthorizer进行循环判断,如果匹配如
isPermitted*/hasRole*会返回true,否则返回false表示授权失败。
- Authorizer会判断Realm的角色/权限是否与传过来的匹配,如果有多个Realm,则会委托给ModularRealmAuthorizer进行循环判断,如果匹配如

2.4.2、角色
角色:权限的集合(比如说系统管理员、业务人员、普通用户人员等)
2.4.3、角色授权示例
【角色】
在ini文件里配置用户角色的权限信息:
[users]
zhangsan=z3,admin,commons
lisi=l4,commons

[roles]
admin=user:insert,user:select
commons=user:select
通过以下方式完成用户角色下权限的判断:
if (subject.isPermitted("user:insert")) {
	System.out.println("用户有插入权限");
}else {
	System.out.println("没有insert权限");
}
完整示例:
public class ShiroRun {
	@SuppressWarnings("deprecation")
	public static void main(String[] args) {
		// 1、获取Shiro初始化 通过ini文件获取用户信息
		@SuppressWarnings("deprecation")
		IniSecurityManagerFactory factory = new IniSecurityManagerFactory("classpath:shiro.ini");
		try {
			// 通过工厂创建SecurityManager
			SecurityManager securityManager = factory.getInstance();
			SecurityUtils.setSecurityManager(securityManager);
			// 2、获取Subject对象
			Subject subject = SecurityUtils.getSubject();
			// 3、获取外部参数 通过页面获取的用户名和密码 创建token对象
			AuthenticationToken token = new UsernamePasswordToken("lisi", "l4");
			// 4、完成登录
			subject.login(token);
			System.out.println("登陆成功...");
			// 5、判断用户角色
			if(subject.hasRole("commons")) {
				System.out.println("拥有commons角色");
			}else{
				System.out.println("没有拥有commons角色");
			}
			if (subject.isPermitted("user:insert")) {
				System.out.println("用户有插入权限");
			}else {
				System.out.println("没有insert权限");
			}
		} catch (UnknownAccountException e) {
			// TODO: handle exception
			System.out.println("用户名不存在...");
		} catch (IncorrectCredentialsException e) {
			// TODO: handle exception
			System.out.println("密码错误...");
		} catch (AuthenticationException e) {
			System.out.println("登陆失败...");
		}
	}
}
注意:使用subject.checkPermission(“user:insert”);没有权限则会抛异常
【授权】
首先现在ini文件里为用户添加相应的角色(zhangsan添加admin、commons角色;lisi添加commons角色)
[users]
zhangsan=z3,admin,commons
lisi=l4,commons
使用以下方式判断角色:
if(subject.hasRole("commons")) {
		System.out.println("拥有commons角色");
	}else{
		System.out.println("没有拥有commons角色");
}
完整示例:
public class ShiroRun {
	@SuppressWarnings("deprecation")
	public static void main(String[] args) {
		// 1、获取Shiro初始化 通过ini文件获取用户信息
		@SuppressWarnings("deprecation")
		IniSecurityManagerFactory factory = new IniSecurityManagerFactory("classpath:shiro.ini");
		try {
			// 通过工厂创建SecurityManager
			SecurityManager securityManager = factory.getInstance();
			SecurityUtils.setSecurityManager(securityManager);
			// 2、获取Subject对象
			Subject subject = SecurityUtils.getSubject();
			// 3、获取外部参数 通过页面获取的用户名和密码 创建token对象
			AuthenticationToken token = new UsernamePasswordToken("zhangsan", "z3");
			// 4、完成登录
			subject.login(token);
			System.out.println("登陆成功...");
			// 5、判断用户角色
			if(subject.hasRole("commons")) {
				System.out.println("拥有commons角色");
			}else{
				System.out.println("没有拥有commons角色");
			}
		} catch (UnknownAccountException e) {
			// TODO: handle exception
			System.out.println("用户名不存在...");
		} catch (IncorrectCredentialsException e) {
			// TODO: handle exception
			System.out.println("密码错误...");
		} catch (AuthenticationException e) {
			System.out.println("登陆失败...");
		}
	}
}
2.5、密码加密
在实际的开发中,一些敏感的信息需要加密,比如说用户的密码,shiro内嵌了很多的加密算法
2.5.1、使用Shiro进行加密
public class ShiroMD5 {

	public static void main(String[] args) {
		String salt = "salt";
		// 1、密码明文
		String password = "z3";
		// 2、使用MD5加密
		Md5Hash MD5 = new Md5Hash(password);
		System.out.println("使用MD5加密后的密码:" + MD5.toHex());
		// 3、给MD5加盐值 在加密玩的再次拼接一段字符串
		Md5Hash MD5_2 = new Md5Hash(password, salt);
		System.out.println("使用MD5(带盐值)加密后的密码:" + MD5_2.toHex());
		// 3、给MD5加盐值 多次加密
		Md5Hash MD5_3 = new Md5Hash(password, salt,3);
		System.out.println("使用MD5(带盐值三次加密)加密后的密码:" + MD5_3.toHex());
	}
}

三、Shiro整合SpringBoot
3.1、整合依赖
<project xmlns="http://maven.apache.org/POM/4.0.0"
	xmlns:xsi="http://www.w3.org/2001/XMLSchema-instance"
	xsi:schemaLocation="http://maven.apache.org/POM/4.0.0 http://maven.apache.org/xsd/maven-4.0.0.xsd">
	<modelVersion>4.0.0</modelVersion>
	<parent>
		<groupId>com.wei</groupId>
		<artifactId>dhcc_ShiroProject</artifactId>
		<version>0.0.1-SNAPSHOT</version>
	</parent>
	<artifactId>dhcc_ShiroSpringBoot</artifactId>

	 <properties>
        <java.version>1.8</java.version>
        <spring.shiro.version>1.9.0</spring.shiro.version>
    </properties>

	<dependencies>
		<dependency>
			<groupId>org.springframework.boot</groupId>
			<artifactId>spring-boot-starter-web</artifactId>
		</dependency>
		<dependency>
            <groupId>org.springframework.boot</groupId>
            <artifactId>spring-boot-starter-test</artifactId>
            <scope>test</scope>
        </dependency>
        <!-- shiro -->
        <dependency>
            <groupId>org.apache.shiro</groupId>
            <artifactId>shiro-spring-boot-web-starter</artifactId>
            <version>${spring.shiro.version}</version>
        </dependency>

        <dependency>
            <groupId>org.projectlombok</groupId>
            <artifactId>lombok</artifactId>
            <optional>true</optional>
        </dependency>
        <!--页面模板依赖-->
        <dependency>
            <groupId>org.springframework.boot</groupId>
            <artifactId>spring-boot-starter-thymeleaf</artifactId>
        </dependency>
        <!--热部署依赖-->
        <dependency>
            <groupId>org.springframework.boot</groupId>
            <artifactId>spring-boot-devtools</artifactId>
            <scope>runtime</scope>
        </dependency>
        <!-- MyBatis-plus -->
        <dependency>
        	<groupId>com.baomidou</groupId>
        	<artifactId>mybatis-plus-boot-starter</artifactId>
        	<version>3.0.5</version>
        </dependency>
        <!-- MySQL -->
        <dependency>
        	<groupId>mysql</groupId>
        	<artifactId>mysql-connector-java</artifactId>
        	<version>8.0.28</version>
        </dependency>
	</dependencies>

	<build>
        <plugins>
            <plugin>
                <groupId>org.springframework.boot</groupId>
                <artifactId>spring-boot-maven-plugin</artifactId>
            </plugin>
        </plugins>
    </build>
</project>
3.2、yml配置文件
mybatis-plus:
  configuration:
    log-impl: org.apache.ibatis.logging.stdout.StdOutImpl
  mapper-locations: classpath:mapper/*Mapper.xml
spring:
  datasource:
    type: com.zaxxer.hikari.HikariDataSource
    driver-class-name: com.mysql.cj.jdbc.Driver
    url: jdbc:mysql://localhost:3306/shirodb?characterEncoding=UTF-8&useUnicode=true&useSSL=false&serverTimezone=UTC
    username: root
    password: 123456
  jackson:
    date-format: yyyy-MM-dd HH:mm:ss
    time-zone: GMT+8
shiro:
  loginUrl: /shiroController/login
3.3、创建目录结构

3.4、创建数据库
打开SqlYog工具创建数据库shirodb
USE `shirodb`;

DROP TABLE IF EXISTS `user`;

CREATE TABLE `user` (
  `id` bigint NOT NULL AUTO_INCREMENT COMMENT '主键id',
  `name` varchar(50) DEFAULT NULL COMMENT '用户名',
  `password` varchar(50) DEFAULT NULL COMMENT '密码',
  `role_id` bigint DEFAULT NULL COMMENT '角色编号',
  PRIMARY KEY (`id`)
) ENGINE=InnoDB DEFAULT CHARSET=utf8mb3;
3.5、创建对应的类
【实体类User】
@Data
public class User {
	private Long id;
	private String name;
	private String password;
	private Long roleId;
}
【respority数据持久层】
@Repository
public interface UserMapper extends BaseMapper<User>{}
采用MyBatis-PLUS的通用Mapper
【Service数据服务层(业务层)】
// 接口
public interface UserService {
	User getUserInfoByName(String name);
}

// 实现类
@Service
public class UserServiceImpl implements UserService {

	@Resource
	private UserMapper userMapper;

	public User getUserInfoByName(String name) {
		QueryWrapper<User> queryWrapper = new QueryWrapper<User>();
		queryWrapper.eq("name", name);
		User user = userMapper.selectOne(queryWrapper);
		return user;
	}

}
【controller控制层】
@Controller
@RequestMapping("/shiro")
public class UserController {

	@RequestMapping(value = "/login", method = RequestMethod.GET)
	@ResponseBody
	public String login(@RequestParam("name") String name, @RequestParam("password") String password) {
		// 1、获取Subject对象
		Subject subject = SecurityUtils.getSubject();
		// 2、 封装请求对象到Token对象
		UsernamePasswordToken token = new UsernamePasswordToken(name,password);
		try {
			// 3、调用Subject的login方法完成登录
			subject.login(token);
			return "登陆成功!";
		} catch (UnknownAccountException e) {
			e.printStackTrace();
			System.out.println("用户名不存在...");
			return "用户名错误,登陆失败";
		} catch (IncorrectCredentialsException e) {
			e.printStackTrace();
			System.out.println("密码错误...");
			return "密码错误,登陆失败!";
		} catch (AuthenticationException e) {
			e.printStackTrace();
			System.out.println("登陆失败...");
			return "登陆失败";
		}
	}
}
【Shiro的自定义授权配置类】
@Component
public class MyShiroRealm extends AuthorizingRealm {

	@Resource
	private UserService UserService;

	/**
	 * 用户的登录信息 自定义授权方法
	 */
	@Override
	protected AuthorizationInfo doGetAuthorizationInfo(PrincipalCollection principals) {
		// TODO Auto-generated method stub
		return null;
	}

	/**
	 * 自定义登录认证方法 token
	 */
	@Override
	protected AuthenticationInfo doGetAuthenticationInfo(AuthenticationToken token) throws AuthenticationException {
		// 获取登录用户的信息
		String name = token.getPrincipal().toString(); // 获取用户名
//		String password = new String((char[]) token.getCredentials()); // 获取密码
		// 调用业务层的接口获取数据库的用户信息
		User user = UserService.getUserInfoByName(name);
		if (user != null) {
			// 封装数据
			AuthenticationInfo info = new SimpleAuthenticationInfo(
									token.getPrincipal().toString(),
									user.getPassword(),
									ByteSource.Util.bytes("salt"),
									token.getPrincipal().toString()
					);
			return info;
		}
		return null;
	}
}
这里需要继承一下AuthorizingRealm,重写参数为token的方法,实现用户的授权登录功能
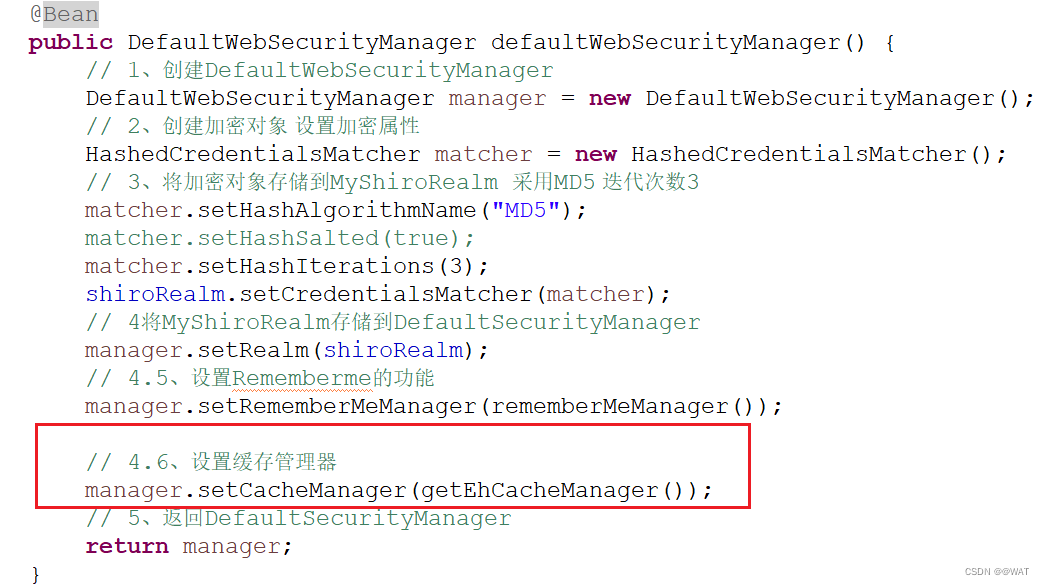
3.6、创建Shiro配置类
3.6.1、自定义Shiro配置类
要想实现自定义的Shiro配置类,需要创建一个DefaultSecurityManager的方法,在里面去重新自定义授权功能。
@Configuration
public class ShiroConfig {

	@Resource
	private MyShiroRealm shiroRealm;

	/**
	* 描述:TODO(这里用一句话描述这个方法的作用)
	* @Title: 创建默认的安全管理器
	* @return
	* @author weiyongpeng
	* @date  2022年10月3日 上午8:15:52
	 */
	@Bean
	public DefaultWebSecurityManager defaultWebSecurityManager() {
		// 1、创建DefaultWebSecurityManager
		DefaultWebSecurityManager manager = new DefaultWebSecurityManager();
		// 2、创建加密对象 设置加密属性
		HashedCredentialsMatcher matcher = new HashedCredentialsMatcher();
		// 3、将加密对象存储到MyShiroRealm 采用MD5 迭代次数3
		matcher.setHashAlgorithmName("MD5");
		matcher.setHashIterations(3);
		shiroRealm.setCredentialsMatcher(matcher);
		// 4将MyShiroRealm存储到DefaultSecurityManager
		manager.setRealm(shiroRealm);
		// 5、返回DefaultSecurityManager
		return manager;
	}
}
3.6.2、自定义Shiro拦截范围
@Bean
public DefaultShiroFilterChainDefinition shiroFilterChainDefinition() {
	DefaultShiroFilterChainDefinition filter = new DefaultShiroFilterChainDefinition();
	// 设置不忍证可以访问的资源
	filter.addPathDefinition("/shiro/login", "anon");
	filter.addPathDefinition("/login","anon");
	// 设置需要进行登录才可以访问的拦截范围
	filter.addPathDefinition("/**", "authc");
	return filter;
}
3.7、测试
使用APIFOX测试登录
【登陆成功】

【登陆失败】

3.8、登录认证前端
使用Thymeleaf实现前端的登陆页面
【引入依赖】
<!--页面模板依赖-->
        <dependency>
            <groupId>org.springframework.boot</groupId>
            <artifactId>spring-boot-starter-thymeleaf</artifactId>
        </dependency>
【添加配置】
  thymeleaf:
    cache: false
    prefix: classpath:/templates/
    suffix: .html
    encoding: UTF-8
    mode: HTML5
【编写页面】
登陆页面
<!DOCTYPE html>
<html lang="en" xmlns:th="http://www.thymeleaf.org">
<head>
<meta charset="UTF-8">
<title>登录</title>
</head>
<body>
	<h1>Shiro登录认证</h1>
	<form th:action="@{/shiro/userLogin}" method="post">
		<div>
			<label>用户名:</label> <input type="text" name="name"
				placeholder="请输入用户名:">
		</div>
		<div>
			<label>用户名:</label> <input type="password" name="password"
				placeholder="123456">
		</div>
		<div class="buttonDiv">
			<input type="reset" value="重置">
			<input type="submit" value="登录">
		</div>
	</form>
</body>
</html>
登陆成功首页
<!DOCTYPE html>
<html lang="en" xmlns:th="http://www.thymeleaf.org">
<head>
<meta charset="UTF-8">
<title>登录首页</title>
</head>
<body>
登陆的用户:<span th:text="${session.user}"></span>
</body>
</html>
登陆失败错误页
<!DOCTYPE html>
<html>
<head>
<meta charset="UTF-8">
<title>Insert title here</title>
</head>
<body>
<h1>登陆失败错误页面</h1>
<h3>
	对不起,你在登陆的时候遇到了<span th:text="${errorMsg}"></span>的错误
	<a th:href="@{/shiro/login}">重新登陆</a>
</h3>
</body>
</html>
修改controller的代码
@RequestMapping(value = "/login",method = RequestMethod.GET)
	public String login() {
		return "login";
	}

	@RequestMapping(value = "/userLogin", method = RequestMethod.POST)
	public String userLogin(@RequestParam("name") String name,
							@RequestParam("password") String password,
							HttpSession session,
							Model model) {
		// 1、获取Subject对象
		Subject subject = SecurityUtils.getSubject();
		// 2、 封装请求对象到Token对象
		UsernamePasswordToken token = new UsernamePasswordToken(name,password);
		try {
			// 3、调用Subject的login方法完成登录
			subject.login(token);
			// 放入session
			session.setAttribute("user", token.getPrincipal().toString());
			return "main";
		} catch (UnknownAccountException e) {
			e.printStackTrace();
			System.out.println("用户名不存在...");
			model.addAttribute("errorMsg","用户名错误,登陆失败");
			return "error";
		} catch (IncorrectCredentialsException e) {
			e.printStackTrace();
			System.out.println("密码错误...");
			model.addAttribute("errorMsg","密码错误,登陆失败!");
			return "error";
		} catch (AuthenticationException e) {
			e.printStackTrace();
			System.out.println("登陆失败...");
			model.addAttribute("errorMsg","登陆异常,登陆失败!");
			return "error";
		}
	}
四、多个Realm登录校验
- 多个Realm实现原理
当应用程序配置多个Realm时,例如,用户名密码校验,手机号校验,邮箱校验等等。Shiro的ModularRealmAuthentication会使用内部的AuthenticationStarategy组件判断认证是否成功或者谁败。
AuthenticationStrategy是一个无状态的组件,它本身验证尝试中被询问4次(这4次交互所需的任何必须的状态将被作为方法参数)
(1)在所有的Realm被调用之前
(2)在调用Realm的getAuthenticationInfo()方法之前
(3)在调用Realm的getAuthenticationInfo()方法之后
(4)在所有的Realm被调用之后
五、rememberMe功能
Shiro提供了记住我的(Remember Me)功能,用户可以在登陆成功后,下次访问页面无需再次登录仍然可以访问。
5.1、基本流程
- 首先在登陆的页面选中Remember Me然后再登陆成功后,如果是浏览器登录,一般会把Remember Me的Cookie写道客户端并保存。
- 关闭浏览器再次重新打开,会发现浏览器还是记住你。
- 访问一般的网页服务器,仍然知道你是谁,且能正常访问。
- 但是,如果我们访问电商平台,如果要查看我的订单或者进行支付,此事还需再次进行身份的认证。
5.2、代码实现
5.2.1、设置记住我
在配置类里的安全管理器方法里添加记住我功能

5.2.2、配置记住我管理器以及Cookie属性
// Cookie的属性设置
public SimpleCookie rememberCookie() {
	SimpleCookie cookie = new SimpleCookie("rememberMe");
	// 设置跨域
//	cookie.setDomain(domain);
	cookie.setPath("/");
	cookie.setHttpOnly(true);
	cookie.setMaxAge(30*24*60*60); // 30天
	return cookie;
}

//创建CookieMaanger
public CookieRememberMeManager rememberMeManager() {
	CookieRememberMeManager manager  =new CookieRememberMeManager();
	manager.setCookie(rememberCookie());
	manager.setCipherKey("1234567890987654".getBytes());
	return manager;
}
5.2.3、添加用户过滤器
保证在登陆成功后,Shiro将登陆成功的用户信息放入到cookie中存储

5.2.4、改造Controller登录接口
// 2、 封装请求对象到Token对象 开启Remember
		UsernamePasswordToken token = new UsernamePasswordToken(name,password,rememberMe);
5.2.5、改造登陆页面
<div>记住我:<input type="checkbox" name="rememberMe" value="true"> </div>

六、用户登出
用户登陆之后,配套的操作有登出操作,直接通过Shiro过滤器即可以实现
6.1、代码实现
【过滤器】
@Bean
	public DefaultShiroFilterChainDefinition shiroFilterChainDefinition() {
		DefaultShiroFilterChainDefinition filter = new DefaultShiroFilterChainDefinition();
		// 设置不认证可以访问的资源
		filter.addPathDefinition("/shiro/userLogin", "anon");
		filter.addPathDefinition("/shiro/login","anon");
		// 配置登出操作
		filter.addPathDefinition("/logout", "logout");
		// 设置需要进行登录认证才可以访问的拦截范围
		filter.addPathDefinition("/**", "authc");
		// 添加remember的用户
		filter.addPathDefinition("/**", "user");
		return filter;
	}
【登陆后的页面改造】

七、授权、角色认证
7.1、角色认证
用户登录后,需要验证是否具有指定角色权限,Shiro也提供了方便的工具进行判断,
这个工具就是Realm的doGetAuthenticationinfo方法进行判断,出发权限判断的有两种方式
- 在页面中通过shiro:xxxx属性判断
- 在接口中通过注解@Requiresxxxxx判断
7.1.1、后端接口服务注解🔥🔥🔥
同过给接口方法添加注解可以实现权限校验,可以加载控制器上,也可以加载业务方法上,一般加载控制器方法上,常用的注解如下:
- @RequiresAuthentication
验证用户是否登录,等同于方法subject.isAuthenticated();
- @RequiresUser
验证用户是否记忆:
登录认证成功subject.isAuthenticated()为true
登录后被记忆subjec.isRemembered()为true
- @RequiresGuest
验证是否是一个Guest请求,是否是游客的请求
此时subject.getPrincipal()为null
- @RequiresRoles
验证subject是否有相应的角色,有角色访问方法,否则会抛出异常
AuthentizationException
例如:@RequiresRoles(“aRoleName”)
void someMethod();
只有subject有aRoleName角色才能访问方法someMethod()
- @RequiresPremissions🔥🔥
验证subject是否具有相应的权限,有权限访问方法,没有则抛出异常
AuthorizationException。
例如:@RequiresPermissions(“USER_SERVICE:QUERY”,“USER_SERVICE:MODIFY”);
void someMethod();
subject只有同时具有USER_SERVICE:QUERY,USER_SERVICE:MODIFY权限才可以访问someMethod()方法
7.1.2、授权验证-没有角色无法访问
【首先在Controller层写一个方法】
@RequiresRoles("admin")
@RequestMapping(value = "/userLoginRoles",method = RequestMethod.GET)
@ResponseBody
public String userLoginRoles() {
	System.out.println("登陆验证表示");
	return "验证角色成功";
}
注意加上注解@RequiresRoles
当我们去访问这个接口的时候,如果这时候还有没做任何的操作,肯定会被抛出异常,如下图所示:

7.1.3、授权验证-有角色
在自定义的Realm类里重写的doGetAuthorizationInfo定义角色授权信息
@Override
protected AuthorizationInfo doGetAuthorizationInfo(PrincipalCollection principals) {
	// 进行授权信息
	System.out.println("进入自定义授权方法");
	// 有权限放行
	// 1、 创建存储信息的对象
	SimpleAuthorizationInfo info = new SimpleAuthorizationInfo();
	// 2、存储角色信息 正常是从数据库里获取
	info.addRole("admin");
	// 3、返回角色信息
	return info;
}

7.1.4、创建角色表
在实际的业务开发中,我们要想完成角色的认证授权,不能向上述一样,需要在数据库中获取相关的用户权限角色信息。
【权限表】

【创建权限实体类】
public class Role {
	/**
	 * 权限编号
	 */
	private Long id;
	/**
	 * 角色名称
	 */
	private String name;
	/**
	 * 描述
	 */
	private String desc;
	/**
	 * 显示名称
	 */
	private String realName;
}
【用户角色表】
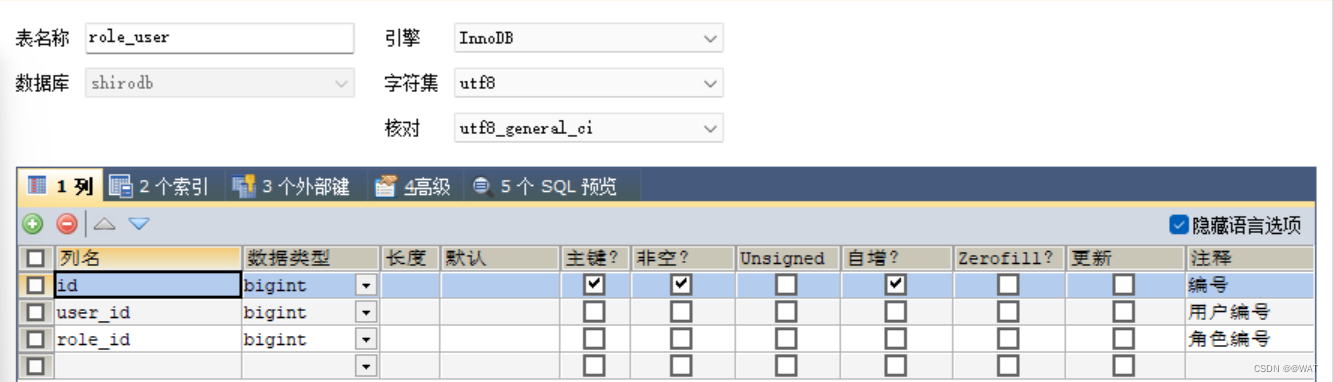
【mapper的查询用户角色】
@Select("SELECT NAME FROM role r WHERE r.`id` IN (\r\n" +
			"   SELECT ru.`role_id` FROM role_user ru WHERE ru.`user_id`=(\r\n" +
			"      SELECT u.`role_id` FROM `user` u WHERE u.`name` = #{principal}  \r\n" +
			"   )\r\n" +
			")")
	List<String> getUserRolesInfoMapper(@Param("principal") String principal);
【Service接口方法】
List<String> getUserRolesInfo(String name);
【自定义MyShiroRealm】
@Resource
	private UserService UserService;

	/**
	 * 用户的登录信息 自定义授权方法
	 */
	@Override
	protected AuthorizationInfo doGetAuthorizationInfo(PrincipalCollection principals) {
		// 进行授权信息
		System.out.println("进入自定义授权方法");
		// 有权限放行
		// 1、 创建存储信息的对象
		SimpleAuthorizationInfo info = new SimpleAuthorizationInfo();
		// 2、存储角色信息 正常是从数据库里获取
//		info.addRole("admin");
		List<String> rolesInfo = UserService.getUserRolesInfo(principals.getPrimaryPrincipal().toString());
		rolesInfo.forEach(System.out::println);
		info.addRoles(rolesInfo);
		// 3、返回角色信息
		return info;
	}
7.2、授权访问
获取权限进行验证,首先是创建权限资源表
CREATE TABLE `shirodb`.`premissions`(
  `id` BIGINT(20) NOT NULL AUTO_INCREMENT COMMENT '编号',
  `name` VARCHAR(50) COMMENT '权限名称',
  `info` VARCHAR(30) COMMENT '权限信息',
  `desc` VARCHAR(50) COMMENT '描述',
  PRIMARY KEY (`id`)
) ENGINE=INNODB CHARSET=utf8 COLLATE=utf8_general_ci;
同理角色认证的编写,首先要在添加相应的接口方法查询数据库中对应角色下的权限集合。
【mapper】
@Select({
		"<script>",
		"select info from premissions where id in ",
		"(select permissions_id from role_ps where role_id in (",
		"select id from role where name in ",
		"<foreach collection='roles' item='name' open='(' separator=',' close=')'>",
		"#{name}",
		"</foreach>",
		"))",
		"</script>"
	})
	List<String> getUserPermissionsInfoMapper(@Param("roles") List<String> roles);
【Service接口】
List<String> getUserPermisssionsInfo(List<String> roles);
【Controller接口】
@RequiresPermissions(value = {"user:update","user:delete","user:add"})
	@RequestMapping(value = "/userLoginPermissions",method = RequestMethod.GET)
	@ResponseBody
	public String userLoginPermissions() {
		System.out.println("登陆权限验证标识");
		return "验证权限成功";
	}
注意🔥@RequiresPermissions注解的参数value是一个数组
最后要想真正能够的实现功能,还需要再自定义的Realm类里定义权限认证。
	@Override
	protected AuthorizationInfo doGetAuthorizationInfo(PrincipalCollection principals) {
		// 进行授权信息
		System.out.println("进入自定义授权方法");
		// 有权限放行
		// 1、 创建存储信息的对象
		SimpleAuthorizationInfo info = new SimpleAuthorizationInfo();
		// 2、存储角色信息 正常是从数据库里获取
//		info.addRole("admin");
		// 3、获取用户角色信息
		List<String> rolesInfo = UserService.getUserRolesInfo(principals.getPrimaryPrincipal().toString());
		// 3、获取用户的权限信息
		List<String> permisssionsInfo = UserService.getUserPermisssionsInfo(rolesInfo);
		permisssionsInfo.forEach(System.out::println);
		rolesInfo.forEach(System.out::println);
		// 4、存储到info、对象中
		info.addStringPermissions(permisssionsInfo); // 权限信息
		info.addRoles(rolesInfo); // 角色信息
		// 5、返回角色信息
		return info;
	}
八、自定义异常
创建认证异常处理类,使用@ControllerAdvice加@ExceptionHandler注解实现特殊异常处理
@ControllerAdvice
public class PermissionsException {

	/**
	* 描述:没有权限自定义异常
	* @Title: doNoPermissionException
	* @return
	* @author weiyongpeng
	* @date  2022年10月4日 上午8:21:39
	 */
	@ResponseBody
	@ExceptionHandler(UnauthorizedException.class)
	public String doNoPermissionException(Exception e) {
		return "对不起,您无权限访问";
	}

	/**
	* 描述:无身份认证异常
	* @Title: doNoAuthenticationException
	* @param e
	* @return
	* @author weiyongpeng
	* @date  2022年10月4日 上午8:23:26
	 */
	@ResponseBody
	@ExceptionHandler(AuthenticationException.class)
	public String doNoAuthenticationException(Exception e) {
		return "对不起,权限认证失败";
	}
}
九、前端角色权限认证
前面虽然说已经实现了基本的功能,但是在用户体验上效果不是很好,我们在平常的系统中,比如说银行的管理系统、绩效系统。行内人员有着不同的权限,比如说行长有全权限,经理有调动查看账务的权限。我们想要的效果是:不同权限的用户登录系统后,看到的界面根据所拥有的权限显示。
那么接下来,我们来实现一把:
9.1、引入依赖
因为我们使用的前端框架是Thymeleaf,所以:
     <!-- 配置Thyemleaf与Shiro的整合依赖 -->
        <dependency>
        	<groupId>com.github.theborakompanioni</groupId>
        	<artifactId>thymeleaf-extras-shiro</artifactId>
        	<version>2.0.0</version>
        </dependency>
配置Shiro的标签配置
// 配置类里配置解析Shiro标签的配置方法
@Bean
public ShiroDialect shiroDialect() {
	return new ShiroDialect();
}
在Thymeleaf中常用的Shiro标签属性:
shiro:
引入完成后,直接启动应用会报错,因为thymeleaf-extras-shiro这个组件需要thymeleaf3.0支持,所以这里不再演示。
十、实现缓存
10.1、缓存工具Ehcache
Ehchche是一种广泛使用的开源Java分布式缓存框架,住哟啊面向的是通用缓存,JavaEE是轻量级的缓存容器。可以和大部分的Java项目无缝融合。例如Hibernate中使用的缓存技术就是Ehcache
Ehcache支持磁盘和内存中的存储,如果内存不够,可以放到磁盘中,也可以直接在JVM虚拟机中做缓存,高效,速度快,但是共享麻烦,分布式集群中不方便,主要做的是本地缓存。
10.2、Shiro整合Ehcache
Shiro官网提供了Shiro-ehcache的整合方案,减少对数据库的访问,提高项目的执行效率。
【添加依赖】
<!-- Shiro整合Ehcache框架 -->
<dependency>
	<groupId>org.apache.shiro</groupId>
	<artifactId>shiro-ehcache</artifactId>
	<version>1.4.2</version>
</dependency>
<dependency>
	<groupId>commons-io</groupId>
	<artifactId>commons-io</artifactId>
	<version>2.6</version>
</dependency>
【配置类配置缓存管理器】
/**
	* 描述:获取ehcache缓存管理器
	* @Title: getEhcacheManager
	* @return
	* @author weiyongpeng
	* @date  2022年10月4日 上午9:12:36
	 */
	@Bean
	public EhCacheManager getEhCacheManager() {
		EhCacheManager ehCacheManager = new EhCacheManager();
		InputStream stream = null;
		try {
			stream = ResourceUtils.getInputStreamForPath("classpath:ehcache/shiro-ehcache.xml");
		} catch (Exception e) {
			// TODO: handle exception
			e.printStackTrace();
		}
		CacheManager cacheManager = new CacheManager(stream);
		ehCacheManager.setCacheManager(cacheManager);
		return ehCacheManager;
	}


 8862
8862


 被折叠的 条评论
为什么被折叠?
被折叠的 条评论
为什么被折叠?
 到【灌水乐园】发言


