


一、SpringBoot简介
1. 原有Spring优缺点分析
1.1 Spring的优点分析
Spring是Java企业版(Java Enterprise Edition,JEE,也称J2EE)的轻量级代替品。无需开发重量级的Enterprise JavaBean(EJB),Spring为企业级Java开发提供了一种相对简单的方法,通过依赖注入和面向切面编程,用简单的Java对象(Plain Old Java Object,POJO)实现了EJB的功能。
1.2 Spring的缺点分析
虽然Spring的组件代码是轻量级的,但它的配置却是重量级的。一开始,Spring用XML配置,而且是很多XML配置。Spring 2.5引入了基于注解的组件扫描,这消除了大量针对应用程序自身组件的显式XML配置。Spring 3.0引入了基于Java的配置,这是一种类型安全的可重构配置方式,可以代替XML。
所有这些配置都代表了开发时的损耗。因为在思考Spring特性配置和解决业务问题之间需要进行思维切换,所以编写配置挤占了编写应用程序逻辑的时间。和所有框架一样,Spring实用,但与此同时它要求的回报也不少。
除此之外,项目的依赖管理也是一件耗时耗力的事情。在环境搭建时,需要分析要导入哪些库的坐标,而且还需要分析导入与之有依赖关系的其他库的坐标,一旦选错了依赖的版本,随之而来的不兼容问题就会严重阻碍项目的开发进度。
2. SpringBoot的概述
2.1 SpringBoot解决上述Spring的缺点
SpringBoot对上述Spring的缺点进行的改善和优化,基于约定优于配置的思想,可以让开发人员不必在配置与逻辑业务之间进行思维的切换,全身心的投入到逻辑业务的代码编写中,从而大大提高了开发的效率,一定程度上缩短了项目周期。
2.2 SpringBoot的特点
- 为基于Spring的开发提供更快的入门体验
- 开箱即用,没有代码生成,也无需XML配置。同时也可以修改默认值来满足特定的需求
- 提供了一些大型项目中常见的非功能性特性,如嵌入式服务器、安全、指标,健康检测、外部配置等
- SpringBoot不是对Spring功能上的增强,而是提供了一种快速使用Spring的方式
2.3 SpringBoot的核心功能
-
起步依赖
起步依赖本质上是一个Maven项目对象模型(Project Object Model,POM),定义了对其他库的传递依赖,这些东西加在一起即支持某项功能。
简单的说,起步依赖就是将具备某种功能的坐标打包到一起,并提供一些默认的功能。
-
自动配置
Spring Boot的自动配置是一个运行时(更准确地说,是应用程序启动时)的过程,考虑了众多因素,才决定Spring配置应该用哪个,不该用哪个。该过程是Spring自动完成的。
二、开发快速入门
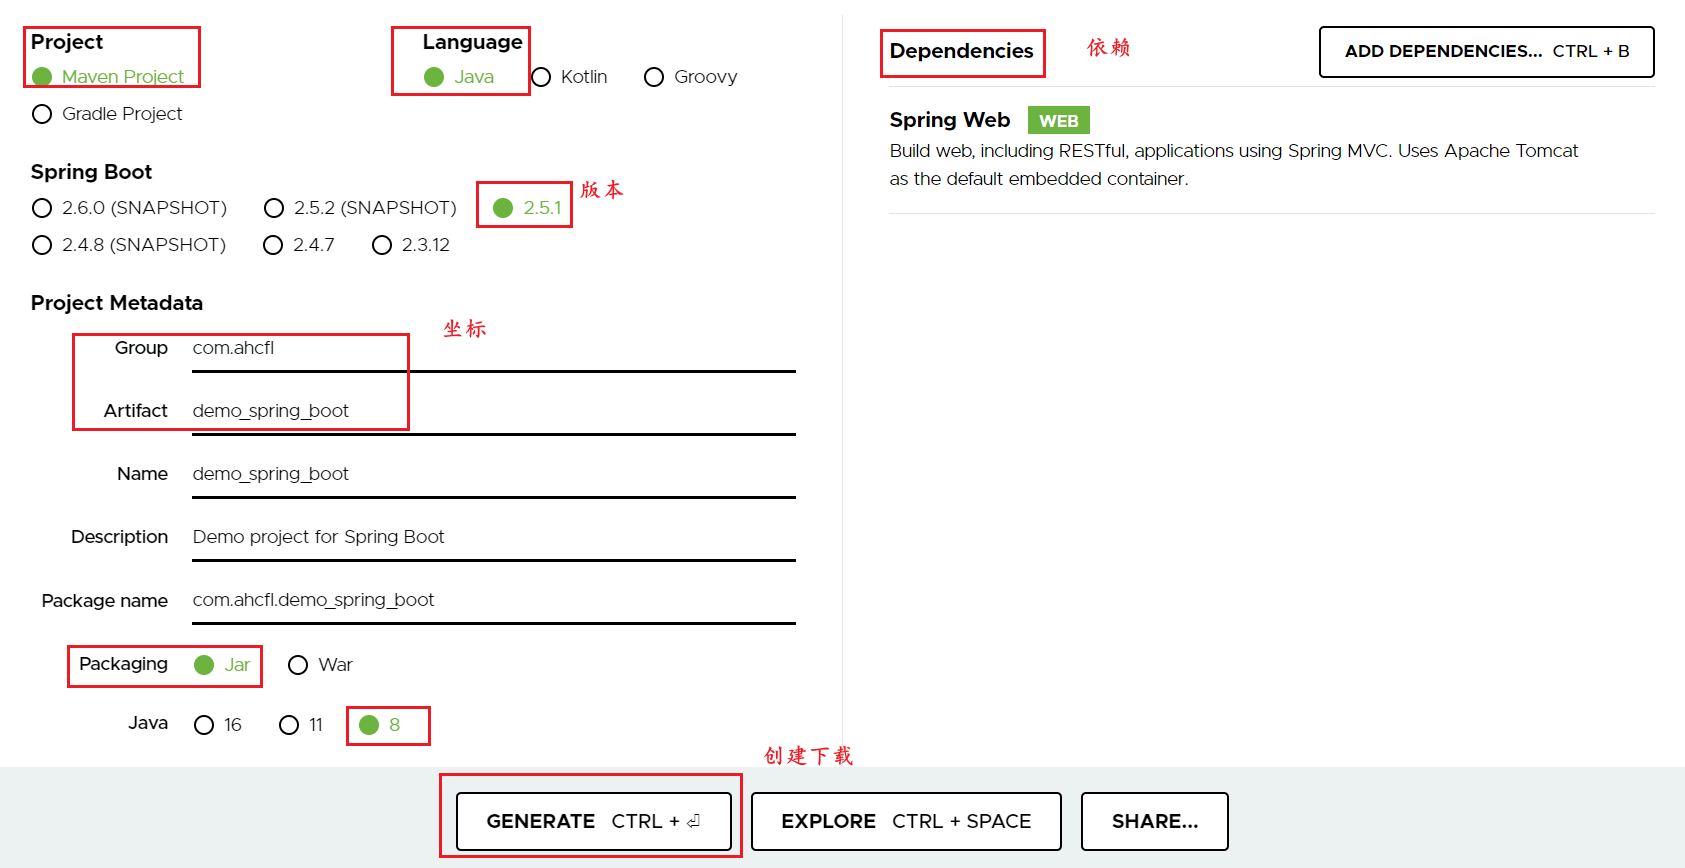
1. Spring Initializr方式
spring官网 Spring Initializr
1.点击上述地址,直接来到springboot官网的工程创建页面
2.根据官网提示,配置坐标依赖等等。
3.等待工程下载,直接使用idea工具打开即可
4.在启动类同级或者自己目录下创建controller
5.运行启动类即可
6.浏览器访问测试
下载完成解压后,直接在idea打开,然后在Controller层编写如下代码
@RestController
public class DemoController {

    @RequestMapping("/demo")
    public String demo(){

        return "hello springBoot";
    }
}
运行启动类即可
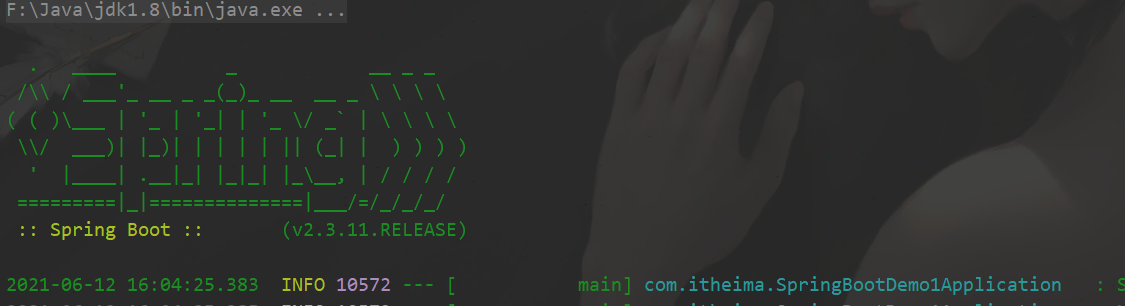
访问/demo
[外链图片转存失败,源站可能有防盗链机制,建议将图片保存下来直接上传(img-7KWy4HEj-1624425855541)(C:\Users\16096\AppData\Roaming\Typora\typora-user-images\image-20210612160612819.png)]
注意:我们创建的所有的包必须是启动类的同级或者子级。
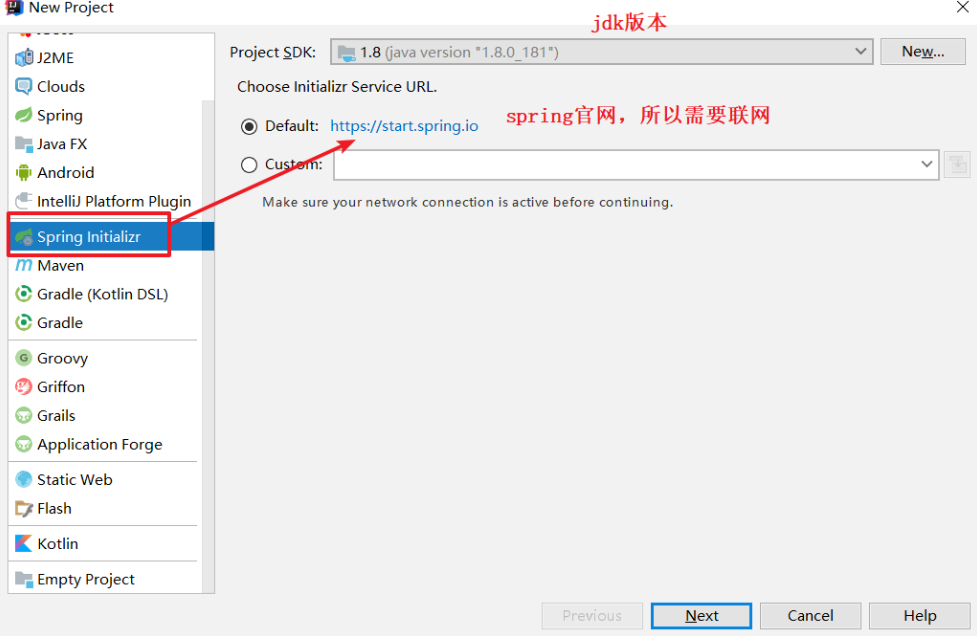
2. idea(Spring Initializr)
1.根据idea工具中提供的Spring Initializr,根据步骤提示创建,和官网差不多
2.编写controller
3.运行启动类
4.浏览器测试
同上创建Controller层编写代码
[外链图片转存失败,源站可能有防盗链机制,建议将图片保存下来直接上传(img-KE2gmsTa-1624425855544)(C:\Users\16096\AppData\Roaming\Typora\typora-user-images\image-20210612163443679.png)]
运行启动类,访问/demo
3. idea手动方式(推荐)
1.创建普通maven工程
2.引入springBoot父工程
3.引入springBoot的web启动依赖
4.编写controller
5.编写启动类,执行启动类
pom.xml
引入springBoot父工程
<parent>
        <groupId>org.springframework.boot</groupId>
        <artifactId>spring-boot-starter-parent</artifactId>
        <version>2.3.0.RELEASE</version>
 </parent>

引入springBoot的web启动依赖
<dependencies>
    <dependency>
        <groupId>org.springframework.boot</groupId>
        <artifactId>spring-boot-starter-web</artifactId>
    </dependency>
</dependencies>
同上创建Controller层编写代码
编写启动类,执行启动类
package com.ahcfl.springBoot;

import org.springframework.boot.SpringApplication;
import org.springframework.boot.autoconfigure.SpringBootApplication;

@SpringBootApplication
public class SpringBootStart {

    public static void main(String[] args) {
        SpringApplication.run(SpringBootStart.class,args);
    }
}
话外(工程的启动方式)
1、 启动类
2、springBoot插件
<plugin>
    <groupId>org.springframework.boot</groupId>
    <artifactId>spring-boot-maven-plugin</artifactId>
</plugin>

3、 java -jar jar包名成来执行
1.引入上述的插件
2.通过maven命令打成jar包
3.来到工作磁盘的工程目录的target中,cmd
4.通过  java -jar  jar包名成来执行

注意:
正常开发环境,都是启动类直接启动
生产环境,一般都是打jar包启动
   注意:打jar包一定要引入springboot的插件,否则打成的jar包无法执行。
三、springBoot配置
1. 父工程依赖版本管理
回忆maven中的父工程的作用:统一管理依赖和插件的版本

引入springBoot父工程:鼠标 Ctrl+左击 点进去
<parent>
    <groupId>org.springframework.boot</groupId>
    <artifactId>spring-boot-starter-parent</artifactId>
    <version>2.3.0.RELEASE</version>
</parent>
发现其又继承父工程:
<parent>
    <groupId>org.springframework.boot</groupId>
    <artifactId>spring-boot-dependencies</artifactId>
    <version>2.3.11.RELEASE</version>
</parent>
<artifactId>spring-boot-starter-parent</artifactId>
<packaging>pom</packaging>
<name>spring-boot-starter-parent</name>
继续点进去,可看到依赖版本的声明:
 <properties>
    <activemq.version>5.15.15</activemq.version>
    <antlr2.version>2.7.7</antlr2.version>
    <appengine-sdk.version>1.9.88</appengine-sdk.version>
    <artemis.version>2.12.0</artemis.version>
    <aspectj.version>1.9.6</aspectj.version>
    <assertj.version>3.16.1</assertj.version>
    <atomikos.version>4.0.6</atomikos.version>
    <awaitility.version>4.0.3</awaitility.version>
    <bitronix.version>2.1.4</bitronix.version>
    <build-helper-maven-plugin.version>3.1.0</build-helper-maven-plugin.version>
     ...............
     ...............
</properties>
springBoot的父工程中声明了很多依赖的版本,已经帮我们避免了依赖冲突的情况。
所以我们声明依赖时,只需要填写坐标,不需要依赖版本
例如:
<dependency>
    <groupId>org.springframework.boot</groupId>
    <artifactId>spring-boot-starter-web</artifactId>
</dependency>
starter-web真实引入了我们web开发所需要的基本依赖。
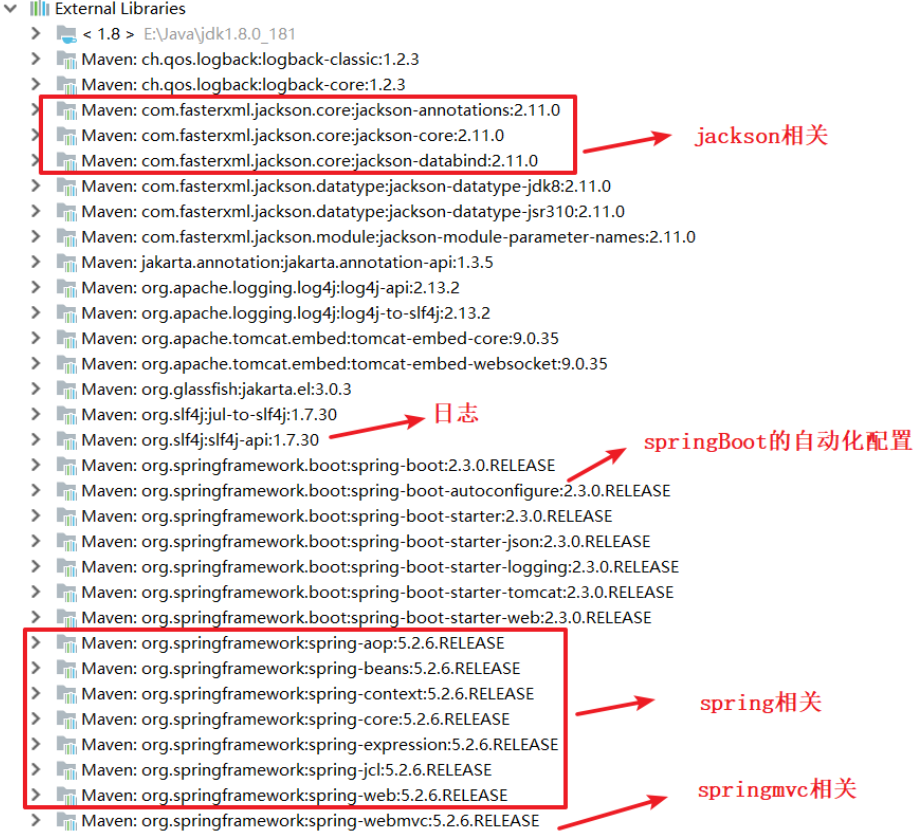
对于springBoot工程来说:
1.引入springBoot父工程,来声明依赖的版本
2.引入web工程需要的starter-web,引入依赖和相关的自动化配置类
3.引入springBoot工程的打包插件,用于后期的打包。
4.编写启动类,即可执行
2. 配置文件的分类
1.springBoot的配置有几种?
2.如果同时存在的会怎样?
配置文件的作用:
修改SpringBoot自动配置的默认值;SpringBoot在底层都给我们自动配置好;
SpringBoot官方讲解:约定 优于 配置 优于 编码
通过spring-boot-starter-parent依赖发现:
<resource>
    <directory>${basedir}/src/main/resources</directory>
    <filtering>true</filtering>
    <includes>
        <include>**/application*.yml</include>
        <include>**/application*.yaml</include>
        <include>**/application*.properties</include>
    </includes>
</resource>
springBoot的配置分为yaml和properties:
基于上面开发入门代码演示:
1、在resources目录下新建 application.properties 配置文件,
添加端口号: 启动项目端口修改为 8088
server.port=8088
componey1=ahcfl
2、添加 application.yml配置文件
启动项目端口修改为 8090
server:
  port: 8090
componey2: cfl
3、修改controller,依赖注入读取配置信息:
package com.ahcfl.controller;

import org.springframework.beans.factory.annotation.Value;
import org.springframework.web.bind.annotation.RequestMapping;
import org.springframework.web.bind.annotation.RestController;

@RestController
public class DemoController {

    @Value("${componey1}")
    private String componey1;
    @Value("${componey2}")
    private String componey2;

    @RequestMapping("/demo")
    public String demo(){
        return "hello springBoot--->"+componey1+" , "+componey2;
    }
}
启动,查看控制台启动日志:
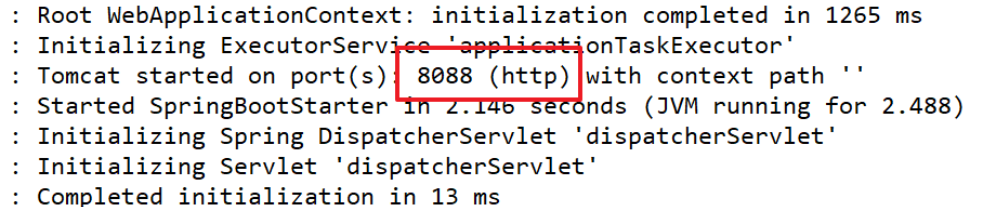
因此,浏览器访问 127.0.0.1/8088/demo
hello springBoot--->ahcfl , cfl
结论:
1. 约定 优于 配置 优于 编码两类配置文件如果同时存在,
2. 若 key 相同则 properties 优先级高,若key不同则合并
3. YAML配置文件基本使用
YAML 是 “YAML Ain’t Markup Language”的递归缩写 ,(YAML 不是一种标记语言)
SpringBoot默认读取的配置文件名称可以是application.properties或者application.yml,
其中application.yml采用一种完全不同与properties的语法风格。
基本语法:
1.大小写敏感
2.数据值前边必须有空格,作为分隔符
3.使用缩进表示层级关系
4.缩进的空格数目不重要,只要相同层级的元素左侧对齐即可
5. # 表示注释,从这个字符一直到行尾,都会被解析器忽略。
properties加载的优先级高于 yaml文件,避免冲突,可以将applicaiton.properties文件注掉或删掉
yml文件配置:
# 缩进表示层级
jdbc:
  username: root
  password: 123

# 对象(map集合)
person:
  name: zhangsan
# 或者行内写法
person1: {name: lisi}

# 数组或者集合
address:
  - beijing
  - shanghai

# 纯量,不可分割
msg1: 'hello \n world' # 单引号忽略转义字符
msg2: "hello \n world" # 双引号,识别转义字符

# 参数引用
name: ahcfl
person2: ${name} # 引用上面定义的参数值
package com.ahcfl.controller;

import org.springframework.beans.factory.annotation.Value;
import org.springframework.web.bind.annotation.RequestMapping;
import org.springframework.web.bind.annotation.RestController;

import java.util.Map;

@RestController
@RequestMapping("/yaml")
public class YamlBasicController {
    @Value("${jdbc.username}")
    private String username;
    @Value("${jdbc.password}")
    private String password;

    //获取对象的值或者map的值
    @Value("${person.name}")
    private String name1;
    @Value("${person1.name}")
    private String name2;

    //获取数组的值
    @Value("${address[0]}")
    private String address1;

    //获取纯量:
    @Value("${msg1}")
    private String msg1;
    @Value("${msg1}")
    private String msg2;

    //参数引用
    @Value("${person2}")
    private String name3;

    @RequestMapping("/demo")
    public String demo(){
        System.out.println("数据库连接参数:"+username+":"+password);
        System.out.println("map或者对象值:"+name1+":"+name2);
        System.out.println("数组的值:"+address1);
        System.out.println("纯量值:msg1:"+msg1);
        System.out.println("纯量值:msg2:"+msg2);
        System.out.println("参数引用:"+name3);

        return "yaml基本使用";
    }
}
4. YAML配置文件自动装配到实体对象
1.编写yaml配置信息
2.定义实体类JdbcConfig和Person
3.给实体添加注解进行配置文件的读取
4.编写controller,依赖注入测试
yml文件配置:
# 对象(map集合)
person:
  name: ahcfl
  age: 20
  address:
    - beijing
    - shanghai
  jdbc:
    username: root
    password: 123
  daughter:
    name: jingtian
    age: 18
package com.ahcfl.pojo;

import lombok.Data;
import org.springframework.boot.context.properties.ConfigurationProperties;
import org.springframework.stereotype.Component;

@Data
@ConfigurationProperties(prefix = "jdbc" ) //自动解析yaml前缀为jdbc的配置,并且自动进行依赖注入
@Component
public class JdbcConfig {
    private String username; // root
    private String password; // 123
}
package com.ahcfl.pojo;

import lombok.Data;
import org.springframework.boot.context.properties.ConfigurationProperties;
import org.springframework.stereotype.Component;

import java.util.Arrays;
import java.util.Map;

@Data
@ConfigurationProperties(prefix = "person")
@Component
public class Person {
    private String name;  // ahcfl
    private int age;      // 20
    private String[] address;
    private JdbcConfig jdbc;
    private Map<String,Object> daughter;  // jingtian:18
}
第二种配置方式:
@ConfigurationProperties(prefix=“xxx”)+@EnableConfigurationProperties(xxx.class)
此时就不需要在pojop配置类上加@Component,
给启动类添加注解@EnableConfigurationProperties(xxx.class)
package com.ahcfl.controller;

import com.ahcfl.pojo.JdbcConfig;
import com.ahcfl.pojo.Person;
import org.springframework.beans.factory.annotation.Autowired;
import org.springframework.web.bind.annotation.RequestMapping;
import org.springframework.web.bind.annotation.RestController;

@RestController
@RequestMapping("/yaml")
public class YamlSuperController {

    @Autowired
    private JdbcConfig jdbcConfig;

    @Autowired
    private Person person;

    @RequestMapping("/demo2")
    public String demo(){
        System.out.println("jdbc配置:"+jdbcConfig);
        System.out.println("人员信息:"+person);
        return "demo2";
    }
}
5. YAML配置文件之配置文件自动提示
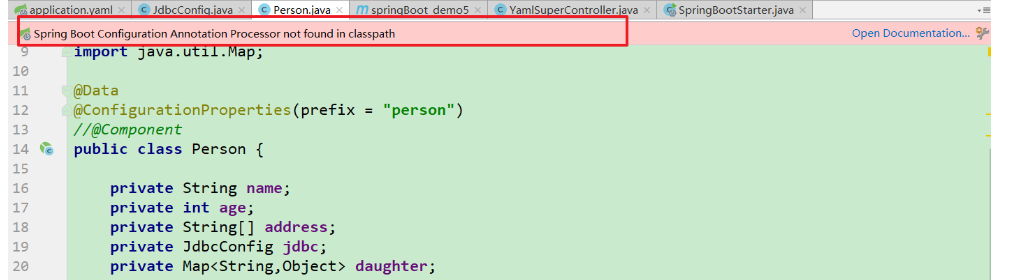
在springBoot的classpath中找不到该注解。在pom添加依赖配置:
<!--解决SpringBoot自定义配置提示问题-->
<dependency>
  <groupId>org.springframework.boot</groupId>
  <artifactId>spring-boot-configuration-processor</artifactId>
  <optional>true</optional>
</dependency>
6. 配置文件切换
实际企业开发中,开发环境和生产环境连接的数据库是不同的,
所以我们需要不同的配置进行相互之间的切换。

步骤:
1.创建3个配置文件
	application.yml
	application-dev.yml
	application-prod.yml
2.dev和prod配置内容不一致
3.application.yml中通过 spring.profiles.active=dev/prod 来激活指定配置
application-dev.yml
# 开发环境

# 对象(map集合)
person:
  name: zhangsan
  age: 20
  address:
    - beijing
    - shanghai
  jdbc:
    username: root
    password: 123
  daughter:
    name: lisi
    age: 18
application-prod.yml
# 对象(map集合)
person:
  name: zhangsan
  age: 20
  address:
    - beijing
    - shanghai
  jdbc:
    username: ahcfl
    password: 123
  daughter:
    name: lisi
    age: 18
application.yml中通过 spring.profiles.active=dev/prod 来激活指定配置
spring:
  profiles:
    active: dev
7. 项目内部配置文件的加载顺序
查看官网,可以看出给了17种方式的配置加载形式
按照官网说明,添加配置实现
优先级:由高到底
- file:./config/:当前项目下的/config目录下
- file:./ :当前项目的根目录
- classpath:/config/:classpath的/config目录
- classpath:/ :classpath的根目录
8. 项目外部配置(了解)
1.保证工程中一个application.yaml配置,打成jar包
2.命令行执行jar包,修改端口配置,访问项目
3.在e盘中创建application.yaml配置,通过jar命令指定配置执行jar包
4.再次运行,查看结果
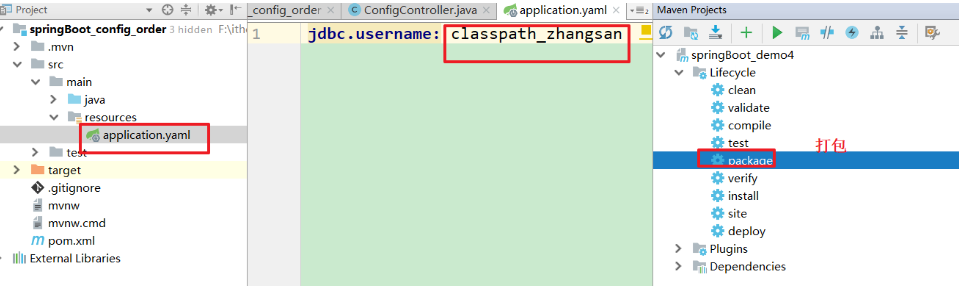
2.命令行执行jar包,修改端口配置,访问项目
java -jar app.jar --server.port=9000
浏览器访问:http://localhost:9000/demo
显示 classpath_zhangsan
3.在e盘中创建application.yaml配置,通过jar命令指定配置执行jar包
jdbc.username=classpath_lisi
4.再次运行,查看结果,注意访问端口是8080(默认值)
java -jar app.jar --spring.config.location=f://application.yaml
http://localhost:8080/demo
显示 classpath_lisi
小结:整体加载优先级: jar包外 到 jar包内
话外(什么是约定优于配置)
什么是约定优于配置
约定优于配置(convention over configuration),也称作按约定编程,是一种软件设计范式,旨在减少软件开发人员需做决定的数量,获得简单的好处,而又不失灵活性。

    补充:约定优于配置也被称为习惯优于配置、约定大于配置

本质来说,系统、类库或框架应该假定合理的默认值,而非要求提供不必要的配置。比如说模型中有一个名为User的类,那么数据库中对应的表就会默认命名为user。只有在偏离这一个约定的时候,例如想要将该表命名为system_user,才需要写有关这个名字的配置。

简单来说,如果你所用工具的约定和你的期待相符,就可以省去配置;不符合的话,你就要通过相关的配置来达到你所期待的结果。

约定优于配置意味着通用化,标准化,意味着开发者都需要遵循同一套约定。这样,当一个开发者要看另一个开发者写的程序的时候,就会很容易上手,因为他了解同一套约定,减少了重新学习的成本。
四、springBoot整合MVC
1. 引入
SpringBoot对Web MVC的自动化配置支持 ,参考官网;介绍如下:
Spring Boot为Spring MVC提供了自动配置,可与大多数应用程序一起很好地工作。
自动配置在Spring的默认值之上添加了以下功能:
- 包含
ContentNegotiatingViewResolver和BeanNameViewResolver视图解析器。 - 支持服务静态资源,包括对WebJars的支持。
- 自动注册
Converter,GenericConverter和Formatter。 - 支持
HttpMessageConverters。 - 自动注册
MessageCodesResolver国际化。 - 静态
index.html欢迎页支持。 - 定制
Favicon网站icon图片支持。 - 自动使用
ConfigurableWebBindingInitializerbean。
如果要保留这些Spring Boot MVC定制并进行更多的MVC定制(拦截器,格式化程序,视图控制器和其他功能),不用@EnableWebMvc注解。
使用 @Configuration + WebMvcConfigurer 自定义规则。
spring-boot-starter-web这个启动器中,已经整合了springmvc了。
2. 静态资源支持
虽然我们可以前后台完全分离,但是springBoot也是支持访问静态资源的。
源码:WebMvcAutoConfiguration.java源码中找到addResourceHandlers方法
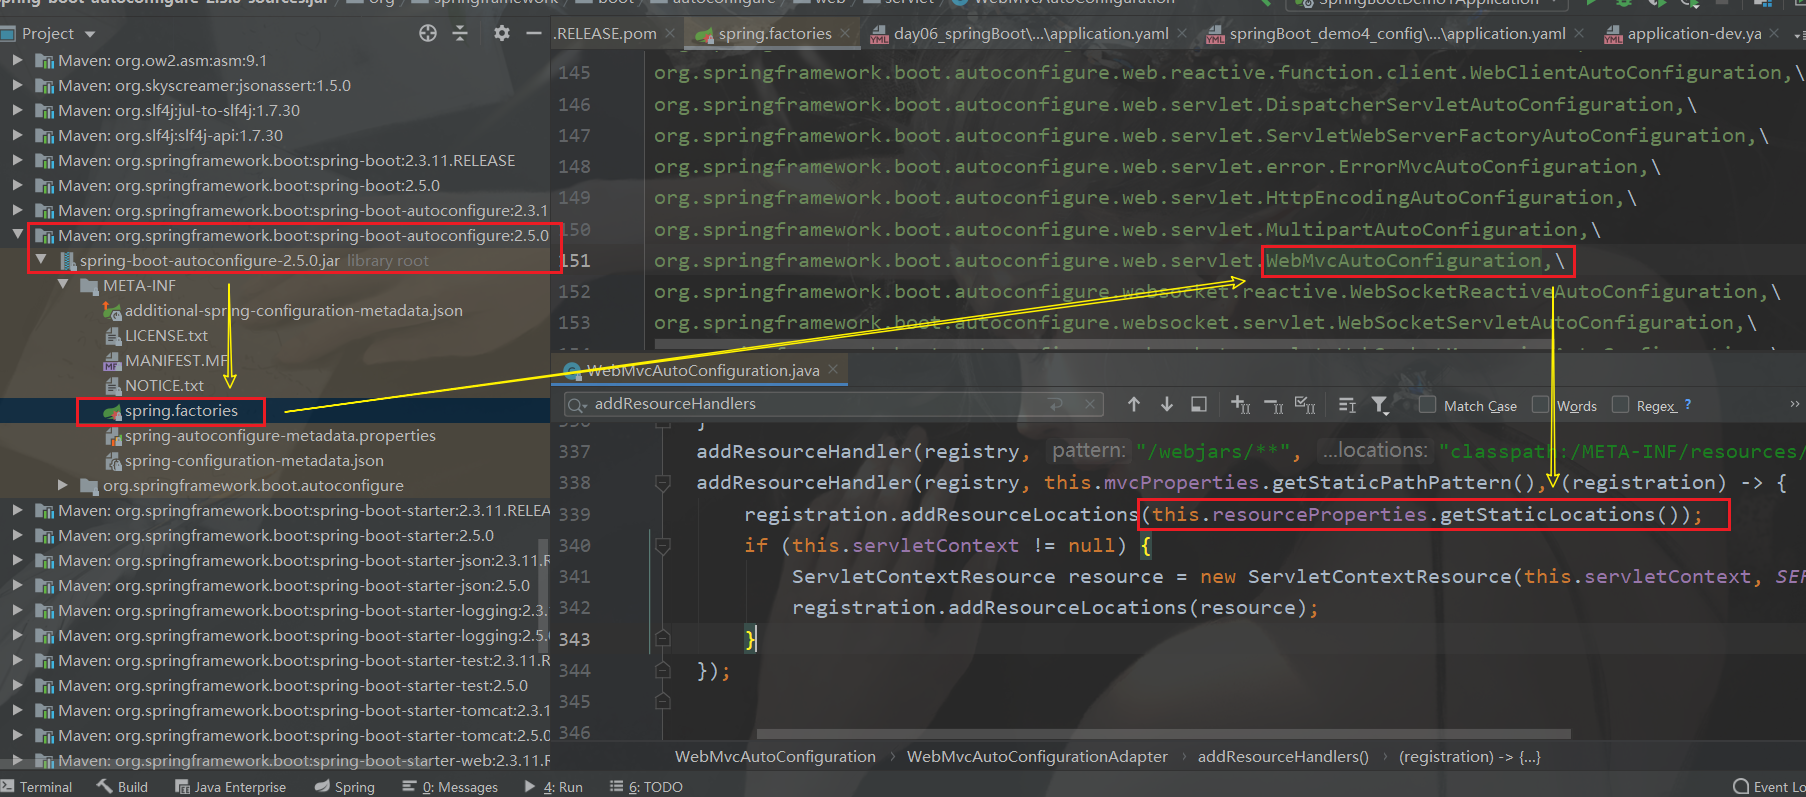
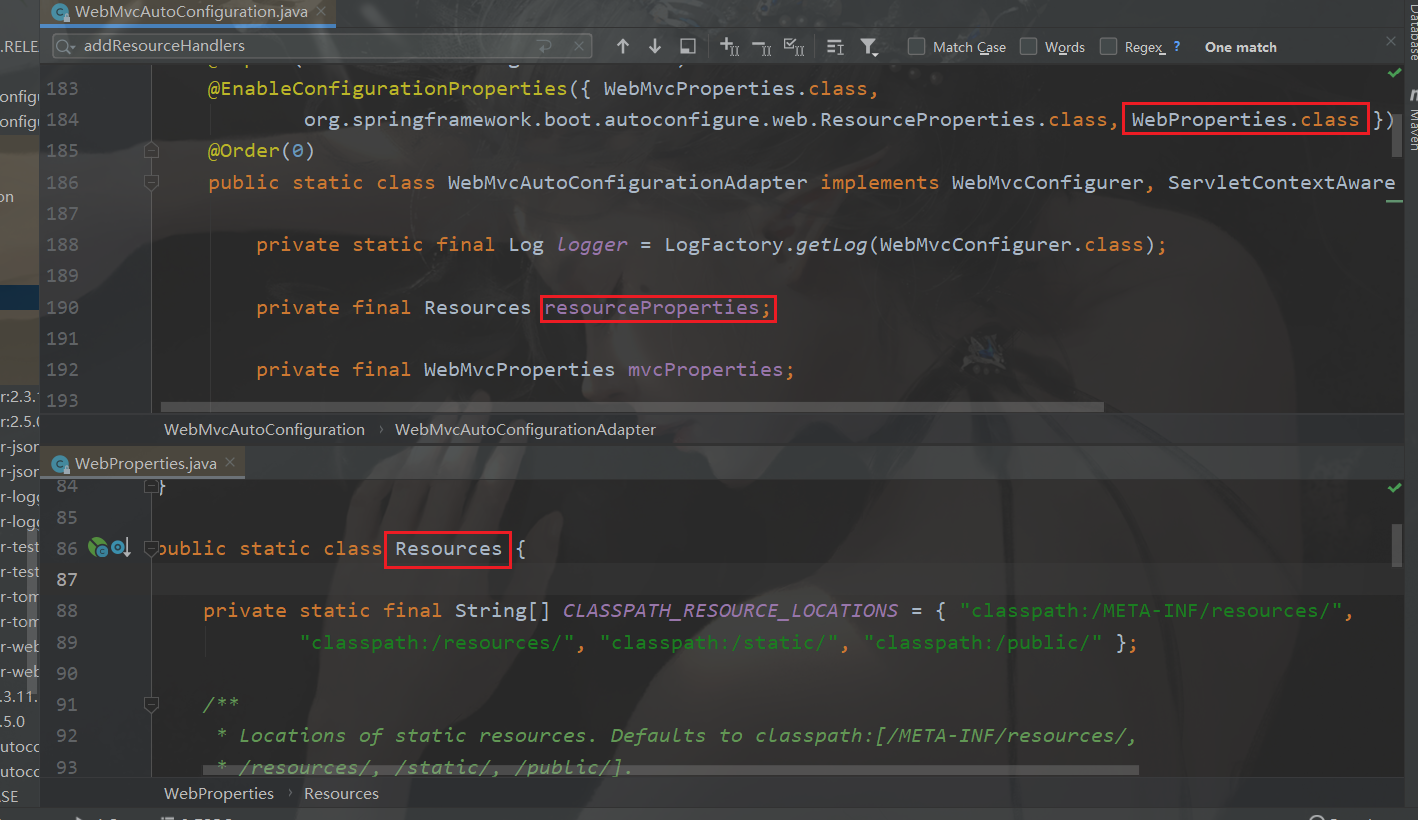
结论:springBoot中静态资源需要放到上述目录
这些目录直接在maven的resources目录下建立即可
访问优先级:/META-INF/resources > resources > static(大家习惯用这个) > public
访问静态资源
1.创建静态资源目录,存放静态资源
2.启动项目访问资源
127.0.0.1:8080/1.jpg
修改静态资源默认配置
spring:
  mvc:
    static-path-pattern: /web/** # 修改静态资源的虚拟访问路径
 # resources:
 #   static-locations: [classpath:/myweb] # 静态资源位置修改

注:
1.约定大于配置
2.配置完成注释即可,实际开发一般不做修改
其他springmvc配置
spring:
  servlet:
    multipart:
      max-file-size: 20MB    # 后续重新设置上传文件大小
      max-request-size: 10MB
  mvc:
    servlet:
      path: /    # 修改DispatcherServlet映射路径
      load-on-startup: 1   # 修改Servlet随tomcat一起初始化
logging:
  level:
    com.itheima: debug      # 日志级别 debug
3. 拦截器支持
1. 编写MyInterceptor类实现HandlerInterceptor接口
2. 拦截器注册到容器中(实现WebMvcConfigurer的addInterceptors)
3. 释放静态资源
4. 编写controller测试
MyInterceptor类
ackage com.ahcfl.interceptor;

import org.springframework.web.servlet.HandlerInterceptor;
import org.springframework.web.servlet.ModelAndView;
import javax.servlet.http.HttpServletRequest;
import javax.servlet.http.HttpServletResponse;

@Service
public class MyInterceptor implements HandlerInterceptor {
    @Override
    public boolean preHandle(HttpServletRequest request, HttpServletResponse response, Object handler) throws Exception {

        System.out.println("***********running preHandleR****************");
        return true;
    }

    @Override
    public void postHandle(HttpServletRequest request, HttpServletResponse response, Object handler, ModelAndView modelAndView) throws Exception {
        System.out.println("running postHandle************************");
    }

    @Override
    public void afterCompletion(HttpServletRequest request, HttpServletResponse response, Object handler, Exception ex) throws Exception {
        System.out.println("running postHandle***********************");
    }
}
2.拦截器注册到容器中(实现WebMvcConfigurer的addInterceptors)
3.释放静态资源
package com.itheima.config;

import com.itheima.interceptor.MyInterceptor;
import org.springframework.context.annotation.Configuration;
import org.springframework.web.servlet.config.annotation.InterceptorRegistry;
import org.springframework.web.servlet.config.annotation.WebMvcConfigurer;

@Configuration
public class MyWebMvcConfig implements WebMvcConfigurer {

    @Autowrid
    private MyInterceptor myInterceptor

    @Override
    public void addInterceptors(InterceptorRegistry registry) {
        registry.addInterceptor(myInterceptor)
                .addPathPatterns("/**") //拦截所有请求
                .excludePathPatterns("/","/css/**","/js/**","/image/**"); //排序静态资源拦截
    }
}
4.编写controller测试
package com.ahcfl.controller;

import org.springframework.web.bind.annotation.RequestMapping;
import org.springframework.web.bind.annotation.RestController;

@RestController
public class DemoController {

    @RequestMapping("/demo")
    public String demo(){

        return "拦截器测试";
    }
}
4. servlet技术支持(了解)
理解springBoot对springMVC原生组件的支持
1、@ServletComponentScan(basePackages = “com.itheima.sh”) :指定原生Servlet组件都放在那里

2、编写对应的组件
@WebServlet(urlPatterns = “/my”):效果:直接响应
@WebFilter(urlPatterns={“/css/*”,“/images/*”})
@WebListener
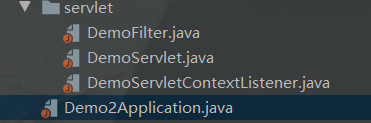
@SpringBootApplication
@ServletComponentScan("com.ahcfl.demo2.servlet") //扫描原生servlet技术包
public class Demo2Application {

	public static void main(String[] args) {
		SpringApplication.run(Demo2Application.class, args);
	}

}
五、springBoot整合单元测试
1. springBoot整合junit4
步骤:
1.引入test的启动器(starter)
2.创建service接口和实现类
3.创建service接口的测试类
4.测试类通过@RunWith替换运行器,并且添加@SpringBootTest
5.编写测试方法,执行测试
1.引入test的启动器(starter)
<dependency>
    <groupId>org.springframework.boot</groupId>
    <artifactId>spring-boot-starter-test</artifactId>
</dependency>
2.创建service接口和实现类
public interface UserService {
}

=============================================

package com.ahcfl.springBoot.service.impl;

import com.itheima.springBoot.service.UserService;
import org.apache.catalina.User;
import org.springframework.stereotype.Service;

@Service
public class UserServiceImpl implements UserService {
}
3.创建service接口的测试类
4.测试类通过@RunWith替换运行器,并且添加@SpringBootTest
5.编写测试方法,执行测试
package com.ahcfl.springBoot_demo4.service;

import org.junit.After;
import org.junit.Before;
import org.junit.Test;
import org.junit.runner.RunWith;
import org.springframework.beans.factory.annotation.Autowired;
import org.springframework.boot.test.context.SpringBootTest;
import org.springframework.test.context.junit4.SpringRunner;

import static org.junit.Assert.*;

@SpringBootTest
@RunWith(SpringRunner.class)
public class UserServiceTest {

    @Autowired
    private UserService userService;

    @Test
    public void demo(){
        System.out.println(userService);
    }

    @Before
    public void before(){
        System.out.println("before*************");
    }

    @After
    public void after(){
        System.out.println("after*************");
    }
}
2. springBoot整合junit5
Spring Boot 2.2.0 版本开始引入 JUnit 5 作为单元测试默认库,2.3.X版本还保留了Junit4版本测试,
但是在2.4.X则不再支持Junit4(参考官方)

作为最新版本的JUnit框架,[JUnit5](https://junit.org/junit5/)与之前版本的Junit框架有很大的不同。

由三个不同子项目的几个不同模块组成。
JUnit 5 = JUnit Platform + JUnit Jupiter + JUnit Vintage

JUnit Platform: Junit Platform是在JVM上启动测试框架的基础,
不仅支持Junit自制的测试引擎,其他测试引擎也都可以接入。

JUnit Jupiter: JUnit Jupiter提供了JUnit5的新的编程模型,是JUnit5新特性的核心。
内部包含了一个测试引擎,用于在Junit Platform上运行。

JUnit Vintage: 由于JUint已经发展多年,为了照顾老的项目,
JUnit Vintage提供了兼容JUnit4.x,Junit3.x的测试引擎。
代码实现:
依赖不变,防止使用旧的junit4相关接口我们将其依赖排除。
    <groupId>org.springframework.boot</groupId>
    <artifactId>spring-boot-starter-test</artifactId>
    <scope>test</scope>
    <exclusions>
        <exclusion>
            <groupId>org.junit.vintage</groupId>
            <artifactId>junit-vintage-engine</artifactId>
        </exclusion>
    </exclusions>
</dependency>
测试类中移除 @RunWith(SpringRunner.class)注解,直接添加@SpringBootTest注解即可。
package com.ahcfl.springBoot_demo4.service;


import org.junit.jupiter.api.*;
import org.springframework.beans.factory.annotation.Autowired;
import org.springframework.boot.test.context.SpringBootTest;


@SpringBootTest
//@RunWith(SpringRunner.class)
@DisplayName("SpringBoot整合Junit5功能测试类")
public class UserServiceTest {

    @Autowired
    private UserService userService;

    @Test
    public void demo(){
        System.out.println(userService+"11111111111");
    }
    @Test
    public void demo2(){
        System.out.println(userService+"22222222222");
    }

    @BeforeAll
    public static void beforeAll(){
        System.out.println("beforeAll*************");
    }

    @AfterAll
    public static void afterAll(){
        System.out.println("afterAll*************");
    }

    @BeforeEach
    public void beforeEach(){
        System.out.println("beforeEach*************");
    }

    @AfterEach
    public void afterEach(){
        System.out.println("afterEach*************");
    }
}
1.@Test需要引入junit5的依赖,不能引入junit4的依赖
2.@BeforeAll和@AfterAll修饰的方法必须是static
3.
    @BeforeAll和@AfterAll 只会运行一次
    @BeforeEach和@AfterEach 每个测试方法都会运行
3. junit5其他测试注解扩展
JUnit5的注解与JUnit4的注解有所变化
参考官网:https://junit.org/junit5/docs/current/user-guide/#writing-tests-annotations
-
**@Test 😗*表示方法是测试方法。但是与JUnit4的@Test不同,
他的职责非常单一不能声明任何属性,拓展的测试将会由Jupiter提供额外测试
-
**@ParameterizedTest 😗*表示方法是参数化测试,下方会有详细介绍
-
**@RepeatedTest 😗*表示方法可重复执行,下方会有详细介绍
-
**@DisplayName 😗*为测试类或者测试方法设置展示名称
-
**@BeforeEach 😗*表示在每个单元测试之前执行
-
**@AfterEach 😗*表示在每个单元测试之后执行
-
**@BeforeAll 😗*表示在所有单元测试之前执行
-
**@AfterAll 😗*表示在所有单元测试之后执行
-
**@Tag 😗*表示单元测试类别,类似于JUnit4中的@Categories
-
**@Disabled 😗*表示测试类或测试方法不执行,类似于JUnit4中的@Ignore
-
**@Timeout 😗*表示测试方法运行如果超过了指定时间将会返回错误
-
**@ExtendWith 😗*为测试类或测试方法提供扩展类引用
package com.ahcfl.springBoot_demo4.service;

import org.junit.jupiter.api.*;

import java.util.concurrent.TimeUnit;

import static org.junit.jupiter.api.Assertions.*;

@DisplayName("junit5功能测试类")
public class Junit5ExtTest {

    /**
     * 测试前置条件
     */
    @DisplayName("测试前置条件")
    @Test
    void testassumptions(){
        Assumptions.assumeTrue(true,"结果不是true");
        System.out.println("111111");
    }

    /**
     * 断言:前面断言失败,后面的代码都不会执行
     */
    @DisplayName("测试简单断言")
    @Test
    void testSimpleAssertions() {
        Object obj1 = new Object();
        Object obj2 = new Object();
        assertSame(obj1, obj2, "两个对象不同");
        System.out.println("前端断言失败,后面代码不执行");
    }

    @Test
    @DisplayName("array assertion")
    void array() {
        assertArrayEquals(new int[]{1, 2}, new int[]{1, 2}, "数组内容不相等");
    }

    @Test
    @DisplayName("组合断言")
    void all() {
        /**
         * 所有断言全部需要成功
         */
        assertAll("test",
                () -> assertTrue(true && true, "结果不为true"),
                () -> assertEquals(1, 2, "结果不是1"));

        System.out.println("=====");
    }

    @DisplayName("异常断言")
    @Test
    void testException() {
        //断定业务逻辑一定出现异常
        assertThrows(ArithmeticException.class, () -> {
            int i = 10 / 0;
        }, "业务逻辑居然正常运行?");
    }

    @DisplayName("快速失败")
    @Test
    void testFail(){
        //xxxxx
        if(1 == 2){
            fail("测试失败");
        }
    }

    @Disabled
    @DisplayName("测试方法2")
    @Test
    void test2() {
        System.out.println(2);
    }

    @RepeatedTest(5)
    @Test
    void test3() {
        System.out.println(5);
    }

    /**
     * 规定方法超时时间。超出时间测试出异常
     *
     * @throws InterruptedException
     */
    @Timeout(value = 500, unit = TimeUnit.MILLISECONDS)
    @Test
    void testTimeout() throws InterruptedException {
        Thread.sleep(600);
    }
}
六、springBoot整合数据访问
1. 自动化配置数据源
springBoot中,我们只需要引入数据源的启动器:starter-jdbc即可,然后配置数据库相关连接配置。
1.引入starter-jdbc 和 mysql驱动。
2.在application.yml中添加相关数据源配置
3.在controller中激动注入数据源,测试数据源是否可用
<dependency>
<groupId>mysql</groupId>
<artifactId>mysql-connector-java</artifactId>
</dependency>
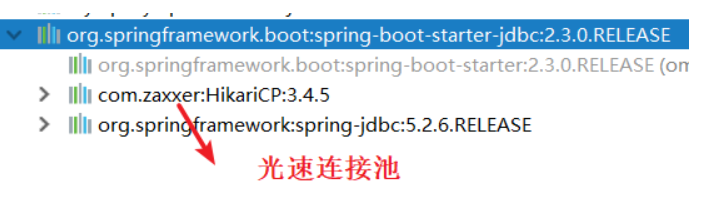
<dependency>
<groupId>org.springframework.boot</groupId>
<artifactId>spring-boot-starter-jdbc</artifactId>
</dependency>
spring:
  datasource:
    driver-class-name: com.mysql.cj.jdbc.Driver
    url: jdbc:mysql://localhost:3306/dbname?serverTimezone=GMT%2B8&useUnicode=true&characterEncoding=utf8&autoReconnect=true&useSSL=false    # mysql8+ 的需要加的参数
    username: root
    password: root
    # type: 连接池实现类,不配置默认采用光速连接池
在controller中激动注入数据源,测试数据源是否可用
@RestController
@RequestMapping("/demo")
public class DemoController {

    @Autowired
    private DataSource dataSource;

    @RequestMapping("/demo")
    public String demo() throws SQLException {

        System.out.println(dataSource.getConnection());
        return "hello springMVC";
    }
}
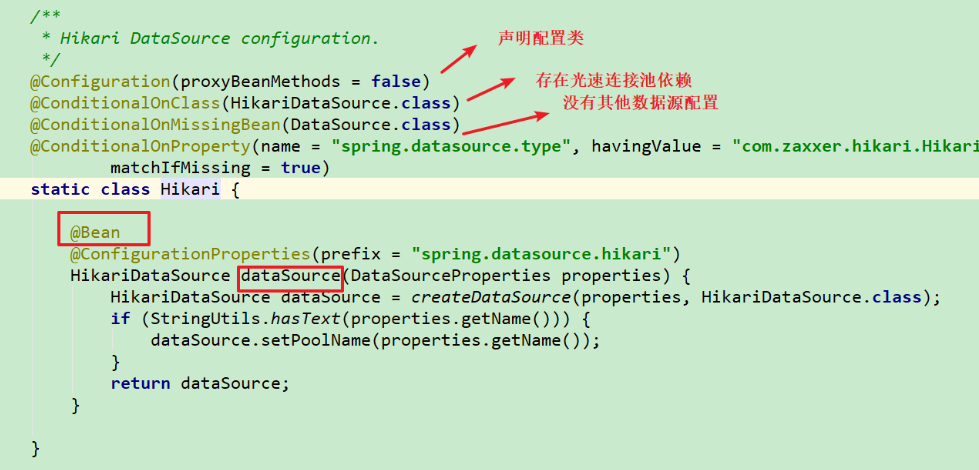
starter-jdbc默认使用了 (hikari)光速连接池,速度最快的连接池
自动化配置帮助我们做了什么呢?
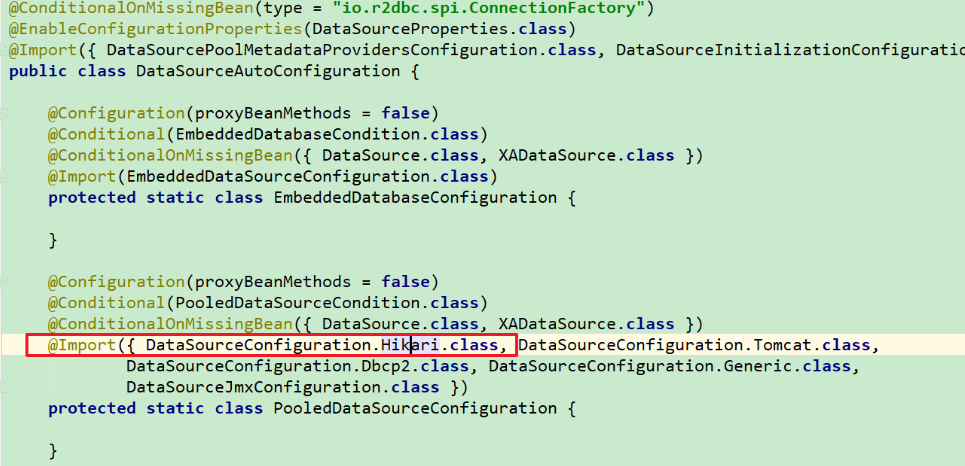
点进去,存在连接池依赖,并且无其他数据源 创建Hikari ,把DataSource 加入到容器中。
2. 整合Druid数据源
步骤:
 1. 依赖添加第三方Druid starter
 2. 修改配置文件 application.yml
1.依赖添加第三方Druid starter
<dependency>
    <groupId>com.alibaba</groupId>
    <artifactId>druid-spring-boot-starter</artifactId>
    <version>1.1.24</version>
</dependency>
2.修改配置文件 application.yml
spring:
  datasource:
    driver-class-name: com.mysql.cj.jdbc.Driver
    url: jdbc:mysql://localhost:3306/dbname?serverTimezone=GMT%2B8&useUnicode=true&characterEncoding=utf8&autoReconnect=true&useSSL=false
    username: root
    password: root

    druid:
      aop-patterns: com.ahcfl.*  #监控SpringBean
      filters: stat,wall,slf4j     # 底层开启功能,stat(sql监控),wall(防火墙)
      stat-view-servlet:   # 配置监控页功能
        enabled: true
        login-username: admin
        login-password: admin
        resetEnable: false
      web-stat-filter:  # 监控web
        enabled: true
        urlPattern: /*
        exclusions: '*.js,*.gif,*.jpg,*.png,*.css,*.ico,/druid/*'
      filter:
        stat:    # 对上面filters里面的stat的详细配置
          slow-sql-millis: 1000
          logSlowSql: true
          enabled: true
        wall:
          enabled: true
          config:
            drop-table-allow: false
3.编写controller获取监控数据
package com.ahcfl.springBoot_demo4.controller;

import com.alibaba.druid.stat.DruidStatManagerFacade;
import org.springframework.web.bind.annotation.GetMapping;
import org.springframework.web.bind.annotation.RestController;

@RestController
public class DruidStatController {
    @GetMapping("/druid/stat")
    public Object druidStat(){
        // DruidStatManagerFacade#getDataSourceStatDataList 该方法可以获取所有数据源的监控数据,除此之外 DruidStatManagerFacade 还提供了一些其他方法,你可以按需选择使用。
        return DruidStatManagerFacade.getInstance().getDataSourceStatDataList();
    }
}
浏览器访问:http://localhost:8080/druid/stat
小结:
druid starter为什么需要添加依赖版本?
帮助我们做了哪些自动化配置功能?
- 扩展配置项 spring.datasource.druid
- DruidSpringAopConfiguration.class, 监控SpringBean的;配置项:spring.datasource.druid.aop-patterns
- DruidStatViewServletConfiguration.class, 监控页的配置:spring.datasource.druid.stat-view-servlet;默认开启
- DruidWebStatFilterConfiguration.class, web监控配置;spring.datasource.druid.web-stat-filter;默认开启
- DruidFilterConfiguration.class}) 所有Druid自己filter的配置
其他配置:
参考官网介绍:https://github.com/alibaba/druid/wiki/%E5%B8%B8%E8%A7%81%E9%97%AE%E9%A2%98
Druid starter介绍:https://github.com/alibaba/druid/tree/master/druid-spring-boot-starter
3. 整合MyBatis
1. 默认配置整合
步骤:
1.添加依赖
2.准备sql和实体
3.编写Mapper接口
4.在resources下创建 com/ahcfl/mapper 文件夹
5.编写Controller测试/编写单元测试类
1、添加依赖,官网参考
<dependency>
  <groupId>org.mybatis.spring.boot</groupId>
  <artifactId>mybatis-spring-boot-starter</artifactId>
  <version>2.1.4</version>
</dependency>
2.准备sql和实体
drop table if exists tb_user;
create table tb_user
(
    id       bigint primary key auto_increment,
    user_name     varchar(8) not null,
    sex      tinyint,
    birthday datetime,
    created  datetime,
    modified datetime
);
insert into tb_user
values (1, '赵一', 0, '2000-1-1', now(), now()),
       (2, '钱二', 0, '2000-1-1', now(), now()),
       (3, '孙三', 0, '2000-1-1', now(), now()),
       (4, '李四', 0, '2000-1-1', now(), now()),
@Data
public class User {
    private Long id;
    private String userName;
    private Integer sex;
    private Date birthday;
    private Date created;
    private Date modified;
}
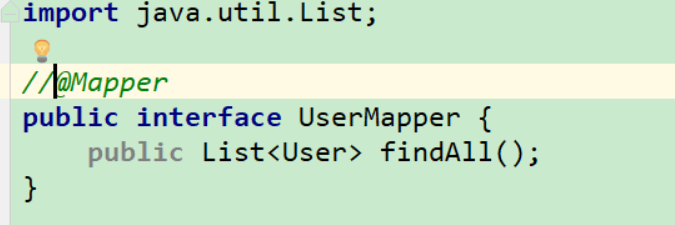
3.编写Mapper接口
package com.ahcfl.springBoot_demo4.mapper;

import com.itheima.springBoot_demo4.pojo.User;
import org.apache.ibatis.annotations.Mapper;
import java.util.List;

@Mapper
public interface UserMapper {
    public List<User> findAll();
}
4.在resources下创建 mapper接口对应 位置创建mapper映射文件
<?xml version="1.0" encoding="UTF-8" ?>
<!DOCTYPE mapper
        PUBLIC "-//mybatis.org//DTD Mapper 3.0//EN"
        "http://mybatis.org/dtd/mybatis-3-mapper.dtd">
<!--
   mapper标签:配置各类声明
   namespace:名称空间,由于映射文件可能有多个,为了防止crud语句的唯一标识被重复,需要设置空间名称。
 -->

<mapper namespace="com.ahcfl.springBoot_demo4.mapper.UserMapper">
    <!--
        select:查询的statement(声明),用来编写查询语句
        id:语句的唯一标识
        resultType:配置返回的结果集类型
        parameterType:传递的参数类型,可以省略
    -->

    <select id="findAll" resultType="com.ahcfl.springBoot_demo4.pojo.User">
       select * from tb_user
    </select>
</mapper>
5.编写Controller测试/编写单元测试类
package com.ahcfl.springBoot_demo4.controller;

import com.ahcfl.springBoot_demo4.mapper.UserMapper;
import com.ahcfl.springBoot_demo4.pojo.User;
import org.springframework.beans.factory.annotation.Autowired;
import org.springframework.web.bind.annotation.RequestMapping;
import org.springframework.web.bind.annotation.RestController;
import java.util.List;

@RestController
@RequestMapping("/myBatis")
public class MyBatisController {
    @Autowired
    private UserMapper userMapper;

    @RequestMapping("/findAllUser")
    public String findAllUser(){

        List<User> all = userMapper.findAll();
        all.forEach(user -> {
            System.out.println(user);
        });

        return "hello springBoot_mybatis";
    }
}
mapper包下的映射接口@Mapper每个接口都要注释 太繁琐
可以在启动类上加注解 @MapperScan("com.ahcfl.demo2.mapper")  扫描所有的映射接口
我们发现 Mybatis的所有的配置是按照我们学习的默认规则,
mybatis-spring-boot-starter帮助我们做成了自动化配置,且mybaitsconfig.xml采取了默认配置来使用的。
- 全局配置文件
- SqlSessionFactory: 自动配置好了
- SqlSession:自动配置了 SqlSessionTemplate 组合了SqlSession
- @Import(AutoConfiguredMapperScannerRegistrar.class);
- Mapper: 只要写的操作MyBatis的接口标准**@Mapper 就会自动扫描进来**
2. 修改mybaits默认配置
上述我们都是按照mybaits的默认配置来使用的,如果需要修改默认配置呢?
原来在spring中:
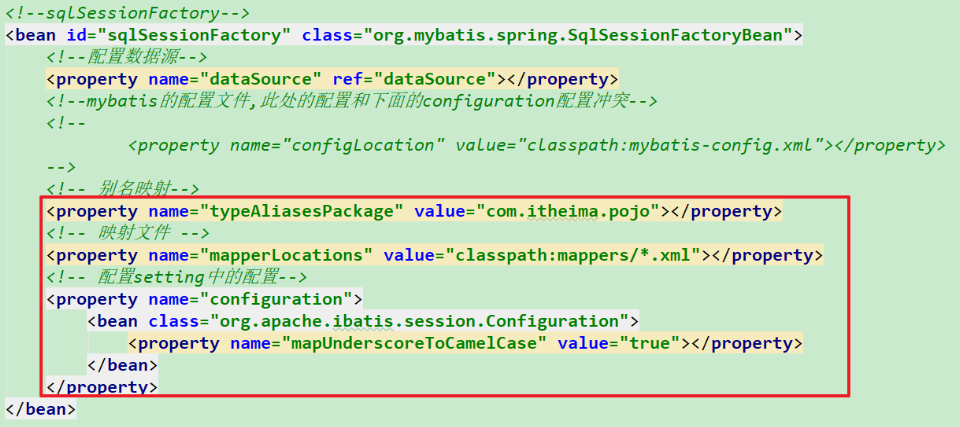
springBoot中配置:
mybatis:
  mapper-locations: classpath:mappers/**Mapper.xml  # 指定mapper映射文件的位置
  configuration:
    map-underscore-to-camel-case: true   #开启驼峰映射
  type-aliases-package: com.ahcfl.springBoot_demo4.pojo  # 配置实体别名映射
原来在spring中:

springBoot中配置包扫描创建mapper 或者 @MapperScan(“com.xxx.mapper”)

其他配置参考spring整合mybaits的starter 官网参考
4. 整合MyBatis实现分页
1、依赖
<dependency>
    <groupId>com.github.pagehelper</groupId>
    <artifactId>pagehelper-spring-boot-starter</artifactId>
    <version>1.3.0</version>
</dependency>
2、配置
pagehelper:
  helperDialect: mysql
  reasonable: true
  supportMethodsArguments: true
  params: count=countSql
import com.github.pagehelper.PageHelper;

@RestController
@RequestMapping("/myBatis")
public class MyBatisController {
    @Autowired
    private UserMapper userMapper;

    @RequestMapping("/findAllUser")
    public String findAllUser(){
        //通知mybatis做分页查询
        PageHelper.startPage(1,4);
        List<User> all = userMapper.findAll();

        all.forEach(user -> {
            System.out.println(user);
        });

        return all;
    }
}
5. 整合Redis
步骤:
1. 导入依赖
2. 配置文件
3. 配置类实现key和value序列化和反序列化
4. 准备Redis
5. 编写测试类
1.依赖
<dependency>
    <groupId>org.springframework.boot</groupId>
    <artifactId>spring-boot-starter-data-redis</artifactId>
</dependency>
2.配置文件
spring:
  redis:
   host: localhost  # 默认localhost
   port: 6379   # 默认6379
   database: 1 # 默认0
3.配置类实现key和value序列化和反序列化
package com.ahcfl.springBoot_demo4.config;

import org.springframework.context.annotation.Bean;
import org.springframework.context.annotation.Configuration;
import org.springframework.data.redis.connection.RedisConnectionFactory;
import org.springframework.data.redis.core.RedisTemplate;
import org.springframework.data.redis.serializer.Jackson2JsonRedisSerializer;
import org.springframework.data.redis.serializer.RedisSerializer;

@Configuration
public class RedisConfig {
    @Bean
    public RedisSerializer<Object> redisKeySerializer() {
        return new Jackson2JsonRedisSerializer<Object>(Object.class);
    }

    @Bean
    public RedisSerializer<Object> redisValueSerializer() {
        return new Jackson2JsonRedisSerializer<Object>(Object.class);
    }

    /**
     * RedisTemplate配置
     * @param factory
     */
    @Bean
    public RedisTemplate<String, Object> redisTemplate(RedisConnectionFactory factory
            , RedisSerializer<Object> redisKeySerializer, RedisSerializer<Object> redisValueSerializer) {
        RedisTemplate<String, Object> redisTemplate = new RedisTemplate<>();
        redisTemplate.setConnectionFactory(factory);

        redisTemplate.setDefaultSerializer(redisValueSerializer);
        redisTemplate.setKeySerializer(redisKeySerializer);
        redisTemplate.setHashKeySerializer(redisKeySerializer);
        redisTemplate.afterPropertiesSet();
        return redisTemplate;
    }
}
4.准备Redis,编写controller测试
package com.ahcfl.demo2.controller;

import com.github.pagehelper.PageHelper;
import com.ahcfl.demo2.mapper.UserMapper;
import com.ahcfl.demo2.pojo.User;
import org.springframework.beans.factory.annotation.Autowired;
import org.springframework.data.redis.core.RedisTemplate;
import org.springframework.web.bind.annotation.RequestMapping;
import org.springframework.web.bind.annotation.RestController;

import java.util.List;

@RestController
@RequestMapping("/redis")
public class MyBatisController {

    @Autowired
    private UserMapper userMapper;

    @Autowired
    private RedisTemplate redisTemplate;

    @RequestMapping("/findAll")
    public List<User> findAll(){

        //优先查询缓存,有直接返回,没有查询数据库,并且存放到缓存中
        List<User> allUser = (List<User>)redisTemplate.opsForList().range("userList", 0l, -1l);
        if (allUser==null||allUser.size()==0){
            System.out.println("从数据库查询数据");
            //通知mybatis做分页查询
            PageHelper.startPage(1,3);

            allUser = userMapper.findAll();

            //保存到redis中
            redisTemplate.opsForList().leftPushAll("userList",allUser);
        }else{
            System.out.println("从缓存查询数据");
        }

        return allUser;
    }
}


 309
309


 被折叠的 条评论
为什么被折叠?
被折叠的 条评论
为什么被折叠?
 到【灌水乐园】发言


