


有时候在我们应用中需要用到表格(
tableView)的多选功能。其实
tableView 已自带了多种多选功能,不用借助第三方组件也可以实现。下面分别进行介绍。
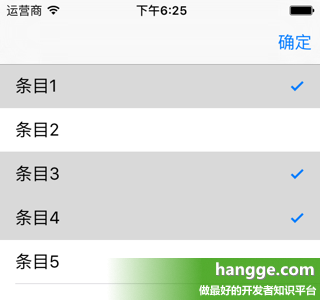
方法1,自定义一个数组保存选中项的索引(非编辑状态)
(1)我们先定义一个数组,表格在非编辑状态时,点击某个单元格便将其索引添加到这个数组中。同时将单元格尾部打勾表示选中状态。再次点击原来选中的单元格,则取消选中状态,并将索引从数组中移除。
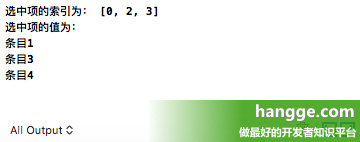
(2)点击导航栏上的“确定”按钮,即可获取到所有选中项的索引以及对应的值,并打印出来。


|
1
2
3
4
5
6
7
8
9
10
11
12
13
14
15
16
17
18
19
20
21
22
23
24
25
26
27
28
29
30
31
32
33
34
35
36
37
38
39
40
41
42
43
44
45
46
47
48
49
50
51
52
53
54
55
56
57
58
59
60
61
62
63
64
65
66
67
68
69
70
71
72
73
74
75
76
77
78
79
80
81
82
83
84
85
86
|
import
UIKit
class
ViewController
:
UIViewController
,
UITableViewDelegate
,
UITableViewDataSource
{
var
items:[
String
] = [
"条目1"
,
"条目2"
,
"条目3"
,
"条目4"
,
"条目5"
]
//存储选中单元格的索引
var
selectedIndexs = [
Int
]()
var
tableView:
UITableView
?
override
func
loadView() {
super
.loadView()
}
override
func
viewDidLoad() {
super
.viewDidLoad()
//创建表视图
self
.tableView =
UITableView
(frame:
self
.view.frame, style:
UITableViewStyle
.
Plain
)
self
.tableView!.delegate =
self
self
.tableView!.dataSource =
self
//创建一个重用的单元格
self
.tableView!.registerClass(
UITableViewCell
.
self
,
forCellReuseIdentifier:
"SwiftCell"
)
self
.view.addSubview(
self
.tableView!)
}
//在本例中,只有一个分区
func
numberOfSectionsInTableView(tableView:
UITableView
) ->
Int
{
return
1;
}
//返回表格行数(也就是返回控件数)
func
tableView(tableView:
UITableView
, numberOfRowsInSection section:
Int
) ->
Int
{
return
self
.items.count
}
//创建各单元显示内容(创建参数indexPath指定的单元)
func
tableView(tableView:
UITableView
, cellForRowAtIndexPath indexPath:
NSIndexPath
)
->
UITableViewCell
{
//为了提供表格显示性能,已创建完成的单元需重复使用
let
identify:
String
=
"SwiftCell"
//同一形式的单元格重复使用,在声明时已注册
let
cell = tableView.dequeueReusableCellWithIdentifier(identify,
forIndexPath: indexPath)
as
UITableViewCell
cell.textLabel?.text =
self
.items[indexPath.row]
//判断是否选中(选中单元格尾部打勾)
if
selectedIndexs.contains(indexPath.row) {
cell.accessoryType =
UITableViewCellAccessoryType
.
Checkmark
}
else
{
cell.accessoryType =
UITableViewCellAccessoryType
.
None
}
return
cell
}
// UITableViewDelegate 方法,处理列表项的选中事件
func
tableView(tableView:
UITableView
, didSelectRowAtIndexPath indexPath:
NSIndexPath
){
//判断该行原先是否选中
if
let
index = selectedIndexs.indexOf(indexPath.row){
selectedIndexs.removeAtIndex(index)
//原来选中的取消选中
}
else
{
selectedIndexs.append(indexPath.row)
//原来没选中的就选中
}
刷新该行
self
.tableView?.reloadRowsAtIndexPaths([indexPath], withRowAnimation: .
Automatic
)
}
//确定按钮点击
@IBAction
func
btnClick(sender:
AnyObject
) {
print
(
"选中项的索引为:"
, selectedIndexs)
print
(
"选中项的值为:"
)
for
index
in
selectedIndexs {
print
(items[index])
}
}
override
func
didReceiveMemoryWarning() {
super
.didReceiveMemoryWarning()
}
}
|
前面的样例,表格实际上还是单选的。只不过我们定义了一个数值来保存选中的单元格索引,从而实现多选的功能。
下面还是实现同样的功能,只不过这次将表格设置成允许多选( allowsMultipleSelection 为 true ),这样我们也就不用再另外定义数组来存储选中项索引了。
|
1
2
3
4
5
6
7
8
9
10
11
12
13
14
15
16
17
18
19
20
21
22
23
24
25
26
27
28
29
30
31
32
33
34
35
36
37
38
39
40
41
42
43
44
45
46
47
48
49
50
51
52
53
54
55
56
57
58
59
60
61
62
63
64
65
66
67
68
69
70
71
72
73
74
75
76
77
78
79
80
81
82
83
84
85
|
import
UIKit
class
ViewController
:
UIViewController
,
UITableViewDelegate
,
UITableViewDataSource
{
var
items:[
String
] = [
"条目1"
,
"条目2"
,
"条目3"
,
"条目4"
,
"条目5"
]
var
tableView:
UITableView
?
override
func
loadView() {
super
.loadView()
}
override
func
viewDidLoad() {
super
.viewDidLoad()
//创建表视图
self
.tableView =
UITableView
(frame:
self
.view.frame, style:
UITableViewStyle
.
Plain
)
self
.tableView!.delegate =
self
self
.tableView!.dataSource =
self
//创建一个重用的单元格
self
.tableView!.registerClass(
UITableViewCell
.
self
,
forCellReuseIdentifier:
"SwiftCell"
)
self
.view.addSubview(
self
.tableView!)
//设置允许单元格多选
self
.tableView!.allowsMultipleSelection =
true
}
//在本例中,只有一个分区
func
numberOfSectionsInTableView(tableView:
UITableView
) ->
Int
{
return
1;
}
//返回表格行数(也就是返回控件数)
func
tableView(tableView:
UITableView
, numberOfRowsInSection section:
Int
) ->
Int
{
return
self
.items.count
}
//创建各单元显示内容(创建参数indexPath指定的单元)
func
tableView(tableView:
UITableView
, cellForRowAtIndexPath indexPath:
NSIndexPath
)
->
UITableViewCell
{
//为了提供表格显示性能,已创建完成的单元需重复使用
let
identify:
String
=
"SwiftCell"
//同一形式的单元格重复使用,在声明时已注册
let
cell = tableView.dequeueReusableCellWithIdentifier(identify,
forIndexPath: indexPath)
as
UITableViewCell
cell.textLabel?.text =
self
.items[indexPath.row]
return
cell
}
//处理列表项的选中事件
func
tableView(tableView:
UITableView
, didSelectRowAtIndexPath indexPath:
NSIndexPath
){
let
cell =
self
.tableView?.cellForRowAtIndexPath(indexPath)
cell?.accessoryType = .
Checkmark
}
//处理列表项的取消选中事件
func
tableView(tableView:
UITableView
,
didDeselectRowAtIndexPath indexPath:
NSIndexPath
) {
let
cell =
self
.tableView?.cellForRowAtIndexPath(indexPath)
cell?.accessoryType = .
None
}
//确定按钮点击
@IBAction
func
btnClick(sender:
AnyObject
) {
var
selectedIndexs = [
Int
]()
if
let
selectedItems = tableView!.indexPathsForSelectedRows {
for
indexPath
in
selectedItems {
selectedIndexs.append(indexPath.row)
}
}
print
(
"选中项的索引为:"
, selectedIndexs)
print
(
"选中项的值为:"
)
for
index
in
selectedIndexs {
print
(items[index])
}
}
override
func
didReceiveMemoryWarning() {
super
.didReceiveMemoryWarning()
}
}
|
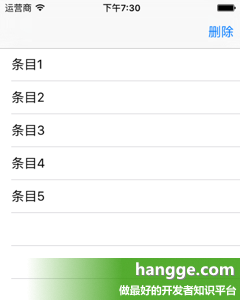
方法3,allowsMultipleSelectionDuringEditing设置为true(编辑状态)
这个样例同上面那个有点类似,只不过是表格进入编辑状态下才可以多选。
(1)下面样例表格默认情况下无法进行多选。
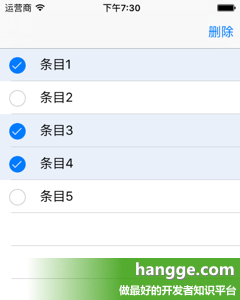
(2)长按表格进入编辑状态,这时单元格前面会出现选择框。点击即可进行单元格的选择与取消。
(3)点击导航栏上的“删除”按钮,即可将选中的单元格都删除。
这个样例同上面那个有点类似,只不过是表格进入编辑状态下才可以多选。
(1)下面样例表格默认情况下无法进行多选。
(2)长按表格进入编辑状态,这时单元格前面会出现选择框。点击即可进行单元格的选择与取消。
(3)点击导航栏上的“删除”按钮,即可将选中的单元格都删除。

|
1
2
3
4
5
6
7
8
9
10
11
12
13
14
15
16
17
18
19
20
21
22
23
24
25
26
27
28
29
30
31
32
33
34
35
36
37
38
39
40
41
42
43
44
45
46
47
48
49
50
51
52
53
54
55
56
57
58
59
60
61
62
63
64
65
66
67
68
69
70
71
72
73
74
75
76
77
78
79
80
81
82
83
84
85
86
87
88
89
90
91
92
93
94
95
96
97
98
99
100
101
102
103
104
105
106
107
108
|
import
UIKit
class
ViewController
:
UIViewController
,
UITableViewDelegate
,
UITableViewDataSource
,
UIGestureRecognizerDelegate
{
var
items:[
String
] = [
"条目1"
,
"条目2"
,
"条目3"
,
"条目4"
,
"条目5"
]
var
tableView:
UITableView
?
override
func
loadView() {
super
.loadView()
}
override
func
viewDidLoad() {
super
.viewDidLoad()
//创建表视图
self
.tableView =
UITableView
(frame:
self
.view.frame, style:
UITableViewStyle
.
Plain
)
self
.tableView!.delegate =
self
self
.tableView!.dataSource =
self
//创建一个重用的单元格
self
.tableView!.registerClass(
UITableViewCell
.
self
,
forCellReuseIdentifier:
"SwiftCell"
)
self
.view.addSubview(
self
.tableView!)
//表格在编辑状态下允许多选
self
.tableView?.allowsMultipleSelectionDuringEditing =
true
//绑定对长按的响应
let
longPress =
UILongPressGestureRecognizer
(target:
self
,
action:#selector(
ViewController
.tableviewCellLongPressed(_:)))
//代理
longPress.delegate =
self
longPress.minimumPressDuration = 1.0
//将长按手势添加到需要实现长按操作的视图里
self
.tableView!.addGestureRecognizer(longPress)
}
//单元格长按事件响应
func
tableviewCellLongPressed(gestureRecognizer:
UILongPressGestureRecognizer
)
{
if
(gestureRecognizer.state ==
UIGestureRecognizerState
.
Ended
)
{
print
(
"UIGestureRecognizerStateEnded"
);
//在正常状态和编辑状态之间切换
if
(
self
.tableView!.editing ==
false
) {
self
.tableView!.setEditing(
true
, animated:
true
)
}
else
{
self
.tableView!.setEditing(
false
, animated:
true
)
}
}
}
//在本例中,只有一个分区
func
numberOfSectionsInTableView(tableView:
UITableView
) ->
Int
{
return
1;
}
//返回表格行数(也就是返回控件数)
func
tableView(tableView:
UITableView
, numberOfRowsInSection section:
Int
) ->
Int
{
return
self
.items.count
}
//创建各单元显示内容(创建参数indexPath指定的单元)
func
tableView(tableView:
UITableView
, cellForRowAtIndexPath indexPath:
NSIndexPath
)
->
UITableViewCell
{
//为了提供表格显示性能,已创建完成的单元需重复使用
let
identify:
String
=
"SwiftCell"
//同一形式的单元格重复使用,在声明时已注册
let
cell = tableView.dequeueReusableCellWithIdentifier(identify,
forIndexPath: indexPath)
as
UITableViewCell
cell.textLabel?.text =
self
.items[indexPath.row]
return
cell
}
//删除按钮点击
@IBAction
func
btnClick(sender:
AnyObject
) {
//获取选中项索引
var
selectedIndexs = [
Int
]()
if
let
selectedItems = tableView!.indexPathsForSelectedRows {
for
indexPath
in
selectedItems {
selectedIndexs.append(indexPath.row)
}
}
//删除选中的数据
items.removeAtIndexes(selectedIndexs)
//重新加载数据
self
.tableView?.reloadData()
//退出编辑状态
self
.tableView!.setEditing(
false
, animated:
true
)
}
override
func
didReceiveMemoryWarning() {
super
.didReceiveMemoryWarning()
}
}
extension
Array
{
//Array方法扩展,支持根据索引数组删除
mutating
func
removeAtIndexes(ixs: [
Int
]) {
for
i
in
ixs.
sort
(>) {
self
.removeAtIndex(i)
}
}
}
|
原文出自: www.hangge.com 转载请保留原文链接: http://www.hangge.com/blog/cache/detail_1320.html


 514
514

 被折叠的 条评论
为什么被折叠?
被折叠的 条评论
为什么被折叠?
 到【灌水乐园】发言


