


原理简介
偶然看到一篇文章,原文链接
突然对人脸识别有了很大兴趣,于是对文章中利用的方法进行了深入的学习,原理大致基于人脸上的OpenCV库和68个特征点,对监测到的标志点进行标记显示
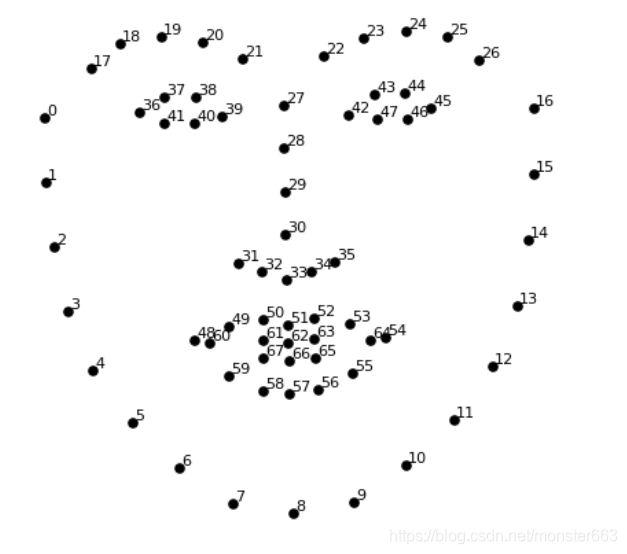
颚点= 0–16
右眉点= 17–21
左眉点= 22–26
鼻点= 27–35
右眼点= 36–41
左眼点= 42–47
口角= 48–60
嘴唇分数= 61–67
资源
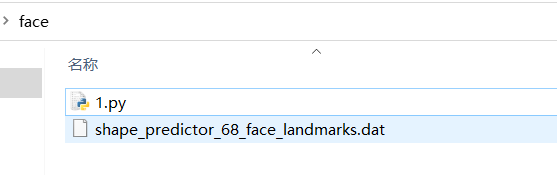
需要 shape_predictor_68_face_landmarks.dat 资源已经上传至百度云
链接:https://pan.baidu.com/s/1qowI0Xf49s_luqozFeWGww
提取码:qwer
python安装dlib库和OpenCV库
dlib库的安装较为麻烦,主要是它十个C++的开源包,笔者是通过vs2019装上的,详细的教程可以参考这篇博客
当然也可以进入
https://pypi.org/project/dlib/19.6.0/#files 下载 Dlib库
pip install dlib-19.6.0-cp36-cp36m-win_amd64.whl
实现代码
当你把数据文件和代码文件放到同一个文件夹下,并且运行也没有报错,就可以开始玩耍了
相比于监测图片,我还是更喜欢实时监测,关于监测图片的代码也贴一下,也可以在原文中查看
import cv2
import numpy as np
import dlib
# Load the detector
detector = dlib.get_frontal_face_detector()
# Load the predictor
predictor = dlib.shape_predictor("shape_predictor_68_face_landmarks.dat")
# read the image
img = cv2.imread("face.jpg")
# Convert image into grayscale
gray = cv2.cvtColor(src=img, code=cv2.COLOR_BGR2GRAY)
# Use detector to find landmarks
faces = detector(gray)
for face in faces:
    x1 = face.left() # left point
    y1 = face.top() # top point
    x2 = face.right() # right point
    y2 = face.bottom() # bottom point
    # Create landmark object
    landmarks = predictor(image=gray, box=face)
    # Loop through all the points
    for n in range(0, 68):
        x = landmarks.part(n).x
        y = landmarks.part(n).y
        # Draw a circle
        cv2.circle(img=img, center=(x, y), radius=3, color=(0, 255, 0), thickness=-1)
# show the image
cv2.imshow(winname="Face", mat=img)
# Delay between every fram
cv2.waitKey(delay=0)
# Close all windows
cv2.destroyAllWindows()
实时监测人脸脚本,这里我做了一些改动,使得部分的点连成了线段,运行效果更原文中的一致
import cv2
import dlib
from math import sqrt
# Load the detector
detector = dlib.get_frontal_face_detector()

# Load the predictor
predictor = dlib.shape_predictor("shape_predictor_68_face_landmarks.dat")

# read the image
cap = cv2.VideoCapture(0)

while True:
    _, frame = cap.read()
    # Convert image into grayscale
    gray = cv2.cvtColor(src=frame, code=cv2.COLOR_BGR2GRAY)

    # Use detector to find landmarks
    faces = detector(gray)

    for face in faces:
        x1 = face.left()  # left point
        y1 = face.top()  # top point
        x2 = face.right()  # right point
        y2 = face.bottom()  # bottom point

        landmarks = predictor(image=gray, box=face)

        # Loop through all the points
        #for n in range(0, 68):
        x67 = landmarks.part(67).x
        y67 = landmarks.part(67).y
        for n in range(0, 67):
            x = landmarks.part(n).x
            y = landmarks.part(n).y
            x2 = landmarks.part(n+1).x
            y2 = landmarks.part(n+1).y
            ptStart=(x,y)
            ptEnd=(x2,y2)
            point_color=(0,255,0)
            thickness=1
            lineType=4
            cv2.circle(img=frame, center=(x, y), radius=2, color=(0, 255, 0), thickness=-1)
            if(n==16 or n==26 or n==35 or n==41 or n==47):
                continue
            cv2.line(frame, ptStart, ptEnd, point_color, thickness, lineType)

    cv2.imshow(winname="human face test", mat=frame)

    if cv2.waitKey(delay=1) == 27:
        break

cap.release()

cv2.destroyAllWindows()
原文中的运行效果
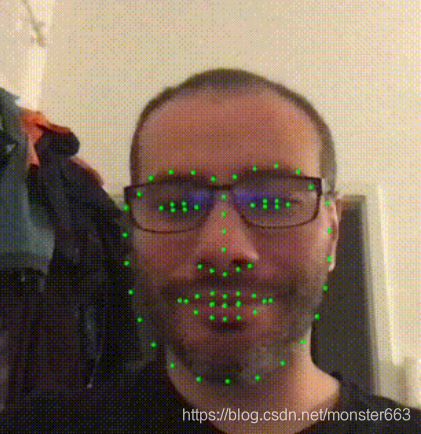
运行效果更原文中的一致,这里就不掩饰了
**Tips:**把眼镜摘下来识别精度将进一步提升
后记
通过记录下每两组点之间的距离并且设定误差,可以比较准确的输出人脸识别的结果,这就实现了对不同人脸记录的保留和监测,大家也可以自己尝试一下
若还有疑问,欢迎评论留言


 6173
6173

 被折叠的 条评论
为什么被折叠?
被折叠的 条评论
为什么被折叠?
 到【灌水乐园】发言


