


目录
Using standard mode or legacy mode
Using multi-line input parameters to fetch data
Making data request with synchronous, asynchronous, batch, and auto mode
Specifying the number of threads
Using URLs instead of file paths
Connecting to data sources
The Qlik Web Connectors let you connect to many web-based data sources from a single web-service. The way you connect to a data source and interact with the Qlik Web Connectors is mostly the same regardless of the data source. This page describes how to open a data source connection and how you select data.
Opening a connector
To open a data source connector, select the Connectors tab.
Connecting to a data source
Tip noteIn this example, we connect to Twitter but the steps are similar for all data source connectors.
Authenticating the connector
Do the following:
- Click on the Qlik Twitter Connector.
-
Under Select Tables, select CanAuthenticate.
Tip noteClick the Authenticate button to open the data source login page in a new window. Make sure your browser is not blocking pop-up windows for Qlik Web Connectors.
-
Enter your account login credentials.
- Copy the authentication code and paste it into the CanAuthenticate table.
- Click Save.
You only have to authenticate the connector once. After you do this, you can run any of the tables for the data source that you logged into. You can also authenticate the connector from any of the other tables.
Defining table parameters
Each connector table is used to select different types of data from your data source. Before the connector can send a request, you need to define some table parameters. Parameters that are required are marked with an asterisk (*).
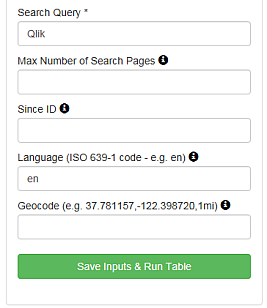
In this example, we use the Twitter Search Query table to retrieve tweets in English that contain the word Qlik.
Do the following:
- Select Search (simple) from the list of tables.
- In the Search Query box, enter Qlik.
-
In the Language box, enter en for English.
-
Click Save Inputs & Run Table.
The Twitter connector makes a request to get all Tweets in English that contain the search term Qlik.
As the table search is running, you will see its progress bar along the bottom, with a Cancel button if you need to abort. The Data Preview tab, shows a preview of the data so that you can check if the data as expected.
- Click on the QlikView, Qlik Sense (Standard Mode), or Qlik Sense (Legacy Mode) tabs to view the relevant script to copy into your QlikView or Qlik Sense application.
- Click on Copy to clipboard to copy the script.
- Paste the script into your application.
When reloading in QlikView or Qlik Sense, the load script makes the same request to Qlik Web Connectors, which contacts the relevant platform to get the data and stream it into your application.
Using standard mode or legacy mode
Depending on the Qlik Web Connectors and Qlik Sense version you are using, you might need to put Qlik Sense in legacy mode. To do this you have to disable standard mode, which prevents Qlik Sense from creating or running requests from arbitrary URLs. If you have problems running your script in Qlik Sense try disabling standard mode. To learn how to disable standard mode see Disabling standard mode.
Information noteIt is recommended to use the Qlik Web Connectors with Qlik Sense in standard mode.
Standard mode
You can only use the script from Qlik Sense (Standard Mode) tab in your Qlik Sense application if you are using Qlik Sense February 2018 or later.
Do the following:
- In Qlik Sense, Create new connection and choose Web file from the list of data sources.
- Use the URL to your Qlik Web Connectors installation and give the connection a name.
-
Place the following line at the top of your script:
let vQwcConnectionName = 'lib://YOUR_CONNECTION_NAME';
- Replace YOUR_CONNECTION_NAME with the name that you gave to the connection.
Connector overview
Each connector has a number of other tabs:
- Support - Links to the Qlik Help page.
- Settings - Displays the cached data and reset settings option.
- Change Log - Shows the history of changes that have been made to the specific connector
- About - Contains information about version, permissions, and links to other documentation sources.
Using multi-line input parameters to fetch data
Some connector tables let you enter multi-line input parameters for setting, for example, JSON or XML configuration or other input data for a connector. A commonly used example of this is the POST/PATCH/PUT Parameter(s) on the Qlik General Web Connector.
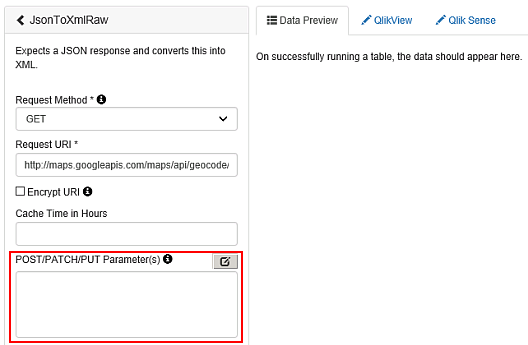
You can type your multi-line parameters directly into the field or you attach a file by specifying the file path.
Example:
@file=c:\path\to\file.txt
A file can be used in conjunction with the ReplaceTokensInFile table in the Qlik Helper Connector.You can have a version of the file that contains placeholder tokens, and then use the ReplaceTokensInFile table to replace these tokens before passing them as a multi-line input parameter to one of the connector tables.
Making data request with synchronous, asynchronous, batch, and auto mode
You can make the following request types with Qlik Web Connectors:
- Synchronous
- Asynchronous
- Batch
- Auto
Writing requests
For/next loops are often used to run a large number of API requests with Qlik Web Connectors. These modes let you extract the maximum performance from Qlik Web Connectors and minimize load time of the QlikView or Qlik Sense application.
For example, if you run a large number of text messages through one of the available sentiment analysis connectors, like Sentiment140, it can result in a long load time.
Example:
LET noRows = NoOfRows('Tweets'); for i=0 to $(noRows)-1 let id = peek('Search_id', $(i), 'Tweets'); let textEncoded = peek('text_urlEncoded', $(i), 'Tweets'); Sentiment: LOAD '$(id)' as Search_id, status as sentiment_status, score as sentiment_score FROM [http://localhost:5555/web/connector/TextAnalyserV2/?table=Sentiment_Sentiment140&text=$(textEncoded)&appID=$(vQWCAppId)format=qvx] (qvx); next
In the script example above, each message is processed sequentially. This means that the sentiment score for the next message cannot be calculated until the current request has completed. If each request takes 250 ms, then it will take 40 minutes to score the sentiment score of 10,000 Tweets.
Many APIs allow multiple requests to be made in parallel from the same client so we can use different request types to improve the performance of the Qlik Web Connectors.
These requests are handled by separate processes on the server or cloud, allowing more requests to be processed per second. The Asynchronous mode allows us to take advantage of this feature.
Some APIs also allow multiple requests to be combined into a single API call, for example sending 1000 text messages in a single request to be processed for sentiment. This is referred to as sending requests in a batch and it is the Batch mode that allows us to take advantage of this feature.
Synchronous requests
Synchronous requests are the default mechanism and all tables of all connectors support this. A request to Qlik Web Connectors results in one or more sequential requests to the underlying API and this is the script you receive when copying the standard generated script from Qlik Web Connectors.
For simple for/next loops, It is possible to simplify the script by using a temporary table.
Example: For/next loop
LET noRows = NoOfRows('Tweets'); for i=0 to $(noRows)-1 let id = peek('Search_id', $(i), 'Tweets'); let textEncoded = peek('text_urlEncoded', $(i), 'Tweets'); Sentiment: LOAD '$(id)' as Search_id, status as sentiment_status, score as sentiment_score FROM [http://localhost:5555/web/connector/TextAnalyserV2/?table=Sentiment_Sentiment140&text=$(textEncoded)&appID=$(vQVSourceAppId)format=qvx] (qvx); next
Example: Temporary Params table
let vQWCAppId = 'test_app'; let vWorkingFolder = 'c:\QlikWebConnectors\Temp\'; let vParamsFile = '$(vWorkingFolder)$(vQWCAppId)' & '_SentimentArgs.txt'; Params: LOAD Search_id as rowKey, Search_text as text resident Tweets; store Params into '$(vParamsFile)' (txt); drop table Params; // Optional. Sentiment: LOAD rowKey as Search_id, status as Sentiment_status, score as Sentiment_score, language as Sentiment_language FROM [http://localhost:5555/web/connector/TextAnalyserV2/?table=Sentiment_Sentiment140& processParamsSync=$(vParamsFile)&appID=$(vQWCAppId)&format=qvx] (qvx);
Create a temporary table named Params that contains the same parameters that are passed in each iteration of the for/next loop above.
There are several important changes to the new script:
- An additional column named rowKey, which is set to the Tweet ID, so we can link it back into the data model when the results come back.
- The Params table is saved as a CSV file. It is important that the user account that is running the Qlik Web Connectors has read access to this file.
Information noteThe parameters in the Params table should not be URL encoded.
Warning noteThere are certain parameters you cannot put in the Params table. In particular, the table or format parameters cannot be used. These should be in the final Qlik Web Connectors request. For a complete list of parameters, see Special parameters
The script makes a request to Qlik Web Connectors but instead of passing the usual parameters, it passes the path of the previously created CSV file using the processParamsSync parameter. We also read back the rowKey and alias ID back to the Tweet ID.
You can apply this method to almost any Qlik Web Connectors request, and it is the basis of the Asynchronous, Batch and Auto modes.
Information noteYou can use rowKey2 and rowKey3 parameters with processParamsSync.
Asynchronous requests
To make asynchronous requests, you simply change the parameter name processParamsSync into processParamsAsync:
Sentiment: LOAD rowKey as Search_id, status as Sentiment_status, score as Sentiment_score, language as Sentiment_language FROM [http://localhost:5555/web/connector/TextAnalyserV2/?table=Sentiment_Sentiment140& processParamsAsync=$(vParamsFile)&appID=$(vQWCAppId)&format=qvx] (qvx);
Qlik Web Connectors attempts to run the requests on a number of parallel threads and the above call only completes when all the requests have finished.
Information noteYou can use rowKey2 and rowKey3 parameters with processParamsAsynch.
Specifying the number of threads
By default, Qlik Web Connectors use a maximum of 30 parallel threads.
You can set an alternative value, between 1 and 50, by including a maxThreads=VALUE parameter in the request.
Batch requests
To make batch requests, you simply change the parameter name processParamsSync into processParamsBatch:
Sentiment: LOAD rowKey as Search_id, status as Sentiment_status, score as Sentiment_score, language as Sentiment_language FROM [http://localhost:5555/web/connector/TextAnalyserV2/?table=Sentiment_Sentiment140& processParamsBatch=$(vParamsFile)&appID=$(vQWCAppId)&format=qvx] (qvx);
Qlik Web Connectors attempt to run the requests using the Batch feature that the API provides, and the above call only completes when all the requests have finished.
Information noteYou can use rowKey2 and rowKey3 parameters with processParamsBatch.
Auto requests
If you want Qlik Web Connectors to decide the best method, you can change the parameter name processParamsSync into processParamsAuto:
Sentiment: LOAD rowKey as Search_id, status as Sentiment_status, score as Sentiment_score, language as Sentiment_language FROM [http://localhost:5555/web/connector/TextAnalyserV2/?table=Sentiment_Sentiment140& processParamsAuto=$(vParamsFile)&appID=$(vQWCAppId)&format=qvx] (qvx);
When you use auto requests, Qlik Web Connectors uses the following rules:
- If the table supports batch mode, Qlik Web Connectors uses this method.
- If the table explicitly supports asynchronous mode, Qlik Web Connectors uses this method.
- Otherwise, Qlik Web Connectors uses the standard synchronous mode.
Information noteYou can use rowKey2 and rowKey3 parameters with processParamsAuto.
Information noteAuto request mode is not recommended because only a few connectors explicitly support asynchronous mode, so Qlik Web Connectors would fall back on the slowest synchronous mode. We recommended that you look at each table you are using and decide whether to use synchronous, asynchronous or batch mode.
Using URLs instead of file paths
When using a processParamsxxx parameter, as well as passing a file location to it, you can also pass a URL beginning with http or https.
Special parameters
Certain parameters can be used by any Qlik Web Connectors connector. These parameters should not be placed in the Params CSV file but specified in the request URL for the table.
| Parameter | Description |
|---|---|
| table | The name of the table requested. Should only be included in the final request. |
| format | Tells Qlik Web Connectors what format to return the data in. As all the data for a given request must be returned in the same format this cannot appear in the Params file. In almost all cases this should be set to qvx. |
| appID | An identifier for your application passed to Qlik Web Connectors allowing it to be logged alongside any errors which may occur. |
| requestStamp | Allows you to specify an id for a request which you can then use to access follow on data from another table related to the request. |


 347
347

 被折叠的 条评论
为什么被折叠?
被折叠的 条评论
为什么被折叠?
 到【灌水乐园】发言


